| One of the first things most people want to tinker with when they get a new phone is the primary ring tone. And unfortunately, most of us have to suffer through this tinkering when that person's phone rings in public with a loud and obnoxious ring tone. I'm not a big fan of loud and annoying ring tones, even if they sound neat when you first set them, but that's another issue. By all means, feel free to set your Treo to ring however you want; just try not to forget that often you aren't the only person who has to listen to your phone ring. Seeing as how Treo devices are much more than phones, the concept of a ring tone is much broader when it comes to your Treo. There are tones that apply to many events other than phone calls. In fact, the Phone, Calendar, and Messaging applications have their own distinct set of tones that can be customized to your liking. As an example, the Phone application supports the following different tones: Known Caller An incoming call from someone listed as a contact or favorite Unknown Caller An incoming call from someone not listed as a contact or favorite Roaming An incoming call when you are roaming outside your home mobile network Voicemail An incoming voicemail message arriving Service A service warning, such as moving into or out of your home mobile network
As you can see, you can use these specific tones to determine the nature of an incoming call based solely on the ring tone. To customize these tones for the Phone application, follow these steps: 1. | Press the Phone/Send button to launch the Phone application.
| 2. | Press the Menu button and scroll over twice to the Options menu. Navigate down to the second menu item, Sound Preferences, and press the Center button to issue the menu command and view the Sound & Alerts Preferences screen.
| 3. | Make sure Phone is selected as the current Application, and then tap the Tones box. The different tones supported by the Phone application are displayed, along with the specific settings for each tone (see Figure 3.18).
Figure 3.18. In the Sound & Alerts Preferences screen, you can access each tone supported by the Phone application. 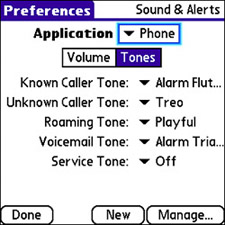
Note You might have noticed the No Sound option in the main tone list. This tone is completely silent, which seems strange until you consider that it can be used to quiet a certain event tone. Although you might find a need for the No Sound tone in the Phone, Calendar, or Messaging applications, it primarily comes into play for silencing the caller ID ring tone of a contact. You might not realize that you can assign unique ring tones to contacts. For example, maybe you have friends who call too much, and you don't want to be bothered with an audible ring every time they call. Just set their caller ID ring tone to No Sound, and the problem is solved. You learn how to set caller ID ring tones in the "Assign a Caller ID Ring Tone and Picture" section in Chapter 5, "Managing Treo Contacts." | 4. | To change one of the tones, tap the pick list to the right of the tone. For example, to change the Known Caller Tone setting from Alarm Flute to Blues 12 Bar, select Blues 12 Bar in the pick list (see Figure 3.19). You hear a preview of the ring tone when you select it, which makes it easier to choose a new tone. By the way, if you'd like to record your own custom voice tone, keep the Sound & Alerts Preferences screen open and continue reading!
Figure 3.19. Changing a ring tone is as easy as selecting the new tone from a pick list. 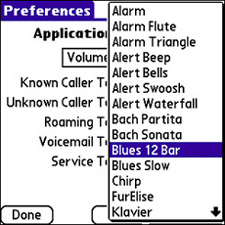
|
Changing tones for applications is certainly useful, but using your own custom tones is more interesting. You can create your own voice tones or download musical tones online. You create a custom voice tone by recording it directly into your device's microphone. So, as an example, you could create a "tone" of your own voice saying "Incoming call!" To create your own custom voice tone, follow these steps: 1. | From the Sound & Alerts Preferences screen in the Phone application, tap the Manage button in the lower-right corner. The Manage Sound screen appears, as shown in Figure 3.20, and displays a list of the tones available on your device.
Figure 3.20. You can view all the tones on your device and record new tones in the Manage Sound screen. 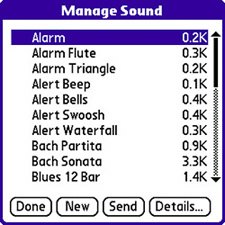
| 2. | You can tap any of the tones in the list to listen to them (or navigate through the list with the Up and Down buttons and press the Center button to listen to a tone).
| 3. | To record a new tone, tap the New button. The Recorder screen appears, as shown in Figure 3.21.
Figure 3.21. The Recorder screen allows you to record a digital sound that can be used as a device tone. 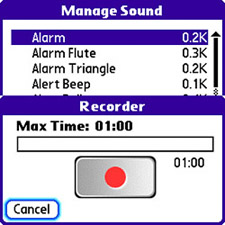
| 4. | You can see in the figure that the Recorder screen includes a huge Record button (red dot). Tap the button to begin recording a new sound. When you're finished, quickly tap the button again.
Note Voice tones are stored in a different format than normal Musical Instrument Digital Interface (MIDI) musical tones. For some reason, Palm limited caller ID ring tones to MIDI tones, so voice tones won't work as caller ID tones. To learn how to set caller ID ring tones to MIDI tones for specific contacts, please refer to Chapter 5, "Managing Treo Contacts." | 5. | After you record a sound, the Recorder screen changes to the Playback screen. You then have a chance to play the sound, re-record the sound, cancel the recording, or accept the recorded sound. If you need to re-record the sound, tap the Re-record button and try again. When you're satisfied with the sound, tap the Done button to accept it.
| 6. | The last step in creating a new tone (sound) is to give the tone a name, which you do in the Edit Tone screen shown in Figure 3.22. Make sure to enter a name that clearly describes the tone so that you can identify it in the pick list of tones. Tap the OK button to finish creating the tone and return to the Manage Sound screen.
Figure 3.22. The Edit Tone screen prompts you to specify the name of the newly created tone. 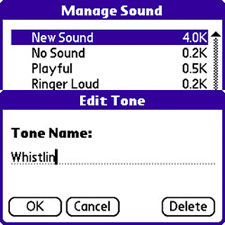
|
Tip The Edit Tone screen also includes a Delete button used to delete tones. If you need to delete a tone after creating it, select the tone in the Manage Sound screen, and tap the Details button to open the Edit Tone screen. Then tap the Delete button followed by Yes to confirm the deletion.
Creating a voice tone is fun, but maybe you aren't terribly excited about listening to yourself every time your phone rings. If so, you might want to consider downloading additional musical tones to beef up the default tones already stored on your device. Fortunately, lots of websites offer MIDI tones for download. Unfortunately, many of those sites are extremely aggressive with pop-up ads and other adware annoyances. So I took the liberty of assembling a small list of MIDI tone websites as resources for finding and downloading new tones. Here goes: TreoBits Ring Tones http://portal.treobits.com/index.php?ind=ringtones MIDI Database http://www.mididb.com/ MIDIRingTones http://www.midiringtones.com/ Mike Oldfield's Tubular.net Ring Tones http://tubular.net/midi/
Note In addition to downloading MIDI tones from the Web, you can also email MIDI tones, beam them back and forth between other Palm devices, and transmit and receive them wirelessly via Bluetooth.
By all means, feel free to carry on the search for MIDI tones further than this list, but you should be able to find a few useful tones from these sites. As an example, I found a tone for the theme song of the old television show Quincy, which is one of my favorites. After you find a tone, you can download it directly onto your device. In other words, you need to use your device to browse to the sites I just mentioned, and then tap the link for a specific MIDI tone to download it to your device. In reality, I recommend using your desktop or notebook PC to first browse the sites and listen to MIDI tones because it's usually much easier to get around the sites on a larger screen. However, after you isolate a tone, follow these steps to download it to your device: 1. | Press the Option key followed by the Phone/Send button to launch the Blazer Web browser. If you've changed the Option + Phone/Send application button combination, you can also navigate to the Blazer Web application on the application screen and launch it.
Tip Voice and MIDI tones aren't the only types of sounds you can use as event tones on your Treo. The Treo 650 also supports Wave sounds, which are popular on Windows systems. You can download a Wave file (.wav file extension) from a website or email it to your device and integrate it as a tone. Your Treo automatically recognizes a Wave file as a sound and prompts you to store it in the tones database when you download it. | 2. | Tap the address bar on the Blazer Web browser, and enter the address of the MIDI website containing a tone you'd like to download. Tap the Go button to open the site.
Tip If you have trouble finding the equals sign (=) when entering the TreoBits Ring Tone Web address, it's located as an alternate character for the pound symbol (#). So press Option+B to insert the pound symbol, and then press the Alt key to access a pick list containing the equals sign. | 3. | If necessary, navigate to the page on the site that contains the MIDI tone you want to download. Tap the link for the MIDI tone to begin downloading it. Figure 3.23 shows the Quincy.mid link highlighted as I begin downloading the file. Your device might display a warning prompt to make sure you want to download the filetap Yes or OK to confirm that you want to proceed.
Figure 3.23. The first step in downloading a MIDI tone to your device is to follow the link to the MIDI file on a website. 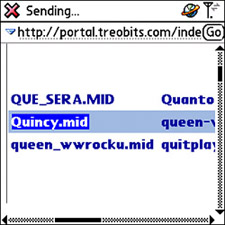
| 4. | The Download screen prompts you to clarify where you want the file to be stored (see Figure 3.24). Make sure the Save To setting is set to Sounds, and tap the Yes button to continue.
Figure 3.24. The Download screen prompts you to specify where to store the MIDI file on your device. 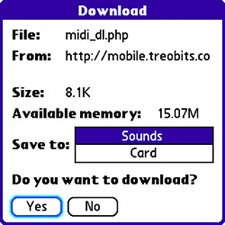
| 5. | Next, you are prompted for what you want to do after the download finishesyou can save the file or save and open the file. Go ahead and select Save and Open so that you can make sure the file is what you wanted (see Figure 3.25).
Figure 3.25. After downloading a MIDI file, you can specify that you'd like to both save and open the file. 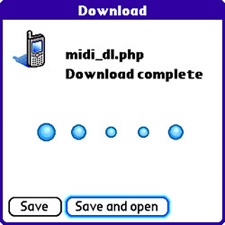
| 6. | Before the new MIDI tone is actually stored to your device, you must give it a name. The Confirm Name screen prompts you to enter a name for the tone (see Figure 3.26). The tone may or may not have a meaningful name by default, so make sure to name it appropriately so that you can quickly identify it in the main tone list.
Figure 3.26. Naming a downloaded MIDI tone is the last step in making the tone ready for use on your device. 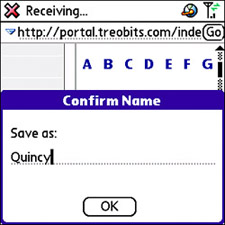
| 7. | The tone is downloaded, which should take only a few seconds because most MIDI files are relatively small. The MIDI tone download process ends with the Manage Sound screen, which shows the new tone as part of the main tone list. From here, you can tap the tone to listen to it, or tap Details to change its name or delete it. Tap the Done button to exit the Manage Sound screen. Keep in mind that you need to return to the sound preferences for each application you'd like to associate the tone with.
|
As I mentioned earlier, the Calendar and Messaging applications also support custom tones for events related to those specific applications. Chapters 6, "Getting Productive with the Calendar, Tasks, and Memos," and 9, "Communicating with Text and Multimedia Messages," explore these applications in more detail, including the application events with which you can associate tones. |