Debugging
To complement what you have already learned on the topic of debugging, you will want to know how to debug a "process" that is already running. In other words, there are occasions when you will want to know how to establish a debugging session and attach to an executable that is running outside of your VS .NET IDE. I demonstrate this type of debugging scenario in this section. Considering the exposure that you got on the mainframe to interactive debugging software (e.g., INTERTEST, XPEDITER, COBTEST, and so forth), the ability to debug in this way should feel familiar to you.
To help make this debugging discussion a bit more interesting, you ll create a Windows Service sample application to use as your targeted application for debugging. That s right. Rather than use a regular .NET Windows executable (.exe) as your targeted executing process, you ll create, install, and start a Windows Service as your executing process. Then, while the sample Windows Service is exe cuting, you ll interactively debug the sample Windows Service application.
| Cross-Reference | You will recall that Windows Services were introduced in Chapter 13. In that earlier chapter, I described a Windows Service as being an application that typically "does not include a GUI" and "a program that runs on the system in an unattended mode." |
Before you move on to the actual debugging discussion, you first need to create your sample Windows Service application.
Creating a Windows Service to Demonstrate Debugging
You ll use Visual Basic .NET (VB .NET) as the chosen language for your sample Windows Service application. Why use VB .NET? Simply, version 1.1 of Fujitsu s NetCOBOL for .NET product doesn t offer a Visual Studio .NET (VS .NET) Windows Service project template. Yes, you could choose to use an empty COBOL .NET project template and add the appropriate assembly references and so forth. Perhaps you can save that for another day. Now, for this chapter s purposes, you ll exercise your bilingual abilities and use the VS .NET Windows Service project tem plate for VB .NET.
| Note | If you feel that Fujitsu should add the VS .NET Windows Service project template to their NetCOBOL for .NET product, please contact them and let them know how you feel. Fujitsu s tech support has indicated to me that this feature is under consideration for a possible future release. Make sure to let them know if you are interested in the VS .NET Windows Service project template. |
For demonstration purposes, you will code the Windows Services to dynami cally attach to an existing MSMQ private queue. This will help create the illusion that the sample Windows Service is performing an important business process. Additionally, you will notice that I have added code to the sample Windows Service to dynamically attach to the EventLog object. Later you will use the Event Viewer to view the new EventLog entries. The Event Viewer is yet one more debugging/ monitoring tool available to you.
I could have used the drag-and-drop approach from the Server Explorer window with both the MSMQ object and the EventLog object. However, because there are times when the dynamic coding approach is more appropriate, I chose to add the needed few lines of code to dynamically create the objects.
| Note | You will attach to the private MSMQ queue MyFirstAsyncQueue that was created in Chapter 20. For simplicity, you will use the same sample application executable, MyMSMQAsyncAndTriggerCOBOL.exe, that you have in the C:\MSMQ-ASYNC-DEMO folder to send new messages to the MyFirstAsyncQueue queue. |
Let s walk through the basic steps to create a Windows Service:
-
From the VS .NET IDE New Project window, choose Visual Basic Projects under the Project Types choices. Select Windows Service under the Templates choices, and name the Windows Service MyFirstWindowsService . Click OK. Name the class (via the Code view window), the .vb file (via the Solution Explorer window), and the Project Startup object (via the Project Properties page) MyFirstWindowsService .
-
Notice the two protected subprocedures OnStart and OnStop . The OnStart procedure will execute when the service is started. Naturally, the OnStop procedure will execute when the service is stopped . For this demonstration, you will not add any code into the OnStop procedure.
-
Add code to dynamically attach to an existing MSMQ private queue. Rather than drag and drop the server object from the Server Explorer window, this time accomplish the same with code. Refer to the following code snippet. Notice the two code lines immediately above the OnStart procedure. Add the familiar code to establish an asynchronous process:
Friend WithEvents MyMessageQueue As System.Messaging.MessageQueue Shared MyCounter As Int32 Protected Overrides Sub OnStart(ByVal args() As String) 'Dynamically attach to an existing MSMQ Me.MyMessageQueue = New System.Messaging.MessageQueue() Me.MyMessageQueue.Path = "FormatName:DIRECT=OS:.\private$\myfirstasyncqueue" AddHandler MyMessageQueue.ReceiveCompleted, _ AddressOf MyMSMQBeginReceive ' Begin the asynchronous receive MyMessageQueue.BeginReceive() End Sub
-
Add the MyMSMQBeginReceive delegate/procedure. With the exception of the EventLog logic, most of the code in this procedure will be familiar to you.
Public Shared Sub MyMSMQBeginReceive(ByVal source As Object, _ ByVal asyncResult As _ System.Messaging.ReceiveCompletedEventArgs) 'Connect to the MSMQ queue. Dim myqueue As System.Messaging.MessageQueue = _ CType(source, System.Messaging.MessageQueue) 'End the asynchronous BeginReceive Dim myMessage As System.Messaging.Message = _ myqueue.EndReceive(asyncResult.AsyncResult) 'use this shared variable for demonstration purposes MyCounter += 1 Dim EventLog = New System.Diagnostics.EventLog() With EventLog .BeginInit() .Log = "Application" .EndInit() .Source = "MyFirstWindowsService" .WriteEntry(MyCounter & " <-> " & myMessage.Label) End With myqueue.BeginReceive() End Sub
-
Add an installer to the Windows Service project. In VS .NET, while you are viewing the design surface of the MyFirstWindowsService.vb file, right-click the design surface of the MyFirstWindowsService.vb file. Select Add Installer from the pop-up context window. As shown in your VS .NET Solution Explorer window, a ProjectInstaller.vb file is added to your Windows Service project.
-
On the design surface of the ProjectInstaller.vb file, notice the two components : ServiceProcessInstaller1 and ServiceInstaller1 (see Figure A-1).
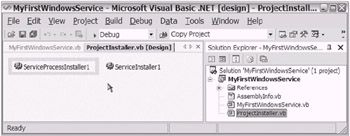
Figure A-1: The two components on the design surface of the ProjectInstaller.vb file -
Access the property pages of the ServiceProcessInstaller1 component (select the component and press F4 or right-click the component and select Properties from the pop-up context window). Change the Account property to LocalSystem . This will be suitable for this demonstration s purposes.
-
Access the property pages of the ServiceInstaller1 component (select the component and press F4 or right-click the component and select Properties from the pop-up context window). Change the ServiceName property to MyFirstWindowsService.
-
Build the MyFirstWindowsService solution. Your Windows Service is ready to install.
Using the Visual Studio .NET Command Prompt window, enter the following command syntax to install the sample Windows Service application MyFirstWindowsService:
C:\>installutil C:\MyFirstWindowsService\bin\MyFirstWindowsService.exe
While your path information may vary, this is basically it. The Visual
Studio .NET Command Prompt window display will indicate whether or not the installation was successful. You can then access the familiar Computer Management console (Services MMC snap-in) to view the newly installed MyFirstWindowsService Windows Service application. From the Services MMC snap-in, start the MyFirstWindowsService Windows Service (see Figure A-2).
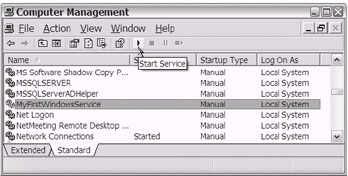
Figure A-2: Using the Services MMC snap-in to start the MyFirstWindowsService Windows Service
| Tip | There is an alternative to using the Command Prompt window and installutil command to install and uninstall your Windows Service. Recall in Chapter 17 that you learned about the Microsoft Windows Installer feature. As it turns out, you can actually add a setup project to your Windows Service project. After you build your complete project, you then install your Windows Service using the Windows Installer (.msi) file and the Setup.exe file. |
Later, you will want to stop the MyFirstWindowsService Windows Service from using the same Services MMC snap-in. At that time, you will want to uninstall the sample Windows Service using the following command syntax:
C:\>installutil /U C:\MyFirstWindowsService\bin\MyFirstWindowsService.exe
| Tip | You will want to stop and uninstall the Windows Service each time that you make changes to the Windows Service application source and rebuild the solution. Afterward, you repeat the install and start steps. |
Access the Event Viewer using the Computer Management console (typically located underneath the System Tools tree node). Navigate to the Application node. As shown in Figure A-3, you should see a message generated from MyFirstWindowsService. If you double-click the message, you should see infor mation indicating that the MyFirstWindowsService has started. As expected, the MyFirstWindowsService sample application has now begun an asynchronous process.

Figure A-3: Accessing the Event Viewer tool to view the application event log entries
Next, view the Windows Task Manager (press Ctrl-Alt-Delete). You will notice that the MyFirstWindowsService.exe Windows Service is listed among the other processes. As shown in Figure A-4, each process has a unique process ID (PID). In this case, the PID is 3092. The PID will likely vary each time you stop and start the Windows Service.
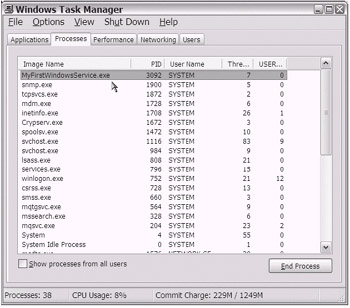
Figure A-4: Using the Windows Task Manager to view the active processes
Now execute MyMSMQAsyncAndTriggerCOBOL.exe (from the C:\MSMQ-ASYNC-DEMO folder). Use the appropriate button to send messages to the private MSMQ queue MyFirstAsyncQueue. After you have sent a few messages to the private MSMQ queue MyFirstAsyncQueue, view the Event Viewer application log to see the new Event Log entries. Choose Refresh from the Event Viewer toolbar to see the new application log entries.
Leave the MyFirstWindowsService.exe Windows Service executing. For dem onstration purposes, close the VS .NET IDE window that you were using to create the MyFirstWindowsService solution. You are now ready to debug.
Debugging the Sample Windows Service
Open a new VS .NET IDE window. From this VS .NET IDE window (which does not have an opened project), select Tools Debug Processes (see Figure A-5). Optionally, press Ctrl-Alt-P while you are within the VS .NET IDE. You will now launch the VS .NET Processes window.
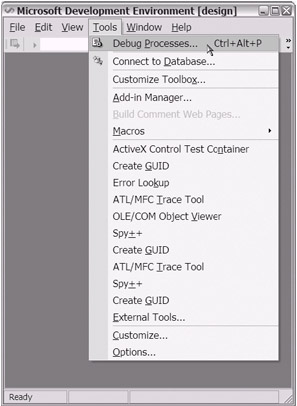
Figure A-5: Proceeding to debug an active process
From the VS .NET Processes window, locate the MyFirstWindowsService process. Then, simply follow these steps:
-
Select the MyFirstWindowsService process (with PID 3092, in this case) and click Attach. See Figure A-6.
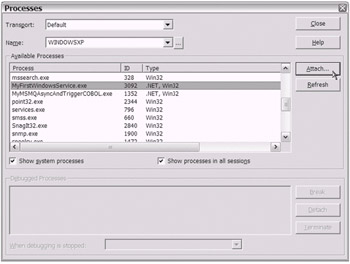
Figure A-6: Attaching to the MyFirstWindowsService process -
An Attach to Process window will appear (see Figure A-7). Click OK. You will return to the Processes window.
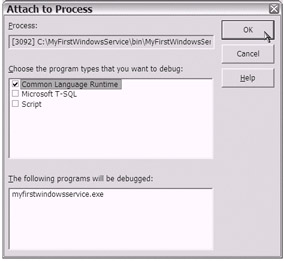
Figure A-7: The Attach to Process window -
Force a break into the process. On the Processes window, choose Break (see Figure A-8). Click Close to close the Processes window.
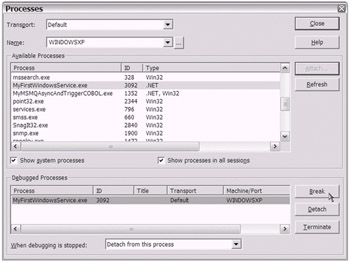
Figure A-8: Forcing a break into the attached process -
A break should now exist in the Sub Main procedure of the MyFirstWindowsService Windows Service process (see Figure A-9).
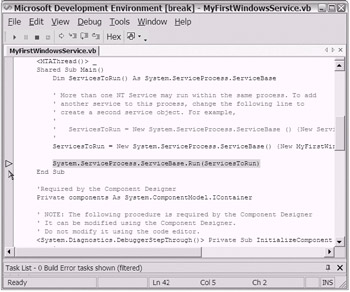
Figure A-9: Viewing the forced break in the Sub Main procedure of the MyFirstWindowsService Windows Service process -
Proceed with normal VS .NET IDE debugging. For example, you can place a manual debug breakpoint on code areas of interest. For demonstration purposes, I have added a breakpoint inside the MyMSMQBeginReceive subprocedure (see Figure A-10). Press F5 to allow the MyFirstWindowsService Windows Service process to move beyond the forced break and resume processing.
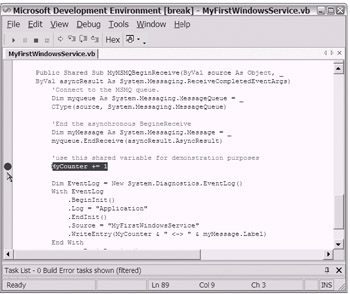
Figure A-10: Manually placing a debugging breakpoint
Now, return to the MyMSMQAsyncAndTriggerCOBOL.exe application (from the C:\MSMQ-ASYNC-DEMO folder). Again, use the appropriate button to send messages to the private MSMQ queue MyFirstAsyncQueue . You should see that the MyFirstWindowsService Windows Service process stops inside the MyMSMQBeginReceive subprocedure at the breakpoint.
While in break mode, hover your mouse over the MyCounter variable. As shown in Figure A-11, the contents of the MyCounter variable will show in a pop-up window.
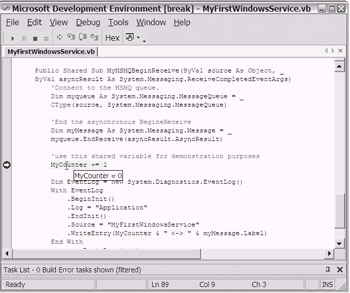
Figure A-11: The MyFirstWindowsService Windows Service process in break mode
Press F5 to allow the process to continue normal execution. Optionally, you can step through the code, allowing executions to occur one line at a time. By default, you can press the F11 key to step through the code. Other stepping options are available on the VS .NET Debug toolbar. From this point forward, you can perform normal VS .NET debugging with the MyFirstWindowsService Windows Service process.
Continue to explore by sending another message to the MSMQ queue. The MyFirstWindowsService Windows Service process will again stop at the break point. While in break mode, consider exploring the VS .NET debug options. Of course, you will see the familiar Locals window. Additionally, you will want to become familiar with the other debug tools. From the VS .NET Standard toolbar, select Debug. The following list introduces some of the other debugging tools that are available from the VS .NET Debug menu:
-
Watch window and QuickWatch window: These windows are great when you are monitoring a specific variable. Both windows allow you to add an expression that creates a conditional breakpoint. For example, you can enter break mode whenever a specific variable meets a certain condition.
-
Autos window: When you are working with functions, the Autos window is useful for monitoring the return values from functions.
-
Exceptions window: Consider using this tool when you are targeting a specific exception. The Exceptions window allows you to enter break mode whenever a specific exception is raised.
-
Immediate window and Command window: From the Debug Windows menu, you can select Immediate to open a window that has a dual mode. When you are in Immediate mode, you can evaluate expressions and execute language statements. When you are in Command mode, you can enter VS .NET IDE commands (instead of always using the VS .NET IDE menu options). Use >cmd to switch to Command mode. Use immed to switch to Immediate mode.
-
Call Stack window: Use this window when you want a quick display of the function and procedure names as they exist on the stack. This is useful when you are trying to trace the execution sequence. Also, consider using the System.Diagnostics.StackTrace class in code. During runtime, you can use this StackTrace class to obtain information similar to what is displayed in the Call Stack window.
-
Running Documents window: When you are debugging ASP.NET applications, you may come across the need to debug script code (e.g., JavaScript). The Running Documents window will prove to be invaluable in such scenarios, as it allows you to attach to a document that is loaded in your process. You may have to enable script debugging on your Internet Explorer browser. (Navigate to Internet Explorer s Standard toolbar and select Tools Internet Options Advanced. Then, uncheck the "Disable script debugging" option.)
As you read the preceding list of VS .NET debug tools, I am sure you were relieved to find out that VS .NET truly does expose a full-featured debugging arsenal. As you know, the interactive debugging software that you and I used for years on the mainframe offered comparable functionality. Naturally, coming from the mainframe platform, you should expect nothing less.
| Tip | Using VS .NET, you can easily debug the portions of your applications that include SQL stored procedures. That is right. You can use all of the VS .NET IDE interactive debugging features (e.g., breakpoints, stepping, and so forth), even with SQL stored procedures. This feature is available through either the VS .NET Server Explorer window or the VS .NET text editor. Be sure to check the references included at the end of this appendix in the "To Learn More" section for more details. |
Remember to detach from the MyFirstWindowsService Windows Service process after you have completed your debugging session. You can accomplish this from the same VS .NET Processes window you visited earlier. Please consider these additional housekeeping tasks : clearing the sample events from the event log, stopping the sample Windows Service, and uninstalling the sample Windows Service.
Let s turn now to the topic of testing.
| |
Consider further exploration of the .NET Framework System.ArgumentException class ( briefly mentioned in Chapter 19) along with the related .NET Try/Catch exception handling syntax. Taking into account your mainframe COBOL background, I believe you will find that .NET exception handling feels familiar to you. Please consider the following two common mainframe scenarios. You will quickly get the idea.
As you know, on the mainframe, the JCL COND statements provided a means to catch errors rising from processing. Using the appropriate COND statement parameter, you could direct the system on the appropriate action to take and how processing should proceed as errors were caught.
Similarly, in your mainframe COBOL programs, you used arithmetic statements (ADD, DIVIDE, COMPUTE, and so forth) along with the ON SIZE ERROR clause to catch errors. Recall that the ON SIZE ERROR clause provided a means for you to catch errors that may have occurred as the result of executing an arithmetic statement. You then had the chance to code defensively and direct the system to execute appropriate alternative logic.
I am sure you see how these two mainframe scenarios relate to each other and to .NET exception handling. Keep these two mainframe implementations in mind as you use .NET Try/Catch exception handling logic in your .NET development. .NET exception handling is an important coding concept to become familiar with. Additionally, you will want to become well acquainted with the .NET Framework System.ArgumentException class.
| |
EAN: 2147483647
Pages: 204