Making Your Windows Applications Informative
Making Your Windows Applications Informative
An application that strives to communicate with its end users is generally well regarded. In this sort of communication, your user interface design should not leave the user guessing about the "status" of a particular request/process. In our mainframe past, working on monochrome 3270-type monitors , our options for communicating status were rather limited. Sure, we mainframe CICS developers had creative ideas. However, not all 3270 terminals would support options such as flashing screen colors and reverse video.
| Tip | A common type of pop-up window used in Windows applications is called a message box. Once you incorporate the message box (actu- ally, the System.Windows.Forms.MessageBox class) into your Windows application code, you simply need to call the Static (Shared in Visual Basic .NET) Show method, passing in the desired parameters. |
In the past on the mainframe, you may have resorted to the use of crude popup windows on some of your ISPF/PDF-type applications to interact with the user. For your mainframe CICS applications, you generally relied on the default infamous "X" or "System" indicator at the bottom of the screen. Fearing a locked keyboard that would need to be reset, your CICS end users quickly learned that the X or System indicator communicated the status of "system busy."
| Note | Those of you mainframe programmers working on projects that involve equipping mainframe CICS applications with a Web or Windows front-end should consider yourselves lucky. Your shackles are now being removed (partially). Let those creative juices flow. |
Fortunately, times have changed and tools have changed. Using the Visual Studio .NET (VS .NET) tool and the .NET Framework, you can easily add value to your Windows applications. You can use the System.Windows.Forms.Control class and its derivatives to inform and communicate with your end user. The following two classes both derive from the Control class and can be used on your Windows Form:
-
System.Windows.Forms.StatusBar
-
System.Windows.Forms.ProgressBar
Other Control classes add value, and even other Control classes seek to inform the end user. I explore the StatusBar and ProgressBar classes here to serve as an example for adding value in your .NET Windows application. Let's now take a look at some COBOL .NET and Visual Basic .NET (VB .NET) sample code to see how to implement these two controls.
Using Controls to Display Status
The following sample code projects are done in both VB .NET and COBOL .NET. Each uses a Windows Application project template as provided in the VS .NET IDE. You will notice in the sample code that the ADO.NET- related logic is similar to what was shown in Chapter 11. These samples leverage the available Northwind sample SQL Server database as a data source ” specifically , the Categories table ”and demonstrate the StatusBar and ProgressBar controls.
| Note | Other controls such as System.Windows.Forms.ToolTip and System.Windows.Forms.DataGrid are included in the sample project. |
I decided to name the first project MyInformativeWinFormCobol . Once you have created the project, you can use the VS .NET IDE to initialize various properties.
You may choose to set certain properties during design time. Each control exposes a Properties window. To access this VS .NET IDE feature, after you add a control from the Toolbox to the Windows Form, select the control and press F4. Optionally, you can access the Properties windows by right-clicking the control and selecting Properties from the context window.
As shown in Figure 14-1, change the Text property of the System.Windows.Forms.Form class to the value MyInformativeWinFormCobol . The Text property will show as the form's "title" during runtime.
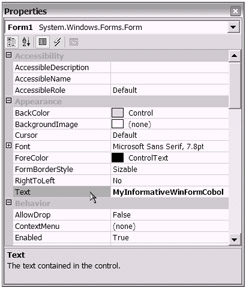
Figure 14-1: The VS.NET IDE Properties window for the System.Windows.Forms.Form control
Next , add additional controls to the Windows Form (i.e., StatusBar, ProgressBar, ToolTip, DataGrid, and Button) and modify a few properties. Using the Properties window (taking one control at a time by selecting the control and pressing F4), modify each added control as follows :
-
StatusBar: Change the Text property to Please Click the Button to Load the DataGrid . During runtime, you will change this value after a selection is made.
-
ProgressBar: Change the Visible property to False . You will change this value to True during runtime.
-
DataGrid: Change the Visible property to False . You will change this value to True during runtime. Change the CaptionText property to Categories Table . Additionally, update the ToolTip property as shown in Figure 14-2.
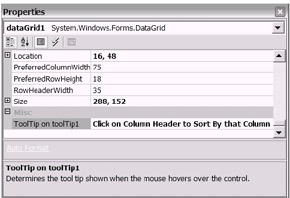
Figure 14-2: The Properties window for the System.Windows.Form.DataGrid control with the ToolTip property updated
I updated the ToolTip property for the Button control to the value Click this Button to Load DataGrid . This will later be apparent when you run the application and hover the mouse pointer over the Button control. Additionally, I changed the Text property of the Button control to Click to Load DataGrid .
| Note | The ToolTip (which you can associate with any control) itself is often referred to as being a control. Because you can find it in the Toolbox along with the other Windows controls, this is understandable. However, when you consider that it inherits directly from System.ComponentModel.Component instead of System.Windows.Forms.Control, it is also understandable that it should be referred to as a component or a just a class. Perhaps you can consider it to be just an exercise in semantics. |
When complete, your design time view should resemble the sample application shown in Figure 14-3.
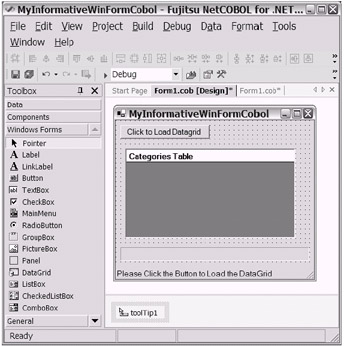
Figure 14-3: A Windows application with StatusBar, ProgressBar, ToolTip, DataGrid, and Button controls added. Several properties have been updated during design time.
Visually setting properties during design time is a common practice and perfectly acceptable as a means of initializing properties. [1] Later, if you need to, you can modify the properties in your code during runtime. Let's now turn to the code module Form1.cob (which you can access from the Solutions Explorer window) for some actual code changes.
| Tip | Consider extending this sample application to include the System.Windows.Forms.NotifyIcon component. The NotifyIcon component displays an icon in the status notification area of the taskbar. Located in the Toolbox, along with the other form controls/ components , you drag and drop the NotifyIcon onto the Windows Form. You would then set its properties (e.g., Icon, Visible, and Text) either during design time or runtime. |
Editing the Code Module Using COBOL .NET
If you double-click the Button control (or any control on the form) while in Design view, two things will occur. First, an event handler method will be created for you. In the case of the Button control, the button1_Click method is created. [2] Second, you will find yourself taken from the Design view of the Form to the Source view of the Form class.
To complete the sample application MyInformativeWinFormCobol, you will need to add logic to connect to a data source and populate the DataGrid control. In the sample application, you will modify the REPOSITORY and Working-Storage COBOL .NET sections. Also, you will need to modify the button1_Click method. Listing 14-1, which I copied from the Form1.cob code file for your convenience, shows these modifications.
| Note | You will notice that a portion of the sample code used here to create the ADO.NET Connection, DataAdapter, and Dataset objects was borrowed from the database access logic used in Chapter 11's sample application, DataBaseAccessExampleCOBOL. |
| |
. . . 000090 REPOSITORY. 000100 CLASS CLASS-BOOLEAN AS "System.Boolean" 000110 CLASS CLASS-CONTAINER AS "System.ComponentModel.Container" 000120 INTERFACE INTERFACE-ICONTAINER AS 000121 "System.ComponentModel.IContainer" 000130 INTERFACE INTERFACE-ISUPPORTINITIALIZE AS 000131 "System.ComponentModel.ISupportInitialize" 000140 CLASS DataColumn AS "System.Data.DataColumn" 000150 CLASS DataColumnArray AS "System.Data.DataColumn[]" 000160 CLASS DataRow AS "System.Data.DataRow" 000170 CLASS DataRowCollection AS "System.Data.DataRowCollection" 000180 CLASS DataSet AS "System.Data.DataSet" 000190 CLASS DataTable AS "System.Data.DataTable" 000200 CLASS SqlCommand AS "System.Data.SqlClient.SqlCommand" 000210 CLASS SqlConnection AS "System.Data.SqlClient.SqlConnection" 000220 CLASS SqlDataAdapter AS "System.Data.SqlClient.SqlDataAdapter" 000230 CLASS CLASS-POINT AS "System.Drawing.Point" 000240 CLASS CLASS-SIZE AS "System.Drawing.Size" 000250 CLASS CLASS-SYSTEMCOLORS AS "System.Drawing.SystemColors" 000260 CLASS CLASS-EVENTARGS AS "System.EventArgs" 000270 DELEGATE DELEGATE-EVENTHANDLER AS "System.EventHandler" 000280 CLASS CLASS-OBJECT AS "System.Object" 000290 CLASS CLASS-STA-THREAD AS "System.STAThreadAttribute" 000300 CLASS CLASS-STRING AS "System.String" 000310 CLASS SystemType AS "System.Type" 000320 CLASS CLASS-APPLICATION AS "System.Windows.Forms.Application" 000330 CLASS CLASS-BUTTON AS "System.Windows.Forms.Button" 000340 CLASS ARRAY-CONTROL AS "System.Windows.Forms.Control[]" 000350 CLASS CLASS-CONTROLCOLLECTION AS 000351 "System.Windows.Forms.Control+ControlCollection" 000360 CLASS CLASS-DATAGRID AS "System.Windows.Forms.DataGrid" 000370 CLASS CLASS-FORM AS "System.Windows.Forms.Form" 000380 CLASS CLASS-PROGRESSBAR AS "System.Windows.Forms.ProgressBar" 000390 CLASS CLASS-STATUSBAR AS "System.Windows.Forms.StatusBar" 000400 CLASS CLASS-TOOLBAR AS "System.Windows.Forms.ToolBar" 000410 CLASS CLASS-TOOLTIP AS "System.Windows.Forms.ToolTip" 000420 PROPERTY PROP-ALTERNATINGBACKCOLOR AS "AlternatingBackColor" 000430 PROPERTY PROP-AUTOSCALEBASESIZE AS "AutoScaleBaseSize" 000440 PROPERTY PROP-BUTTON1 AS "button1" 000450 PROPERTY PROP-CAPTIONTEXT AS "CaptionText" 000460 PROPERTY PROP-CLIENTSIZE AS "ClientSize" 000470 PROPERTY PROP-ColumnName AS "ColumnName" 000480 PROPERTY PROP-Columns AS "Columns" 000490 PROPERTY PROP-CommandText AS "CommandText" 000500 PROPERTY PROP-COMPONENTS AS "components" 000510 PROPERTY PROP-Connection AS "Connection" 000520 PROPERTY PROP-ConnectionString AS "ConnectionString" 000530 PROPERTY PROP-CONTROLS AS "Controls" 000540 PROPERTY PROP-CONTROLTEXT AS "ControlText" 000550 PROPERTY PROP-DATAGRID1 AS "dataGrid1" 000560 PROPERTY PROP-DATAMEMBER AS "DataMember" 000570 PROPERTY PROP-DataSource AS "DataSource" 000580 PROPERTY PROP-DataType AS "DataType" 000590 PROPERTY PROP-DROPDOWNARROWS AS "DropDownArrows" 000600 PROPERTY PROP-EMPTY AS "Empty" 000610 PROPERTY PROP-HEADERFORECOLOR AS "HeaderForeColor" 000620 PROPERTY PROP-LOCATION AS "Location" 000630 PROPERTY PROP-NAME AS "Name" 000640 PROPERTY PROP-PrimaryKey AS "PrimaryKey" 000650 PROPERTY PROP-PROGRESSBAR1 AS "progressBar1" 000660 PROPERTY PROP-SelectCommand AS "SelectCommand" 000670 PROPERTY PROP-SHOWTOOLTIPS AS "ShowToolTips" 000680 PROPERTY PROP-SIZE AS "Size" 000690 PROPERTY PROP-STATUSBAR1 AS "statusBar1" 000700 PROPERTY PROP-TABINDEX AS "TabIndex" 000710 PROPERTY PROP-Tables AS "Tables" 000720 PROPERTY PROP-TEXT AS "Text" 000730 PROPERTY PROP-TOOLBAR1 AS "toolBar1" 000740 PROPERTY PROP-TOOLTIP1 AS "toolTip1" 000750 PROPERTY PROP-Unique AS "Unique" 000760 PROPERTY PROP-VISIBLE AS "Visible" 000770 PROPERTY PROP-WINDOW AS "Window" 000780 . . . . 000990 WORKING-STORAGE SECTION. 001000 01 mySqlConnection OBJECT REFERENCE SqlConnection. 001010 01 mySqlDataAdapter OBJECT REFERENCE SqlDataAdapter. 001020 01 mySqlCommand OBJECT REFERENCE SqlCommand. 001030 01 myDataSet OBJECT REFERENCE DataSet. 001040 01 myDataTable OBJECT REFERENCE DataTable. 001050 01 myDataRow OBJECT REFERENCE DataRow. 001060 01 myDataColumn OBJECT REFERENCE DataColumn. 001070 01 myPrimaryKeyColumn OBJECT REFERENCE DataColumn. 001080 01 myPrimaryKeyColumns OBJECT REFERENCE DataColumnArray. 001090 01 myDataRowCollection OBJECT REFERENCE DataRowCollection. 001100 01 myCLASS-STRING OBJECT REFERENCE CLASS-STRING. 001110 01 myDisplayString PIC X(30). 001120 01 myInt PIC S9(9) COMP-5. 001130 01 myOtherInt PIC S9(9) COMP-5. 001140 01 NOT-END-OF-READ PIC 1 USAGE BIT. 001150 01 statusBar1 OBJECT REFERENCE CLASS-STATUSBAR. 001160 01 progressBar1 OBJECT REFERENCE CLASS-PROGRESSBAR. 001170 01 dataGrid1 OBJECT REFERENCE CLASS-DATAGRID. 001180 01 button1 OBJECT REFERENCE CLASS-BUTTON. 001190 01 toolTip1 OBJECT REFERENCE CLASS-TOOLTIP. 001200 01 components OBJECT REFERENCE INTERFACE-ICONTAINER. . . . 019200 METHOD-ID. button1_Click PRIVATE. 019210 DATA DIVISION. 019220 LINKAGE SECTION. 019230 01 sender OBJECT REFERENCE CLASS-OBJECT. 019240 01 e OBJECT REFERENCE CLASS-EVENTARGS. 019250 PROCEDURE DIVISION USING BY VALUE sender e. 019260 SET PROP-VISIBLE OF progressBar1 TO B"1" 019270 INVOKE progressBar1 "Increment" USING BY VALUE 10 019280 SET PROP-TEXT OF statusBar1 TO "Updating DataGrid" 019290 019300*************************************************************** 019310* Create a new DataTable. 019320 INVOKE DataTable "NEW" USING BY VALUE "myCategories" 019330 RETURNING myDataTable. 019340 019350* Create 1st myDataColumn. 019360 INVOKE DataColumn "NEW" RETURNING myDataColumn. 019370 SET PROP-DataType OF myDataColumn TO 019380 SystemType::"GetType"("System.Int32"). 019390 SET PROP-ColumnName OF myDataColumn TO "CategoryID". 019400 SET PROP-Unique OF myDataColumn TO B"1". 019410 INVOKE PROP-Columns OF myDataTable "Add" 019420 USING BY VALUE myDataColumn. 019430 019440* Create 2nd myDataColumn. 019450 INVOKE DataColumn "NEW" RETURNING myDataColumn. 019460 SET PROP-DataType OF myDataColumn TO 019470 SystemType::"GetType"("System.String"). 019480 SET PROP-ColumnName OF myDataColumn TO "CategoryName". 019490 INVOKE PROP-Columns OF myDataTable "Add" 019500 USING BY VALUE myDataColumn. 019510 019520 INVOKE progressBar1 "Increment" USING BY VALUE 10 019530 019540* Create 3rd myDataColumn. 019550 INVOKE DataColumn "NEW" RETURNING myDataColumn. 019560 SET PROP-DataType OF myDataColumn TO 019570 SystemType::"GetType"("System.String"). 019580 SET PROP-ColumnName OF myDataColumn TO "Description". 019590 INVOKE PROP-Columns OF myDataTable "Add" 019600 USING BY VALUE myDataColumn. 019610 019620* Create 4th myDataColumn. 019630 INVOKE DataColumn "NEW" RETURNING myDataColumn. 019640 SET PROP-DataType OF myDataColumn TO 019650 SystemType::"GetType"("System.Byte[]"). 019660 SET PROP-ColumnName OF myDataColumn TO "Picture". 019670 INVOKE PROP-Columns OF myDataTable "Add" 019680 USING BY VALUE myDataColumn. 019690 019700 INVOKE progressBar1 "Increment" USING BY VALUE 10 019710 019720* Assign primary key column to CategoryID column. 019730 INVOKE DataColumnArray "NEW" USING BY VALUE 1 019740 RETURNING myPrimaryKeyColumns. 019750 INVOKE PROP-Columns OF myDataTable "get_Item" 019760 USING BY VALUE "CategoryID" 019770 RETURNING myPrimaryKeyColumn. 019780 INVOKE myPrimaryKeyColumns "Set" 019790 USING BY VALUE 0 myPrimaryKeyColumn. 019800 SET PROP-PrimaryKey OF myDataTable TO myPrimaryKeyColumns. 019810 019820* Reference the DataSet. 019830 INVOKE DataSet "NEW" RETURNING myDataSet. 019840* Associate the Table with the Dataset. 019850 INVOKE PROP-Tables OF myDataSet "Add" 019860 USING BY VALUE myDataTable. 019870 019880 INVOKE progressBar1 "Increment" USING BY VALUE 10 019890 019900* Reference Data Provider Objects 019910 INVOKE SqlConnection "NEW" RETURNING mySqlConnection 019920 INVOKE SqlDataAdapter "NEW" RETURNING mySqlDataAdapter 019930 INVOKE SqlCommand "NEW" RETURNING mySqlCommand 019940 019950* Prepare to Connect to SQL Server Database 019960* using Connection String 019970 SET PROP-ConnectionString OF mySqlConnection TO 019980 "user id=sa;pwd=;Database=northwind;Server=(LOCAL)" 019990 020000* Associate the Command Object with the Connection Object 020010 SET PROP-Connection OF mySqlCommand TO mySqlConnection 020020* Associate the Command Object with intended SQL Statement 020030 SET PROP-CommandText OF mySqlCommand TO "Select * from Categories" 020040* Associate the DataAdapter Object with the Command Object 020050 SET PROP-SelectCommand OF mySqlDataAdapter TO mySqlCommand 020060 020070 INVOKE progressBar1 "Increment" USING BY VALUE 10 020080 020090* Have the DataAdapter Object Execute the SQL Statement and 020100* store the result set in a DataSet DataTable named myCategories 020110 INVOKE mySqlDataAdapter "Fill" 020120 USING BY VALUE myDataSet, "myCategories" 020130 020140*************************************************************** 020150 SET PROP-VISIBLE OF dataGrid1 TO B"1" 020160 SET PROP-DataSource OF dataGrid1 TO myDataSet 020170 SET PROP-DATAMEMBER OF dataGrid1 TO "myCategories" 020180*************************************************************** 020190* Close the Database Connection 020200 INVOKE mySqlConnection "Close". 020210 020220 INVOKE progressBar1 "Increment" USING BY VALUE 10 020230 020240 SET mySqlConnection TO NULL. 020250 SET mySqlDataAdapter TO NULL. 020260 SET mySqlCommand TO NULL. 020270 SET myDataTable TO NULL. 020280 020300*************************************************************** 020310 INVOKE progressBar1 "Increment" USING BY VALUE 40 020320 SET PROP-VISIBLE OF dataGrid1 TO B"1" 020330 SET PROP-TEXT OF statusBar1 TO "Completed Filling DataGrid" 020340 020350 END METHOD button1_Click. . . . | |
When you review the code in Listing 14-1, you will notice the inclusion of code to manipulate various properties on the controls. For example, code is included to "turn on" the Visible property of the DataGrid and ProgressBar controls. The StatusBar's Text property is set at the beginning and end of the button1_Click method. Notice also the use of the ProgressBar control's Increment method. In this case, the arbitrary value used to "increment" the ProgressBar gradually moves it from a value of 0 to 100.
| Note | This sample application accesses the Northwind sample database. Check to see if your SQL Server service is active. The ADO.NET Connection object requires your service to be active to establish a connection to the data source. |
The sample application in Listing 14-1 is a very basic example of adding a few controls to a Windows Form using COBOL .NET. Several of the controls used serve the purpose of communicating with the end user. The StatusBar and ProgressBar controls represent easy ways to add "informative" value to your .NET Windows applications. In the next section, you will take a quick look at the same sample application implemented with VB .NET.
Editing the Code Module Using VB .NET
In support of your bilingual programming language approach, I have created a new project in the VS .NET IDE using the VB .NET Windows Application project template. Given that this project accomplishes the same thing that the COBOL .NET version does, a comparison of the two should be rather straightforward. Nevertheless, just to keep things interesting for you, I have altered the design approach slightly with the VB .NET version of the sample application, which is named MyInformativeWinFormVB.
Rather than use the Properties window during design time, I have added code in the Form1_Load method (in the Form1.vb code module file) to initialize the controls. During runtime, the end result will be identical to what was achieved with the COBOL .NET version of the sample application. Please take a moment to review the sample code in Listing 14-2.
| |
Public Class Form1 Inherits System.Windows.Forms.Form . . . (excluding code generated by Win Forms designer) . . . Private Sub Form1_Load(ByVal sender As System.Object, _ ByVal e As System.EventArgs) Handles MyBase.Load 'set all controls with initial values Me.Text = "MyInformativeWinFormVB" Button1.Text = "Click to Load Datagrid" With ToolTip1 .SetToolTip(Button1, _ "Click this Button to load Datagrid") .SetToolTip(DataGrid1, _ "Click on Column Header to Sort By that Column") End With With DataGrid1 .Visible = False .CaptionText = "Categories Table" End With ProgressBar1.Visible = False StatusBar1.Text = _ "Please Click the Button to Load the DataGrid" End Sub Private Sub Button1_Click(ByVal sender As Object, _ ByVal e As System.EventArgs) Handles Button1.Click ProgressBar1.Visible = True ProgressBar1.Increment(10) StatusBar1.Text = "Updating DataGrid" Call UseSqlDataAdapter(OptionalPreTableBuild) End Sub Public Function OptionalPreTableBuild() As DataSet 'It is possible to obtain the "schema" or table structure 'directly/automatically from the SQL Server Database 'This section is added for training purposes. 'The information found in this section would be critical 'in the case of building a disconnected .NET dataset 'that may have a non-SQL Server Data Source. ' Create new DataTable. Dim myDataTable As DataTable = _ New System.Data.DataTable("myCategories") ' Declare DataColumn and DataRow variables. Dim myDataColumn As System.Data.DataColumn Dim myDataRow As System.Data.DataRow ' Create 1st myDataColumn. myDataColumn = New System.Data.DataColumn() myDataColumn.DataType = System.Type.GetType("System.Int32") myDataColumn.ColumnName = "CategoryID" myDataColumn.Unique = True myDataTable.Columns.Add(myDataColumn) ProgressBar1.Increment(10) ' Create 2nd myDataColumn. myDataColumn = New System.Data.DataColumn() myDataColumn.DataType = Type.GetType("System.String") myDataColumn.ColumnName = "CategoryName" myDataTable.Columns.Add(myDataColumn) ' Create 3rd myDataColumn. myDataColumn = New System.Data.DataColumn() myDataColumn.DataType = Type.GetType("System.String") myDataColumn.ColumnName = "Description" myDataTable.Columns.Add(myDataColumn) ' Create 4th myDataColumn. myDataColumn = New System.Data.DataColumn() myDataColumn.DataType = Type.GetType("System.Byte[]") myDataColumn.ColumnName = "Picture" myDataTable.Columns.Add(myDataColumn) ' Assign primary key column to CategoryID column Dim PrimaryKeyColumns(0) As System.Data.DataColumn PrimaryKeyColumns(0) = myDataTable.Columns("CategoryID") myDataTable.PrimaryKey = PrimaryKeyColumns ' Reference the DataSet. Dim myDataSet As New System.Data.DataSet() ' Associate the Table with the Dataset. myDataSet.Tables.Add(myDataTable) myDataTable = Nothing Return myDataSet ProgressBar1.Increment(10) End Function Public Sub UseSqlDataAdapter(ByVal myDataset As DataSet) 'Reference Data Provider Objects Dim mySqlConnection As New System.Data.SqlClient.SqlConnection() Dim mySqlDataAdapter As New System.Data.SqlClient.SqlDataAdapter() Dim mySqlCommand As New System.Data.SqlClient.SqlCommand() 'Reference Dataset Objects Dim myDataRow As System.Data.DataRow 'Prepare to Connect to SQL Server Database 'using Connection String mySqlConnection.ConnectionString = _ "user id=sa;pwd=;Database=northwind;Server=(LOCAL)" ProgressBar1.Increment(10) 'Associate the Command Object with the Connection Object mySqlCommand.Connection = mySqlConnection 'Associate the Command Object with intended SQL Statement mySqlCommand.CommandText = "Select * from Categories" 'Associate the DataAdapter Object with the Command Object mySqlDataAdapter.SelectCommand = mySqlCommand 'Have the DataAdapter Object Execute the SQL Statement and 'store the result set in a DataSet DataTable named myCategories mySqlDataAdapter.Fill(myDataset, "myCategories") ProgressBar1.Increment(10) '**************************************************** With DataGrid1 .Visible = "True" .DataSource = myDataset .DataMember = "myCategories" End With '**************************************************** ProgressBar1.Increment(60) 'Close the Database Connection mySqlConnection.Close() mySqlConnection = Nothing mySqlDataAdapter = Nothing mySqlCommand = Nothing StatusBar1.Text = "Completed Filling DataGrid" End Sub End Class | |
When you examine the code in Listing 14-2, you will notice that the ToolTip control has the method SetToolTip . This method is used to associate the ToolTip control to other controls. In this case, the ToolTip control is associated with both the Button and DataGrid controls. As shown in Figures 14-4 and 14-5, the ToolTip control can add value to your application by communicating usage tips to your end user.
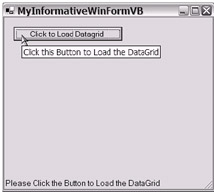
Figure 14-4: You can view the ToolTip display when you place your mouse pointer over the Button control.

Figure 14-5: You can view the ToolTip display when you place your mouse pointer over the DataGrid control.
| Note | The decision of whether or not to initialize your control properties during design time or runtime is a design choice. In real life, you may come across situations where you will prefer one approach or the other. As you have seen, the same results were achieved in the earlier COBOL .NET project using the design-time Properties window. In both languages, VB .NET and COBOL .NET, you have the option of initializing your controls using the design-time Properties window or using code logic. Simply be aware that you do have a choice. |
Fun with the Timer Control
Just for fun, I have added another Button control to the VB .NET version of the sample application MyInformativeWinFormVB. The new button is listed on the form with the Text property set to the value "TimerFun". When you click this button, you will execute a small piece of code in the in the Button2_Click event method. This code will cause the Timer control to activate. The Timer control is a member of the Windows.Forms family of controls (i.e., System.Windows.Forms.Timer). The Timer control can remind you of the diversity of the Windows Form controls.
| Tip | Feel free to extend the COBOL .NET version of the sample application using the Timer control. As long as you know the full name of the class (in this case, System.Windows.Forms.Timer) and its members (Start, Stop, Interval, and so forth), adding it to your COBOL .NET code is rather easy. Incidentally, this Timer control logic provides an example of the code needed to associate an event with an event handler. |
By the way, if you run this TimerFun logic on a Windows 2000 or Windows XP system (a system that supports layering), you will get a chance to see a demonstration of one of the coolest properties that has been added to the Windows Form class: the Opacity property. As shown in Listing 14-3, you can use the Windows Form Opacity property to bring a Windows Form to varying degrees of transparency. Bravo, bravo! Viva la .NET!
| |
Private Shared tm As New System.Windows.Forms.Timer() Private Shared Cycles As Int32 Private Sub Button2_Click(ByVal sender As System.Object, _ ByVal e As System.EventArgs) Handles Button2.Click Cycles = 0 Call FunWithTimer() End Sub Public Sub TimerEventProcessor(ByVal myObject As Object, _ ByVal myEventArgs As EventArgs) Cycles += 1 Me.Opacity = 0.1 * Cycles If Cycles > 10 Then tm.Stop() End If End Sub Public Sub FunWithTimer() AddHandler tm.Tick, AddressOf TimerEventProcessor tm.Interval = 500 tm.Start() End Sub
| |
Please take a moment to reflect on the namespaces that you have used in this section for Windows Forms development. You will recall [3] that each of the Windows Forms controls inherit either directly or indirectly from System.ComponentModel.Component or System.Windows.Forms.Control. Understanding the namespace hierarchy and the base classes will give you the advantage with .NET. You will leverage this advantage as you build applications that sufficiently provide your end users with pertinent information.
In the next section, I will continue the "adding value" theme, but I will switch over to Web application development. As you will see, the ASP.NET technology arena brings with it an entirely different set of concerns, challenges, and opportunities for adding value to your applications.
[1] The VS .NET IDE Windows Forms Designer actually builds code for you behind the scenes.
[2] Each control has other event methods available. You can manually type others. For example, most controls expose GotFocus and LostFocus events that you can handle with appropriate methods during runtime.
[3] This topic was originally introduced in Chapter 13.
EAN: 2147483647
Pages: 204