Chapter 20: Logic Statements, Enabling and Disabling Controls, and Focus
A Simple, Programmer-Designed Main Menu
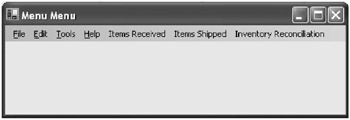
The main menu we create will have the four standard main menu items: File, Edit, Tools, and Help. It will also have three custom top-level entries: Items Received, Items Shipped, and Inventory Reconciliation. We build only the menu ” not the code in the event handlers that support each menu item. Under Items Received, there will be three subitems: Catalog Sales Items, Special Sales Items, and Facility Support. Items Shipped will also have three subitems: Awaiting Shipment, Shipped Out, and Items to be Reworked. The third main menu item, Inventory Reconciliation, will have no subitems.
Project MenuMenu
-
To begin, create a new project in the IDE Visual Studio\Projects folder named MenuMenu . There will be no additional windows ; the activity centers on the main window. In the window template, set the main window size at 550 pixels wide by 150 pixels high. For StartPosition, set the window for Center Screen . Set the text in the main window caption as Menu Menu .
-
Highlight the window template (to fill the Properties window with main window data), click on the Toolbox tab on the left edge of the IDE screen, and find MenuStrip under the Menus & Toolbars category. Click on the MenuStrip icon once, move the mouse pointer over the window template, and click on the template to place the MenuStrip onto the template. A main menu form will appear at the top of the window template, and an icon marked MenuStrip1 will appear at the left bottom of the IDE.
-
At the top left of the window template there will be a small rectangle with the words Type here inside the rectangle. We will use this rectangle to enter the three custom entries later. But first we must place the four standard entries on the menu. Highlight the main menu strip at the top of the window template. Then move to the far left of the strip and right-click until a floating context menu appears. (It is difficult to get this context menu to appear, so be patient.) Click on Insert Standard Items to insert a group of four items (File, Edit, Tools, and Help) in the code.
-
Next, move to the rectangle with the words Type here just to the right of the Help entry that the IDE has inserted into the project. Click on that rectangle and type Items Received . Then click somewhere else on the main window template to examine what you have done so far. Click on Items Received and two more rectangles will appear (one to the right of the Items Received rectangle and one below the item).
You will quickly learn the rules: If you click on a menu item that has no menu item to its right, the IDE provides a way to include new menu items to the right and also below. If you click on a menu item that already has an item to its right, it provides a way to add items below only.
-
In the rectangle to the right of Items Received, enter Items Shipped . Click elsewhere on the main window, and then click back on Items Shipped to reveal yet another rectangle to the right. Click on this rectangle and enter the final item on the main menu, Inventory Reconciliation .
-
Click elsewhere on the main window and examine the seven entries across the top of the window. We will show you later how to correct misspellings and how to add and remove custom items.
-
To enter the submenu items that accompany the three custom entries you have made, click on Items Received (and the only new rectangle offered will be below the main menu item). Then type in Catalog Sales Items as the first submenu item. Click on the main menu item Items Received again to provide another rectangle for submenu entry, and type Special Sale Items . Click on the Items Received main menu item a third time to produce a third submenu rectangle below, and type Facility Support .
-
Click on the main menu item Items Shipped to produce a rectangle below (for submenu items). Type the first submenu item Awaiting Shipment , then the second submenu item Shipped Out , and finally the third submenu item Items to be Reworked . This completes all the entries into the fixed main menu.
Figure 18-1 shows how the main window should look.

Figure 18-1: Menu Menu window -
Move to the main window template and click on each custom menu entry (main menu or submenu item) that is at the end of a menusubmenu chain. These are the only entries that should support an event handler. In this case, there are three submenu items under Items Received that need an event handler, three items under Items Shipped, and the main menu item Inventory Reconciliation (a total of seven). To invoke these handlers, click on the menu entry in the main window template to highlight the submenu items below, and then double-click on each submenu item to place its event handler in Form1.cs source code.
If you double-click on a main menu item (such as Items Received) that is not at the end of a menu-submenu chain, the IDE creates a handler to this main menu item even though it should never be used. If you create an unwanted handler for an intermediate menu item, then leave it there . Any attempt to remove the handler will confuse the IDE s bookkeeping.
| Warning | The bookkeeping for the main menu is rather complex, and the first time you attempt to compile a project with a main menu the compiler may ding you for not having a handler for an intermediate menu item. For example, the compiler may complain that it cannot find a handler for Items Received. If this occurs, move to the window template, highlight Items Received, and then double-click on it to create this unnecessary handler. This makes the compiler happy, and the project can compile (and eventually run). |
| Note | Once the source code is presented (to show you that the source code has been entered), you can quickly return to the main window template by pressing the F7 key. This is as far as we take the demonstration ” there is no code to place in any of these event handlers. |
If you want to assure yourself that the wiring between the menu items and the handler is working as advertised, then create a simple two-line entry within each handler to post the result of a menu item on the screen. For example, in the catalogSalesItemsToolStrip Menu-Item_Click handler enter:
MessageBox.Show("In catalogSalesItemsToolStripMenuItem_Click"); return; The return statement brings the user back to the MenuMenu main window. If you replace return with Close(), the project terminates.
| Note | The Visual Studio C# version 2.0 compiler is not configured to enter the special code that connects the standard items File, Edit, Tools, and Help to working software. Maybe later. |
There are only three tasks that alter the appearance of the fixed menu:
-
Correcting misspellings in the text.
-
Adding another menu or submenu item somewhere along the chain of menu items.
-
Deleting a menu or submenu item.
Correcting Misspellings
For demonstration purposes we will change the word Catalog (a submenu item under Items Received) to Catalogue.
-
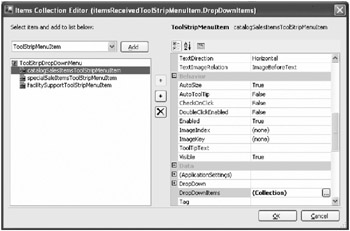
Right-click on Items Received on the template to open a context menu. Click on Edit DropDown Items to open the following window.

Figure 18-2: Items Collection Editor -
Highlight the catalogSalesItemsToolStripMenuItem entry on the left side of the window. This action displays all the properties of the menu item in the Properties window at the right. Scroll down to the Text entry in the Properties window and change Catalog to Catalogue . Close the window by clicking on the OK button at the bottom of the window.
-
To edit the text in the main menu, click on that item on the main window template. This displays its properties in the Properties window on the IDE screen. Scroll to Text, correct the spelling of the item, and click on another part of the window to set the correction. For example, change Items Shipped to Items Shipped Out .
Adding a Menu or Submenu Item
To insert a main menu item between two existing main menu items, right-click on the item to the right . A new entry is immediately inserted in the main menu (and you may have to widen the Menu Menu window to provide for the additional item).
For example, add a main menu item Lost Paperwork between Help and Items Received by right-clicking on Items Received. This produces a context menu. Click on Insert, and a new item is inserted. This item already has default text in it, so you must correct the text by highlighting the menu item on the window (to display its properties in the Properties window), scrolling down to the Text entry in the Properties window, and changing the default text to Lost Paperwork.
To add an item at the end of the existing far-right item (Inventory Reconciliation), first place the cursor at the right edge of the Inventory Reconciliation entry and click with the mouse. This creates a temporary entry below Inventory Reconciliation. Click again on Inventory Reconciliation to produce a new entry to the right of Inventory Reconciliation. Enter the name of the new menu item, such as the word HoHoHo, there. If you desire , you can highlight HoHoHo and place submenu items below it. The temporary entry below Inventory Reconciliation disappears because you did not type any text into it.
Deleting a Menu or Submenu Item
To delete a submenu item, simply highlight that item with the mouse cursor, right-click on the item to reveal a context menu, and select Delete. In this case, highlight the item Shipped Out under Items Shipped and delete it. But what happens to the event handler that was created for Shipped Out? Its code remains in Form1.cs and need not be removed.
| Warning | The adding and deleting of both menu and submenu items may cause problems in the source code, so it is best if the programmer waits until all elements of the project have been placed before he creates the main menu. |
Compile and run this project. The main window should look like Figure 18-1.
This is as far as we intend to take this example. Note that we have not placed a button on the window template to quit this project, but the white X in the red field at the top right corner of the main window will serve to exit the window.
| 1. | QUESTION: Suppose I decide to place another main menu item on the far left of the window. Can I insert an item there? |
Answers
| 1. | ANSWER: Yes. Recall that the insert process always inserts to the left of the item selected initially. |
EAN: 2147483647
Pages: 129
If you may any questions please contact us: flylib@qtcs.net