Chapter 4: Cloning an Existing Project
Opening a Project in the IDE
To open any existing project in the IDE (or create a new project) the programmer first clicks on the File main menu item at the top left of the IDE screen. These submenu choices are offered : New, Open, Save All, Source Control, Recent Files, Recent Projects, and Exit. We are only interested in New and Open. New creates a new project, and Open opens an existing project.
Creating a New Project
To create a new project, follow these steps:
-
Select File from the main menu, then choose New . You are offered three choices: Project, File, or Project From Existing Code. The File option is of little use, and it is unclear what the purpose of the Project From Existing Code option is. It looks like you should be able to clone an existing project here (and rename it so it can be reworked and used in repetitive projects), but that does not work. Chapter 4 shows how to clone a Visual Studio C# version 2.0 project. If you create projects that are similar in their makeup , then this manual clone sequence will decrease your preparation time.
-
Under New, click Project to open the New Project window, as shown in Figure 3-6.
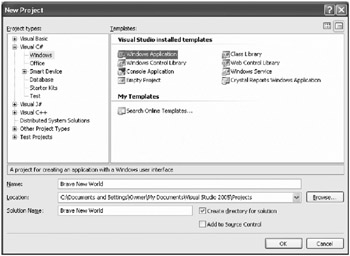
Figure 3-6: New Project window -
The first thing you must do is name the project. In the Name box near the bottom of the window, replace WindowsApplication1 with Brave New World . As soon as you type the new project name, the words Brave New World will appear in the text box after Solution Name.
Note that the Create directory for solution option is checked.
-
The second entry you may have to make is in the Location box directly below the Name box. If you highlight the path shown in Location you can add a subdirectory below the Projects subdirectory. For example, if you are creating a project named Scooby Doo and you wish to place its project folder in subdirectory WhereAreYou, enter Scooby Doo in the Name line and \ WhereAreYou after Projects in the Location line. The subdirectory that you name in the Location box need not exist when you create the new project. If it does not exist, the IDE will create that subdirectory and place the new project there.
In this case there is no required pathing after Projects in the Location box shown in Figure 3-6.
-
Now click on the OK button to create the new project.
| Note | If you choose a name for a project that includes forbidden characters (like #), a message will appear to tell you that the character is a no-no. The only two common characters (other than letters of the alphabet and numbers ) that the IDE allows within project names are the hyphen (-) and the underline (_). |
Figure 3-7 shows how the project looks initially.
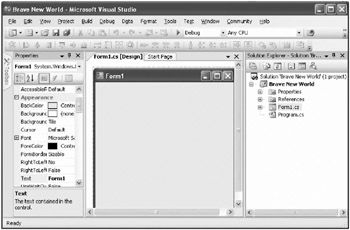
Figure 3-7: Brave New World project in the IDE
Note that the Toolbox window is hidden from view (its tab is shown at the left edge of the IDE window). The Solution Explorer window is on the right, and the Properties window is on the left. But you are going to need both the Properties window and the Toolbox in this demonstration (flip-flopping between the two), and they are both docked to the left side of the IDE.
The easiest way around this problem is to hide the Solution Explorer by clicking on its pushpin, which leaves a lot of empty space on the right side of the IDE screen. Now, when you click on the Toolbox tab on the left edge of the screen, there is room for both the Properties window and the Toolbox at the same time since the window template will move to the right to accommodate the needs of the two windows on the left.
Figure 3-8 shows how the IDE screen should look after you have hidden the Solution Explorer and placed both the Properties window and the Toolbox on the left.
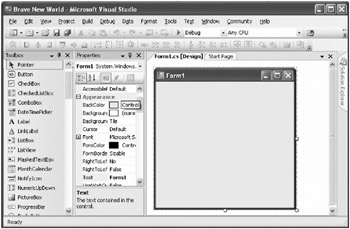
Figure 3-8: Rearranging the IDE
-
Single-click on the window template Form1 ; the Properties window will be filled with Form1 properties. Note that Text is highlighted in the Properties window.
-
Replace the word Form1 next to Text with Brave New World and click on the window template. Form1 at the top of the window (in the title bar) is replaced with Brave New World.
-
In the Toolbox window, click on the Label control, then move the mouse cursor over the window template and click the mouse again. The label is placed on the window template and the word label1 will appear inside the label (in the window template). In the Properties window the Text entry should be highlighted. Replace label1 with Welcome to this Brave New World! Remain in the Properties window. Set the Location of label1 as (40, 34) . Find Font , click on the + sign to expand the font details, and change the font size from 8.25 to 10 .
-
Return to the Toolbox. Click on the Button item in the Toolbox, and move the cursor to the center of the window template. Click again, and a button will appear there. Move to the Properties window of the button and replace the text button1 with Push Me Now . Since the words Push Me Now won t fit into the button width, drag the right edge of the button on the window template until all the text fits on one line (or move to the Properties window and set the button size to (110, 25) ).
-
Highlight the window template (Form1) and set its size to (300, 200) in the Properties window.
-
Highlight the window template again, then place a second label from the Toolbox below the button on the template. Replace the text label2 in the button Properties window with Good Grief, Charlie Brown! Set the location of label2 as (114, 125) , and set the font size of the label to 10 .
-
The last task you will perform in this new project is to connect the Push Me Now button to the text Good Grief, Charlie Brown! such that the text changes when the button is pressed. To do this, you must create an event handler that is inserted into the source code to control the actions of the button. Highlight the button in the window template. You do not need to toggle to the Events subwindow (the one on the flip side of the Properties window) because the event you are about to install is the default event. To create this default event, simply double-click on the button in the window template (it is already highlighted). This creates an event in the Form1.cs source code named button1_click. As soon as you complete the double-click, you are shown the new code. The link between the code in the source code list and the button on the window template is made automatically by the compiler.
IMPORTANT Double-clicking on any active item in the window template will only create its default event. We will show you later how to create events that are not the default. Don t double-click on anything else in the main window ” every time you do, some unwanted event handler will pop up in the source code.
-
Within the curly brackets of the button1_click procedure, type this line of code:
label2.Text = "Row, row, row your boat.";
| Q: | How do I switch back and forth between the window template and the source code view? | |
| Q: | If I inadvertently drag a control onto the window template that I do not want, how do I get rid of it? | |
| Q: | Suppose I create an event handler, then decide later to delete it. How do I do that? | |
| Q: | I have opened the Events window, and now there is no way to get back to the Properties window (since only one of the two can be displayed at any one time). What should I do? | |
| Q: | If I create so many forms (windows) in a project that they all cannot have their tabs displayed at the top center of the IDE, how do I retrieve forms that have no tabs? | |
Answers
| Q: | The F7 key toggles the view between code view and window template. |
| Q: | Right-click on the unwanted control to produce a floating (context) menu. Click on Delete to delete the control. |
| Q: | Highlight the control (to bring its properties into the Properties window). Click on the Events icon (the bolt of lightning) to produce a list of possible events. The event that you want to delete should be highlighted in blue. Right-click on the event to produce a floating menu with two choices: Reset and Description. Click on Reset to remove the procedure from the code. (This method works only if the procedure is empty. If you have entered code in this procedure, then it won t disappear from the source code list, but its hooks to the project will. So you must manually delete source code if it contains new code added by you. Perform this manual deletion after you have reset the event in the list of event handlers for the control.) |
| Q: | Move the cursor to the left of the Events icon where there is a small icon for the Properties window. Click on that icon to exit events and return to properties. |
| Q: | The number of tabs that can be shown on the IDE is usually no more than three or four. So, the designer of the IDE placed a down arrow at the top right of the center screen (just to the left of the black X, which one clicks to close the center screen). When you click on that down arrow, you are presented with a list of forms in the project, and you can bring any one of them into the center screen by clicking on the appropriate form. |
Building and Executing Brave New World
If you don t like the results of this creation process, move to My Documents\Visual Studio 2005\Projects and delete the project Brave New World. Now you can start all over again.
If you are satisfied with your creation, then it is time to compile and run the project. The IDE screen should look something like this:
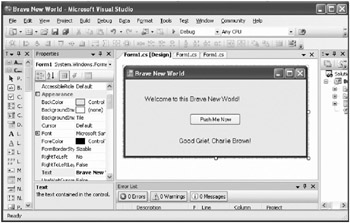
Figure 3-9: Complete Brave New World project
-
We have not saved any of this work so far, so choose File on the main menu and click on the Save All item.
-
Next, click on the Build main menu item. There are a number of submenu items, but the only ones that you will use are Build Solution and Rebuild Solution. Note that Build Solution has a shortcut key combination of Ctrl+Shift+B. You may elect to use this shortcut to do all of your project building. As soon as you elect to build, the source code will be displayed in the center of the IDE. The line number in the code where the cursor is presently located will be displayed at the bottom of the IDE, along with the cursor location within the line (but only the line number is important). If the error list at the bottom of the IDE screen shows an error in Line 33, for example, then you can use the up arrow or down arrow on the keyboard to move the cursor to that line number. The compiler tries to show you what the error is by underlining the offending keystrokes in red.
-
If the project fails to compile, then the errors discovered by the compiler will be listed at the bottom of the IDE screen. When all errors have been corrected (when the build is successful), the successful build will be announced at the lower-left corner of the IDE screen. Then it is time to run the project. To run it, you open the Debug main menu item and then click Start . Note that the shortcut for Start is F5.
When the project compiles and runs, the main window should look like Figure 3-10.
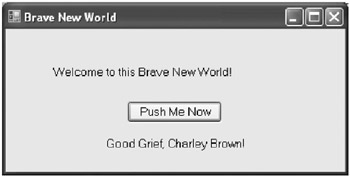
Figure 3-10: Executing Brave New WorldAs soon as the user clicks on the Push Me Now button, the window changes to:
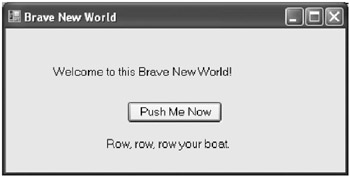
Figure 3-11: Brave New World project after clicking the Push Me Now button -
To exit this project, the user must click on the X at the top right of the window.
The complete listing of an earlier version of Brave New World is shown below. Your source code should look a lot like this:
Brave New World (TN)
Form1.cs: TN001: using System; TN002: using System.Collections.Generic; TN003: using System.ComponentModel; TN004: using System.Data; TN005: using System.Drawing; TN006: using System.Text; TN007: using System.Windows.Forms; TN010: namespace Brave_New_World TN011: { TN012: public partial class Form1: Form TN013: { TN014: public Form1() TN015: { TN016: InitializeComponent(); TN017: } //-----------------------------------------------------------------------------/ TN021: private void button1_Click(object sender, EventArgs e) TN022: { TN023: label2.Text = "Row, row, row your boat."; TN024: } TN025: } TN026: } //=============================================================================/ Form1.Designer.cs: TN040: namespace Brave_New_World TN041: { TN042: partial class Form1 TN043: { // Required designer variable. TN044: private System.ComponentModel.IContainer components = null; // Clean up any resources being used. // <param name="disposing">true if managed resources should be disposed; otherwise, false.</param> TN045: protected override void Dispose(bool disposing) TN046: { TN047: if (disposing && (components != null)) TN048: { TN049: components.Dispose(); TN050: } TN051: base.Dispose(disposing); TN052: } TN053: #region Windows Form Designer generated code // Required method for Designer support - do not modify TN054: private void InitializeComponent() TN055: { TN056: this.label1 = new System.Windows.Forms.Label(); TN057: this.button1 = new System.Windows.Forms.Button(); TN058: this.label2 = new System.Windows.Forms.Label(); TN059: this.SuspendLayout(); // // label1 // TN060: this.label1.AutoSize = true; TN061: this.label1.Font = new System.Drawing.Font("Microsoft Sans Serif", 10F, System.Drawing.FontStyle.Regular, System.Drawing.GraphicsUnit.Point, ((byte)(0))); TN062: this.label1.Location = new System.Drawing.Point(40, 34); TN063: this.label1.Name = "label1"; TN064: this.label1.Size = new System.Drawing.Size(210, 16); TN065: this.label1.TabIndex = 0; TN066: this.label1.Text = "Welcome to this Brave New World!"; // // button1 // TN067: this.button1.Location = new System.Drawing.Point(140, 74); TN068: this.button1.Name = "button1"; TN069: this.button1.Size = new System.Drawing.Size(110, 25); TN070: this.button1.TabIndex = 1; TN071: this.button1.Text = "Push Me Now"; TN072: this.button1.Click += new System.EventHandler(this.button1_Click); // // label2 // TN073: this.label2.AutoSize = true; TN074: this.label2.Font = new System.Drawing.Font("Microsoft Sans Serif", 10F, System.Drawing.FontStyle.Regular, System.Drawing.GraphicsUnit.Point, ((byte)(0))); TN075: this.label2.Location = new System.Drawing.Point(114, 125); TN076: this.label2.Name = "label2"; TN077: this.label2.Size = new System.Drawing.Size(164, 16); TN078: this.label2.TabIndex = 2; TN079: this.label2.Text = "Good Grief, Charlie Brown!"; // // Form1 // TN080: this.AutoScaleDimensions = new System.Drawing.SizeF(6F, 13F); TN081: this.AutoScaleMode = System.Windows.Forms.AutoScaleMode.Font; TN082: this.ClientSize = new System.Drawing.Size(392, 166); TN083: this.Controls.Add(this.label2); TN084: this.Controls.Add(this.button1); TN085: this.Controls.Add(this.label1); TN086: this.Name = "Form1"; TN087: this.Text = "Form1"; TN088: this.ResumeLayout(false); TN089: this.PerformLayout(); TN090: } TN091: #endregion TN092: private System.Windows.Forms.Label label1; TN093: private System.Windows.Forms.Button button1; TN094: private System.Windows.Forms.Label label2; TN095: } TN096: } Placing Windows in the Center of the Screen
The Brave New World project output is probably located at the top left of your PC screen. One of the features that was added to Visual Studio C# programming by the version 1.0, 1.1, and 2.0 releases is the ability to center every output window automatically. To do this, follow these steps:
-
Click on the Brave New World Form1 in the IDE screen (which puts the window s properties in the Properties window), and scroll down to the Layout group of properties.
-
Highlight Start Position . As soon as you do this, a tiny down arrow appears at the right edge of the right column. Click on that down arrow to produce five different start positions for the window: Manual, Center Screen, Windows Default Location, Windows Default Bonds, and Center Parent. The default is Windows Default Location, which is the location that Brave New World presently has.
-
Click on Center Screen , then recompile and rerun the project. The main window will now open in the center of the PC screen.
Creating Child Windows
There is one other important IDE function that we have not demonstrated so far: creating additional windows in the project (called child windows). If you decide to add other windows to this project, you would do so by clicking on the Project main menu item. As soon as you click on the Add Windows Form submenu item, the IDE creates another window (and names it Form2 ). Form1 is always the main window, and all child windows follow. Later we will demonstrate a multi-window project that uses the Project main menu item to create multiple windows.
This ends the demonstration of how to create a new project in the version 2.0 Visual C# compiler. Next, we show how to bring an already-existing project into the IDE.
EAN: 2147483647
Pages: 129
If you may any questions please contact us: flylib@qtcs.net