| You can set your Mac OS X preferences to set up a local copy of your iDisk. This local iDisk lets you browse the contents of your iDisk very quickly, and it's there even if your network is not (such as when you're traveling with your PowerBook). A local copy of your iDisk takes up space on your hard drive (roughly the same amount as the size of your iDisk), but in these days of 40-plus-gigabyte hard drives on the low end of standard equipment, you won't even miss the paltry megabytes that a full iDisk copy would take. If you keep a local copy of your iDisk on your hard drive, you can synchronize it with your "real" iDisk via your Internet connection. To do this, you'll choose from two options: automatic and manual. To set up your local iDisk in Mac OS X 10.4 1. | From the Apple menu, choose System Preferences.
Your System Preferences window opens.
| 2. | In the Internet & Network section, click the .Mac icon.
The .Mac preferences pane opens.
| 3. | Click the iDisk tab.
The iDisk preferences pane opens.
| 4. | In the iDisk Syncing section, click Start (Figure 3.60).
Figure 3.60. Click Start to turn on iDisk synchronization. This creates a local copy of your iDisk, which you can work with even when you're not connected to the Internet. 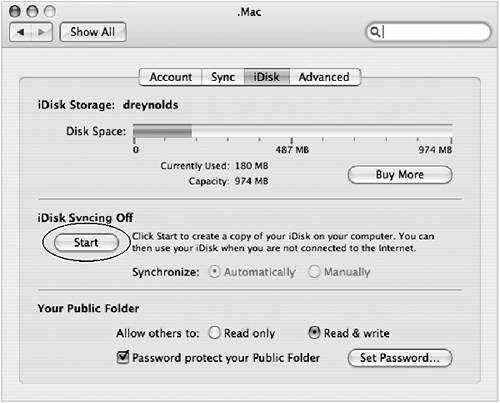
A local copy of your iDisk is created on your desktop, and Mac OS X attempts to synchronize the local copy with your online copy by copying files from the remote iDisk to the local iDisk (Figure 3.61).
Figure 3.61. The local copy of your iDisk sits on your Desktop, just like other volumes. 
| 5. | Do one of the following (Figure 3.62):
- To set Mac OS X to periodically synchronize your iDisk copy uploading files you've added, deleting ones you've trashed, or moving ones that you've moved click the Synchronize: Automatically radio button.
- To set Mac OS X so that it will synchronize your iDisk copy uploading files you've added, deleting ones you've trashed, or moving ones that you've moved only when you tell it to do so, click the Synchronize: Manually radio button.
Figure 3.62. When setting up a local copy of your iDisk, you'll need to choose whether or not your iDisk is synchronized automatically. 
| 6. | Click the red close window box to close the System Preferences application.
Your synchronization process is complete, and your local iDisk copy is ready for use. When the disk is synchronized, the copied items will be uploaded to your Web-based iDisk. Same goes for deleting or moving items changes are made on your Web-based iDisk when synchronization takes place.
|
 Tips Tips
To manually synchronize your iDisk, click the circular arrow button to the right of the iDisk icon in any Finder window. You can change whether your local iDisk is synchronized automatically or manually at any time by opening the iDisk preferences and clicking the appropriate radio button. Setting up a local iDisk in Mac OS X 10.3 is almost the same as setting it up in Mac OS X 10.4, except that instead of starting iDisk Syncing, you simply check a box for "Create a local copy of your iDisk."
|