| Now that you've created all these great Web pages, it's time to organize them with a site menuand for that, we'll need the Site Menu template. A site menu provides visitors with a high-level overview of the pages in a site that you've created using your .Mac account. The site menu should be one of the last things you do when creating a siteit ties all those pages into a coherent whole. To Create a Site Menu 1. | Log in to your .Mac account using a Web browser, and click the HomePage link. The main HomePage page loads.
| 2. | In the second column from the left, at the top of the page, select the site for which you want to create a site menu, and then click the Site Menu tab (Figure 4.49).
The Site Menu templates load.
| 3. | Click a Site Menu template.
The "Edit your page" page loads for that selected template. This page shows all of the site's individual Web pages.
| 4. | Fill in all of the text fields, writing a title and description for the page, and a title and description for each item (Figure 4.50).
Figure 4.50. To create a site menu, fill in a title for the page, and a title and description for each item on the page. 
| | | 5. | To choose a picture to represent each page accessible from the site menu, click the Choose button within each image and select a picture in the "Choose a file" page (Figure 4.51).
Figure 4.51. Click the picture you want to use as the representative graphic for the site menu item, and then click Choose to set the image. 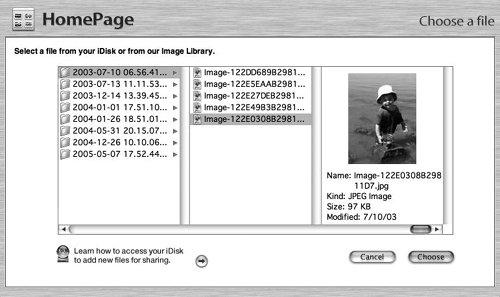
You can use appropriate photos from your own Pictures folder or make a selection from the HomePage Image Library a collection of artwork you can plunder for your own purposes. This selection of high-class clip art is organized by category, so it's easy to find something you might like. To do so, simply navigate to the Image Library rather than the Pictures folder (Figure 4.52).
Figure 4.52. If you don't have a photo of your own to match a Site Menu entry, you can probably find one that works in the HomePage Image Library. 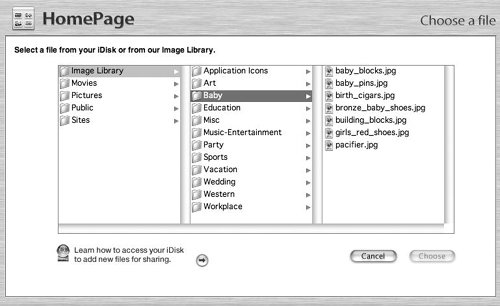
| 6. | To remove a page from the site menu you are creating, click the minus () button next to each page you want removed from the site menu (Figure 4.53).
Figure 4.53. To remove an item from a site-menu page, click the minus () button in its upper right corner. 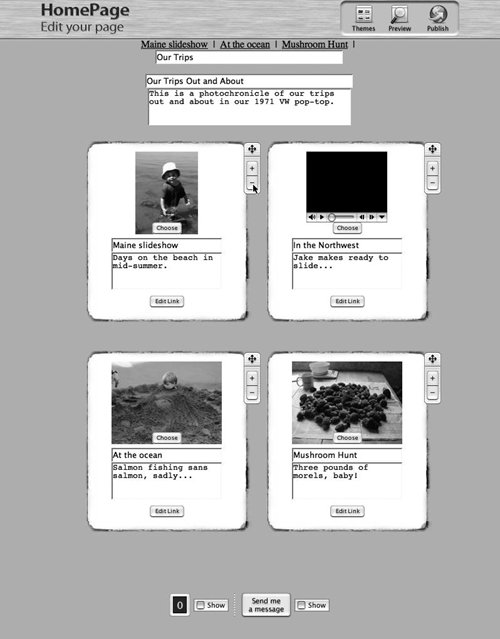
The page reloads sans the items you clicked.
| | | 7. | To add a new page (or external link) to the site menu you are creating, click the plus (+) button next to the item that comes before the place where you want to add a new item (Figure 4.54).
Figure 4.54. To add a new item linking to another page (or to an e-mail address), click the plus (+) button in the upper right corner of the item you want to have appear before the new item. 
The page reloads with a new item. See the sidebar "Adding Links to Your Site Menu" for details on how to do this.
| 8. | To reposition any item on the site-menu page, drag the crossed-arrows icon on its right side to move it (Figure 4.55).
Figure 4.55. Repositioning items on a site-menu page is as easy as dragging the upper right corner of the item until the item is where you want it to beplace it between two items to have the moved item appear between them. 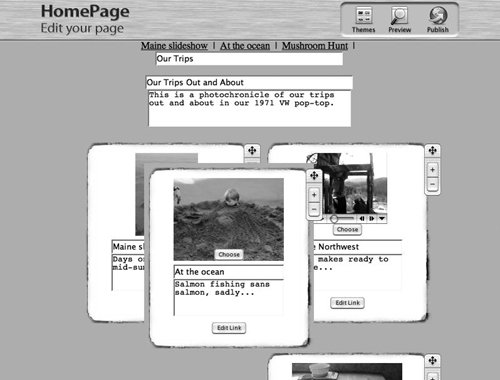
| 9. | To preview your site menu before publishing it, click the Preview button.
| 10. | If you're satisfied, click the Publish button.
Your site-menu page is published, and the Congratulations page loads with the URL to your new page.
| 11. | If you want the site menu to be the first page visitors see when they visit the site, drag its page icon to the topmost spot in the site's page list on the HomePage page. Its name will appear in boldface, indicating that it's the default page for the site.
|
Adding Links to Your Site Menu Remember that plus (+) button next to each item on the Site Menu template (see Figure 4.55)? That button lets you link to the following items from your site menu: To create a section that links to any of these items from your site menu, click the plus button next to the Web page to which you want to add the link. Don't worry, you won't remove the existing pagethe section for adding the link appears after it. Customize this one as you would any other section within a site-menu page by typing a title and description and choosing a graphic element (Figure 4.56). Figure 4.56. A new item on a site-menu page is mostly blankit's up to you to select a graphic and type in a page title and description. 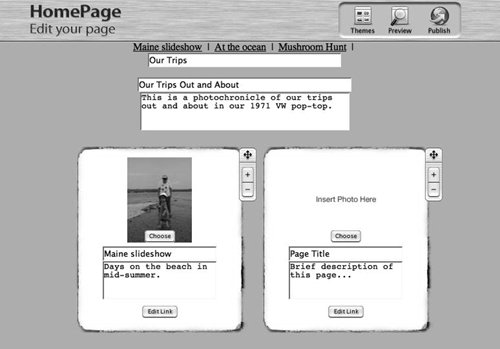
To create the new link, click the Edit Link button. The "Edit your links" page opens. Select from the My Pages, Other Pages, and Email tabs (Figure 4.57). Here's what each one does: My Pages. This pane lets you link only to pages that you've created through your .Mac account. In the My Pages pane, select a page to link to it from the site menu, and click Apply. Other Pages. This pane lets you link to pages other than the ones you've created yourself through your .Mac account. In the Other Pages pane, type into the field the URL of the page you want to link to from the site menu, and click Apply. Email. This pane lets you link an item on your Web page to an e-mail address. In the Email pane, type into the field the e-mail address that you'd like to link to, and click Apply.
Figure 4.57. By clicking the Edit Link button on an item in a site menu, you can link to another .Mac element, a Web page outside of .Mac, or an e-mail address. 
|
|