| Apple has integrated .Mac e-mail into its own e-mail client, Mail. Since Apple owns both Mail and .Mac, you can expect them to work very well together. (Don't be fooled, though.Mac plays well with other e-mail clients, too.) There are three scenarios for setting up Mail to use your .Mac e-mail account: You haven't opened Mail but have entered your .Mac subscription information in System Preferences. You haven't opened Mail and haven't entered your .Mac subscription information in System Preferences. You have already opened Mail (whether or not you've entered your .Mac subscription information in System Preferences).
 Tip Tip
Pop vs. Imap Most e-mail accounts come in two flavors: the old-school, client-based POP (or POP3), and the newer, server-based IMAP. What's the difference? POP (short for Post Office Protocol) accounts download all of your mail to your computer when you connect, whereas IMAP (short for Internet Message Access Protocol) accounts keep the mail on the server and let you read it from your computermaking it easy to read your e-mail from anywhere but requiring you to stay connected to the Internet whenever you work with your e-maileven for reading or moving messages. Your .Mac e-mail account can act as either a POP or IMAP account, depending on which you prefer. So, which should you choose? One drawback of an IMAP account is that your stored mail counts toward your .Mac storage protocol. Another is that you must be connected to the Internet to organize or sort your maileven mail you've already read. You should use IMAP if: You should use a POP account if: You use only one computer to access your e-mail. You like the idea of keeping your mail on your computer and not on a server. You work with your mail when you're not connected to the Internet.
|
If You Haven't Opened Mail but Have Entered your .Mac Subscription Information This is typically the case if you've just installed a fresh copy of Mac OS X and entered your .Mac information in the setup assistant but you haven't yet fired up Mail. Typically, folks who already have a .Mac account fall into this category. If you're using Mac OS X v10.4 Tiger and you've entered your .Mac information in System Preferences, Mac OS X automatically creates an account for you in Mail. All you have to do is open the Mail application. To Set Up Mail with Your .Mac E-mail Address (Mac OS X 10.3 or Earlier) 1. | In the Applications folder, double-click the Mail icon to open Mail.
The Mail application opens, and you're asked if you want to import mailboxes from another client (Figure 2.1).
Figure 2.1. When you first launch Mail, it asks if you want to import mailboxes from another e-mail client, which is great if you've been using a different client and want to take the leap to Mail. Click Yes to import mailboxes; click No to skip this step and move on. 
| 2. | Click No.
Mail then notes that this version is greatly enhanced and asks if you'd like to take a tour (Figure 2.2).
Figure 2.2. Next, Mail asks if you'd like to see what's new in this version. Click Yes to take a tour; click No to skip this step and move on. 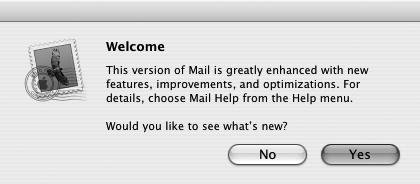
| 3. | Click No.
Mac OS X automatically configures Mail to work with your .Mac e-mail address. You are ready to use Mail to send and receive mail with your .Mac account.
|
If You Haven't Opened Mail and Haven't Entered Your .Mac Subscription Information This usually happens if you set up your Mac before you had a .Mac subscription (and thus didn't enter anything in the setup assistant) and you haven't been using Mail as your e-mail client. We'll show you how to do this using Mac OS X v10.3 Jaguar as well as with Mac OS X v10.4. To Set Up Mail to Work with Your .Mac E-mail Address (Mac OS X v10.4) 1. | In the Applications folder, double-click the Mail icon to open Mail.
The Mail setup assistant opens (Figure 2.3).
Figure 2.3. This is the first pane in the Mac OS X 10.4 Mail setup assistant. Click Continue to move to the next step. 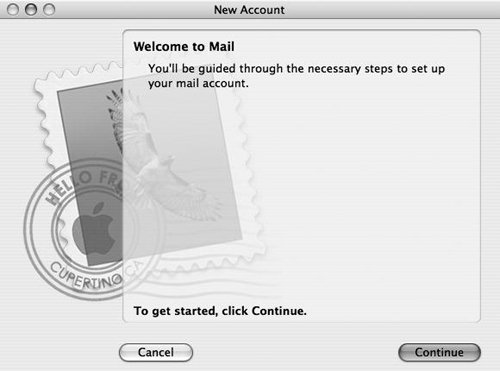
| 2. | Click Continue.
The General Information pane opens (Figure 2.4).
Figure 2.4. The General Information pane asks you to choose your account type, provide an account description and your full name, and provide your e-mail user name and password. Click Continue to move to the next step after you've filled in all the fields. 
| 3. | From the Account Type pop-up menu, choose .Mac.
| 4. | In the Account Description field, give the account a description.
| 5. | In the Full Name field, type your name.
| | | 6. | In the User Name field, type your .Mac member name.
| 7. | In the Password field, type your .Mac password.
| 8. | Click Continue.
Mail checks your connection information to make sure you can connect (Figure 2.5). After this check is complete, a summary pane opens (Figure 2.6).
Figure 2.5. After you've clicked Continue, Mail checks the information you've entered to ensure that all of the connections are good. 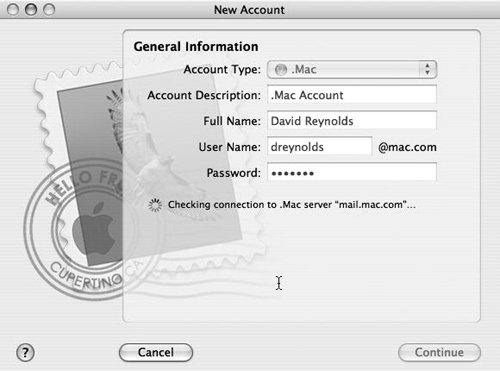
Figure 2.6. Mail presents you with a summary of your new Mail account settings. 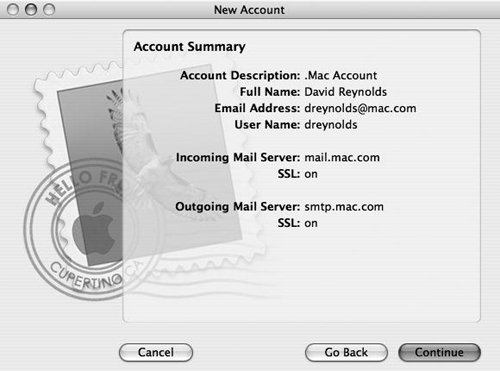
| 9. | Click Continue.
The Conclusion pane opens, offering you the choice of importing mailboxes or creating another account (Figure 2.7).
Figure 2.7. Finally, when your account is created, you can choose to import mail, create another account, or click the Done button and go on about your business. 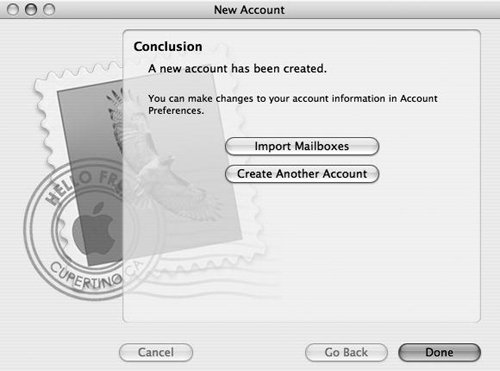
| 10. | Click Done to finish.
You're ready to use Mac OS X v10.4 Mail to send and receive e-mail with your .Mac e-mail address.
|
To Set Up Mail to Work with Your .Mac E-mail Address (Mac OS X v10.3 or Earlier) 1. | In the Applications folder, double-click the Mail icon to open Mail.
The Mail application opens, and you're asked to set up an account (Figure 2.8).
Figure 2.8. Creating a new Mail account in Mac OS X v10.3 is fairly simple, and Mail gives you a blank slate from which to start. 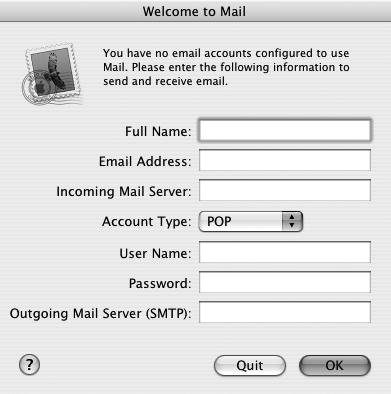
| 2. | In the Full Name field, type your name.
| 3. | In the Email Address field, type your .Mac e-mail address, which is your .Mac member name plus @mac.com.
| 4. | In the Incoming Mail Server field, type mail.mac.com.
| 5. | From the Account Type pop-up menu, choose POP or IMAP (see the sidebar "POP vs. IMAP").
| 6. | In the User Name field, type your .Mac login.
| 7. | In the Password field, type your .Mac password.
| 8. | In the Outgoing Mail Server (SMTP) field, type smtp.mac.com.
| 9. | Click OK (Figure 2.9). You're asked if you want to import mail from another client (Figure 2.10).
Figure 2.9. After you've filled in the pertinent information, you can click OK to create your account. 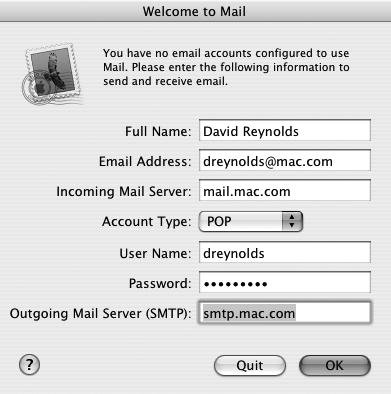
Figure 2.10. Again, Mail asks if you care to bring e-mail messages over from another e-mail program. You'd click Yes to import mail messages, but for now click No to skip this step. 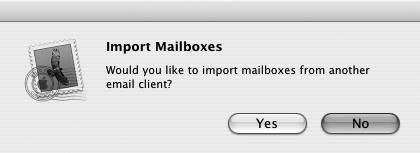
| | | 10. | Click No.
You're asked if you want to find out about the new features in Mail (Figure 2.11).
Figure 2.11. Again, Mail asks if you'd like to see what's new in this version. Click Yes to take a tour; click No to skip this step and move on. 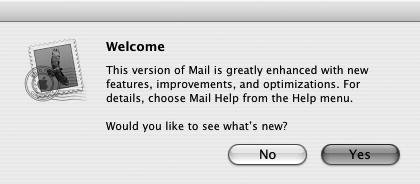
| 11. | You can click Yes another time for a pleasant tour, but for now click No. You're ready to use Mail to send and receive e-mail with your .Mac e-mail address.
|
Setting Up E-mail Software Other Than Apple Mail Setting up another e-mail client to work with your .Mac e-mail account is similar to setting up Mailmostly, you need to enter a few bits of information in a window much like the one used for Mail. This information consists of your e-mail address, incoming-mail-server address, outgoing-mail-server address, user name and password, and any authentication that your servers need. You can use your .Mac account with any POP or IMAP e-mail client, whether on Windows, the Mac OS, or Linux (or pretty much any other operating system that has a POP or IMAP client available). The same method should apply to any e-mail client. To set up another e-mail client to use your .Mac e-mail account: 1. | Open the e-mail client.
| 2. | Create a new account in your e-mail client. Typically, you'll look under a menu named Preferences, Tools, or Accounts (you may need to consult the e-mail client's help system).
| 3. | Choose IMAP or POP for the account type.
| 4. | In the field for the incoming e-mail server, enter mail.mac.com.
| 5. | In the account ID field, enter your .Mac member ID.
| 6. | In the password field, enter your .Mac password.
| 7. | In the outgoing-mail-server field, enter smtp.mac.com.
| 8. | In the SMTP-authentication fields, enter your .Mac member name and password.
| 9. | Check to ensure that SMTP authentication is turned on for this account.
|
The account should be ready to send and receive e-mail using your .Mac e-mail account. |
If You've Already Opened Mail If you've opened Mail but haven't entered your .Mac information, you need to manually configure your account. This simply means that you need to provide more information when setting up your account. To Set Up Mail to Work with Your .Mac E-mail Address (Mac OS X 10.4) 1. | In the Applications folder, double-click the Mail icon to open Mail.
The Mail application opens.
| 2. | From the Mail menu, choose Preferences (Figure 2.12).
Figure 2.12. To access Mail's preferences, choose Preferences from the Mail menu or press Command-, (comma). 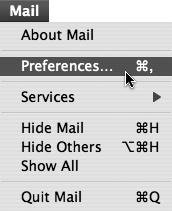
Mail's Preferences window opens with the Account Information tab selected and the Accounts pane opens. (Figure 2.13).
Figure 2.13. Using Mail's Accounts preferences, you can create and manage e-mail accounts in Mail. Here, no e-mail accounts exist yet. 
| 3. | In the lower left corner of the window, click the plus (+) button.
Mail's setup assistant opens to the General Information pane, as shown in Figure 2.4.
| 4. | From the Account Type pop-up menu, choose .Mac.
| 5. | In the Account Description field, give the account a description.
| 6. | In the Full Name field, type your name.
| 7. | In the User Name field, type your .Mac member name.
| | | 8. | In the Password field, type your .Mac password.
| 9. | Click Continue.
Mail checks your connection information to make sure you can connect. After this check is complete, the Account Summary sheet slides down over the window (Figure 2.14).
Figure 2.14. Once you've entered your .Mac account information, the Account Summary sheet shows you how the account has been set up. 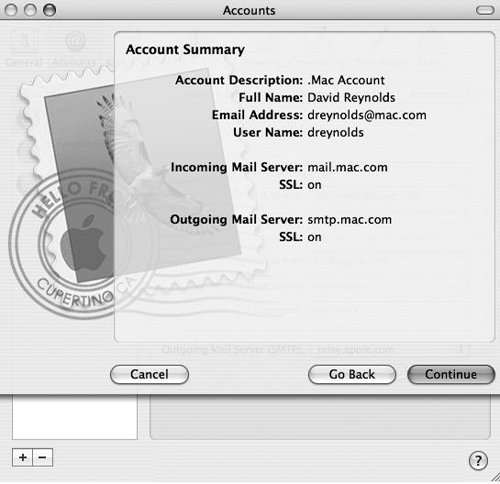
| 10. | Click Continue.
The Conclusion sheet opens, offering you the chance to create another account (Figure 2.15).
Figure 2.15. After your account has been created, Mail gives you the option of creating another account or simply clicking Done on the lower-right portion of the page and moving on with your life. 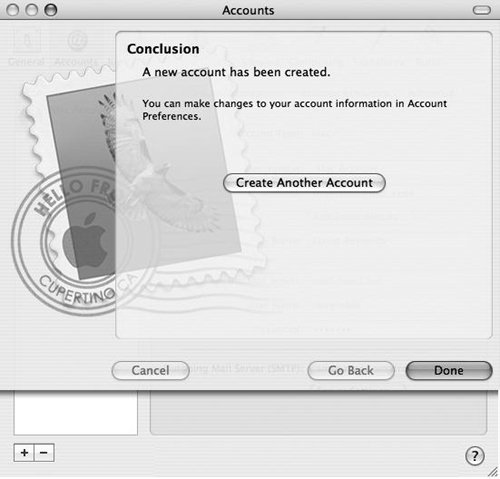
| 11. | Click Done.
You're ready to use Mac OS X v10.4 Mail to send and receive e-mail with your .Mac e-mail address.
|
To Set Up Mail to Work with Your .Mac E-mail Address (Mac OS X v10.3) 1. | In the Applications folder, double-click the Mail icon to open Mail.
The Mail application opens.
| 2. | From the Mail menu, choose Preferences, as shown in Figure 2.12.
Mail's Preferences window opens.
| 3. | If it's not already selected, click the Accounts button.
The Accounts pane opens (Figure 2.16).
Figure 2.16. Mail's Accounts preferences let you create and manage e-mail accounts in Mail. Here, no e-mail accounts exist yet. 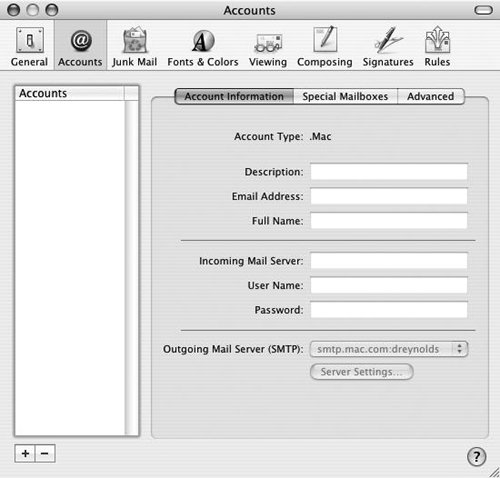
| 4. | In the lower left corner of the window, click the plus (+) button.
Anew Mail account is created, and the Account Information tab is automatically selected (Figure 2.17).
Figure 2.17. After you click the plus (+) button, the name of a new account appears in the column on the left, and the fields on the right are ready to fill in. 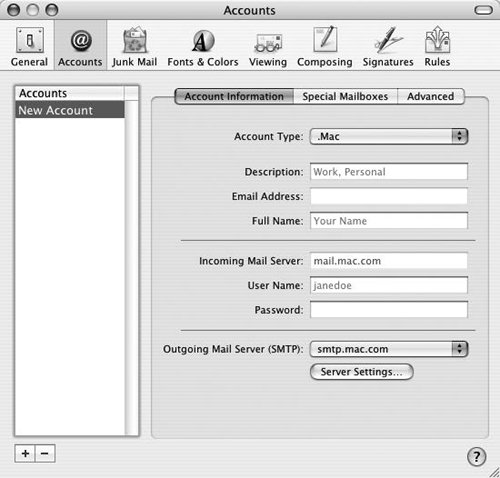
| | | 5. | From the Account Type pop-up menu, choose .Mac (Figure 2.18).
Figure 2.18. Mail supports these four types of e-mail accounts: .Mac, POP, IMAP, and Exchange. For our purposes, select .Mac (and note that .Mac e-mail will also work with POP and IMAP). 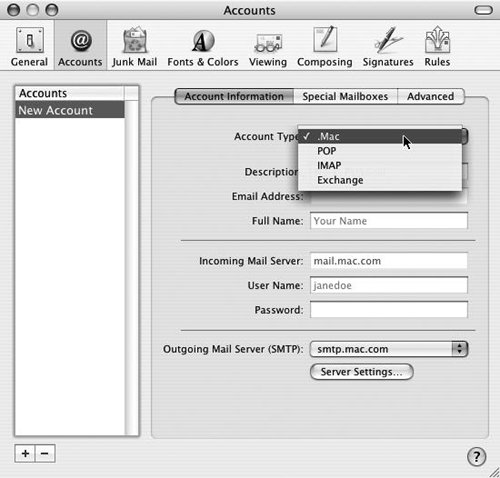
| 6. | In the Description field, type a short description of your account (such as your name or your business name typically a few words).
| 7. | In the Full Name field, type your name.
| 8. | In the User Name field, type your .Mac member name.
| 9. | In the Password field, type your .Mac password.
Mail fills in the Email Address, Incoming Mail Server, and Outgoing Mail Server fields for you.
| 10. | Click the red close button in the upper left corner to close the window (Figure 2.19).
Figure 2.19. Once you've finished entering the account information, close this window; Mail will now be able to send and receive e-mail using your .Mac account. This is how the window looks when everything is filled in. Note that what used to read New Account on the left has now changed to the account name you typed in the Description field. 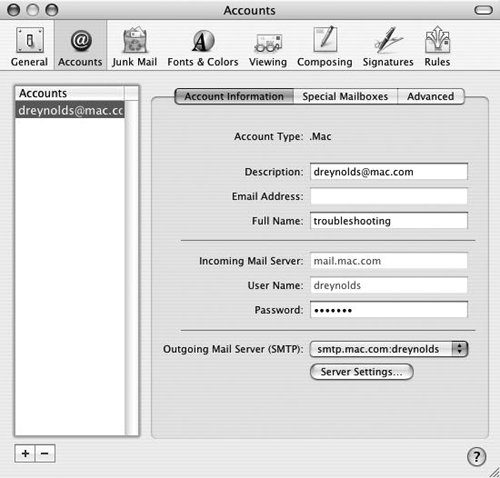
You're ready to use Mail to send and receive e-mail with your .Mac e-mail address. The account is added to any other e-mail accounts you've already set up in Mail.
|
|