You're ready to start adding interactivity to your Flash movie. You'll start by adding a couple of Stop actions. This may sound like un-interactivity, but it's a good first step.
You should still have zoo20.fla open before you begin.
-
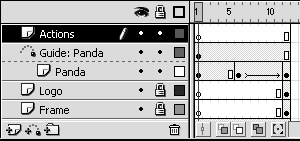
Add a new layer, named Actions, to the main timeline. Place the Actions layer at the top of the layer stacking order.
Throughout the rest of this book, you will notice references to the main movie's timeline, or the main timeline. The main timeline is not part of any symbolit's the one you see when you first open a movie. You can reach this timeline from inside any symbol by choosing Edit > Edit Document. If the Edit Document command is not available, you are already in the main timeline.
It's usually a good idea to add your ActionScript to a separate layer in each timeline. That way, if you run into problems with your ActionScript, you'll know just where to fix it.
-
Select frame 12 of the Actions layer and add a keyframe. With the new keyframe selected, double-click the stop action in the Actions toolbox.
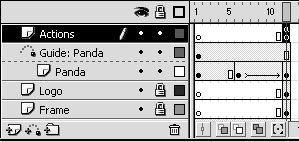
A small a should appear in frame 12 of the Actions layer. This a indicates that an ActionScript is applied to this frame. If you don't see the a in frame 12, check frame 1. If the a appears in frame 1, you added the action to the wrong frame. Make sure you added a keyframe to frame 12, and select that keyframe, before you try to add the stop action.
When you add actions to the timeline, you can add them only to keyframes. Keyframes not only mark changes in the contents of the movie, as you learned in Lesson 4, but they also mark changes in the interactivity (ActionScript). Whenever you add something to your movie at a certain point in time, as measured by the timeline, you need to add a keyframe.
To add the stop action, make sure you select frame 12 of the Actions layer. Look at the Property inspectorit should indicate that you have a frame selected. Then make sure the Actions panel is openit should still be open from the last exercise. You should also make sure the Actions panel's title is Actions Frame, which indicates you are about to add ActionScript to a frame. Finally, double-click the stop action in the Actions toolbox. It's inside the Movie Control category, in the Actions category. When you double-click the action, it should appear in the script pane.

Take a look at the script pane after you add the action. There should be a single line, displaying the text stop(); . The stop portion of the script should be pretty easy to understandthat's the action. But what about the (); ? That's ActionScript's punctuation. The parentheses ("(" and ")") enclose any parameters that the preceding action might have, and the semicolon (";") marks the end of a line of ActionScript. Parameters are extra information the action might need in order to perform properlythe stop action doesn't have any parameters, it just stops the movie, but many of the other actions do.
TIP
You can also add the action by clicking the Add a New Item to the Script button, and then choosing Actions > Movie Control > stop. Notice when you choose this option, there's also a keyboard shortcut listed in Windows. You can click the script pane and then press that keyboard shortcut to add the ActionScript as well.
By adding a stop action to the keyframe in frame 12, you're telling Flash to stop when it gets to that point. So the Flash movie will play for about 2 seconds, and then stop.
TIP
You may find as you add more ActionScript that you can't view much of it if you leave the Actions panel in its default size and position. You can, and should, resize the Actions panel so the script pane is larger than the default. Make it as large as possible, covering the stage if necessary. You can always collapse it by clicking the title bar. You can unhide it by clicking the title bar again.
Take a quick look at some of the other actions listed in the Movie Control categorymove the pointer over each one to get a brief description. The goto action tells the timeline to go to a specific frame, and either stop or play from there. The on action is for use with buttons , as you'll learn in the next exercise. You can use the play action to make a stopped timeline play.
-
Choose Control > Test Movie.
When you test the movie, you should see that as expected, the movie stops when it gets to frame 12. This keeps you from having to choose Control > Loop in the Test Movie window.
So you have the main timeline stopping at frame 12. But what about that Bitmap Animation movie clip? It's still looping away, ignoring the fact that the main timeline has stopped. That's because the Bitmap Animation is a movie clip, and movie clip timelines are independent of other timelines .
As you learned in Lesson 3, movie clips are basically mini-movies. They can contain interactions, sounds, and other movie clips, as well as vector graphics, bitmaps, and graphic symbols. The timeline of a movie clip is completely independent of any other timeline, so you can place a movie clip containing 20 frames inside a movie clip containing only one frame, and the entire 20-frame movie clip will still play, unless there's an ActionScript telling it to do otherwise .
A graphic symbol's timeline is tied to the timeline it's inside of, unlike movie clips. So if you place a 20-frame graphic symbol inside a 1-frame movie clip, only the first frame of the graphic symbol will play. If you had used Graphic behavior for the Bitmap Animation, instead of Movie Clip behavior, only the first frame of the symbol would appear.
Close the Test Movie window when you're finished, so you can get back and make some changes in zoo20.fla.
-
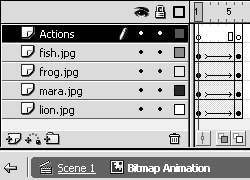
Open the Bitmap Animation symbol in symbol-editing mode. Change the topmost layer's name to Actions.
You can open the Bitmap Animation symbol in symbol-editing mode by double-clicking the icon to the left of its name in the Library. Or you can click the Edit Symbols button under the timeline and choose the Bitmap Animation symbol from the menu that appears. If you have the Actions panel expanded, you may have to collapse it to see the contents of the symbol. For now, just click the panel's title bar to collapse it.
Once again you're going to add your ActionScript to a single layer in this movie clip, called Actions. Remember, it's a good practice to place all your actions in a single layer in each timeline, and the timeline for the Bitmap Animation movie clip is no exception. It's a good idea to place the Actions layer at the top, or bottom, of the layer stacking order to make it easy to find. In this case, you need to change the name of the empty layer, which is called Layer 1 or something similar in your Bitmap Animation symbol, to Actions. Double-click the existing name and type a new name in its place.
-
Select frame 6 of the Actions layer and double-click the stop action in the Actions toolbox of the Actions panel.
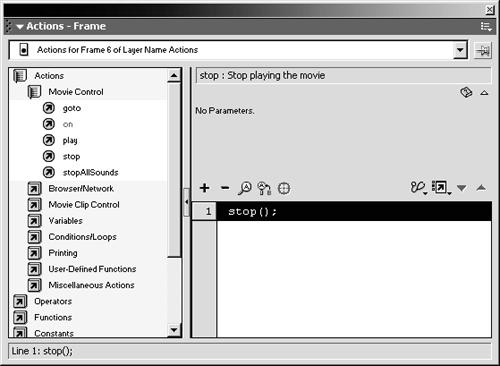
You should already have a keyframe in frame 6 of the Actions layer. If not, be sure to add one before you add the stop action. If you don't add the keyframe, the action will be added to frame 1 and the movie will stop in frame 1, which means you won't see any of the animation.
As before, you can locate the stop action in the Movie Control category of the Actions category.
Adding a stop action to the last frame of the main timeline stopped that timeline, but it didn't stop the Bitmap Animation movie clip from looping continuously. Adding a stop action to the last frame of the Bitmap Animation movie clip should prevent looping. Remember that movie clip timeline's run independently from the timelines they're inside of, so stopping one timeline will not stop the other.
-
Choose Control > Test Movie. Save the file as zoo21.fla.
When you test the movie this time, the main movie should stop at frame 12, and then the instance of the Bitmap Animation symbol should stop when it reaches frame 6.
Close the Test Movie window when you're done, and save the movie as zoo21.fla. Now that you've made the movie stop, you're going to add more ActionScript to make it go again.