Adding Clip Art


Instead of drawing your own pictures in your worksheet, you can use ready-made clip art and photographs to spruce up your data. Plenty of pictures come with Excel, so all you have to do is insert a picture wherever you want it to appear in a worksheet. Excel's clip art collection contains a myriad of professionally prepared pictures that can enhance a wide range of topics.

Microsoft organizes clip art by descriptive keywords including almost any popular artfrom academic to zoo. In addition to art, you can insert sound effects, music, videos , and other media clips into your worksheets to add auditory and visual interest.

You can get clip art from the following places:

  • Microsoft's clip organizer

  • Clip art on the Web

  • Clip art software packages

Getting Clip Art from the Clip Art Task Pane

graphics/new_icon.gif

The Microsoft Clip Organizer lets you store collections of your favorite clip art, photos, and sounds. Excel automatically adds any clips you select from the Web to the Clip Organizer.

To organize your clips, click Organize Clips at the bottom of the Clip Art task pane, and the Microsoft Clip Organizer appears. Click a folder in the Collection List in the left pane, and click Search or Clips Online to find and select the clips you want to store in the folder. For example, click the + next to Downloaded Clips, click the Academic folder, and then click Search or Clips Online to find and download your favorite academic clips.

After you download clips into the Microsoft Clip Organizer, you can copy and paste any clip you want. Simply point to a clip, click the down arrow on the right side of the clip, and choose Copy. Right-click in a cell on the worksheet where you want the clip to appear and choose Paste.

In addition to copying and pasting clips from the Microsoft Clip Organizer, you use clips that come with Excel. You can insert clip art pictures in your worksheet with the Insert, Picture, Clip Art command. For example, you could insert a graphic in a sales report to spice it up. In the next exercise, you insert clip art in Sheet3.

To Do: Insert Clip Art
  1. Select cell B8. This cell is where you want to insert the clip art.

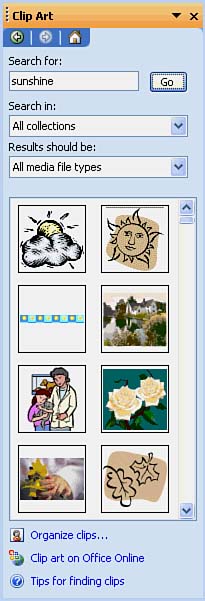
  2. Click the Insert menu and choose Picture, Clip Art. The Clip Art task pane opens.

  3. In the Search For text box, type sunshine , as shown in Figure 11.6.

    Figure 11.6. The Clip Art task pane.

    graphics/11fig06.jpg

    graphics/lightbulb_icon.gif

    You can also insert clip art from the Drawing toolbar. Just click the Insert Clip Art button on the Drawing toolbar to display the Clip Art task pane.


  4. Scroll down through the thumbnails of sunshine clips until you see the thumbnail that shows the sun and a pair of sunglasses. If you don't see this clip, select any clip that shows the sun. When you point to the thumbnail, Excel displays a ScreenTip that contains the clip's categories, dimensions (width and height), size (KB), and file type. For example, one of the sunshine clips belongs to the categories Household, Seasons, Summer; its dimensions are 239 (width) by 259 (height) pixels; its size is 11KB; and it has the file type WMF.

    graphics/lightbulb_icon.gif

    To widen the palette of thumbnails, click the button with a pane and left arrow at the top of the task pane beneath Results. To narrow the palette of thumbnails, click the button with a pane and right arrow at the top of the task pane beneath Results.


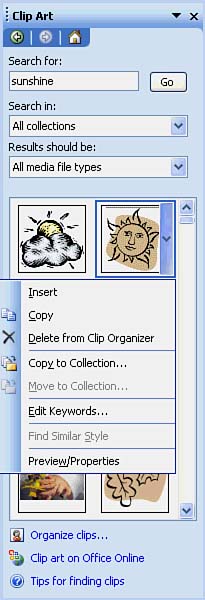
  5. Point to the sunshine clip and click the down arrow on the right side of the clip. A menu appears, which contains commands for working with the clip, as shown in Figure 11.7.

    Figure 11.7. The Clip Art shortcut menu.

    graphics/11fig07.jpg

  6. Choose Insert on the shortcut menu. Excel inserts the clip into your worksheet.

    graphics/lightbulb_icon.gif

    If the clip file was not installed or had been deleted, you need to install the clip art from the Microsoft Office or Microsoft Excel CD-ROM software. After you insert the CD, click OK to install the clip art.


  7. Click the Close button in the upper-right corner of the Clip Art task pane to close the pane. You should see the cartoon on your worksheet along with the Picture toolbar, which you don't need now. Selection handles (white squares) surround the picture.

  8. Click the Close button on the Picture toolbar to close the toolbar.

  9. Click outside the picture to deselect it. Notice that the picture overlaps the rectangle, but there's no need to worry. We will fix that later by moving objects on the worksheet.

    graphics/lightbulb_icon.gif

    To remove a piece of clip art, click it to select it and press the Delete key. Excel removes the clip art from the worksheet.


Visiting the Web

The Web offers thousands of pieces of clip art and photographs that you can insert in your worksheets. You just need to tell Excel and your Web browser where to find the clip art and photographs you want, and Excel will get them for you.

To insert clip art from the Web, first make sure you're connected and online if necessary. Then choose Insert, Picture, Clip Art. The Clip Art task pane opens. At the bottom of the task pane, click Clip Art on Office Online. This link lets you access the Clip Art and Media Web site for more pictures.

Other Sources for Clip Art

There are other sources for clip art besides Excel and the Web. Images galore! They're out there, ready for you to use. You can buy packages of clip art (in black and white or color ) from software stores and mail-order catalogs. These clip art "libraries" are packaged by topics such as animals, business, holidays, music, and people. Clip art is also sold on CDs. If you want more professional artwork, look for photo collections, which are usually sold on CDs.


Sams Teach Yourself Microsoft Office Excel 2003 in 24 Hours
Sams Teach Yourself Microsoft Office Excel 2003 in 24 Hours (Sams Teach Yourself in 24 Hours)
ISBN: 1435276337
EAN: 2147483647
Year: 2003
Pages: 279
Authors: Trudi Reisner

flylib.com © 2008-2017.
If you may any questions please contact us: flylib@qtcs.net