Using the Drawing Toolbar
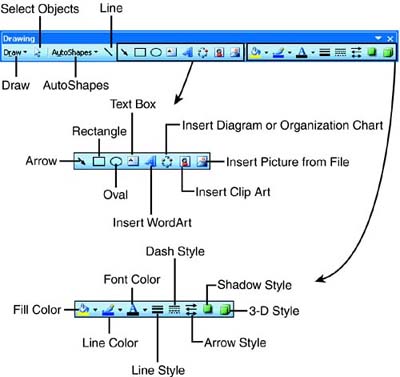
| Like drawing on paper, using Excel's Draw feature takes patience and practice. The Drawing toolbar offers many drawing tools for drawing and modifying lines and shapes, including 3D shapes . The drawing tools also come in handy for annotating your worksheet data and charts . To display the Drawing toolbar, you click the Drawing button on the Standard toolbar. Figure 11.1 depicts the tools on the Drawing toolbar. To hide the Drawing toolbar, click the Drawing button on the Standard toolbar again. Figure 11.1. The tools on the Drawing toolbar. Table 11.1 lists the drawing tools on the Drawing toolbar and describes what they do. Table 11.1. Excel's Drawing Tools
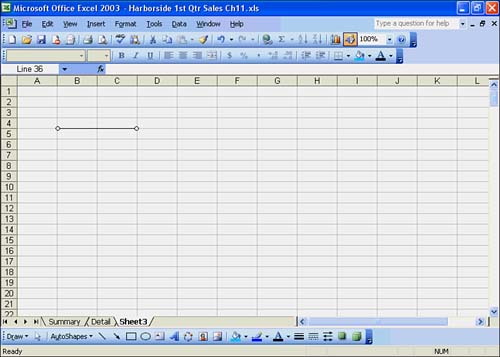
After you draw an object, small squares, called selection handles , surround the object's border. The selection handles indicate the object is selected and let you modify the object. Before you can move, resize, or edit an object, you must select it. To select an object, just click anywhere on it. When the selection handles appear, you can then use the handles to move and resize the object. Other alterations you can make to an object you have created include changing the color, border, and fill. Filling an object places a pattern or color inside the object to make the shape more interesting. You can also delete objects when you no longer need them. Drawing a ShapeWith Excel's drawing tools, you can create an almost endless variety of shapes. You can start with a simple drawing and then build on it. When you want to draw a shape, you click a shape tool on the Drawing toolbar, drag the crosshair pointer straight in a particular direction or diagonally to draw the shape you want, and then release the mouse button. A nice feature about drawing shapes in an Excel worksheet is that you have the gridlines on the worksheet to use as guides for starting and ending an object. Are you ready to draw some shapes? You don't have to be a talented artist to create vibrant, eye-catching graphics. Try out the Line and Rectangle tools to draw a line and a rectangle in the next To Do exercise. Again, you need to use the Sales workbook, so be sure to have it open before you begin the exercise. You'll be drawing shapes in the Sheet3 sheet. To Do: Draw a Shape
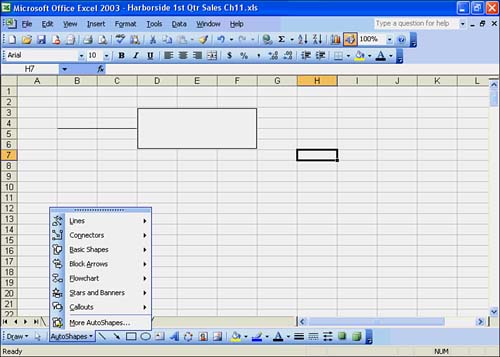
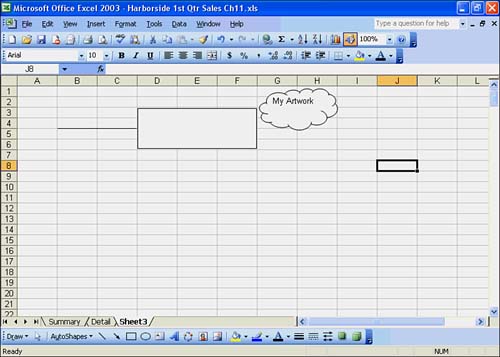
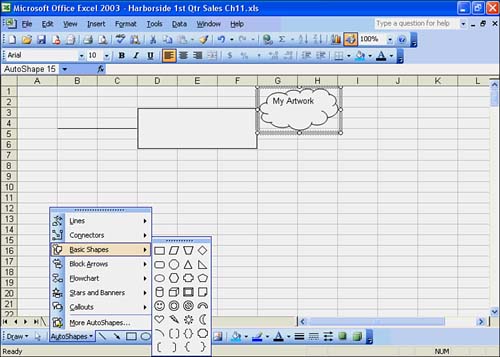
Adding an AutoShapeThe standard shapes available are a line, rectangle, square, oval, and circle. For a greater variety, use those available via the AutoShapes menu on the Drawing toolbar, as shown in Figure 11.3. Figure 11.3. The AutoShapes menu on the Drawing toolbar. To add an AutoShape to your worksheet, click the AutoShapes button on the Drawing toolbar and choose an AutoShape type from the menu. Then click the shape that you like. On your worksheet, click and drag to create the shape. For example, if you click Callouts on the AutoShapes menu, choose the Cloud Callout, and hold down the Shift key while dragging the crosshair pointer diagonally across the cells , Excel inserts the cloud shape on your worksheet. An insertion point appears inside the cloud, ready for you to type text. Type My Artwork and click any cell in the worksheet. Figure 11.4 shows the cloud callout pointing to the shapes you drew earlier. Figure 11.4. The cloud callout AutoShape.
The Draw menu on the Drawing toolbar contains a command intended for use with AutoShapes. The Change AutoShape command is a special command for converting one AutoShape to another. To change an AutoShape, click the Draw button on the Drawing toolbar and choose Change AutoShape. You should see a menu of shape types. Click a shape type, and a palette of shapes appears, as shown in Figure 11.5. Click any AutoShape you like. Excel inserts the shape into your worksheet. Figure 11.5. Change AutoShape command on the Draw menu. Rather than change the AutoShape, you can delete the AutoShape and start over. Be sure to select the AutoShape you want to remove and then press the Delete key. Repeat the steps mentioned earlier to insert a different AutoShape. |
EAN: 2147483647
Pages: 279
- The Effects of an Enterprise Resource Planning System (ERP) Implementation on Job Characteristics – A Study using the Hackman and Oldham Job Characteristics Model
- Context Management of ERP Processes in Virtual Communities
- Intrinsic and Contextual Data Quality: The Effect of Media and Personal Involvement
- A Hybrid Clustering Technique to Improve Patient Data Quality
- Development of Interactive Web Sites to Enhance Police/Community Relations