The Text Tool and the Property Inspector
Although Flash is neither an illustration program, like Macromedia FreeHand, nor a traditional page-layout program, like Adobe Illustrator or Quark, its text-handling capabilities are robust and easy to use. While you can create nearly any style of text directly in Flash, you can also import text created in other applications as vector artwork. With compatible applications such as Illustrator and FreeHand, you can even preserve your type as editable text boxes when it is imported to Flash.
Working with the Text Tool
The Text tool, shown in Figure 8-6, delivers a broad range of control for generating, positioning, and modifying text. Although the Text tool is located in the Flash Tools panel, when the tool is active, the controls for working with text are in the Property inspector.

Figure 8-6: The Text tool is used to create text boxes and text fields in Flash.
Creating Static Text Boxes
To create text in your current Flash document, click the Text tool in the Tools panel (or press T on your keyboard) to activate it. You may choose to create new text in your Document window with either of two methods:
-
Label text: To enter text on one extending line, click on the Document Stage and begin typing. To control the width of a line of label text, you can either enter hard returns with the Enter or Return key as you type, or you can convert the label text into block text by dragging any of the handles to a specific width or height — the round label text icon will change to a square block text icon to indicate that the box is now constrained.
Tip If your text continues beyond the viewable area of the Document window, you can add some line breaks, click and drag to move the label text box, or choose View ð Work Area to make the entire text label visible.
-
Block text: To define the area that will constrain your type by auto-wrapping as you enter more characters, click on the Document Stage and drag the text area to the width that you want. You can change the width of your block text at any time by dragging the handles that appear when the text area is selected or in Edit mode. Refer to Figure 8-2 (right image) for an example of the square box text icon.
| Tip | Convert a text block into label text by double-clicking the square corner icon (visible in Edit mode), which will be changed to a round icon to indicate that the box is now extending instead of constrained. |
| New Feature | Use the new blue handles that appear when you select a text box with the Selection tool in Flash 8 to change the size of your text boxes or text fields without double-clicking or using the Text tool to enter Edit mode. The icons that indicate whether a text box is extending (label text) or constrained (block text) are still only visible in Edit mode. |
One characteristic of the Flash text tool that might surprise you is that Static text boxes that do not contain any text are cleared from the Stage. As long as a Static text box contains even one character, it remains on the Stage until you delete or move it manually. Adobe Illustrator has adopted this same behavior because it eliminates the hassle of a project cluttered by empty invisible text boxes. Editable text fields will remain visible even if you have not entered any text characters at author-time.
Modifying or Deleting Text
Flash handles text as a group, which allows you to use the Text tool to edit the individual letters or words inside a text area at any time by clicking on the text box and then typing or drag-selecting specific characters. To select the whole block or group of text, you can click once anywhere on the text with the Selection tool.
To delete individual characters, click and drag to select them with the Text tool or use the Backspace key (the Delete key on a Mac). To delete a whole group of text, select it with the Selection tool and then use the Backspace key (or Delete key).
| Tip | Double-clicking a text block with the Selection tool invokes Edit mode and activates the Text tool — this enables you to modify the individual characters or change the text box style, without having to switch to the Text tool first. You can use the shortcuts you use to navigate in the Actions panel in an active text box as well. For example, the Ctrl+arrow key (z+arrow key on a Mac) shortcut moves the cursor to the beginning or end of a word, and holding down the Shift key at the same time selects the word. |
You can use most common text editing/word processing commands in Flash. Cut, Copy, and Paste move selected text within Flash and also between Flash and other applications that handle type. Flash provides a built-in Check Spelling command and a handy Search and Replace command.
The Check Spelling settings are quite sophisticated and you can customize them using the Spelling Setup dialog box available from the application menu (Text ð Spelling Setup), or launched with the Setup button in the Check Spelling dialog box. As shown in Figure 8-7, these options enable you to work with language-specific features and to control what areas of your Flash document to include when Check Spelling is applied.
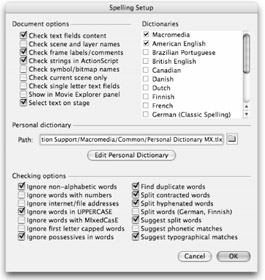
Figure 8-7: The Spelling Setup dialog box gives you a range of settings to control how the Check Spelling command is applied to your documents.
After you choose your settings, you can choose Text ð Check Spelling from the application menu, and Flash opens the Check Spelling dialog box (shown in Figure 8-8). You can then go through various text elements in your Flash document and modify or replace errors (with the help of suggestions), as you would in any other program with a spell check feature.
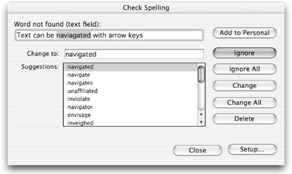
Figure 8-8: Check spelling with ease in Flash
The Movie Explorer panel makes it easy to find and modify text if you are working with a complex document. To access this feature if it is not already open, use the application menu (Window ð Movie Explorer) or the Alt+F3 (Option+F3) shortcut keys to invoke the Movie Explorer panel, and modify text in any of the following ways:
-
To see all the text used in your current document: Set the Movie Explorer to Show Text with the option button at the top of the panel. The contents of each text box will be listed along with the font and point size that is used.
-
To search for a specific item: Enter the font name, instance name, frame number, or ActionScript string in the Find field of the Movie Explorer panel.
-
To edit the contents of individual text boxes: Double-click any listing in the Movie Explorer panel, and type in the field as you would if you were editing a filename in any other list.
-
To specify a new font or font size: Select any text item listing that you want to change in the Movie Explorer and then simply change the font settings in the Property inspector. Use Shift+select to select multiple items in the Movie Explorer if you want to apply a change to more than one text box at a time.
-
To copy text: Use the Copy command in the Movie Explorer options menu to copy a currently selected line of text to the Clipboard. Or to copy all the text in your current document to the Clipboard without having to select items individually in the Movie Explorer, use the Copy All Text to the Clipboard command in the Movie Explorer options menu.
Setting Text Attributes in the Property Inspector
The Text tool does not include options in the Tools panel because the extensive text controls are centrally located in the Property inspector. You create all Flash text in text blocks or boxes using the same Text tool, but when you create text, you can assign it specific behavior with the Property inspector.
Although you can always access font style and size menus from the application menu (Text ð Font, Text ð Size, and Text ð Style), the options for controlling text are not visible in the Property inspector unless the Text tool is active or you select a text box with the Selection tool. The options available in the Property inspector vary slightly, depending on the kind of text you select.
Static Text Options
When working with Static text, you can modify both the font and paragraph attributes with the following options (shown in Figure 8-9):
-
Text type menu: This drop-down enables you to specify Static Text, Input Text, or Dynamic Text for your text box type. Set this behavior first to invoke the relevant options in the Property inspector.
-
Font field (and menu): When the Text tool is active, this field displays the name of the current font. Click the arrow button to invoke a scrolling menu of available fonts. Choose a font from this scrolling menu to set the font for the next text element that you create. Or, to change the font of existing text in the Document window, first select individual characters with the Text tool or the whole group with the Selection tool, and then choose a different font from the scrolling menu. When you select a font from the Property inspector menu, you'll see a preview of the highlighted font in the style or typeface that will display.
-
Font size: You can select the size of your type either with a pop-up slider or in a point size entry field. When the Text tool is active, it displays the current font size in the entry field. You can change the font size by typing a specific point size number in the field. If you click the arrow button to the immediate right of the text entry field, a pop-up slider enables you to select a font size — as you move the slider, the font size number updates in the entry field.
-
Type Color chip: Click this button to invoke the Swatches pop-up menu, which in addition to offering current and temporary swatches, also enables you to acquire a color from anywhere within the interface by sampling with the dropper arrow.
-
Bold and Italic: The Bold option is a radio button that toggles selected text between Normal and faux Bold. The Italic option is another radio button. It toggles selected text between Normal and faux Italic.
Note Many computer programs (including Flash) that handle type permit you to approximate a bold and/or italic version of a font, even if this style is not available in the original installed font; this has led to some confusion about font styles. If a font was originally designed to include a bold or italic version, it will be appropriately named in the font menu (such as Century Schoolbook Bold), and will be selected as a separate typeface. With many fonts, the faux bold or italic style may display very similarly to the designed Bold or Italic style, but with well-designed fonts, the shapes and proportions of individual characters are designed separately for each style. Theoretically, the original designed letter shapes for each style should look better than a normal letter shape thickened with an outline to create a faux Bold style, or slanted to create a faux Italic style.
-
Text Orientation menu: This pop-up menu enables you to select the flow direction for your text. The default is Horizontal, which orients text from Left to Right in rows along a horizontal baseline. The vertical text options are Vertical Left to Right, and Vertical Right to Left — these options automatically orient the text in columns that progress from left to right or from right to left, respectively.
Note If you select a Vertical text orientation, the other text formatting options will apply slightly differently than they do to the Horizontal text orientation. See the section "Vertical text options" for descriptions of the controls that are relevant to vertically oriented type.
-
Text Align options: The top-right area of the panel displays four buttons for the arrangement of text: Left, Center, Right, and Full Justification. When you're editing, the alignment you choose affects only those paragraph(s) you've selected. When entering text, use these options to predetermine the alignment before text entry, and all subsequent text will be aligned accordingly.
-
Letter spacing menu: You use this value field and slider to change the space or tracking between individual letters. The default setting of 0 applies the built-in tracking and kerning of the font, while any setting between +1 and +60 adds space between characters, and any setting between -1 and -60 decreases space between characters (extreme settings cause the letters to overlap).
Tip With a section of text selected, you can use Ctrl+Alt+arrow keys (z+Option+arrow keys on a Mac) to increase or decrease spacing between characters. The higher the Zoom setting, the smaller the spacing increments will be.
-
Baseline shift: Three options are in this drop-down menu. Normal resets text to the baseline. Superscript shifts Horizontal text above the baseline and Vertical text to the right of the baseline. Subscript sets Horizontal text below the baseline and Vertical text to the left of the baseline.
-
Anti-alias option menu: Use this menu to select the level of anti-aliasing (or smoothing) to apply when the Flash Player renders your type. If you do not want to include font outlines in your file, select Use device fonts and text will be rendered using a font that is available on each user's computer.
Note The Alias text button and the Use device fonts check box have been replaced in Flash 8 with the new and improved Anti-alias settings menu. Now there are no excuses for jagged or blurry text (unless they serve some stylistic purpose).
-
Auto kern check box: If the font includes built-in kerning information, which evens out the spaces between letterforms, select this to activate automatic kerning.
-
Paragraph Format Options: The Edit format options button (paragraph icon) invokes the paragraph Format Options dialog box shown in Figure 8-10, with additional text controls.
Note The default units of measurement (pixels) for both the margin and indentation entries of the paragraph Format Options dialog box are determined by the Ruler units setting on the file. You can change Ruler units in the Document Properties dialog box, which you access from the application menu with Modify ð Document or from the keyboard by pressing Ctrl+J (z+J on a Mac).
-
Selectable: Use this toggle button to make selected text, or text that's entered subsequently, selectable when it's displayed on users' machines. This allows users to copy and paste your text into other text-editing applications or browser windows.
-
Link entry: This option is only available for Horizontal Static or Dynamic text fields. By selecting a text box or an individual word in the Document window, and then entering a URL in this Link entry field, you can add a hyperlink to selected text. The text link will be identified in the authoring environment with a dotted underline — the underline will not be visible in the published .swf file, but the mouse pointer will change to indicate a link when it is over the text.
-
Target menu: This menu is accessible after you enter a URL in the Link field, and it allows you to select a destination for the loaded URL. The options will be familiar to anyone who has worked with HTML page structures. For more information, refer to the description of the getURL() action in Chapter 18, "Understanding Actions and Event Handlers."
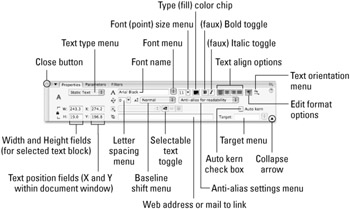
Figure 8-9: The main options available for Static text in the (expanded) Property inspector
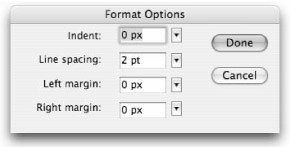
Figure 8-10: The paragraph Format Options dialog box for horizontal text invoked with the Edit format options button in the Property inspector
Application Menu Commands
Some of the text settings in the Property inspector are also available from the application Text menu:
-
Under Text ð Font, you can select from the same available fonts listed in the Property inspector Font menu, but the list is slightly larger so it is easier to read.
-
Under Text ð Size, you can select a specific font point size from a list, instead of using the Font size slider in the Property inspector.
-
Under Text ð Style, the commands include
-
Plain: Ctrl+Shift+P (z+Shift+P on a Mac)
-
Bold: Ctrl+Shift+B (z+Shift+B on a Mac)
-
Italic: Ctrl+Shift+I (z+Shift+I on a Mac)
-
Subscript
-
Superscript
-
-
Under Text ð Align, the commands include
-
Align Left: Ctrl+Shift+L (z+Shift+L on a Mac)
-
Align Center: Ctrl+Shift+C (z+Shift+C on a Mac)
-
Align Right: Ctrl+Shift+R (z+Shift+R on a Mac)
-
Justify: Ctrl+Shift+J (z+Shift+J on a Mac)
-
-
Under Text ð Letter Spacing, you will find a list of options that offer an alternative way to adjust the space between characters. If you have the Property inspector open as you apply these commands manually, you will see the letter spacing or tracking value field update. Manual tracking has the advantage that you can apply it either to selected (highlighted) text characters or to the pair of text characters on either side of the cursor:
-
Increase: To increase text character spacing by one half-pixel, press Ctrl+Alt+→ (z+Option+→). To increase text character spacing by two pixels, press Shift+Ctrl+Alt+→ (Shift+z+Option+→).
-
Decrease: To decrease text character spacing by one half-pixel, press Ctrl+Alt+← (z+Option+←). To decrease text character spacing by two pixels, press Shift+Ctrl+Alt+← (Shift+z+Option+←).
-
Reset: To reset text character spacing to normal, press Ctrl+Alt+↑(z+Option+↑).
-
-
Scrollable: The final item in the Text menu is an option that is only available when an editable text box is selected. When applied to a Dynamic text field, this option makes it possible to enter and scroll through text that extends beyond the frame of the text box. Apply this option by choosing Text ð Scrollable from the application menu or from the contextual menu when a Dynamic text box is selected, or by pressing Shift and double-clicking the handle of a Dynamic text box.
Vertical Text Options
Some of the options that are visible in the Property inspector change slightly when you choose a Vertical orientation for your text box.
-
Text Align options: These buttons now function to align the arrangement of text in a vertical text box to Top, Middle, Bottom, and Full Justification. When entering text, use these options to predetermine the alignment before text entry, and all subsequent text will be aligned accordingly.
-
Auto kern check box: On Vertical text, this setting can be overridden by the Vertical text settings in the Flash Preferences dialog box (refer to Figure 8-4). When No Kerning is selected in Preferences, then the Auto-Kerning toggle in the Property inspector will only apply to Horizontal text.
-
Rotate toggle: This very handy button (which appears to the right of the Text Orientation menu) flips the characters in your Vertical text box so that the type is turned sideways — or actually resting on the vertical baseline. This is an effective alternative to creating Horizontal text and then using Free Transform to rotate the text box 90 degrees.
-
Edit format options: The Edit format button invokes the paragraph Format Options dialog box (see Figure 8-11) with additional text controls specifically for vertical text.
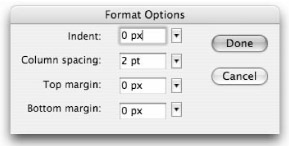
Figure 8-11: The paragraph Format Options dialog box for Vertical text invoked with the Edit format options button in the Property inspector
Editable Text Options
The options available for Dynamic and Input text are predominantly the same, but there are a few important options that are unique for these two Editable text types. Figure 8-12 shows the Property inspector as it displays when you specify Dynamic behavior for your text. We label only the additional options not shown in Figure 8-9 here.
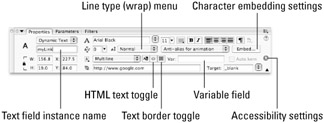
Figure 8-12: The additional options available in the Property inspector when Dynamic text behavior is selected
The following options are common to both Dynamic and Input text:
-
Text field instance name: As we described previously, this identifier allows the Flash Player to put your dynamic data in the correct field.
-
Line type: Use this drop-down menu to choose how your text will be organized in the text field. Choose between Single Line, Multiline (with line breaks), and Multiline with no text wrap.
-
HTML text: When this toggle is turned on, Flash preserves rich text styles when displaying Dynamic text. This includes font, font style, hyperlink, paragraph, and other formatting consistent with permissible HTML tags. You can also enable HTML so that the entry field will accept formatting that has been assigned to it in the Actions panel. For more information on this, refer to Chapter 30, "Applying HTML and Text Field Formatting."
-
Text border: Use this toggle to draw the text field with a border and a white background that will be visible in your published movie (.swf).
-
Variable: This field is now redundant with the Instance name field, but if you use it for backwards compatibility, you should assign it a different name than your instance to avoid confusion.
-
Character embedding: When preparing a file for export, you can control how much font information is included with the .swf. The Embed button invokes the Character Embedding dialog box (see Figure 8-13), in which you can specify that no characters are embedded by clicking the Don't Embed button; or you can pick from a long list of character or glyph sets to be embedded. You can also enter a more selective range of characters by typing them directly into the field at the bottom of the dialog box (under "Include these characters:"). The Auto Fill button automatically loads all the unique glyphs or characters in the currently selected text box into the Include field to be embedded with the final .swf. The counter for total number of glyphs (at the bottom of the dialog box) updates based on your settings to show the total number of unique glyphs that will be embedded with the final exported file.
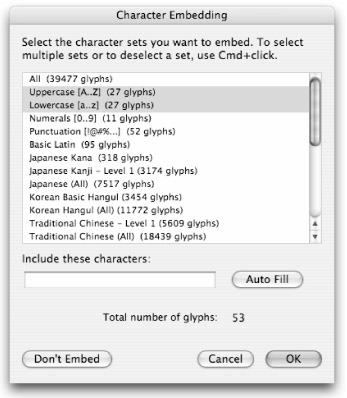
Figure 8-13: The Character Embedding dialog box for specifying embedded font information to be exported with your final .swf
| Note | The Character Embedding options include international language sets and specialized sets such as music symbols. These glyph sets can be very large, but this is a useful feature if you are creating dynamic text fields that will need to display specialized characters. |
The Link and Target value fields are not available in the Property inspector when Input text behavior is selected, because you cannot add links to text that users will be entering. The only additional control available in the Property inspector for Input text fields is the Maximum Characters value field. Use the Maximum Characters value field to specify the maximum number of characters that a user can enter in this particular text field. The number of characters can be limited to any number between 0 and 65,535. This feature is generally used for controlled content, such as passwords.
EAN: 2147483647
Pages: 395