Font Export and Display
By default, Flash embeds all fonts used in Static text boxes in order to deliver WYSIWYG (what-you-see-is-what-you-get) display in the published movie (.swf.). As long as font outlines are available for the text you use in your Flash document (.fla), the published movie (.swf) displays consistently, regardless of which fonts the user has installed on his machine.
In order to edit a Flash project (.fla), you need to have the original fonts available, unless you are willing to view the document with a substitute font in the authoring environment. If you select a text box that is displayed with a substitute font, you should still see the name of the original font listed in the Property inspector, although it will be marked by parentheses. As long as the font formatting is not modified, Flash preserves all the original font information so that when the document (.fla) is opened again on a machine that has the original font, any edits that were made using the default font are rendered correctly. Although you can make text edits while working with a default font, you need to have the original font installed in order to publish the final movie (.swf) with the design intact.
Smoothing Text with Anti-Alias Settings
The consistent text display of embedded fonts is what endears Flash to type-obsessed designers, but there is a small price to pay: Every embedded font adds to the final file size, and anti-aliasing (smoothing) can sometimes make fonts too blurry. The good news is that for most projects, the additional weight is not an issue, and the new anti-aliasing controls in Flash 8 make it easy to customize the level of anti-aliasing as needed. If file size is a critical issue, you may choose to use device fonts or a runtime shared library. If you prefer the look of bitmap (aliased) fonts, that setting is still available in the Font rendering menu (see Figure 8-14).
![]()
Figure 8-14: The new Flash 8 Font rendering menu makes it easier to choose a setting that will suit your design style and file size requirements.
Figure 8-15 compares aliased with anti-aliased text in two published .swfs: one with Anti-alias for readability applied (left) and one with Anti-alias for animation applied (right).
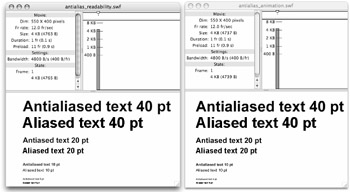
Figure 8-15: The two default settings for anti-aliasing in Flash 8 (readability and animation) render more smoothly than Bitmap text. Anti-alias for animation (right) results in a slightly smaller file size than Anti-alias for readability (left).
The Anti-alias for readability setting does an amazing job of rendering smooth, legible type, even at small sizes. This setting has only two drawbacks: It contributes to larger file sizes and it can only be rendered with Flash Player 8. The Anti-alias for animation setting smoothes text almost as well as the Anti-alias for readability setting but it ignores kerning information in order to create slightly smaller files and to render animated text more quickly. This is the only anti-aliasing option that will render on older versions of the Flash Player.
| Caution | Advanced Flash 8 anti-alias settings (Anti-alias for readability and Custom anti-alias) will not render if text is skewed or flipped, but work fine if text is rotated or scaled. The advanced anti-alias settings do not carry over to files that are exported in .png format or printed. If the more advanced anti-alias settings "break," the text will be auto-rendered with the more simplified Anti-alias for animation setting. |
If you feel the need to polish your text further, use the Custom anti-alias controls (shown in Figure 8-16) to adjust the thickness and sharpness of the rendered text. With a little trial-and-error, you should find the exact level of anti-aliasing that suits the size and style of the font you are using.
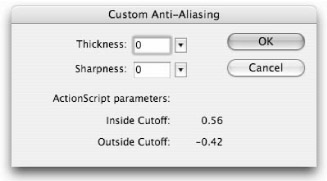
Figure 8-16: Custom anti-alias controls in Flash 8 make it easier to find a setting that smoothes text just how you like it.
The settings ranges for thickness and for sharpness are different, but for both, "normal" is 0. Select a higher number to increase the level of the effect and choose a lower number to decrease or reverse the effect. Figure 8-17 illustrates "high," "normal," and "negative" combined settings, but these settings are really only meaningful if you adjust them individually and observe the results on your own specific font sample.
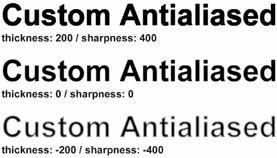
Figure 8-17: The combination of thickness and sharpness set in the Custom Anti-Aliasing dialog box will determine the look of your rendered anti-aliased text.
| Caution | Anti-alias for readability and Custom anti-aliasing settings only work on files published for Flash Player 8. To make your files compatible with older versions of the Flash Player, you must use Anti-alias for animation, bitmap (aliased) text, or device fonts. For very large text (larger than 48 point), the more simplified Anti-alias for animation setting is recommended over the advanced Flash 8 settings. It is best to use advanced anti-aliasing options to improve the legibility of very small text or unusual text styles on projects that do not need to be backwards compatible. |
| Note | If you are working on OS X, you may not notice much difference between aliased and anti-aliased text because the system applies automatic smoothing on any screen text, even on application menu lists. Although this feature cannot be turned off completely, the text smoothing controls in your System preferences panel (in the Appearance category) allow you to specify between the lowest setting (only smoothes text larger than 12 points) and the highest setting (only smoothes text larger than 4 point). The default setting smoothes any text larger than 8 points. |
Rendering Outlines with the Bitmap Text Setting
The Bitmap text option in the Flash 8 Text rendering menu replaces the Flash MX 2004 Alias text button. This option still makes it possible to quickly convert any selected text from anti-aliased to a prerendered aliased outline that will be embedded with the final .swf. The aliased outline will add less to your file size than the anti-aliased font information, if the font is at a size below about 24 point. Another advantage of using the Bitmap text button is that you can create a "custom" aliased outline from any font on your machine, which gives you many more creative options than the three basic device fonts. Unlike device fonts, text converted to aliased outlines in Flash can also be rotated or scaled — although it doesn't always look that great, at least it does display in the published .swf.
Despite the benefits of using bitmap text, we can't say it's a great option because it doesn't always give you the crisp, clean results you might hope for. In fact, this feature is only really useful when it's applied to fonts in the mid-size range. When it's applied to fonts between 12 and 24 point, the Bitmap text feature will render a fairly crisp outline and will eliminate the "blur" associated with anti-aliased text smoothing. Unfortunately, when it's applied to smaller text (between 6 and 11 point), most fonts completely fall apart and became illegible blocky pixel shapes. On text larger than 24 point, the Bitmap text feature usually makes the text look rough, and can bloat the file size more than including standard font outlines will.
Understanding Device Fonts
Device fonts are three basic font style designators identified by a preceding underscore in your font menu. These fonts will be familiar to anyone who has worked with HTML text. Although they are not as exciting as some custom fonts, entire design styles are based on these "generic" fonts — think minimal and unpretentious. You will find the three device font designations, _sans, _serif, and _typewriter, in either the Property inspector font menu or in the application menu under Text ð Font. These device font labels tell the Flash Player to use any equivalent font available on a viewer's system. The formatting that you have applied to the text in your Flash document (.fla), such as bold or italic style and point size, will be preserved and applied to the font the Flash player selects from the viewer's system to render the text in your movie (.swf).
To give you an idea of how device fonts relate to installed fonts, _sans usually becomes Arial or Helvetica, _serif usually becomes Times or Times New Roman, and _typewriter becomes Courier. Because these settings utilize the default fonts on the user's machine, Flash doesn't have to include their outlines in the exported .swf, and the final movie file size is reduced.
Device fonts are always available and always take little time to render, but they cannot be rotated or skewed and occasionally they will vary slightly in their metrics from player to player and across platforms. Another important difference between standard embedded fonts and device fonts is that embedded fonts will be anti-aliased or smoothed by Flash, while device fonts will be unsmoothed or aliased.
Working with the Use Device Fonts Setting
You will notice that even if you have not used one of the device fonts from your font menu, you can still select the Use Device Fonts setting in the Text rendering menu. This is a terrific "compromise" option if you strive for more specific control over the Flash Player's font choices, but still want to take advantage of the file size savings afforded by device fonts. When the Use Device Fonts setting is applied, the font is not embedded — only the Font name, Font family/style (serif/sans serif/monospace), and other information are added to specify the font, which adds no more than 10 or 15 bytes to the final .swf file. This information is used so that the Flash player on the user's system will know if the font is installed or not. If the original font is available, it will display exactly as you designed it. If the original font is not present, then the Flash Player will still know whether the substitute font should be serif or sans serif.
The Use Device Fonts option also works as a toggle to turn off anti-aliasing. This means that even if the user has all the fonts used in your Flash movie installed, Use Device Fonts changes how the type displays:
-
When Use Device Fonts is selected: No anti-aliasing or smoothing is applied to any device font, regardless of its presence on your system.
-
When Use Device Fonts is not selected: The font outline is embedded and all characters are smoothed (even if the font is available). Smoothed text can sometimes be too blurry at small point sizes.
To accurately preview the Use Device Fonts setting on your machine, if you have a font manager (as most Web designers do), you need to make sure you're careful about your font activation settings. Make sure Global activation is turned off to limit the number of fonts that the Flash player can find for rendering the movie (.swf).
For best results with this specific Use Device Fonts option, we suggest that you limit your font selection to those fonts that most of your audience is likely to have (all those common fonts that come installed with their machines), or those that will translate into one of the default device fonts without wreaking havoc on your design. It is better to be conservative and design your layout using Times, Arial, and Courier than to go wild with custom fonts that will most likely be substituted very differently when the movie is viewed on someone else's machine. Otherwise, for unusual fonts, we suggest that you either embed the full font outline information (and apply one of the anti-alias settings) or, for limited areas of text (such as headlines), that you use the Bitmap text option to generate a custom aliased outline or break the text apart to manually create vector shapes, as we describe later in this chapter.
Troubleshooting Font Display
Although Flash does an amazing job of displaying fonts consistently and cleanly, even on different platforms, the success of your font export depends entirely on the quality and completeness of the font information available when the Flash document is created (.fla). Because Flash can access font information on your system while you are working in the authoring environment, many of the font display problems that can come up during production will only be visible when the Flash movie (.swf) is published.
To display fonts in the published movie (.swf), the Flash Player relies on the font information embedded in the movie, or on the fonts installed on the user's system. If there are discrepancies between the information available to the Flash Player and the font information that was available to the Flash authoring application when the document was created, you will run into font display problems.
When you encounter problems with fonts (as you almost always do at some point), a good guide to font management is indispensable. We can't describe everything that can go wrong when working with fonts here, and solutions will often vary depending on how you are storing and managing your fonts. Ideally, you should find resources that are specific to the platform and programs you are using.
| Tip | A good general guide to some basic font-management techniques for Macintosh users is How to Boss Your Fonts Around by Robin Williams (Peachpit Press, 1998). Even if you are a Windows user, this book can give you some basic background on how fonts and font management utilities work. |
TrueType, Type 1 PostScript, and bitmap fonts (Mac only) can all be used in Flash. Although Flash exports the system information about the fonts that are used, a damaged or incomplete font may still display correctly in the authoring environment (.fla). However, the exported movie (.swf) will appear incorrectly on other systems if the end-user doesn't have the font installed. This is due to the fact that Flash can display the font within the editor by using the screen font; it does not recognize that particular font's outline and can't export information needed to display the text in the .swf. You can avoid font display problems by using device fonts (_sans, _serif, or _typewriter fonts).
Controlling Font Substitution
If Flash cannot find font information on your machine to match what is specified in a file (.fla) when you open it in the authoring environment, you will be notified by the Missing Fonts alert box (shown in Figure 8-18), and prompted to select fonts installed on your system to substitute for display.
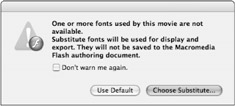
Figure 8-18: The Missing Fonts alert box appears when fonts used in a Flash file (.fla) are not found on the local machine.
| Note | If you publish or export a document without viewing any of the scenes containing missing fonts, the alert box only appears when Flash attempts to publish or export the .swf. |
The first time that a scene with missing font information is displayed in the authoring environment, you will be prompted by the Missing Fonts alert box to choose one of the following options:
-
Choose Substitute: To specify individual substitutions from the fonts available on your system for each missing font, click this button to invoke the Font Mapping dialog box (see Figure 8-19). This dialog box lists all fonts specified in the document that Flash can't find on your system. To choose a substitute font for a missing font, select the font name in the Font Mapping list and then choose a font installed on your machine from the Substitute font pop-up menu. Click OK to apply the settings and close the dialog box.
-
Use Default: This button substitutes all missing fonts with the Flash system default font and dismisses the Missing Fonts alert box. If you don't use the button on the first alert box, you have another chance to choose this setting by using the System Default button in the Font Mapping dialog box (see Figure 8-19).
-
Turn Alert Off: To disable the alert box in the current document, select the Don't warn me again check box.
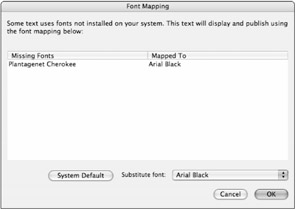
Figure 8-19: The Font Mapping dialog box used to view missing fonts and to modify mapping of substitute fonts
Even though the text is displayed in a substitute font, Flash includes the name of the missing font in the Property inspector font menu (see Figure 8-20). Flash preserves the original font specification when the file is saved so that the text displays correctly when the document (.fla) is opened on a system with the missing fonts installed. You can even apply the missing font to new text by selecting it from the font menu in the Property inspector.

Figure 8-20: The missing font name is displayed in the font menu, even when text is displayed in a substitute font in the authoring environment.
Because appearance attributes such as size, leading, and kerning may render differently with a substitute font, you may have to adjust any modifications you make while viewing text in a substitute font when the document is opened on a machine with the original font available.
| Tip | To turn the Missing Fonts alert box off for all documents, clear the Warn on missing fonts check box in the Warnings category of Flash Preferences (Edit ð Preferences or Flash ð Preferences for OS X). To turn alerts on again, reselect the check box. |
To view all the missing fonts in the currently active document or to reselect font mappings, choose Edit ð Font Mapping (or in OS X, Flash ð Font Mapping) from the application menu and repeat the same steps we described previously to choose new substitute fonts. To view all the font mapping settings saved on your system or to delete font mappings, close all Flash documents before opening the Font Mapping dialog box or making changes to the listed mapping.
Using Miniml Fonts in Flash, by Craig Kroeger
For those of you who are not familiar with Miniml fonts, these are bitmap fonts designed by Craig Kroeger and J. D. Hooge to remain crisp (aliased) in Flash and they can be used as an alternative to generic device fonts. These aliased fonts are particularly useful at small sizes, where anti-aliasing can reduce legibility. This is a real concern when designing Flash applications for devices. (See Figure 8-21.)
![]()
Figure 8-21: Crisp aliased text (top) compared to blurry anti-aliased text (lower)
There are free versions of the Miniml fonts, included on this book's CD-ROM in the ch8 folder — you may use these to test what you can do with them. Professional versions of these fonts are available at www.miniml.com.
There is also a sample source file (Miniml.fla) on the CD-ROM that shows how the fonts are used in various text field examples. In order for the Miniml fonts to work properly (with no anti-aliasing), consider these guidelines:
-
Select font: When the Miniml fonts have been installed on your system, you can select them from the Font menu in the same way as any other available font.
-
Font size: Miniml fonts must be set to 8 points or any multiple of 8 (16, 24, 32, and so on). The numbers in the font name refer to the font style, not what point size it should be set to.
-
Vertical Static text: Miniml fonts can be used on a vertical axis when they are rotated with the rotate option in Flash (not rotated manually or with Transform settings).
-
Spacing Static text: Only Static text can have adjusted character spacing. When adjusting the character spacing, use whole-pixel values to keep the text aliased. Professional Miniml fonts have versions with increased Letter spacing for use with Dynamic or Input text fields.
-
Paragraph alignment: Do not use Center paragraph alignment — only use Left or Right.
-
Embed font: You must embed the Miniml fonts when using Dynamic or Input text fields. In Character Options, select the Select All Characters check box to embed the complete font. To reduce overall fill size, only embed the characters you need in your text. Static text is automatically embedded.
-
Snap to Pixels: Use the Snap to Pixels feature under View ð Snapping in the application menu to keep fonts clear. When the fonts are not on whole _x and _y values, they will appear blurry. If you are not using Snap to Pixels, make sure to check your Info panel to set the text box _x and _y values to whole pixels, using the top-left corner as the registration point. To ensure consistent placement of text after you have converted a text box into a symbol, reposition the registration point of the symbol by dragging it from the center to the top-left corner of the text box. (See Figure 8-22.)
-
Using Miniml fonts in motion: When you are using Miniml fonts in animation, round the _x and _y values to whole values to keep them crisp. Use the following ActionScript to round the numbers down to the closest integer:
_x = Math.floor(_x); _y = Math.floor(_y);
-
Preview in the Flash Player: Preview your finished movie in the Flash Player (.swf) to see the aliased text displayed correctly because it may appear anti-aliased in the authoring environment (.fla).
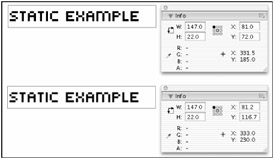
Figure 8-22: To keep text crisp (aliased), use Snap to Pixels or the Info panel to set X,Y values to whole pixels (top). If text boxes are not aligned to whole X,Y values, then the font will be anti-aliased (bottom).
This may seem like a lot of rules, but following them will help you get the most out of Miniml.
Note from the authors: This tutorial was written as a guide for using a specific series of pixel fonts (called Miniml fonts) designed by Craig Kroeger and J. D. Hooge, but much of the advice that Craig offers for using his fonts can be applied to any bitmap or pixel fonts that you use with Flash. There are many sources for bitmap fonts, but hopefully the free versions that Craig and J. D. allowed us to include on the CD-ROM will give you an idea of their benefits and limitations.
EAN: 2147483647
Pages: 395