Understanding the Document Library
The Library (z/Ctrl+L) is the storehouse for reusable elements, known as symbols, which can then be placed as symbol instances within a Flash movie. Imported sounds and bitmaps are automatically placed in the Library. Upon creation, Graphic symbols, Button symbols, and Movie Clip symbols are also stored in the Library. It's a good practice to convert main items within a Flash document into symbols, and to then develop your project from instances derived from these original symbols.
The main document Library panel is used to access stored assets for any files that are currently available in the tabbed Document window. Each file has its own unique Library list that will display all symbol assets used in the file as well as any assets that were imported or added to the Library to be saved with the file.
| New Feature | The Flash 8 Library panel includes a new drop-down menu that provides quick access to the Library list of any project files (.fla) loaded into the Document window. Changing the view within the main Library panel in Flash 8 is faster and more space efficient than opening and managing multiple Library panels in older versions of Flash. |
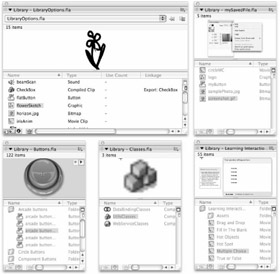
| Note | In Figure 6-1, the document Library is shown in Wide state, whereas the Common Libraries are shown in Narrow state. All Library panels can be toggled between these two view options by clicking the wide or narrow rectangle icons on the right margin of the panel or scaled manually by dragging the lower-left corner of the panel. |
Working with Common Libraries and External Libraries
External Libraries are panels that open separately from the main Library panel to provide access to stored assets for files that are not currently open in the Document window. You can open any saved Flash file as an External Library by choosing File ð Import ð Open External Library and browsing to the file that you want to load. All the stored symbols from your selected file will be visible in a floating External Library panel, but the document will not be visible in the Document window and you cannot edit the symbols in the External Library unless you copy them to the main Library panel or to the Stage of a file that is open in the Document window.
Flash ships with three External Libraries called Common Libraries. These panels hold readymade elements that you can drag into any document Library (or onto the Stage or Pasteboard in an open Document Window) to use in your own projects. Common Libraries behave exactly like any other External Library. Choose Window ð Common Libraries to open the submenu of Common Libraries that ship with Flash. The Buttons and Learning Interactions Libraries contain a selection of prebuilt Flash elements that you can reuse in any Flash project. The Classes Library contains compiled scripts that are used with the components that ship with Flash 8. Macromedia stores these elements in the Classes Library as Compiled Clips to encapsulate the code.
You can open and use the Common Library panels and any other External Library panels as free-floating panels (as shown in Figure 6-1) or you can stack or group them for tabbed access (as shown in Figure 6-2). After you copy assets to one of the document asset lists in the main Library panel (or into any of your project files in the Document window), you can close the External Library and work with the copied symbols without changing the original symbol source.
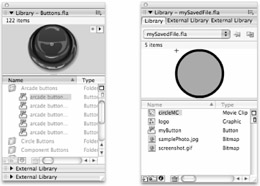
Figure 6-2: You can organize Common Libraries and External Libraries into panel stacks (left) or tabbed groups (right).
If you find it hard to keep track of which Library is your "real" library — or the asset list for the project file that you are currently working on — you will appreciate the visual clue that Macromedia has included with the Library feature. The asset list directly linked to the project file that is currently open in the Document window is rendered in black text (refer to the document Library panel shown on the right in Figure 6-2), while any asset lists for other project files or External Libraries are rendered in gray text (refer to the Buttons Library panel shown on the left in Figure 6-2). This difference is subtle in the authoring environment but it does help your main Library panel list stand out if you are working with multiple libraries.
| Tip | To add your own buttons, symbols, or even complete libraries for specific projects, first save them in a Flash document (.fla) with a descriptive name; then place that Flash file in the Libraries folder within the Configuration folder for Flash 8 on your hard drive. |
The source files for the External Libraries that show up in the Common Libraries menu are stored in the Libraries folder of the Configuration folder for Flash 8.
-
The standard directory path on Windows is:
C:\Program Files\Macromedia\Flash 8\(language)\Configuration\Libraries
-
The standard directory path to the application config folder on Mac is:
HD\Applications\Macromedia Flash 8\Configuration\Libraries
| Note | The Sounds Library is no longer shipped with Flash, but you can create your own library of sounds if you have a collection of optimized files that you plan to reuse in future projects. Simply load the sounds into one Flash document (.fla) and save the file in the Libraries folder within the Flash 8 Configuration folder on your hard drive. If you have the sounds that were available in the Flash MX Sounds Library, you could also move that folder to the Libraries folder to access them from the Common Libraries menu in Flash 8. |
Working with Multiple Document Libraries
The new Flash 8 Library panel includes a drop-down menu (shown in Figure 6-3) that lists all currently open files. This is a great space-saver that makes it much easier to switch between different document Libraries without having to manage separate floating panels. By default, the Library panel will switch views as you tab from one document to another in the Document window, but changing the Library view will not change the Document view — in other words, the Library panel is slaved to the Document panel but not the other way around. This makes it easy to access a different Library while maintaining the view of your current file in the Document window.
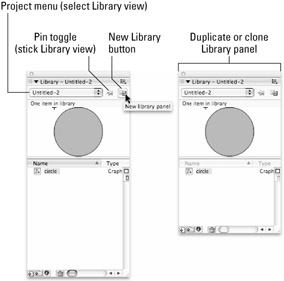
Figure 6-3: The Flash 8 document Library panel includes a new project menu, Pin toggle, and New Library button. As shown, you can use the New library panel button to launch a clone panel (right) for the current project view in the main document Library (left).
If you want to keep a Library asset list for one project visible in the Library panel while tabbing to a different project file in the Document window, you can use the handy new Pin toggle in the Library panel. Click the tack or pushpin icon (shown in Figure 6-3) to pin or "stick" the current asset list so it won't change when you tab to a new project in the Document window. Don't forget to click the Pin toggle again to turn it off when you want to un-stick the Library asset list.
There are times when you may want to see the contents of more than one Library at a time — to compare files or to drag items from one Library to another. Fortunately, Macromedia included a handy button in the Library panel that supports this workflow. Click the New library panel button (shown in Figure 6-3) to create a duplicate floating Library panel at any time. You can then use the drop-down menu to switch the project view in one of the Library panels to compare items or to drag the contents of one Library to another. Like External Libraries or other floating panels, Document Library panels can be grouped (for tabbed access), stacked, or floated as individual panels.
You can access elements stored in the Library of any other Flash document (without opening the actual .fla file in the Document window) by choosing File ð Import ð Open External Library from the application menu and browsing to an .fla file. The Library will open next to the Document window of your current project as a floating panel that can be handled exactly like any of the Common Libraries. External Libraries (Library panels for files that are not open in the Document window) do not show up in the drop-down menu of the main Document Library panel, but they can be grouped or stacked with the main Document Library if you need to keep them handy without eating up screen space.
You can copy assets from an External or Common Library to a current Document Library by dragging items from the source Library onto the current document Stage, or directly into the Library panel. This will also work if you have two documents open, and you want to move assets between the two Libraries. It is also then possible to drag or copy and paste elements directly from one document Stage onto another, or drag an item from a source document Stage into a current document's Library.
| New Feature | In Flash 8, open documents are loaded into the new tabbed Document window. If you want to view more than one Document Stage at a time, use the Window ð Duplicate Window command to create a clone of one of the tabbed documents. You can then use the tabbed UI in the main Document window to switch views to any other open document while keeping a view of the cloned document in the duplicate Document window. |
The shared Library feature, introduced in Flash MX, makes it possible to link assets between project files (.fla) during production using Authortime sharing, or to link multiple published movie files (.swf) on the server with Runtime sharing. Shared libraries create a more optimized workflow than saving individual copies of assets in multiple documents. You can learn more about linking symbols in your project files in the "Using Authortime Shared Libraries" section later in this chapter.
Reading the Library
Every Flash document has its own Library, which is used to store and organize symbols, sounds, bitmaps, and other assets such as video files. As shown in Figure 6-4, the item highlighted — or selected — in the Sort window is previewed in the Preview window. Each item in the Library has an icon to the left of the name to indicate the asset type. Click any heading to sort the window by Name, Kind (type), Use Count, or Linkage (all headings shown in Figure 6-1).
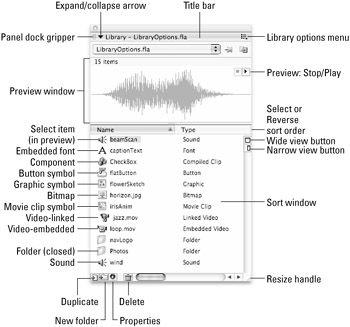
Figure 6-4: The Document Library in Narrow view
If the item selected in the Library is a Button symbol, a Movie Clip, or a sound file with more than one frame on its timeline, a controller appears in the upper-right corner of the Preview window. This Preview Stop/Play controller pops up to facilitate previewing these items. It's equivalent to the Play command in the options menu. As shown in Figure 6-5, the Library options pop-up menu lists a number of features, functions, and controls for organizing and working with items in the Library.
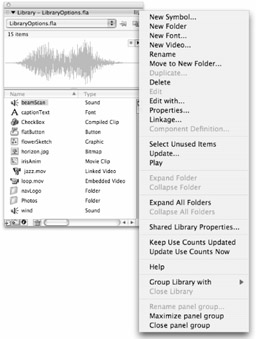
Figure 6-5: The Library panel and the options pop-up menu
The following commands, found in the Library options menu, enable you to add or modify content stored in your document Library.
-
New Symbol: Choose this command to launch the Create New Symbol dialog box where you can name and choose Properties for a symbol. Then click OK to open Edit mode and place or create graphics on the symbol timeline. When a new symbol is created, it is stored at the root of the Library Sort window. You can drag it inside of any existing Library folders.
-
New Folder: Items in the Library can be organized in folders. The New Folder command simply creates a new folder within the Sort window. New folders are "untitled" by default z double-click the folder text to type a custom folder name. This menu command is equivalent to the New Folder button at the bottom of the Library panel.
-
New Font: Use this command to invoke the Font Symbol Properties dialog box, which is the first step in creating a Font Symbol for use within a Shared Library.
-
New Video: Creates a new empty Video object in the Library.
-
Rename: Use the Rename command to rename the currently selected item in the Sort window. Double-click on any item title in the list to achieve the same thing.
-
Move to New Folder: Use the Move to New Folder option to open the New Folder dialog box. Click OK to automatically insert the new folder in the Library Sort window. The currently selected item in the Library is stored in the new folder.
Note You can also move Library items to folders by dragging them onto any Folder icon.
-
Duplicate; Delete: Select Duplicate to create a copy of an item and Delete to delete an item in the Sort window.
-
Edit: Choose Edit to access the selected symbol in Edit mode.
Tip Double-clicking a symbol on the Stage takes you into Edit in Place mode, a variant of Edit mode that enables you to see other elements on the Stage dimmed in the background for layout reference as you modify the symbol.
-
Edit with: Provided that you have appropriate external applications installed, most imported assets (such as sounds, bitmaps, and vectors) will have this command available to jump to the external editing environment of your choice.
-
Properties: This command invokes the related Properties dialog box for the particular symbol type — Sound, Bitmap, Symbol, Component, or Video Properties. The Properties dialog box is a central control that enables you to rename an element, access Edit mode, or access the Linkages dialog box from one location. This is also where you can define or edit the Source for any element.
-
Linkage: Use this command to invoke the Linkage options dialog box. Linkage means that you can assign an identifier string to a Movie Clip symbol, a Font symbol, a sound, or a Video object so that it can be accessed with ActionScript. This is an aspect of Shared Libraries.
-
Component Definition: This Library option invokes the Define Component dialog box, which you use to assign variables to Movie Clips to create your own Components. (Components are Movie Clips with customizable behavior that can be reused in projects.)
Tip A library of precompiled components is available in the Components panel. To set parameters for the compiled Components that ship with Flash, you must use the Component Inspector panel or the Parameters tab in the Property inspector.
-
Select Unused Items: Select Unused Items to find any items stored in the Library that have not been used in the current project.
Tip Unused items will not be included in your published movie file (.swf), but they will add weight to your project file (.fla). The Select Unused Items command is a handy way to find these files so you can delete them to streamline your project file. Use Save and Compact or Save As to save your .fla file minus the extra weight of the unused items that you have deleted from the Library.
-
Update: Use this option if you've edited items subsequent to importing them into Flash. Items will be updated without the bother of re-importing. You can also use this option to swap in a new element of the same kind to replace an item already used in your project.
-
Play (or Stop, if currently playing): If the selected asset has a timeline or is otherwise playable (such as a sound), click this to preview the asset in the Library Preview window. If the asset is currently playing, this option is updated to Stop — in which case, click to stop playing.
-
Expand Folder/Collapse Folder: Use this command to toggle the currently selected folder in the asset window open or closed.
-
Expand All Folders/Collapse All Folders: Use this command to toggle all folders and subfolders in the asset window open or closed.
-
Shared Library Properties: Use this command to invoke the Shared Properties dialog box, which is another aspect of runtime Shared Libraries.
-
Keep Use Counts Updated: Use this command to tell Flash to continuously keep track of the usage of each symbol. If you're working with multiple, complex graphics and symbols, this feature can slow down your processor.
-
Update Use Counts Now: Use this option to tell Flash to update the usage of each symbol. This command is a one-time check and is probably less of a drain on system resources than the previous command, which checks continuously.
Selecting New Symbol, Duplicate, or Properties from the options menu launches the Symbol Properties dialog box, shown in Figure 6-6. Use this dialog box to give the symbol a unique name and assign it a behavior (as a symbol type — Graphic, Button, or Movie Clip). However, if you choose the Properties option for a sound asset, then the Sound Properties dialog box appears.
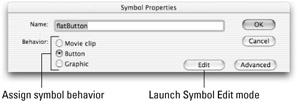
Figure 6-6: The Symbol Properties dialog box. Note the button for Advanced options — this expands the dialog box to include Linkage and Source information for the selected element.
Organizing the Library
When your movies start to become complex, you'll find that the Library gets crowded, and it can be hard to find symbols. When this happens, you'll appreciate the capability to create and name folders for your symbols. You can organize your Library folders however you like, but here are a few suggestions for greater productivity:
-
Create a separate folder for each Scene.
-
Create folders for symbol types, such as buttons, sounds, or bitmap imports.
-
Store all symbols or graphics that relate to a specific element (such as a logo or an animated element) together in one folder.
When you build complex layered structures in your movie — a Movie Clip symbol on the first frame of a Button symbol, with a text symbol on the layer above it, and a sound on the layer above that — the Library doesn't visually track this hierarchy. But you can indicate this — just put all the associated symbols in a folder with a name that describes the final element. You can also nest folders within other folders. Working with folders in the Library is almost exactly the same as working with folders in the Layers area of the Timeline window, as follows:
-
To create a folder, click the folder icon at the bottom-left corner of the Library.
-
To move a file or folder into another folder, simply drag it over the target folder icon.
-
To move a folder that's been nested within another folder back to the top level of the Library, drag the folder until it is just above the Library list and over the word Name and release.
| Note | Putting symbols in different folders does not affect the links between them and their instances (as opposed to the way moving a graphic file into a new folder breaks an existing link on a Web page). Flash tracks and updates all references to Library items whenever you rename or move them into separate folders (within the same Library). |
The Movie Explorer is a great way of getting a visual overview of the nested relationship of symbols, Movie Clips, and other items within your document. Refer to the end of this chapter for more on the Movie Explorer.
| Caution | If you change the Undo behavior in your Flash Preferences from Document-level to Object-level, you'll lose the option to undo some authoring steps. For example, any item that is deleted from the Library is gone forever, including all instances throughout the current document (.fla). If you decide that you shouldn't have deleted an item, the only cure is to close the file without saving any changes. When you reopen the file, the Library should be intact as it was the last time the file was saved. |
Importing or copying an asset into your current project Library will occasionally invoke a Resolve Library Conflict alert box asking if you want to Replace Existing Items and Instances. This alert box appears when you are trying to add a new asset to your Library with the same name as an asset already present in your current document. If you choose not to replace the existing item, the newly added items will have the word copy added to their filenames. For example, if you have an item named photo in your current Library and attempt to add another item to the Library with the same name, the new item is given the name photo copy in the Library. To rename the added item, simply double-click on the item name in the Library list and type a new name.
If you choose to replace the existing item in your Library, all instances will be replaced with the content of the newly added item. If you choose to cancel the import or copy operation, the selected items will not be added to your current document and the existing items stored in the Library will be preserved.
| Tip | Flash offers an option to Import to Library that is especially useful when you want to bring in a series of items. Instead of having all the items dumped onto the Stage in your Document window, you can load them directly into the project Library. Select File ð Import ð Import to Library. |
EAN: 2147483647
Pages: 395
