Using Drawing Tools
The tools for drawing freehand lines and strokes in Flash come with options for applying different combinations of line processing and shape recognition. So, what does that mean exactly? These are general terms for a class of options that you can set to assist accurate drawing and manipulation of basic shapes. These options can be applied dynamically as you draw with the Pencil or Brush tool, or applied cumulatively to an item selected with the Selection tool to clean up a shape or line that you've already drawn. These are some of the Flash assistants that can help even a drafting-challenged designer create sharp-looking graphics with ease.
| Note | The biggest challenge when drawing in Flash is finding a happy medium between the degree of line variation and complexity required to get the graphic look you want, and the optimization and file size that you need to keep your artwork Web friendly. |
The Pencil Tool
You use the Pencil tool to draw lines and shapes. At first glance, it operates much like a real pencil. You can use the Pencil tool with different line styles as you draw a freeform shape. But a deeper examination reveals that, unlike a real pencil, you can set the Flash Pencil tool to straighten lines and smooth curves as you draw. You can also set it to recognize or correct basic geometric shapes. For example, a crude lumpy oval can be automatically recognized and processed into a true, or perfect, oval. You can further modify these shapes and lines after you've drawn them using the Selection and Subselect tools.
When the Pencil tool is active, one option besides the Object Drawing toggle appears in the Tools panel. This is actually a button for the Pencil Mode pop-up menu, which sets the Pencil tool's current drawing mode. The three modes, or drawing styles, for the Pencil are Straighten, Smooth, and Ink. These settings control the way that line processing occurs as you draw.
Figure 5-12 shows the same freehand drawing done with the different Pencil modes. The drawing on the left was done with the Straighten mode, the drawing in the middle was done with Smooth mode, and the drawing on the right was done with Ink mode. As you can see, each mode is more effective for certain types of lines and shapes.
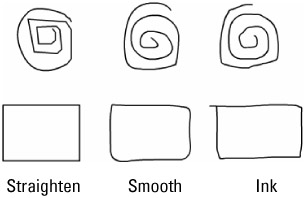
Figure 5-12: Similar sketches made using the three different Pencil modes to show how line processing affects various shapes— Straighten (left), Smooth (center), and Ink (right).
To create a pleasing finished result, you'll most likely use different Pencil modes when working on individual elements of your drawing. Here are some notes on the characteristics of the three Pencil drawing modes that you can select in the Tools panel:
-
Straighten: Drawing with the Straighten option processes your drawings while taking into account both line and shape recognition. This means that nearly straight lines are straightened, and wobbly curves are smoothed. Approximate geometric shapes, such as ovals, rectangles, and triangles, are recognized and automatically adjusted.
-
Smooth: Drawing with the Smooth option reduces the zeal with which Flash automatically processes your drawings. With the Smooth option, line straightening and shape recognition are not applied, but curved lines are smoothed. Additionally, a line that ends near another line is joined automatically, if the Connect Lines tolerance is set to Can be Distant.
-
Ink: Drawing with the Ink option turns off all line processing. Lines remain as you've drawn them. Your lines are not smoothed, straightened, or joined. There will always be a slight difference between the line preview and the final, rendered line, but this setting is as close to raw sketching as you can get in the Flash drawing environment.
You may adjust the degree to which shape recognition processes your drawings as you create them with the Pencil with the Drawing Settings found in Edit ð Preferences ð Drawing (or Flash ð Preferences ð Drawing). By default, all the Drawing Settings are Normal. You can adjust each option to make it more specific or more general. The optimal setting combinations depend on the style of drawing that you're trying to achieve, but in general, you really only need to adjust the default Normal settings for these controls if you find that you aren't getting the look you want using the Straighten, Smooth, or Ink modes with the Pencil tool.
You can also choose to further simplify lines and shapes that you have drawn with the Pencil in Ink mode by using the Selection tool to select what you've drawn and then using either the Smooth or Straighten modifiers. Or, for maximum control, manually edit extraneous points with either the Pen or the Subselect tool (as we describe in the Pen and Subselect sections later in this chapter). Here are the various Drawing Settings and options available in Preferences:
-
Connect Lines: The Connect Lines setting adjusts how close lines or points have to be to each other before Flash automatically connects them into a continuous line or shape. This setting also controls how close to horizontal or vertical a line has to be for Flash to set it at an exact angle. The options are Must be Close, Normal, and Can be Distant. This setting also controls how close elements need to be to snap together when Snap to Objects is turned on.
-
Smooth Curves: Smooth Curves simplifies the number of points used to draw a curve when the Pencil is in Straighten or Smooth mode. Smoother curves are easier to reshape and are more optimized, whereas rougher curves will more closely resemble the original lines drawn. The options are Off, Rough, Normal, and Smooth.
-
Recognize Lines: The Recognize Lines setting controls how precise a line has to be for Flash to recognize it as a straight line and automatically align it. The options are Off, Strict, Normal, and Tolerant.
-
Recognize Shapes: The Recognize Shapes setting controls how accurately you have to draw basic geometric shapes and 90-degree or 180-degree arcs for them to be recognized and corrected by Flash. The options are Off, Strict, Normal, and Tolerant.
-
Click Accuracy: Click Accuracy determines how close to an element the cursor has to be for Flash to recognize it. The settings are Strict, Normal, and Tolerant.
These drawing settings do not modify the Straighten and Smooth options for the Selection tool, which only reduce point complexity with each application to a shape or line that has already been drawn.
The Brush Tool
You use the Brush tool to create smooth or tapered marks and to fill enclosed areas. Unlike the Pencil tool, which creates marks with a single row of anchor points, the Brush tool actually creates marks using filled shapes. The fills can be solid colors, gradients, or fills derived from bitmaps. Because the Brush paints only with a fill, the Stroke color chip does not apply to the marks drawn with the brush. The Brush tool is especially well suited for artwork created using a drawing tablet. A number of settings and options are available when the Brush tool is active, giving you precise control over the type of marks that it makes.
| New Feature | In an attempt to better support animators who draw directly in Flash, Macromedia has once again modified the smoothing controls for the Brush tool. If you worked with Flash MX 2004, you may remember that a Smoothing setting in the Property inspector is available when the Brush tool is active. Use the value field or the slider menu to select a Smoothing setting between 0 and 100. The default value is 50, as it was in Flash MX 2005. Values from 0 to 39 use the Flash MX 2004 algorithm to add more points to the shape as you draw, making precise strokes with lots of internal path points to match the original stroke more closely. Values from 40 to 60 apply the new Flash 8 smoothing algorithm to create more efficient paths with a moderate deviation from the original stroke. Values from 61 to 100 use the looser Flash MX 2004 algorithm, adding fewer points to the shape and creating "smoother" strokes that may look very different than your original marks. You can use the Smoothing setting when you are drawing on a tablet or with your mouse. |
The Brush Mode Menu
The Brush tool includes options for controlling exactly where the fill is applied. The Brush mode option menu reveals five painting modes that are amazingly useful for a wide range of effects when applying the Brush tool: Paint Normal, Paint Fills, Paint Behind, Paint Selection, and Paint Inside, as shown in Figure 5-13.
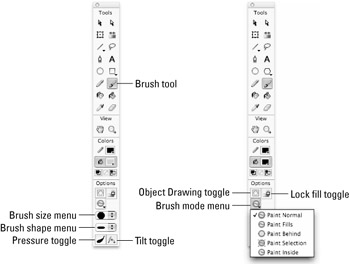
Figure 5-13: The Brush tool and options (left); the Brush mode settings menu (right)
| Note | The Pressure toggle and the Tilt toggle will only be visible in the Options area if you have a drawing tablet installed on your system. |
| Web Resource | To learn more about tablets and read some fun tutorials, visit www.wacom.com. |
The following images depict various ways in which the Brush modes interact with drawn and painted elements. The base image is a solid white rectangle drawn with a black outline. The boat outline is drawn with the Pencil tool in dark gray on top of the rectangle.
| Caution | Painting with the background color (such as white) is not the same as erasing. Although painting with a background color may appear to accomplish something similar to erasing, you are, in fact, creating a filled item that can be selected, moved, edited, deleted, and erased. Even if you can't see it, it adds to your file size. Only erasing erases! |
Paint Normal Mode
Paint Normal mode, shown in Figure 5-14, applies brush strokes over the top of any lines or fills.
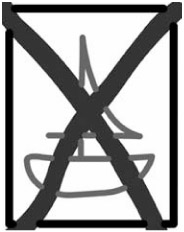
Figure 5-14: In Paint Normal mode, a dark-gray brush mark covers all elements— background, outline, fill, and drawn lines.
Paint Fills Mode
Paint Fills mode, shown in Figure 5-15, applies brush strokes to replace any fills, but leaves lines untouched.
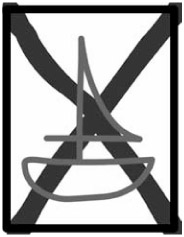
Figure 5-15: In Paint Fills mode, a dark-gray brush mark covers the white background and fill without painting over any of the lines.
Paint Behind Mode
Paint Behind mode applies brush strokes only to blank areas and leaves all fills, lines, or other items untouched. As shown in Figure 5-16, the only areas the brush mark covers are those in the background, outside the frame of the picture. Effectively, the brush has gone behind the entire shape. If the stroke had originated within the frame, it would have covered the white fill and gone behind the drawn gray lines and the black outline.
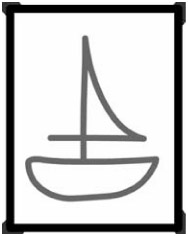
Figure 5-16: In Paint Behind mode, the gray brush mark is only visible on the background outside the frame because it has gone behind the white fill and the lines.
Paint Selection Mode
Paint Selection mode applies brush strokes only to selected fills. In Figure 5-17, a selection was made by Shift+clicking both the white fill inside the boat and inside the sail. The same gray brush marks drawn on the previous figure are now visible only inside the selected fills.
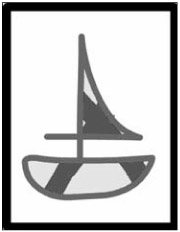
Figure 5-17: With Paint Selection mode, only the selected white fills have been covered by the brush marks.
Paint Inside Mode
Paint Inside mode, shown in Figure 5-18, applies brush strokes only to the singular fill area where the brush stroke was first initiated. As the name implies, Paint Inside never paints over lines. If you initiate painting from an empty area, the brush strokes won't affect any existing fills or lines, which approximates the same effect as the Paint Behind setting.
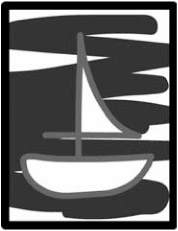
Figure 5-18: With Paint Inside mode, the brush marks only cover the area where the stroke is first started. Lines separate the white fills inside the sail and the boat shape from the background where the stroke was initiated, so those areas are not painted.
Brush Size and Shape Options
Although similar to Stroke height and style, the Brush size and Brush shape settings are unique to the Brush tool.
| Cross-Reference | The Lock Fill option is common to both the Brush tool and the Paint Bucket tool. For coverage of using the Lock Fill option with the Brush tool and the Paint Bucket tool, refer to Chapter 9, "Modifying Graphics." |
In Flash, the size of applied brush marks is always related to the Zoom setting. Therefore, using the same brush diameter creates different-sized brush marks depending on what Zoom setting you work with in the Document window (see Figure 5-19). You can paint over your whole stage in one stroke, even with a small brush diameter, if your Zoom is at a low setting such as 8 percent. Or you can use a large brush diameter to make detailed lines if your Zoom is at a high setting such as 1,500 percent.
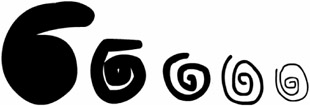
Figure 5-19: Marks made using the same brush size applied with the Document View at different percentages of Zoom
The Brush Shape option is a drop-down menu with nine possible brush shapes that are based on the circle, ellipse, square, rectangle, and line shapes. (Refer to Figure 5-9.) The oval, rectangle, and line shapes are available in various angles. You can combine these stock brush shapes with the range of brush sizes available in the Brush Size menu to generate a wide variety of brush tips. When using shapes other than circles, note that the diameter sizes chosen in the Brush Size menu apply to the broadest area of any brush shape.
Additional Brush Options for Drawing Tablets
If you use a pressure-sensitive tablet for drawing, two extra options appear in the Tools panel when the Brush tool is active. (The Pressure and Tilt toggles are shown at the bottom of the Tools panel in Figure 5-9.) The Pressure toggle enables you to use pen pressure on a tablet to vary the thickness of brush marks as you draw. Working on a tablet with this option, you can create organic-looking strokes that taper or vary in width as you change the amount of pressure applied to the tablet surface.
| Tip | To achieve pressure-sensitive eraser marks, use the eraser on the tablet pen while the Brush tool is active, rather than the Eraser tool in the Tools panel. |
Figure 5-20 shows a series of tapered marks created with a pressure-sensitive tablet using a single Brush size and a consistent Zoom setting.
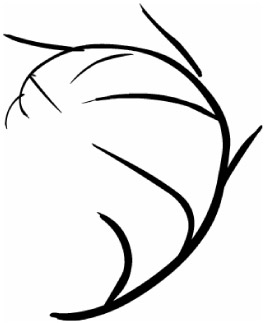
Figure 5-20: Drawing with the Brush tool on a pressure-sensitive tablet (with the Pressure option turned on in the Tools panel) creates tapered, calligraphic marks.
If you're drawing on a tablet that supports this feature, activating the Tilt toggle enables you to control the thickness and direction of strokes with the movement of your wrist. The degree of tilt is determined by the angle between the top of your stylus (or pen) and the top edge of the drawing tablet. This is a very subtle control that you'll most likely notice if you're using a large, tapered (or "flat") brush style — and if you spend hours drawing on a tablet! We didn't include a figure to illustrate this feature because it is hard to tell from finished artwork how it affects your drawings, but experienced artists will appreciate the "feel" that this option adds to the drawing environment.
| Note | Support for the Tilt feature varies on different drawing tablets. If you have a Wacom tablet, you can get current drivers and feature documentation from www.wacom.com. It is beyond the scope of this book to describe different types and features of drawing tablets, but the drawing options available in Flash 8 have been tested on a wide range of tablets, so the chances are good that they will work for you. |
The Eraser Tool
The Eraser tool (E) is used in concert with the shape and drawing tools to obtain final, usable art. As the name implies, the Eraser tool is primarily used for rubbing out mistakes. When the Eraser tool is active, three options appear on the Tools panel, as shown in Figure 5-21. Eraser mode and Eraser Shape are both drop-down menus with multiple options. For Eraser Shape, you can select rectangular or oval erasers in various sizes. Eraser modes are similar to the Brush modes we described previously.
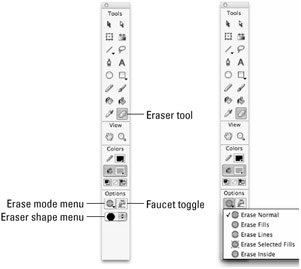
Figure 5-21: The Eraser tool has three basic options— Eraser mode, Eraser Shape, and Faucet.
You use the Eraser tool's one unique option, the Faucet toggle, to clear enclosed areas of fill. Using the Faucet is the equivalent of selecting a line or a fill and then deleting it, but the Faucet accomplishes this in one easy step. Select the Eraser tool, choose the Faucet option, and then click on any line or fill to instantly erase it. Clicking on any part of a selection with the Faucet deletes all elements in the selection.
The interaction of Eraser modes and artwork is consistent with the Brush modes available for the Brush tool. The only difference is that instead of adding a mark to a specified part of a drawing, the Eraser removes marks in a specified part of a drawing. Aside from Erase Normal, Erase Fills, Erase Selected Fills, and Erase Inside, which you will recognize from the previous descriptions of Brush modes, there is also an Erase Lines mode that enables you to remove any lines without disrupting fills.
| Note | The Eraser tool erases only lines and fills that are in the current frame of the scene. It won't erase groups, symbols, or text. When you need to erase a part of a group, you have two options: Select the group and choose Edit ð Edit Selected from the application menu (or double-click the group), or select the group and choose Modify ð Ungroup from the application menu (Ctrl+Shift+G or z+Shift+G). |
| New Feature | Drawing Objects have some of the same characteristics as groups, but they can be treated like raw shapes when you're using the Eraser tool — no need to break them apart. |
The only alternative to using the Eraser tool to remove graphic elements or areas of drawings is to select them with the Selection, Subselect, or Lasso tool, and then delete them by pressing the Delete (or Backspace) key.
| Tip | To quickly erase everything in the current keyframe (even from multiple layers), double-click the Eraser tool in the Tools panel. Don't double-click on the Stage with the Eraser selected; just double-click the Eraser button on the Tools panel. And — poof! — everything in the keyframe is gone. |
EAN: 2147483647
Pages: 395