Optimizing Vector Graphics for Use in Flash
Adobe Illustrator and Macromedia Fireworks are two of the most commonly used vector programs, and there are many other programs that also offer tools or techniques that can add a special touch to your Flash designs. The best effects are often complex, and a detailed description of specific techniques in other programs is beyond the scope of this book. However, with an understanding of how Flash interprets imported vector files, you will be able to apply the information in this chapter to optimize your workflow, regardless of what specific programs you choose to work with.
| Web Resource | FreeHand has not kept pace with the evolution of other Macromedia applications and it is not included as part of the Studio suite. As a result, more people may be more familiar with Fireworks as a vector authoring companion to Flash. FreeHand does offer some unique tools and options and it's worth a look if you'd like to expand your toolkit. The trial version of FreeHand is available from Macromedia's Web site, along with tutorials and documentation. We have archived the "Working with Vector Graphics" chapter from the Flash MX 2004 Bible (Wiley, 2004), which included coverage of FreeHand. Visit www.flashsupport.com/archive, and look for Chapter 36, "Working with Raster Graphics." |
| Cross-Reference | For coverage of how imported vector files can be modified in the Flash authoring environment, refer to Chapter 16, "Importing Artwork." If you are looking for more detailed information on production techniques in Macromedia programs beyond Flash, a good place to start is the Macromedia Studio 8 Bible (Wiley, 2006). |
Maintaining Color Consistency
Flash can only use an RGB color space, meaning that it renders colors in an additive fashion — full red, green, and blue light added together produce white light. Whenever possible, you should use RGB color pickers in your preferred drawing application. If you're using Illustrator, specifying colors with the RGB color picker ensures that both copied-and-pasted objects and exported files will appear as you see them in the original workspace. If you use CMYK (cyan, magenta, yellow, and black), then you will notice color shifts when the artwork is imported into Flash. Fireworks is an RGB graphics environment, so your artwork will be Flash and Web-friendly.
| Caution | Some vector file formats cannot save artwork color values in RGB space. If you're using Adobe Illustrator and you choose to save to Illustrator 6 or lower format, RGB values will not be saved, and color shifts will result. |
| Cross-Reference | For more coverage of color issues related to Flash production, please refer to Chapter 7, "Applying Color." |
Saving in the Proper File Format
As long as you save your file to the correct format and version, Flash can import most common vector formats, with a few limitations on support for editable text and layers. Both Macromedia Fireworks and Adobe Illustrator (version 9.0 or higher) support export to the SWF format — this is one of the most consistently compatible vector formats for importing graphics to Flash, although it does have limitations. Native Illustrator files (.ai) saved directly from Illustrator CS have not been a reliable format for import to Flash MX 2004, but from the testing we've done, compatibility between Illustrator CS2 files (.ai) and Flash 8 is much improved.
| Note | If you are working with Adobe Illustrator CS, use the File ⇨ Export command to save your file in a format that will import to Flash reliably. The most compatible formats include Macromedia Flash (.swf) and Acrobat PDF (.pdf). Files saved directly (with the Save or Save As command) from Illustrator CS in AI format do not always import correctly to Flash. Officially, Flash 8 only supports .ai files in version 10 or lower, .pdf files in version 1.4, and .eps files in version 3.0 and earlier. |
Fireworks files (.png), FreeHand files (.fh), and Illustrator files (.pdf and .ai) can be imported to Flash with layers and symbols preserved, but .eps files and .swf files exported from Illustrator will be flattened into a single layer. We discuss the various methods for importing files into Flash from Illustrator later in this chapter.
| Cross-Reference | You can also use the coverage of Fireworks in Chapter 36, "Working with Raster Graphics," which is included as a PDF file on this book's CD-ROM, as reference for working with Fireworks files with vector content. For a detailed discussion of some of the issues related to rendering imported artwork in vector and raster format, refer to Chapter 16, "Importing Artwork." |
Converting Text to Outlines
Many of the designs you import from other programs may consist only of vector shapes, but there are times when you also need to handle text. An important aspect of vector graphics that comes up, especially when working with other designers, is font linking and embedding. With most vector file formats, such as Illustrator, FreeHand, or EPS, you can link to fonts that are located on your system. However, if you give those files to someone else who doesn't have the same fonts installed, he or she won't be able to work with or view your file as it was originally designed. Some formats (such as PDF) enable you to embed fonts into the document file, which circumvents this problem. However, whether the fonts are linked or embedded, you may be unnecessarily bloating the size of the graphic file by including all of the font information when you need to render only a few letters in a logo.
You can convert any text into outlines (aka paths) in most drawing or illustration programs. In Fireworks, select the text as a text block (with the Selection tool, not the Text tool) and choose Text ⇨ Convert to Paths. In Illustrator, select the text as an object and choose Type ⇨ Create Outlines.
| Cross-Reference | We discuss converting text to outlines in more detail in Chapter 16, "Importing Artwork." |
If you have a lot of body text in the file, you may want to copy the text directly into a Flash text box and use a _sans, _serif, or _typewriter device font. These fonts do not require any additional file information (unlike embedded fonts) when used in a Flash movie and will result in smaller .swf files than if you included outlines of all the text.
| Cross-Reference | For more detailed information on optimizing and managing fonts in Flash projects, refer to Chapter 8, "Working with Text." |
Tracing to Convert Rasters to Vectors
A handful of applications, including Flash and FreeHand, let you trace raster artwork to create a vector "drawing." Adobe's stand-alone product for tracing images, Streamline, has been discontinued in favor of the more advanced tracing tools now integrated as the Live Trace feature in Illustrator CS2.
| Note | Streamline has not been updated since version 4.0 and will only run on OS X in Classic mode. Get more info on the retirement of Streamline from Adobe's Web site at www.adobe.com:80/products/streamline/main.html. |
| Cross-Reference | For coverage of Flash's native Trace Bitmap command, refer to Chapter 16, "Importing Artwork." |
With any tracing application, keep these points in mind:
-
Higher resolution images always yield better "traced" vector artwork. With more pixels to define edges, the application can better detect shapes.
-
Images with many colors, subtle gradients, or very complex patterns may need to be simplified before they can be traced and effectively converted into vector files.
-
Sharper images (such as clearly focused images) and higher contrast images produce better traced artwork. Applying Photoshop or Fireworks filters to reduce the complexity of a photographic image can make it easier to trace.
-
One-color images or scans, like those of hand-drawn sketches with pencil or ink, produce the best traced results.
With all of the software and tool options available, it can be difficult to keep track of all the variables. The most important thing to decide is how you want your final artwork to look. For example, if you want a minimal silhouetted vector look, then it may actually be better to create a clipping path from the bitmap and fill it with solid color manually than to use an autotrace tool. On the other hand, if you are trying to maintain detail in an image and your goal is simply to reduce your file size, it may be best to import an optimized bitmap directly into Flash (where you can then apply the Break apart command and erase any unnecessary parts of the image).
The two traps that you want to avoid in production are bloated file sizes and needless quality loss. There are certainly times when you will have to compromise on image size or resolution in order to keep your Flash movies streamlined, but don't make the mistake of assuming that the worse the image looks, the smaller your file will be — this is not always the case.
| Caution | Surprisingly, the results of some traced raster images can produce even larger vector images. Remember that vectors were designed for solid colors, limited blends, lines, and points. Every file format has its purpose, and sometimes raster images are smaller than their traced counterparts. With a little practice, you'll be able to judge what kind of images will produce effective traced versions. |
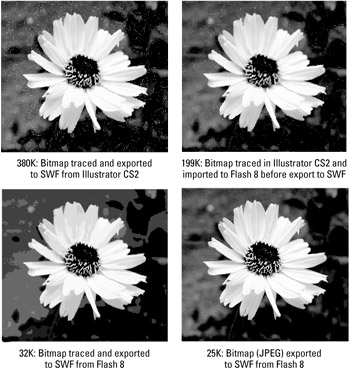
Figure 37-1 compares the same bitmap image in a series of different workflow options. As you can quickly see, the differences in file size do not always have the same relationship to image quality as you might expect.

Figure 37-1: Even when the final image quality is similar, the file sizes that are achieved with different workflow options can vary widely.
In our production testing overall, Flash proves to be the first choice for achieving high image quality and small file sizes with traced or optimized bitmaps. The lesson we've learned is that unless we need a special effect that can't be created directly in Flash, it's best to import high-quality images (scaled appropriately for the movie size) directly to Flash and use the native Flash authoring tools to modify the image if needed.
Reducing Vector Complexity
Although Flash provides robust tools for modifying the complexity of vector artwork, if you're creating artwork in other applications, you generally have some options for streamlining the artwork before bringing it into your Flash project.
| Cross-Reference | For coverage of the Flash 8 native tools for modifying artwork, refer to Chapter 9, "Modifying Graphics," and Chapter 16, "Importing Artwork." |
Combining Paths
You can use the Pathfinder panel (View ⇨ Pathfinder) in Illustrator to control how overlapping paths are combined. Not only does this reduce the complexity of the path, but it also makes the graphic easier to edit or move. There are several different options for combining overlapping paths, including merging or cropping specific sections to create custom shapes.
| Note | The default behavior of ungrouped shapes in the Flash authoring environment achieves a kind of "automatic" optimization by combining or merging overlapping shapes on the same layer. This takes a little getting used to, but it eliminates the need to spend time analyzing and combining separate paths or Drawing Objects to optimize your graphics. |
| New Feature | The new Object drawing mode in Flash 8 provides the option of working with shapes that behave more like shapes in Illustrator or groups in Flash — lines, strokes, and individual polygons remain independent and will not accidentally merge with or erase other shapes on the same layer. Raw shapes can be converted to Drawing Objects using the Modify ⇨ Combine Objects ⇨ Union command. If you are working with Drawing Objects, the Combine Objects menu enables other options for combining graphics, similar to the Pathfinder options in Illustrator. |
To apply a command for combining separate paths, select the overlapping paths by Shift+clicking each object (or by dragging a selection box around all of the elements you want to modify). In the Illustrator Pathfinder panel, select an option to combine the overlapping elements and create a unified path shape.
| Caution | The stacking order of overlapping shapes may affect how paths are combined — if your first try doesn't work, analyze the shapes you are trying to combine and make sure that you have them in the right order for the combine commands to work. For example, if you want to modify a shape by "trimming" it with some other shapes in Adobe Illustrator or in Macromedia Flash, you need exactly opposite stack orders to create the same effect. In Illustrator, you must make certain that the shapes you want to use as "trimmers" are behind the main shape in the stack before using the Minus Back command. To achieve the same effect in Flash, you must move your main object to the back of the stack and use the Punch command to trim the main object with the objects that are stacked in front of it. |
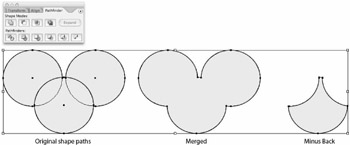
Figure 37-2 shows three individual oval outlines in Adobe Illustrator (left) combined using the Merge option (center), and the Minus Back option (right) to create unified paths that describe different simplified polygons.

Figure 37-2: The Pathfinder panel in Illustrator offers a variety of options for simplifying overlapping paths.
Simplifying Paths
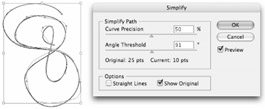
In addition to combining paths, you can simplify complex artwork by reducing the number of points used to describe the path (or a set of paths). The controls available for simplifying paths in Adobe Illustrator are slightly different than the controls in Macromedia Flash (as shown in Figure 37-3), but the final result is similar. Simplifying reduces the number of the points that define the lines and curves of a vector graphic to make the file smaller and easier to edit. The goal is to remove as many extraneous points along individual paths as you can without distorting the final shape too much.

Figure 37-3: The Simplify dialog box in Adobe Illustrator for modifying the points in the paths that describe a vector shape
To simplify vector artwork, select the paths that describe the object and choose the Simplify command and settings available in your program of choice. The commands and settings for Illustrator are as follows:
-
In Illustrator, choose Object ⇨ Path ⇨ Simplify. Along with controls for Curve Precision (lower values result in more simplified shapes, higher values can actually add points to your shapes) and Angle Threshold, the Illustrator Simplify dialog box includes three handy options:
-
Preview: Select this check box to see a live preview of your settings. When you make changes, the preview may not always update until you deselect and reselect the Preview check box.
-
Straight Lines: Select this check box to favor straight lines over curves — similar to the Straighten modifier in Flash. Use this option in concert with the Angle Threshold control to define the allowable range of angles in the graphic. An Angle Threshold of 0 degrees will allow any angle in the selected shape, a setting of 90 degrees will convert all angles to right angles, and the highest setting of 180 degrees will reduce the shape to a single line defined by two points (with a relationship of 180 degrees).
-
Show Original: Select this check box to keep an outline view of your original shape for comparison as you preview various simplify settings.
-
EAN: 2147483647
Pages: 395
- Structures, Processes and Relational Mechanisms for IT Governance
- An Emerging Strategy for E-Business IT Governance
- Assessing Business-IT Alignment Maturity
- Measuring and Managing E-Business Initiatives Through the Balanced Scorecard
- A View on Knowledge Management: Utilizing a Balanced Scorecard Methodology for Analyzing Knowledge Metrics