Exporting Raster Images from Flash
If you've been wondering how to use your artwork in Flash with other raster-based applications, then this section is for you. Many people prefer to use Flash as their primary drawing and illustration environment, thanks to Flash's uniquely intuitive set of vector drawing tools. Combined with a pressure-sensitive graphics tablet, Flash can indeed be a powerful illustration program.
Why would you want to export raster-based images from a vector-based application? The answer is quite simple: Some applications work better with raster (or bitmap) images than they do with vector images. Video-editing applications and other motion graphics programs intended for producing broadcast content usually work better with bitmaps instead of vectors. If the application in which you want to use Flash artwork does support vector file formats such as EPS or AI, then it's generally better to use those instead of bitmap-based formats such as BMP or PCT.
| Cross-Reference | We discuss using external vector applications in Chapter 37, "Working with Vector Graphics," which is included as a PDF file on this book's CD-ROM. If you want the best-quality vector artwork exported from Flash, jump to that chapter. |
If you are unsure of the format to use in your graphics program, refer to Table 36-1. Afterward, we show you how to export a frame's artwork as a static raster image.
| Flash Export Format | File Extension | Comments |
|---|---|---|
| BMP (Windows Bitmap; Windows only) | .bmp | Can be used with all Windows and some Mac applications. Variable bit depths and compression settings with support of alpha channels. Supports lossless compression. Ideal for high-quality graphics work. |
| GIF (Graphics Interchange File) | .gif | Limited to a 256-color (or less) palette. Not recommended as a high-quality Flash export format, even for Web use. |
| JPEG (Joint Photographic Experts Group) | .jpg, .jpeg | Supports 24-bit RGB color. No alpha channel support. Recommended for most high-quality graphics work that will not need to be re-edited. Note that format throws out color information due to its lossy compression method. |
| PICT (Picture) | .pct , .pict | Can be used with many Windows and all Mac applications. Variable bit depths and compression settings with support of alpha channels. Supports lossless compression. Can contain vector and raster graphics. Ideal for high-quality graphics work. |
| PNG (Portable Network Graphic) | .png | Supports variable bit depth (PNG-8 and PNG-24) and compression settings with alpha channels. Lossless compression schemes make it an ideal candidate for any high-quality graphics work. |
To export a frame from the Flash 8 Timeline in a raster image format using the Export command, follow these steps:
-
Move the Playhead in the Flash Timeline to the frame that contains the artwork that you wish to export.
-
Choose File ⇨ Export ⇨ Export Image.
-
Select a destination folder and enter a filename. Select your preferred raster image format in the Format drop-down menu.
-
Depending on the file format you selected, you are presented with an export dialog box with options specific to that file format.
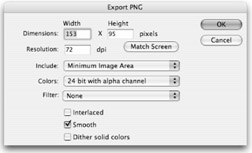
The dialog box for PNG export is shown in Figure 36-17. We look at the general options available for all raster formats and at some file-specific settings next.

Figure 36-17: The export options available for PNG format include options common to all raster formats, as well as some file-specific options.
| Cross-Reference | If you would prefer to use the Publish Settings dialog box to specify options for publishing the content of a frame in your Flash movie to raster format, refer to the coverage of GIF, JPEG, and PNG settings in Chapter 21, "Publishing Flash Movies." The explanations of settings and export options for the Publish Settings dialog box also apply to the options in the Export Image dialog box. |
General Export Options in Raster Formats
Every raster image format in Flash's Export Image dialog box has the same basic options, and all pertain to the image size, resolution, and bit depth (or number of colors) for the exported image. You can also trim any unused Stage area from the final exported image. As you will see in the next section, for each specific raster format there are other unique settings in addition to the main options we describe here:
-
Dimensions: The Width and Height options control the image's width and height, respectively, in pixels. Note that the aspect ratio of these values is always locked. You cannot control the Width value independently of the Height value.
-
Resolution: Measured in dpi (dots per inch), this setting controls the quality of the image in terms of how much information is present in the image. By default, this setting is 72 dpi. If you want to use Flash artwork in print or high-resolution graphics work, enter a higher value, such as 300 or 600. If you change this setting accidentally, pressing the Match Screen button reverts the value to 72 dpi, the resolution of most computer monitors. Note that changing the value for this setting also changes the Width and Height values in the Dimensions setting.
-
Include: This drop-down menu determines what Flash content is included in the exported image.
-
Minimum Image Area: When this option is selected, the image size (aka dimensions) is reduced to the boundary of Flash artwork currently on the Stage. This means that if you have only a circle in the middle of the Stage, the dimensions of the exported image match those of the circle — the rest of the Flash Stage or background won't be included.
-
Full Document Size: When this option is selected, the exported image looks exactly like the Flash Stage. The entire frame dimensions and contents are exported.
-
-
Color depth (or Colors): This drop-down setting controls the color range of the raster image. The higher the bit depth, the wider the color range. Depending on the file format, not all options are identical. We define the most frequently occurring options here. This option is not available for JPEG images, as that format must always be 24-bit. The options include the following:
-
8-bit grayscale: This option limits the image to 256 levels, or values, of gray. It is equivalent to a typical scan of a black-and-white photograph.
-
8-bit color: This option reduces the image to 256 colors. You may notice unsightly dithering in the image as a result. See Chapter 21, "Publishing Flash Movies," for more information regarding dither.
-
24-bit color: This option enables the image to include any of the 16.7 million colors available in true RGB color space. Use this option for the best color quality.
-
32-bit color w/ alpha: This option enables the same range of colors as 24-bit color, but also adds an alpha channel using the Flash movie's background color as a matte. If your raster image program can read alpha channels, then the Flash background color is transparent.
-
Other Raster File Format Options
Each specific file format Export dialog box will also have some additional export options. In this section, we look at the additional options available for BMP (Windows only), PCT or PICT, and GIF.
| Cross-Reference | We discuss the JPEG, GIF, and PNG format options in Chapter 21, "Publishing Flash Movies." Because a problem exists with publishing adaptive GIFs in the Macintosh version of Flash, however, we describe the GIF export options in this chapter, too. |
Export BMP (Windows Only) Options
The Windows Bitmap (.bmp) file format has numerous options. In addition to the general export settings (described previously), the BMP Export dialog box has an options setting containing a check box for Smooth. When this option is selected, Flash anti-aliases all Flash artwork, making the edges nice and smooth. If this option is unchecked, Flash artwork is rendered in an aliased fashion, in which edges may appear jagged and rough.
| Caution | In most external graphics applications, the 32 bit w/ alpha option in the Colors drop-down menu is not supported. You should use the 24-bit option if you experience difficulties using 32-bit BMP files. If you need to export an image with alpha channel support, use the PNG format in the Windows version of Flash. |
Export PICT Options
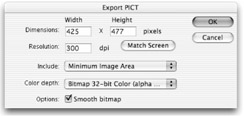
The PICT (short for Picture) format is a standard Macintosh graphic file format. Any Mac OS application that uses graphics can use it, and, with QuickTime, you can also use PICT (or .pct) files on Windows computers. PICT files can contain both vector and raster (bitmap) information. Usually, only raster-based PICT files are truly cross-platform (see Figure 36-18).

Figure 36-18: The PICT format has a unique Objects option (in the Color depth drop-down menu) in addition to traditional raster-based options.
The following options can be used to control how your Flash artwork is converted to PICT format:
-
Color depth: This drop-down menu is the same as the Colors setting for other rasterimage file formats. (It has a few peculiarities that we define in the next section.) There are six different color depth options, as follows:
-
Objects: Because PICT files will support vector or raster information, you can specify Objects to export Flash artwork as vector-based images.
Caution Selecting the Object color option enables you to select Use PostScript in the Options setting. Use PICT output that contains PostScript with caution, as it can produce undesirable results. If you need PostScript with your output, it is better to use Illustrator or EPS as the export format.
-
Bitmap 1-bit B/W: This option converts all colors to either black or white, with no intermediate values of gray. It is equivalent to the Bitmap image mode in Photoshop, and gives a fax document look to your Flash artwork.
-
Bitmap 8-bit Gray: This option converts your Flash artwork colors to 256 values of gray.
-
Bitmap 8-bit Color: This option creates an adaptive palette of 256 colors for the exported image.
-
Bitmap 24-bit Color: This option produces the highest-quality raster-based PICT files, enabling any color in the RGB color space to be represented. This is usually the preferred color setting for images that will be used for graphics work in other applications.
-
Bitmap 32-bit Color (alpha channel): This option has the same color depth as 24-bit color, with the addition of an alpha channel (or transparent mask). Any unoccupied areas of the Flash Stage are used to determine the transparent areas of the alpha channel.
-
-
Options: The PICT Export dialog box displays only one other option. The options that are displayed vary depending on the Color depth setting.
-
Smooth bitmap: If you choose any of the Bitmap color options in Color Depth, then you have the option of anti-aliasing (or smoothing) Flash artwork. Smoothing produces cleaner edges on Flash vector-based artwork.
-
Include PostScript: If you choose Objects from the Color Depth menu, you can enable the Include PostScript option. This option optimizes the file's settings for output to a PostScript-compatible printer.
-
Export GIF Options
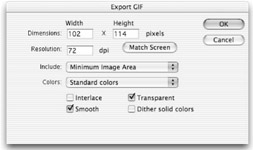
The check box options in the Colors section of the Export GIF dialog box (see Figure 36-19) are discussed in the "Using the GIF settings" section in Chapter 21, "Publishing Flash Movies." The Colors drop-down menu is slightly different, however. Also, as we mentioned in a previous note, the Publish Settings in the Macintosh version of Flash do not create adaptive GIF images (even if you have selected the option to do so).

Figure 36-19: Export options that are specific to the GIF format
| On the CD-ROM | You can see the effect of each of these color options by looking at a series of GIF images created from a test Flash movie, gifColors.fla, located in the ch36/GIFexport folder of the CD-ROM that accompanies this book. Each GIF color depth setting was applied to this movie and saved as a separate GIF image. These images are also printed for your reference in the color insert pages of the book. |
-
Colors: As stated in the discussion regarding general options, this setting controls the range of colors contained in the exported image. GIF images can use a variety of bit depths with the overall 8-bit color depth setting. The fewer the colors, the smaller the resulting GIF file. The three different approaches to color conversion are as follows:
-
Black & White: This option is equivalent to a 2-bit color depth, and converts all Flash colors to one of three colors (Web hex in parentheses): black (#000000), middle gray (#808080), or white (#FFFFFF).
-
4, 8, 16, 32, 64, 128, or 256 colors: These options create the respective color ranges within the GIF format. Flash determines which colors are used for each setting, similar to the adaptive palette type in Photoshop.
-
Standard colors: This option creates GIF images that use the 216 Web-safe palette.
-
EAN: 2147483647
Pages: 395
- Structures, Processes and Relational Mechanisms for IT Governance
- A View on Knowledge Management: Utilizing a Balanced Scorecard Methodology for Analyzing Knowledge Metrics
- Measuring ROI in E-Commerce Applications: Analysis to Action
- Governance in IT Outsourcing Partnerships
- The Evolution of IT Governance at NB Power