Customizing the Actions Panel
The Actions panel in Flash 8 (and the Script editor in Flash Professional 8) is the primary place for adding interactivity to your movies, which you do by writing your own ActionScript code.
| Note | Whenever you open or create an ActionScript file (.as) in Flash Professional 8, you are using the Script editor to type your code. You do not use the Actions panel whenever you edit an .as file in Flash Professional 8. |
Code Hints
If you have code hints enabled when you are typing ActionScript, a pop-up window appears containing relevant syntax, method, and event completion tips. This very useful tool is helpful when you are writing ActionScript because it reveals the suggested syntax of the function or method. Flash 8's code hints, however, work best when it knows what class of object you are addressing. For example, if you name your Movie Clip instance with an _mc suffix, the Actions panel knows that the object is a MovieClip object. When writing code, the most relevant action out of several suggestions is highlighted in the code hints pop-up menu, as shown in Figure 32-1.
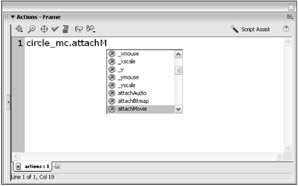
Figure 32-1: The Code Hints menu
If you press the Enter key at this time, the method or function is completed for you. The cursor is then positioned at the end of the line and a tooltip pops up, providing the necessary parameters for the function or method you are typing. As you type your code, the tooltip makes the parameter you are writing bold. Refer to Figure 32-2 for an example of the Code Hints tooltip.
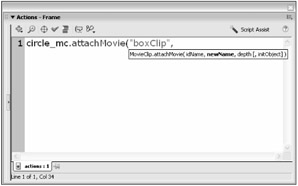
Figure 32-2: The Code Hints tooltip indicates the correct parameters for the attachMovie() method.
If you use ActionScript 2.0's strict typing for variable declarations, you can forego the use of suffixes for your instance names. Flash 8 can automatically show you the code hints for a class of objects if you declare the object's type. For example, if you type the following code into the Actions panel, Flash 8 knows that mcHolder is a MovieClip object:
var mcHolder:MovieClip = createEmptyMovieClip("mcHolder", 1); | Tip | If you're following along and typing this code into the Actions panel, notice that the Code Hints menu appears after you type the colon (:) following the mcHolder term. This hint menu displays most of the class names available in ActionScript. |
Then, if you refer to mcHolder later in your code (as shown in Figure 32-3), the code hints for the MovieClip class appear.
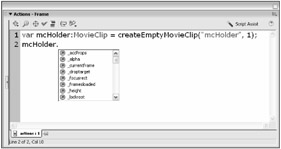
Figure 32-3: Code hints work for ActionScript 2.0 declared objects as well.
Code hints remove a lot of the guesswork from writing ActionScript. Using this feature is often faster than traversing the massive list of nodes in the Actions toolbox. There are a few settings you can modify to customize the way code hints work and act.
We'll walk you through the options to customize code hints:
-
Choose Edit ⇨ Preferences (Windows) or Flash ⇨ Preferences (Mac OS X).
-
Select the ActionScript category. We will focus on the Editing options section.
Tip You can also access this tab in the Preferences dialog box by selecting Preferences from the Actions panel options menu.
-
The Automatic indentation check box should already be selected. When you type code into the Script pane, this option controls how your code indents. Adjust the Tab size value to increase or decrease the spacing of the indentation.
-
Make sure the Code hints check box is selected in order to enable them. We recommend keeping the Delay slider at a value of 0 seconds, which makes the code hints appear automatically as you type. Refer to Figure 32-4 to see how the ActionScript Editor tab should appear.
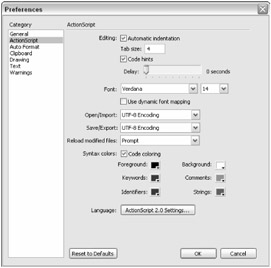
Figure 32-4: The default settings for the Actions panel
If you prefer not to have Code Hints on all the time, you can invoke a code hint whenever needed. While typing your code in the Script pane, do one of the following:
-
Click the Show Code Hint button in the Action panel's toolbar.
-
Select Show Code Hint from the Actions panel options menu.
-
Press Ctrl+spacebar (Windows) or Control+spacebar (Mac).
Syntax Coloring
A feature that was added in the original release of Flash MX was the capability to choose how your ActionScript is colored. Flash 8 has this feature as well. This is known as syntax coloring, and it helps to visually "divide" your ActionScript. There are many elements to ActionScript such as variables, functions, constants, and statements. Using syntax coloring makes it much easier to read ActionScript. Set up your Syntax color settings so that they are easy to read, but also follow common "standards" in syntax highlighting.
-
Create a new Flash document by choosing File ⇨ New.
-
Select the first frame of Layer 1 and open the Actions panel by choosing Window ⇨ Actions (F9 or Option+F9 on Mac).
-
Enter the code shown in Listing 32-1 into the Actions panel. This code can be used for testing and modifying syntax coloring because it uses most of the different elements of ActionScript.
Listing 32-1: Sample Code to Aid Syntax Color Settings

#include "externalActions.as" // This is a one line comment. /* This is a multiple line comment. */ var nIdx:Number = 30; var sText:String = "Flash Video"; if (nIdx != 4) { var snd:Sound = new Sound(this.mcTarget); snd.loadSound("soundFile.mp3"); } else { mcCircle._alpha = this.mcTarget._alpha; }
-
Open the Preferences dialog box (to the ActionScript tab) by selecting Preferences from the Actions panel options menu. See Figure 32-5.
-
Refer to the Syntax colors section in the ActionScript category. You can turn syntax coloring on or off by selecting or clearing the check box next to Syntax colors, respectively.
-
Select the Foreground color chip and choose black (#000000) from the pop-up swatch menu. The Foreground option sets the default color of the text in the Actions panel. (Unless you changed this setting earlier, the default value should already be black.)
-
Select the Keywords color chip and choose blue (#0000FF) from the pop-up swatch menu. This blue color highlights all keywords such as var, if, and else.
-
Select the Identifiers color chip and choose a medium green (#009900). This color is used to highlight terms that are methods and properties of classes, as well as class names themselves.
-
Set the Background color chip to white (#FFFFFF). You should use white because it is likely you will spend hours at a time typing ActionScript, and black text on a white background has high contrast and is more forgiving on your eyes than a colored background might be. (Unless you changed this setting earlier, the default value should already be white.)
-
Set the Comments color chip to a bright orange (#FF9900). Most programming applications use a gray for the comment color. We have chosen an orange as we believe that commenting code is a very important (and often neglected) part of authoring (and learning) code. Using a more visible color helps comments stand out more easily from the rest of the code.
-
Finally, select red (#FF0000) in the Strings color chip. Red is a common color for strings in many programming packages that have syntax coloring.
-
Click OK to close the Preferences dialog box. Make sure you have the Actions panel open and frame 1 of Layer 1 selected so that you can see the colors in use.
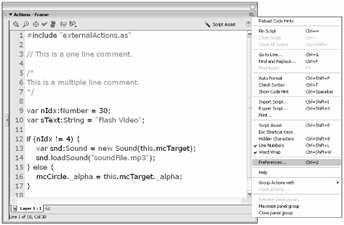
Figure 32-5: Accessing the Preferences from the Actions panel
You can modify these colors if you prefer something different — the point of these steps is to illustrate where you can change the colors of your ActionScript code and visibly see those changes on the test code we provide.
EAN: 2147483647
Pages: 395