Printing with ActionScript
Using the new PrintJob class introduced with Flash Player 7 ActionScript, you can enable your Flash movies to output Flash artwork, text, and bitmaps. With these actions, you can do the following:
-
Create Flash ads that have printable specifications for e-commerce merchandise. Imagine if the next car ad you saw on your favorite Web site automatically printed dealer locations and maps without having to go to the car manufacturer's Web site?
-
Make Flash coupons. You can design printable coupons for e-tailers on the Web that can be printed and redeemed at their brick-and-mortar stores.
-
Automate dynamic Web-generated invoices and receipts at e-commerce sites. With ActionScript, you can format ordered items and add dynamic data to printable sheets.
-
Print rich vector illustrations or photorealistic bitmaps from a Web site. You can design Flash portfolio sites that print samples of stock images, or create personalized vector artwork that can print unique images for each visitor.
-
E-mail printable Flash artwork to clients. The next time you have a proof of concepts or finished artwork that needs final approval, you can e-mail your clients the Flash artwork in a stand-alone projector or .swf file.
-
Design custom contact information pages. Are you sick of HTML tables that won't print your nice row-and-column-formatted pages of information consistently from browser to browser? Printable Flash frames print beautifully each time. You can even add a visitor's contact information to a dynamic database and print it.
Although we can't describe how to do all these tasks in the space of this chapter, we will show you how to get started with the last idea. The following exercise shows you how to use the new PrintJob class to build pages that can be sent to a user's printer. You'll also practice new ActionScript 2.0 coding conventions using strict data types.
| Note | Because Flash natively uses vector artwork, it translates best when it is output to a PostScript printer. Nevertheless, the Flash Player produces high-quality output to both PostScript and non-PostScript printers. |
| Caution | The PrintJob class is only available for use in Flash Player 7-compatible movies. If you need to generate printable output for Flash Player 5 or 6, use the older print() and printAsBitmap() functions, as discussed in the Flash 5 Bible by Robert Reinhardt and Jon Warren Lentz (Wiley, 2001) and the Flash MX Bible by Robert Reinhardt and Snow Dowd (Wiley, 2002). |
-
Open the printjob_starter.fla file in the ch27 folder of this book's CD-ROM. This document has sample artwork in the library that you can use to practice printing exercises. Resave this document as printjob_noscale.fla.
-
Rename Layer 1 to mcContent.
-
Create a new Movie Clip symbol (Insert ð New Symbol) named contentClip. Inside of this symbol (in Edit mode), rename Layer 1 to page border.
-
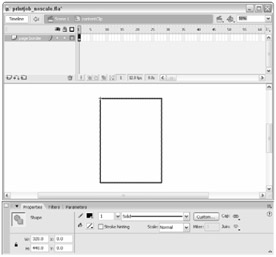
Select frame 1 of the page border layer. Using the Rectangle tool, draw a nonfilled rectangle with a black stroke. After you have drawn the rectangle, select the entire outline, and open the Property inspector. Choose a line style of Solid, at 1 px. In the width and height fields, enter values that are in the same aspect ratio as an 8.5" x 11" piece of paper. For example, as shown in Figure 27-10, the size 320 x 440 uses the same aspect ratio. Position the artwork's left corner at 0, 0.
-
Add another layer in the contentClip timeline, and rename this layer content.
-
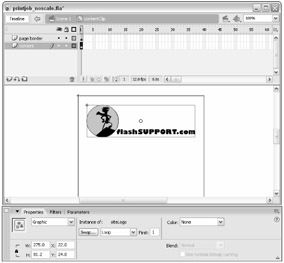
Open the Library panel (Ctrl+L or ?+L), and drag an instance of the siteLogo symbol to frame 1 of the content layer. Use the Free Transform tool to resize the artwork to fit within the frame artwork you created in Step 3. See Figure 27-11.
-
Save your Flash document.
-
Go back to the Main Timeline (that is, Scene 1). On frame 1 of the mcContent layer, drag an instance of the contentClip symbol from the Library panel to the Stage. In the Property inspector, name this instance mcContent. Do not resize the instance. For now, just let the bottom edge of the instance run off the Stage.
-
On the Main Timeline, create another layer named cbtPrint. Place this layer above the mcContent layer. The cbtPrint layer will hold a Button component that the user can click to print the mcContent instance.
-
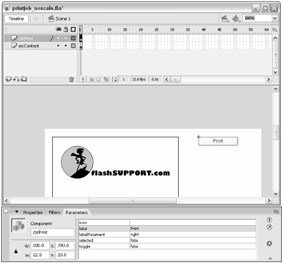
On frame 1 of the cbtPrint layer, drag an instance of the Button component from the Components panel to the Stage. In the Property inspector, name this instance cbtPrint. In the Parameters tab of the inspector, type Print into the label field. Refer to the settings shown in Figure 27-12.
-
Create another layer, and name it actions. Place this layer above the other layers.
-
Now, you're ready to add the ActionScript that will print the mcContent instance. Select frame 1 of the actions layer, and open the Actions panel (F9, Option+F9). In the Script pane, type the code shown in Listing 27-6.
Listing 27-6: The printContent() Function

1. var cbtPrint:mx.controls.Button; 2. 3. function printContent():Void { 4. var pj:PrintJob = new PrintJob(); 5. var mc:MovieClip = mcContent; 6. var bInit:Boolean = pj.start(); 7. if (bInit) { 8. trace("printing..."); 9. pj.addPage(mc); 10. pj.send(); 11. } else { 12. trace("print aborted by user"); 13. } 14. } 15. 16. cbtPrint.addEventListener("click", this.printContent);
Line 1 declares the cbtPrint instance as a Button component. By strong typing your variables (and instances) in ActionScript, the Actions panel displays the code hints for that variable (or instance) whenever you type the name and follow it with a period.
Line 3 declares a printContent() function. Line 4 declares a local variable named pj, set to use the PrintJob data type, which invokes the constructor for the PrintJob class. Line 5 creates a local variable named mc, pointing to the mcContent instance.
Line 6 uses the start() method of the PrintJob class to initiate a print session on the user's machine. When the start() method is invoked, the system's standard Print dialog box appears. If the user clicks OK in this dialog box, then lines 8 through 10 execute. If the user cancels the print request, lines 11 through 13 execute. If the user clicks OK, the local variable bInit is set to true. If the user cancels the dialog box, bInit is set to false.
Line 7 checks the result of the user's input in the Print dialog box. If bInit is true, then lines 8 through10 execute. In line 8, a trace() message is sent to the Output panel, indicating that a print job is being submitted. In line 9, the addPage() method of the PrintJob class is invoked, specifying the mcContent instance, represented by the variable mc, as the target instance to print. The addPage() method enables you to submit individual pages in a print job that is sent to the printer. When all of the addPage() methods are finished, you must initiate a send() method to complete the print job, as demonstrated in line 10.
If the user cancels the Print dialog box, lines 11 through 13 execute. In line 12, a trace() message is sent to the Output panel, indicating that the print request was denied.
Finally, after the function is declared, the printContent() function is added as an event listener for the cbtPrint instance (line 16). Now, when the user clicks the Button component, the printContent() function will be invoked.
-
Save your Flash document, and test the movie. When you click the cbtPrint instance, you should see the Print dialog box. If you click OK, the Output panel displays the "printing..." message. The first frame of the mcContent instance will print at 100 percent on the outputted page. To accurately foretell what your printed dimensions will be in inches, divide the pixel width and height of your content clip by 72 — there are 72 pixels to an inch. So, 320 x 440 will print at a size of 4.4" x 6.1". You can, however, scale the content clip to be printed, so that it will fill the entire page. In the next step, you'll learn how to do just that.
-
Select frame 1 of the actions layer, and open the Actions panel. Add the bold code shown in Listing 27-7 to the printContent() function. Here, you use the nWidth and nHeight properties of the PrintJob object, pj, to calculate two variables, nXScale and nYScale. nWidth and nHeight return the size of the page output by the printer, in pixels. By dividing each value by the respective width and height of the mcContent instance (mc) you can determine how much you need to scale the mcContent instance to fill the entire page.
Listing 27-7: Scaling Content in the printContent() Function

function printContent():Void { var pj:PrintJob = new PrintJob(); var mc:MovieClip = mcContent; var bInit:Boolean = pj.start(); if (bInit) { trace("printing..."); var nWidth:Number = pj.pageWidth; var nHeight:Number = pj.pageHeight; var nXScale:Number = (nWidth / mc._width) * 100; var nYScale:Number = (nHeight / mc._height) * 100; with (mc) { _xscale = nXScale; _yscale = nYScale; } pj.addPage(mc); pj.send(); } else { trace("print aborted by user"); } }
-
Save your Flash document as printjob_scale.fla, and test it. When you click the cbtPrint instance, the mcContent instance scales to a larger size. The printed output will fill the entire page with the mcContent instance's artwork.
-
The last step will be to scale the mcContent clip back to original size after the print output has been sent to the printer. Add the bold code shown in Listing 27-8 to the printContent() function.
Listing 27-8: Resetting the Scale of the clip Instance

function printContent():Void { var pj:PrintJob = new PrintJob(); var mc:MovieClip = mcContent; var bInit:Boolean = pj.start(); if (bInit) { trace("printing..."); var nWidth:Number = pj.pageWidth; var nHeight:Number = pj.pageHeight; var nXScale_orig:Number = mc._xscale; var nYScale_orig:Number = mc._yscale; var nXScale:Number = (nWidth / mc._width) * 100; var nYScale:Number = (nHeight / mc._height) * 100; with (mc) { _xscale = nXScale; _yscale = nYScale; } pj.addPage(mc); pj.send(); with (mc) { _xscale = nXScale_orig; _yscale = nYScale_orig; } } else { trace("print aborted by user"); } }
-
Save your Flash document, and test it. When you click the cbtPrint instance, the art-work no longer scales on the Stage, but the printed output will be scaled.

Figure 27-10: The frame artwork

Figure 27-11: The siteLogo artwork

Figure 27-12: The cbtPrint instance
| On the CD-ROM | You can find the completed documents, printjob_noscale.fla and printjob_scale.fla, in the ch27 folder of this book's CD-ROM. |
| Web Resource | We'd like to know what you think about this chapter. Visit www.flashsupport.com/feedback to send us your comments. |
EAN: 2147483647
Pages: 395