Importing the Video
Digital video, as with other external media assets that Flash can import, is something that you need to create before working with it in a Flash document. In today's economic climate, you might not only be a Web designer or developer; you might also wear the part-time hat of a videographer. Be sure to read our coverage of video in Appendix D, "Digital Video Basics" (included as a PDF file on this book's CD-ROM), for a primer on shooting and producing better-looking video. The appendix also discusses the various video formats that you can import into Flash 8.
After you have created a video file in the desired import format, you're ready to prepare the video for use in a Flash movie. This section introduces you to the Sorenson Spark and On2 VP6 codec options available in Flash 8. In the latter half of this section, we walk you through the process of importing one of the sample files on this book's CD-ROM.
An Overview of Codec Options
Flash Player 8 movies have the capability to use a new video codec, On2 VP6. This codec, created by On2 (www.on2.com) has been licensed by Macromedia to be used with Flash Player 8 distribution. This new codec features superior compression and image quality compared to the Sorenson Spark codec used in Flash Player 6 and 7.
| Web Resource | You can view side-by-side comparisons of equivalent data rate Flash Video by visiting the Flash Video Comparison link at www.flashsupport.com/links. Compare the quality of a VP6-encoded video clip next to a Spark-encoded one. |
The VP6 codec, however, doesn't come without a price. Playback of VP6-encoded files, first of all, requires Flash Player 8. This fact alone means that not everyone will be able to view content encoded with the codec. Flash Player 6 has been out for almost four years, while Flash Player 7 has been out for just over two years. Furthermore, VP6-encoded Flash Video files require twice as much CPU power and twice as much RAM (memory) to play compared to Spark-encoded clips. Slower machines, such as Apple Power Macintosh G3 computers and Pentium II computers, may have trouble playing back VP6-encoded files.
| Tip | Make sure you test your Flash Video file's playback on a variety of machines, so that you accurately gauge your expectations for the target audience(s) of your Flash content. |
If you're willing to sacrifice visual quality of your Flash Video content and want the security of appealing to a larger audience (that is, people who have either Flash Player 6 or 7 installed, but not Flash Player 8), you may want to encode your video content with the Sorenson Spark codec. The quality of Sorenson Spark encoding is not necessarily poor compared to other Web video codecs; however, the built-in encoder that ships with Macromedia Flash 8 tools can only encode video in the Basic edition of the codec; you'll need to use Sorenson Squeeze or another third-party utility to encode video with the higher quality Pro edition of the Sorenson Spark codec.
| Note | Flash Player 8 can only decode VP6 video content. If you're broadcasting live camera output from a Flash movie to a Flash Communication Server (or Flash Media Server) application, Flash Player 8 uses the Sorenson Spark codec for all live streams. |
Video codecs can compress image data in two different ways — temporally and spatially. A temporal compression algorithm, or interframe compressor, compares the data between each frame and stores only the differences between the two. A spatial compression algorithm, also known as intraframe compression, compresses the data in each frame, just as the JPEG format compresses data in a still image. Most video codecs designed for Web playback, including Sorenson Spark and On2 VP6, do not use a lossless compression technique. Rather, some color and detail information is thrown out in an effort to minimize the amount of data saved with each frame. For example, if the original video source recorded a sunset with 80 shades of orange, the compressed version of the sunset may only include 50 or fewer shades of orange. You may have noticed the extremes of lossy compression in Web videos where a person's face is hardly distinguishable, looking more blocky than human.
| Note | Historically speaking, most new codecs developed in the last few years rely upon the ever-increasing computer processor speeds to efficiently decompress each frame of video on playback. For this reason, you may want to test video playback on a number of machines and devices that support your targeted Flash Player version and video decoding. |
Sorenson Spark and On2 VP6 use interframe (temporal) compression, but they also use intraframe compression when making keyframes. (You will see how tricky keyframes can be in just a moment.) A keyframe in video footage is similar to a keyframe in a Flash timeline. A keyframe defines a moment in time where a significant change occurs. For example, if a section of video has three hard cuts from one scene to another to another, the compressed version of that video should have a keyframe at the start of each scene. A keyframe then becomes the reference for subsequent frames in the video. When the following frame(s) are compared to the keyframe, only the differences are remembered (or stored) in the video file. As soon as the scene changes beyond a certain percentage, a new keyframe is made in the video. If you use the Video Import wizard, video keyframes are created while the movie is being compressed (or imported) into a Flash 8 document.
| Caution | Video keyframes are the reason you should be careful with special effects or video filter usage in transitions from scene to scene in your video production software. The more frequently your video changes from frame to frame, the more keyframes your video file needs. Keyframes take up more file size than interframes between the keyframes. |
We also can't overstate the importance of understanding that the new On2 VP6 codec is very processor intensive and RAM hungry. Remember, a Flash Video clip using the On2 VP6 codec requires twice as much processing and memory as an equivalent Flash Video clip using the Sorenson Spark codec. In fact, Macromedia engineers have recommended not using the On2 VP6 codec for any video content with dimensions larger than 640 x 480. Specifically, the On2 VP6 codec uses an arithmetic entropy compression that retains more quality than Sorenson Spark but at the cost of complexity — Sorenson Spark uses a much simpler compression formula (called H.263), which is easier for computer processors to perform. Keeping video data rates below 1 Mbps is critical for any Flash Video clip using the VP6 codec. If you attempt to use larger data rates, the decompressing tasks for VP6-encoded clips will quickly overwhelm the computer processor. If you need to use video data rates higher than 1 Mbps, we recommend that you use Sorenson Spark for your Flash Video encoding. At such high data rates, the quality differences between Spark and VP6 are minimal.
| Web Resource | You can learn more about arithmetic entropy compression at http://en.wikipedia.org/wiki/Arithmetic_coding. |
Compressing Video with Flash Basic 8
If you're using Flash Basic or Pro 8, you can import video source files by using the File ð Import ð Import Video command. However, the options available in the Import Video dialog box (also known as the Video Import wizard) are limited in Flash Basic 8. We discuss the extended options of Flash Pro 8 later in this chapter. First, we'll review the stages of video import. Later in this section, you can follow a step-by-step exercise that shows you how to compress a sample clip on this book's CD-ROM. You can follow along here to familiarize yourself with the process.
| Note | If you want to use Flash Video in your Flash document, you must be using Flash Player 6 or higher as the targeted version in the Publish Settings (File ð Publish Settings). If you want to use the new On2 VP6 codec, you must target Flash Player 8. |
Choosing a Source Clip: The Select Video Screen
When you first select the Import Video option from the File ð Import menu in Flash Basic 8, you see the Select Video screen of the Import Video dialog box, as shown in Figure 17-1. On the Select Video screen, you can browse to a video source clip. To proceed to the next stage of import, click the Next button.
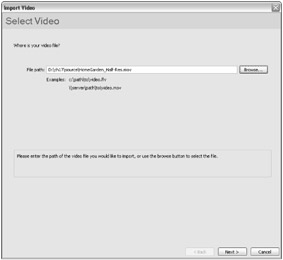
Figure 17-1: The Select Video screen
| Note | On the Mac, all Next buttons within the Video Import wizard process are labeled as Continue buttons. |
| On the CD-ROM | You can find several source clips in the ch17/source folder of this book's CD-ROM. |
Picking a Distribution Method: The Deployment Screen
After you have selected a source clip, you can choose how you want to include the video clip in your Flash movie. If you're using Flash Basic 8, you have at most two options (as shown in Figure 17-2):
-
Embed video in SWF and play in timeline: This option is selected by default, and adds the encoded video clip to the current Flash document's Library panel. As the note on the right of the Deployment screen indicates, this option can substantially increase your final Flash movie (.swf) file size. Also, because the audio track of the compressed video clip will be within the Flash movie, you should make sure you match the encoder's frame rate to that of your Flash movie.
-
Linked QuickTime video for publishing to QuickTime: This option enables you to import the video clip as a placeholder for a video track in a QuickTime Flash movie published by Flash 8. The final file deployed is still a QuickTime file, but you can use Flash 8 to create content on top of the QuickTime video. You must be importing a QuickTime .mov file into Flash 8 in order to select this option. Also, the Publish Settings of the current Flash document must be set to Flash Player 3, 4, or 5.
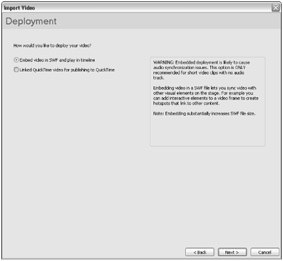
Figure 17-2: The Deployment screen
| Cross-Reference | You can learn more about QuickTime Flash movies by reading our online PDF archived version of Chapter 41, "Working with QuickTime," from the Flash MX Bible by Robert Reinhardt and Snow Dowd (Wiley, 2002). This chapter can be found online at www.flashsupport.com/archive. |
We discuss the extended deployment options of Flash Pro 8 later in this chapter. If you choose the Embed video in SWF and play in timeline option, the next screen in the process is the Embedding screen. If you choose the QuickTime option, the selected QuickTime video file is placed on the current timeline and the import session is over. Let's proceed to the Embedding screen. Click the Next button to proceed to the next stage of the import process.
Formatting the Video Content: The Embedding Screen
At this stage of the import process, you determine how you want Flash 8 to place the encoded Flash Video content into the current document. On the Embedding screen (shown in Figure 17-3), you can choose from the following options:
-
Symbol type: This menu lets you choose how you want the video content to be nested within the Flash document.
-
Embedded video: This option simply places the Flash Video clip as an Embedded Video symbol in the Library panel.
-
Movie clip: This option places the Flash Video clip inside of a Movie Clip symbol in the Library. Note that you still have a separate Embedded Video symbol of the Flash Video clip; this option saves you the step of creating a new Movie Clip symbol and placing the Embedded Video symbol onto its timeline.
-
Graphic symbol: This option behaves identically to the Movie clip option, except that the video content is nested within a Graphic symbol in the Library panel.
-
-
Audio track: This menu controls how the audio track (if it exists) of the video asset is handled. The default value, Integrated, keeps the audio track bound inside of the embedded video symbol after import. When you use this option, you control the compression of the audio track via the audio stream settings in the Flash tab of the Publish Settings dialog box (File ð Publish Settings). The Separate option tells Flash 8 to store the audio track as a separate Sound asset in the Library panel. If you use this option, you must physically place this Sound asset on the starting keyframe of the video layer in the Timeline window. (You can put the sound on another layer on the same timeline as well.) Be sure to set this sound to use a Stream sync, to ensure proper playback. If you choose None in the menu, the audio track is stripped from the video asset; the audio, then, is not imported into the Flash document.
Tip If you use the Separate option for the Audio track, you can scrub the video track and the audio track in the Timeline window. If you use the Integrated option, you will not be able to scrub the audio track in the Timeline window. Not all video source formats have the Separate or None option available.
-
Place instance on stage: This option, if selected, places an instance of the video clip on the current timeline of the Flash document. The instance will be of the symbol type selected in the menu we discussed previously.
-
Expand timeline if needed: This option, if selected, adds more frames to the current timeline of the Flash document to accommodate the length of the video clip. For example, if the timeline had 10 frames and your clip is 100 frames long, 90 new frames would be added to the timeline.
-
Embed the entire video or Edit the video first: These radio buttons determine the next stage of the import process. If you choose Embed the entire video, the next screen is the Encoding screen. If the Edit the video first option is selected, the Split Video screen is next.
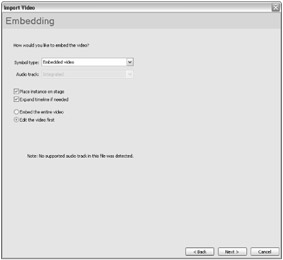
Figure 17-3: The Embedding screen
To show you all of the options of the video import process, let's choose the Edit the video first option and click the Next button.
Editing the Video: The Split Video Screen
You can specify multiple in and out points for a video file in the Split Video screen, shown in Figure 17-4.
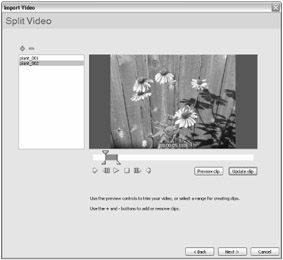
Figure 17-4: The Editing screen of the video import process
Here, you can drag the in and out markers to specific sections of your video file. Click the plus (+) button to add a new segment to the editing list (on the left side of the wizard). You can click the text area of segment names in the editing list to rename the clips — these names translate to the names of the imported video symbols in the document's Library panel.
You can change the in and out points of a segment in the editing list by choosing the segment in the list, altering the in and/or out markers, and clicking the Update clip button.
| Note | You cannot apply different compression profiles to individual clips. You can choose only one profile, which is applied to all clips. |
When you're done making the edits, you can click the Next button to proceed to the Encoding screen.
Compressing the Video: The Encoding Screen
This stage is where you determine how you want to compress the original source clip into the Flash Video clip. In Flash 8's Encoding screen (shown in Figure 17-5), you can choose from seven presets as a starting point for your preferred compression options. If you're using Flash Basic 8, you can only modify the advanced settings for Flash 7 presets.
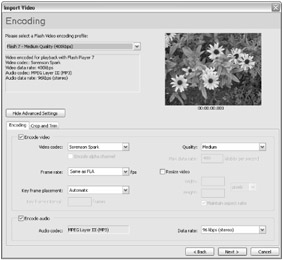
Figure 17-5: The Encoding screen of the video import process
The encoding profiles are listed in two groups, Flash (Player) 7 and Flash (Player) 8. The first four presets create Flash Video encoded with the Sorenson Spark codec and are compatible with Flash Player 6 and higher. The last three presets create Flash Video encoded with the new On2 VP6 codec and are only compatible with Flash Player 8. The presets for each group are ranked according to data rate, from lowest to highest.
If you're using Flash Basic 8, you can only use the advanced settings for the Flash 7 presets; the Flash 8 presets can not be changed. The advanced settings for the Sorenson Spark codec are shown in Figure 17-5. The Encoding tab has two areas:
-
Encode video: This area displays all of the compression options related to the video channel of the video clip.
-
Video codec: This menu selects the codec used for compression. Sorenson Spark is the only option available in the advanced settings if you're using Flash Basic 8. Note that you can still encode video with the On2 VP6 codec in Flash Basic 8 — simply select one of the Flash 8 presets in the profile menu.
Note The Encode alpha channel option is only available in Flash Pro 8 when the On2 VP6 codec is selected. We discuss the alpha channel encoding capability of the On2 VP6 codec later in this chapter.
-
Frame rate: This menu controls the encoded frame rate of the Flash Video clip. If you want the video to synchronize well with the other content in your Flash document, use the Same as FLA option, which encodes the Flash Video clip to the same frame rate as that shown in the Document Properties dialog box for the current Flash document. The Same as source option encodes the Flash Video clip with the same rate as your original video clip. You can also choose fixed frame rates, from 10 frames per second (very choppy) to 30 frames per second (very smooth).
-
Key frame placement: This option determines how often keyframes within the Flash Video content are created. As we discussed earlier in the chapter, keyframes are needed to store differences between frames in the video clip. If you use the default value, Automatic, Flash 8 determines how often a keyframe should be generated. If you choose Custom, you can specify your own keyframe interval, in the text field below the menu. The lower the value you specify, the more frequently Flash 8 creates keyframes within the Flash Video clip. The higher the value, the less frequently Flash 8 creates keyframes. Be very careful with custom settings here — if your data rate isn't high enough to support the keyframe interval you specify, the overall image quality is sacrificed to maintain the keyframe interval.
-
Quality: This menu controls the data rate used by the Flash Video clip. This setting, more than any other, influences the file size and image quality of the encoded clip. The Low preset uses a data rate of 150 Kbps, which is more bandwidth than a 56K dial-up modem can support. On the other end of the spectrum, the High preset uses a data rate of 700 Kbps, requiring a broadband Internet connection but yielding superior image quality for the video clip.
-
Resize video: This option resizes the original dimensions of the source video clip. If selected, you can enter a new width and height for the encoded Flash Video clip. If you've captured high-resolution video footage from your DV camcorder (that is, source video with dimensions of 640 x 480 or larger), you may want to reduce the frame size to a more Web-friendly size, such as 320 x 240. You can create smaller Flash Video file sizes with a combination of smaller video dimensions and reduced data rates.
-
-
Encode audio: This section of the Encoding tab controls the compression of the audio channel (if one exists) of the Flash Video clip. Regardless of which Flash 8 version you use (Basic or Pro), the Audio codec option can not be modified; all audio channels of video content encoded with Flash 8 will use MP3 compression. However, you can change the data rate of the audio channel, choosing a value between 16 Kbps to 256 Kbps. Unless you're encoding high-quality musical scores, an audio data rate between 32 and 64 Kbps is usually adequate.
| Note | The audio data rate is separate from the video data rate. As such, you should mentally add both rates to get a clear picture of the total data rate required for the Flash Video clip. For example, the Flash 7-Medium preset uses a video data rate of 400 Kbps and an audio data rate of 96 Kbps. The total data rate for the clip, therefore, is 496 Kbps. |
The Crop and Trim tab of the Encoding screen, shown in Figure 17-6, enables you to change the borders of your original source clip before it is encoded as Flash Video. You can use the numeric fields to crop the left, top, right, and bottom borders of the source clip. If you crop the content area, a marquee is displayed in the video preview area.
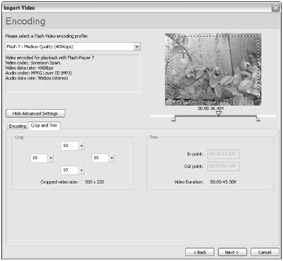
Figure 17-6: The Crop and Trim tab of the Encoding screen
| Tip | Cropping video clips might be necessary if your original footage is letterboxed (that is, black bands are above and below the actual picture area of the clip), or if you captured video with an analog video capture card that retains black borders on the video clip. |
The Trim area of the tab does not contain any editable fields. Rather, you can drag the in and out markers on the controller below the video preview area. If you want to nudge either marker more precisely, click the marker and then use the left or right arrow key to move the marker.
| Caution | You can not trim your clip if you have opted to use the Split Video screen to divide your original source clip into multiple Flash Video clips. |
| Tip | Even though the Crop and Trim tab isn't displayed for the Flash 8 presets, you can still drag the in and out markers to trim your clip. |
When you have finished specifying the encoding parameters for the clip, you're ready to move on to the summary screen. Click the Next button.
Reviewing Your Settings: The Finish Video Import Screen
After you have taken the care to specify the encoding options you want for your Flash Video clip, you can quickly review some of the presets on the final screen, shown in Figure 17-7. Click the Finish button to proceed with video encoding.
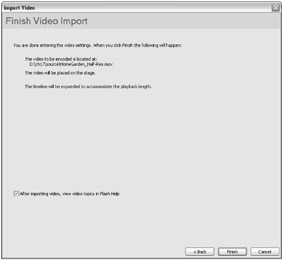
Figure 17-7: The Finish Video Import screen
| Tip | You might want to clear the check box at the bottom of this screen, to avoid seeing the Flash Help topics on Flash Video. If you leave this option selected, you can review various help documents related to Flash Video usage within Flash documents. |
After you click the Finish button, the Flash Video Encoding Progress dialog box appears, indicating the progress of the video encoding session (see Figure 17-8).
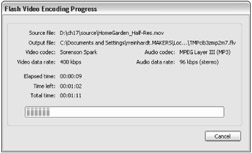
Figure 17-8: The Flash Video Encoding Progress dialog box
Walking through the Video Import Procedure
In this section, we show you how to go through the process of selecting a video file and embedding it in a Flash 8 document.
| On the CD-ROM | For this example, make a copy of the HomeGarden_Full-Res.mpg file from the ch17/source folder on this book's CD-ROM to a local folder or your desktop. |
-
Open a new Flash document (File ð New).
-
Open the Document Properties (Modify ð Document), and make sure the frame rate is set to 15 fps. Alternatively, you can change the frame rate in the Property inspector. Click any empty area of the Stage or Work area to show the document properties in the Property inspector.
Note Because our sample video clip doesn't display a wide range of movement within the frame, we can elect to use a slower frame rate such as 15 fps. If your video content contains more action, you may want to use a higher frame rate, such as 24 or 30 fps.
-
Choose File ð Import ð Import Video. In the Select Video screen, browse to the QuickTime file that you copied to your system. Once you have selected the file, click the Next button.
-
On the Deployment screen, choose the Embed video in SWF and play in timeline option and click the Next button.
-
On the Embedding screen, choose Embedded video in the Symbol type menu. Match the other options shown in Figure 17-9, and click the Next button.
-
On the Encoding screen, choose the Flash 8 — Medium Quality preset. This preset uses the new On2 VP6 codec available in Flash Player 8, and uses a video data rate of 400 Kbps, yielding a better-than-average image quality for the video clip (see Figure 17-10). Click the Next button to proceed to the next screen.
-
On the Finish Video Import screen, review your settings and click the Finish button. Flash 8 begins the encoding process.
-
The video clip appears on the Main Timeline of the current Flash document. Flash 8 automatically centers the video clip and adds the necessary frames to the layer as well. Rename Layer 1 to sample video.
-
Save your Flash document as sampleVideo_100.fla, and test it (Ctrl+Enter or z+Enter). If you open the Bandwidth Profiler (Ctrl+B or z+B), you can see that the Flash movie (.swf) is 3833 KB, or 3.74 MB. Considering the content is just over one minute long, that is a data rate close to 500 Kbps. If this file size is too large, repeat this exercise selecting a lower data rate in the Encoding screen of the Import Video dialog box.
-
You can further modify the quality of the video clip's audio track by adjusting the Audio Stream settings in the Publish Settings. Our sample clip has a silent audio track, but chances are that your own video content (or the other samples on the book's CD-ROM) will have audio channels. By default, Flash 8 uses MP3 compression at 16 Kbps, mono, with Fast quality. Open the Publish Settings dialog box (File ð Publish Settings), and click the Flash tab. Click the Set button for the Audio Stream option, and choose a new codec and/or bitrate. For example, you can choose MP3 compression at 20 Kbps, mono, with Best quality. This will produce a slightly larger file size with better audio quality than the default. Close the Publish Settings dialog box, and retest your movie.
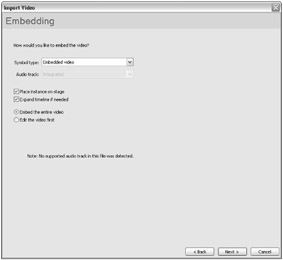
Figure 17-9: The Embedding screen options
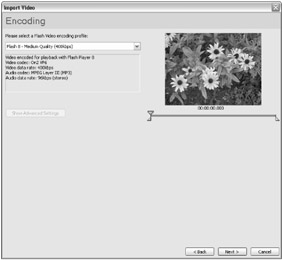
Figure 17-10: The Encoding screen options
You may want to repeat this exercise, experimenting with a different compression profile or even creating a custom profile of your own. Try other sample video files on the book's CD-ROM as well.
| Web Resource | To learn more about using Embedded Video symbol types in Flash movies, read our archived coverage of Embedded Video from the Flash MX 2004 Bible at www.flashsupport.com/archive. The workflow for using Embedded Video has not changed in Flash 8, and if you're publishing Flash Player 7 or higher content, we strongly recommend you use external .flv files instead of Flash .swf files with Embedded Video content. |
| On the CD-ROM | You can find the completed file, sampleVideo_100.fla, in the ch17 folder of this book's CD-ROM. |
Adjusting Audio Compression
As strange as it may sound, the audio track of a digital video file is imported and retained in its original source format. Flash 8 uses the global audio settings found in the Publish Settings dialog box to control the compression applied to your imported video's audio track. Most important, audio linked to an embedded video is treated as Stream sound so that it will be properly synched to the playback of the video. Therefore, you must specify the video's audio compression in the Audio Stream options of the Publish Settings dialog box.
| Note | You can use the new Separate option in the Audio track menu of the Advanced settings area of the Video Import wizard to extract the audio of a video file to its own Sound asset in the Library. See our prior coverage of this feature in this chapter. |
Extracting .Flv Files from Embedded Video Symbols
Regardless of which version of Flash 8 you are using, you can export an existing Embedded Video symbol as a separate .flv file from the Flash document file (.fla). To follow along with this exercise, open the sampleVideo_100.fla document from the ch17 folder of this book's CD-ROM.
-
With the sample document open in Flash 8, open the Library panel (Ctrl+L or z+L).
-
Right-click the Embedded Video symbol in the Library panel, and from the contextual menu, choose Properties.
-
In the Video Properties dialog box, click the Export button. In the Export FLV dialog box, browse to a location to save the Embedded Video content as an .flv file.
| Caution | If you change the Type option to Video (ActionScript-controlled) in the Video Properties dialog box, the Export button becomes disabled. The only way to re-enable the Export button is to switch the Type option back to Embedded, click the Cancel button, and re-open the Video Properties dialog box. |
Once you've saved an .flv file, you can use the .flv file with your own custom NetStream objects in ActionScript code, or you can load the file into the FLVPlayback component (available in Flash Pro 8 only).
| On the CD-ROM | You can find the extracted .flv file, HomeGarden_Half-Res.flv, in the ch17/source folder of this book's CD-ROM. |
Deploying Existing .Flv Files with Flash Pro 8
If you use Flash Professional 8, you have several more options for deploying and encoding Flash Video content. In this section, you learn about how to deploy an existing .flv file that you have uploaded to your Web server. The Flash Pro 8 Video Import wizard automatically sets up the parameters for a new FLVPlayback component in your Flash document.
Create a new Flash document and choose File ð Import ð Import Video in Flash Pro 8. The Select Video screen of the Import Video dialog box (see Figure 17-11) presents you with two options:
-
On your computer: This field and Browse button enable you to select a digital video source clip on your local computer or computer network.
-
Already deployed to a web server, Flash Video Streaming Service, or Flash Communication Server: This option, only available in Flash Pro 8, enables you to enter a fully-qualified domain name pointing to an existing .flv file on a server.
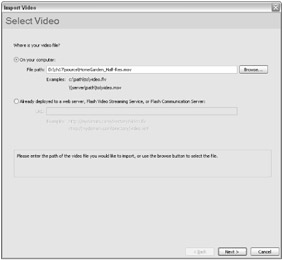
Figure 17-11: The Select Video screen in Flash Pro 8
Choose the second radio button option in this screen, and enter the following URL:
-
http://www.flashsupport.com/video/lizard_112k_vp6.flv
Click the Next button to proceed to the Skinning screen.
If you enter a URL to a Flash Video file (.flv) in the Select Video screen, the Flash Pro 8 version of the Video Import wizard takes you directly to the Skinning screen (see Figure 17-12). Here, you choose the playback control skin for your video clip. This skin is used by the FLVPlayback component instance that the Video Import wizard places on to the current document's stage at the end of the importing process.
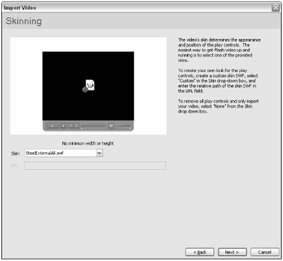
Figure 17-12: The Skinning screen of Flash Pro 8
You can select one of several skins in the Skin menu. All of these skins are separate .swf files included with the Flash Pro 8 installation. Whichever skin you choose is automatically copied to the location of the current Flash document you're importing the video file into. This .swf skin file must be uploaded along with your Flash document's .swf file to the Web server, so that the FLVPlayback component can load the skin into the Flash movie. If you prefer to make your own video playback controls to use with the FLVPlayback component, you can choose None in the Skin menu. You can also choose Custom Skin URL and enter the path (relative or absolute) to the skin .swf file you created for the FLVPlayback component.
| Cross-Reference | For more information on creating a custom skin, search the Flash 8 Help panel for "SkinFLA." The "Creating a new skin" help file should be the only result for this search term. |
After you have picked a skin, click the Next button. As shown in Figure 17-13, you are taken to the Finish Video Import screen (as described in the Flash Basic 8 coverage of the Video Import wizard). The Finish Video Import screen describes the steps you will need to take once you have finished the import process.
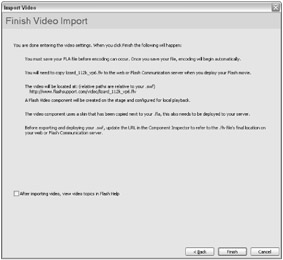
Figure 17-13: The Finish Video Import screen
Click the Finish button. You are prompted to save your Flash document (.fla). Save the document as deploy_existing.fla anywhere on your computer. After you have saved the file, Flash Pro 8 loads the metadata from the .flv file you specified during the Import Video process. The width and height data from the .flv file are used to size the instance of the FLVPlayback component that Flash Pro 8 places in the center of your Stage area, as shown in Figure 17-14. Rename Layer 1 to cfp, short for component FLVPlayback. In the Property inspector, name the instance cfp as well.
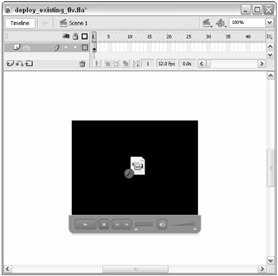
Figure 17-14: The FLVPlayback component
Resave the Flash document, and test the movie (Ctrl+Enter or z+Enter). When the movie loads, the lizard video clip plays in the FLVPlayback component instance (see Figure 17-15). The skin you selected earlier in this exercise is also displayed, enabling you to control the playback of the video clip.
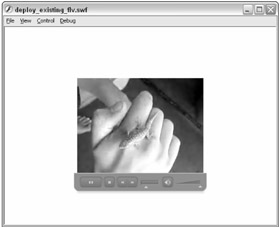
Figure 17-15: The remote video clip playing in the FLVPlayback component
| On the CD-ROM | You can find the completed file, deploy_existing.fla, in the ch17 folder of this book's CD-ROM. |
| Tip | If you want to try loading another .flv file into the FLVPlayback instance, you don't have to repeat the Import Video procedure. Instead, select the cfp instance on the Stage, and open the Property inspector. Select the Parameters tab, and change the contentPath value to the new .flv file name (or location). You can also change the skin file in the Parameters tab. |
Compressing and Deploying New .Flv Files with Flash Pro 8's Video Import Wizard
Flash Pro 8's Video Import wizard can create stand-alone .flv files. You also have more settings available in the Video Import wizard during the Encoding stage of the importing process. In this section, you learn how to create a Flash Video file (.flv) with Flash Pro 8's Video Import wizard.
| On the CD-ROM | You can find sample video source files in the ch17/source folder of this book's CD-ROM. You can also find online video archive links in the Public Domain Media Sources heading at www.flashsupport.com/links. |
-
Create a new Flash document in Flash Pro 8. Save the document as deploy_new_flv.fla.
-
Choose File ð Import ð Import Video. On the Select Video screen, click the Browse button for the On my computer option. Browse to the stella_raw.mpg file in the ch17/source folder on this book's CD-ROM. Once you've selected the file, click the Next button to proceed to the next screen.
Note If you select an existing .flv file, the Video Import wizard jumps straight into the Skinning screen, as we described in the last section.
-
On the Deployment screen (shown in Figure 17-16), Flash Pro 8 offers a few more options than the Flash Basic 8 edition. The top three options effectively produce the same result, creating a new .flv file that is used with an FLVPlayback component instance. The only difference between these top three options is that the Finish Video Import summary screen has specific instructions for what needs to be done with the new .flv file after you have finished the encoding process. Select the Progressive download from a web server option, and click the Next button.
-
The Encoding screen, shown in Figure 17-17, has expanded functionality in Flash Pro 8 as well. Not only can you specify advanced options for the Flash 7 presets using Sorenson Spark, but you can also modify the advanced options for the new On2 VP6 codec! For this example, choose the Flash 8 - Medium preset in the profile menu and click the Show Advanced Settings button. Also, we intentionally used the stella_raw.mpg clip because the first three-quarters of the clip should be cut from the clip. Drag the in marker about 22 seconds into the clip, as shown in Figure 17-17. In the Quality menu, choose Custom and type 300 in the Data rate field. Also, check the Resize video option, and enter 320 for the width and 240 for height. Change the audio data rate to 64 kbps, as the audio track for this clip is not high-fidelity — it's just our dog Stella barking. Click the Next button to proceed to the next stage of the import process.
Note Whenever you change any of the preset values of a profile, the profile name changes to Custom at the top-left corner of the Encoding screen.
Cross-Reference We explore the new Cue Points tab of the Encoding screen in Flash Pro 8 in the "Creating .flv files with Embedded cue points" section later in this chapter.
-
On the Skinning screen, you can pick a skin for the FLVPlayback component used to play the Flash Video file. For this example, choose the ClearExternalAll.swf skin, as shown in Figure 17-18. Click the Next button to proceed to the summary screen.
-
On the Finish Video Import screen, review the importing options and the directives that Flash Pro 8 provides. Click the Finish button to begin the encoding process.
-
After the Flash Video file has been created, Flash Pro 8 inserts an instance of the FLVPlayback component on to the document's Stage. Rename Layer 1 to cfp, and name the instance cfp in the Property inspector.
-
Because you selected the ClearExternalAll.swf skin, the control button graphics are not easily seen on a white background color. Choose Modify ð Document and change the background color to a light or dark gray color.
-
Save the document, and test it (Ctrl+Enter or z+Enter). By default, the FLVPlayback instance has an autoPlay parameter set to true, which means the video starts playing as soon as the .flv file has loaded into the component. You should see Stella jumping up and down, as shown in Figure 17-19.
Note If you want the video to be paused on load, you can select the cfp instance on the Stage and change the autoPlay parameter to false in the Parameters tab of the Property inspector.
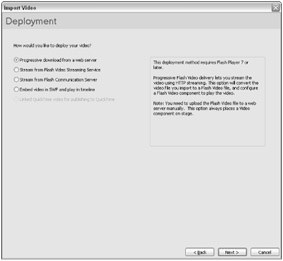
Figure 17-16: The Deployment screen options in Flash Pro 8
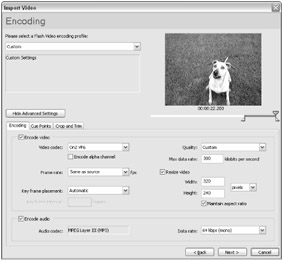
Figure 17-17: The Encoding screen options in Flash Pro 8
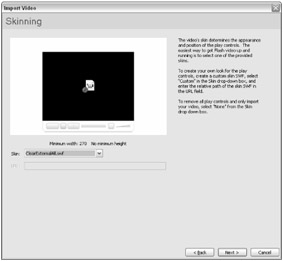
Figure 17-18: The Skinning screen options
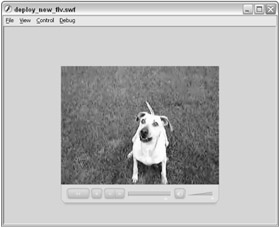
Figure 17-19: The final Flash Video clip playing in the FLVPlayback component
| On the CD-ROM | You can find the completed files, deploy_new_flv.fla and stella_raw.flv, in the ch17 folder of this book's CD-ROM. |
When you're done creating a Flash document using the FLVPlayback component, remember to upload all supporting files to your Web server for deployment, including the skin .swf file, the .flv file, and the main movie .swf file.
EAN: 2147483647
Pages: 395