Converting Rasters to Vectors
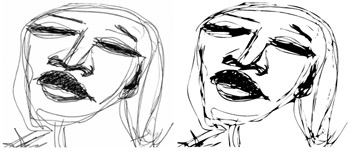
Have you ever wanted to take a scan of a "real" pen-and-ink drawing that you made and turn it into a vector graphic? It's not incredibly hard to do, and the results are usually pretty close to the original (see Figure 16-11). You can also turn continuous tone or photographic images into vector art, but the converted version will not likely bear much resemblance to the original. However, this can be useful for aesthetic effects.

Figure 16-11: Compare the raster version (left) of the sketch to its traced vector version (right).
As we described in Chapter 9, "Modifying Graphics," bitmap images can be traced in Flash to convert them to vector shapes. Figure 16-3 illustrated why this is not recommended for complex photographic images — the file size will be huge and the image quality will not be as satisfactory as the original bitmap. However, converting rasters to vectors allows you to create some unique visual effects in Flash. After an image has been traced, you can use any of the Flash tools available for shapes, including the Distort and Envelop options of the Free Transform tool. You can also select parts of the image individually to modify colors, or even add custom gradient or bitmap fills.
The Trace bitmap command is different from using the Break apart command on a bitmap. When an image is broken apart, it is perceived by Flash as areas of color that can be modified or sampled for use as a fill in other shapes. Break apart actually duplicates the automatic conversion handled by the Mixer panel to show bitmaps from the Library in the bitmap fill menu. Although you can modify images that are broken apart with the drawing and painting tools, you cannot select individual parts of the image with the Selection tool or apply the Optimization command, Smooth/Straighten options, or Distort and Envelop modifiers as you can with a traced vector image.
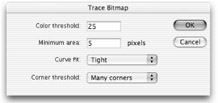
To apply Trace bitmap, select a bitmap image that has been imported to Flash (ideally with lossless compression and no Smoothing) and placed on the Stage; then choose Modify ð Bitmap ð Trace Bitmap from the application menu to invoke the Trace Bitmap dialog box, as shown in Figure 16-12.

Figure 16-12: Use the Trace Bitmap dialog box to select settings for converting a raster image into vector shapes.
We detail the settings for the Trace bitmap command in Chapter 9, but the default settings can be a good place to start. Higher Color Threshold and Minimum Area values reduce the complexity of the resulting Flash artwork, which means smaller file sizes. This process is most effective when applied to simple images with strong contrast. In these cases, tracing a bitmap graphic can actually reduce the file size and improve the appearance of the scaled image. The settings shown in Figure 16-12 were used to trace the GIF image shown in Figure 16-13. When viewed at a scale of 200 percent, the difference in image quality can clearly be seen, and this difference will be exaggerated the more the images are scaled — the vector image will remain smooth, while the bitmap image will break apart and look increasingly jagged.

Figure 16-13: Images with simple shapes and limited colors will be more scalable when converted from bitmap (left) to vector art (right) using the Trace bitmap command.
| Tip | The traced vector lines and fills created from an imported bitmap are not always exact, but you can use the Smooth and Straighten modifiers or any of the other drawing tools to "touch up" the artwork. |
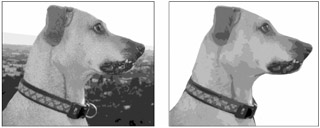
In order to get the best results from using Trace bitmap, we advise reducing the number of colors in the original image before importing it to Flash. Figure 16-14 shows an imported image that was converted to indexed color and reduced to ten colors in Photoshop before saving as a GIF image for import to Flash. After the image is traced, you can simplify the shapes further by applying the Optimize command (Modify ð Shape ð Optimize), which simplifies the image and reduces the final file size. You can also use any of the drawing tools to further modify the image.

Figure 16-14: A reduced-color GIF image (left) can be traced and then simplified using the Optimize command and Eraser tool in Flash (right).
EAN: 2147483647
Pages: 395