21.4 Adding a Printer
| |
A printer can be added using the lpadmin command or SAM. The lpadmin command accepts a number of command-line arguments that can be used to create and modify a printer. Adding a printer using the command line is laborious compared with SAM. You get a comprehensive window while you add a printer with SAM. Let's first see the command-line method.
Adding a Printer
The lpadmin command can be used to add a printer with the name laser as shown in the following command.
lpadmin -plaser -mhplj4 -v/dev/lp
This command adds a printer named laser on device file /dev/lp . The interface program used for this printer is hplj4 .
Setting a Printer as Default Destination
A printer may be established as a default destination for users of a system by using the lpadmin command. The following command sets a printer named laserjet as the default destination.
lpadmin -dlaserjet
Deleting a Printer
Deleting a printer with the lpadmin command is shown next , where printer laserjet has been deleted.
lpadmin -xlaserjet
Adding Printers Using SAM
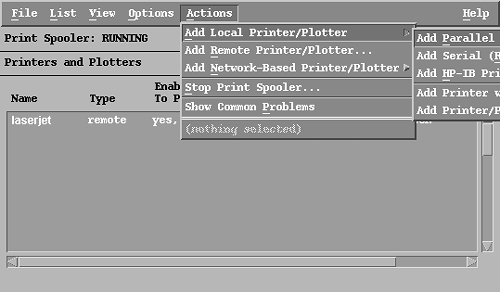
Adding a printer is done using the SAM Printers and Plotters area. Figure 21-3 shows a list of printers in SAM where you can see a printer named laserjet and its type is remote . It also shows that the print spooler is running on the system. The Actions menu is used for printer administration. Using this menu, you can add local, remote, and network printers. You can also start and stop the print scheduler using this menu. When you add a local printer using SAM, you can select how the printer is physically connected to the system. Most of the common printers are connected using a parallel port.
Figure 21-3. The Printers and Plotters area in SAM.

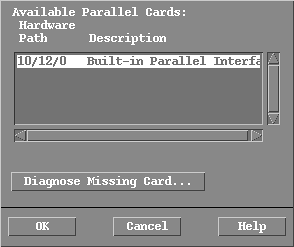
When adding a parallel port printer, SAM looks for the parallel ports installed in your system. After scanning the hardware, you will see a window like the one shown in Figure 21-4, where all parallel ports are listed.
Figure 21-4. List of parallel ports installed in the system.

From this list, you can select one of the ports to attach the printer. A parallel port is represented as a Hardware Path in this window. This Hardware Path is represented as a parallel port device in the /dev directory. When adding a printer, the parallel port device is used.
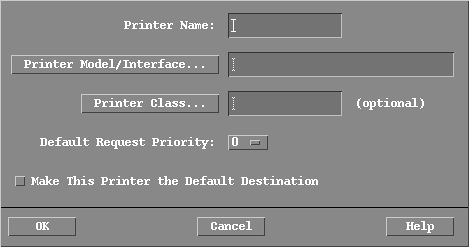
After selecting a parallel port, you press the OK button and enter the Printer Name and its properties as shown in Figure 21-5.
Figure 21-5. Adding a local printer.

A Printer Name is any name of your choice. The printer will be known with this name on your system. For example, you can select a name laserjet here. This is the same name that you used with the lpadmin command using the -p option. When you use the lp command to print a document, you use this name with the -d option.
The Printer Model/Interface is the name of the interface program that will be used with the printer. The model or interface names are present in the /usr/lib/lp/model directory. If there is no interface program for your printer, you can use a "dumb" model, but in this case, you will not be able to use all of the printer capabilities.
Printer Class is an optional parameter. You use Printer Class if you are using more than one printer of the same type and want to share print requests among them. You may not need to use a class if you are using only one printer.
The Default Request Priority setting is used if no priority is explicitly mentioned using the -p option of the lp command. Priorities are numbered from 0 to 7,0 being the lowest priority. You can also use the -g option with the lpadmin command to set the default priority for a printer.
In this window, you can also set a printer as the default printer for the entire system. If no destination is mentioned with the lp command, the print request is sent to the default printer. However, it should be noted that the default printer location is changed if the LPDEST variable is set in the user shell. The lp command uses the printer name set with the LPDEST variable. If this variable is not set, only then the default printer is used for printing purposes.
Note
If the LPDEST variable is set but contains an invalid value, the result of the lp command is unpredictable.
Warning
Adding a printer causes the print spooling system to be stopped and restarted. All jobs currently being printed are also restarted. A printer should be added when there are no jobs in progress.
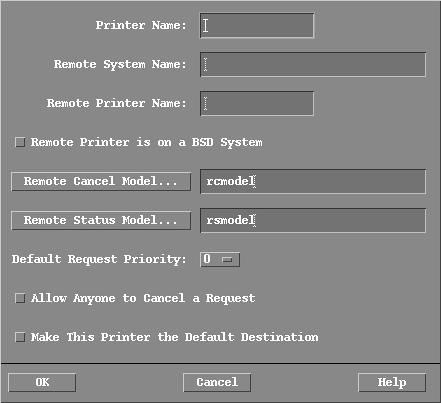
If you are adding a remote printer, the window shown in Figure 21-6 appears. Here you need to fill out a number of parameters for use with a remote printer.
Figure 21-6. Adding a remote printer using SAM.

In addition to the local printer name, you also need to know the system to which the remote printer is attached and the name used for the printer on that system. The Remote System Name must be known to your system. For this you need to enter the Remote System Name in the /etc/ hosts file. Users of your system will use the Printer Name you define yourself (not the Remote Printer Name ).
If the remote system is using Berkley Software Distribution (BSD) print services, you must check the box for that purpose.
SAM already fills the Remote Cancel Model and Remote Status Model name boxes for you. The remote cancel script is used to cancel print jobs on the remote printer. The remote status script is used to check the status of a print job on a remote printer.
Default Request Priority can be specified, as in the case of adding a local printer. Its value is from 0 to 7, 0 being the lowest priority.
You can allow anyone to cancel a print job on a remote printer. If you don't do this, only the owner of the job can cancel it. The last option can be used to set this printer as a default printer for the local system. You don't specify any printer interface model script as you did in the case of a local printer. For a remote printer, the rmodel script is used by default, which uses the rlp command to send print jobs to a remote printer.
On the remote system, you must edit the /etc/services file and remove any comments in the printer line. You must also edit the /etc/inetd.conf file to enable rlpdaemon and restart the inetd daemon. The /etc/hosts file on the remote system must contain the name and address of the local system.
| |
| |
| Top |
EAN: 2147483647
Pages: 390