13.4 Advanced Installation
| |
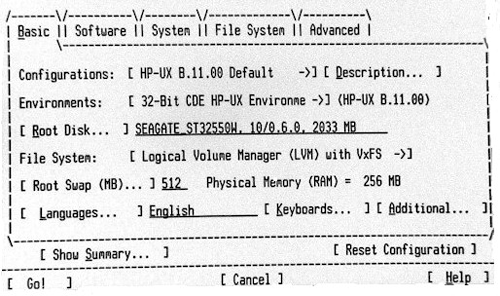
If you select Advanced Installation (Figure 13-3), you will see a screen as shown in Figure 13-5. Here you can select all of the options used in your guided installation. Additionally, you can set the network configuration and make changes to file system sizes in the LVM.
Figure 13-5. Advanced HP-UX installation.
Here you can use the ![]() key to move around. When the cursor is over a particular item, you can press the
key to move around. When the cursor is over a particular item, you can press the ![]() key to change options. The topmost line lists five categories. By selecting a particular category, options related to that category are listed in the lower part of the screen. In Figure 13-5, you can see the basic configuration options with their default values. You can make changes to any of these. The basic reason for using the Advanced Installation is to make changes to the LVM file systems during the installation process or to make a network setup. Network setup can be performed in the System category of Figure 13-5. Changes to the LVM are made using the File System category. Figure 13-6 shows a screen shot of the File System category for adjusting file system sizes.
key to change options. The topmost line lists five categories. By selecting a particular category, options related to that category are listed in the lower part of the screen. In Figure 13-5, you can see the basic configuration options with their default values. You can make changes to any of these. The basic reason for using the Advanced Installation is to make changes to the LVM file systems during the installation process or to make a network setup. Network setup can be performed in the System category of Figure 13-5. Changes to the LVM are made using the File System category. Figure 13-6 shows a screen shot of the File System category for adjusting file system sizes.
Figure 13-6. Adjusting file system sizes during advanced HP-UX installation.
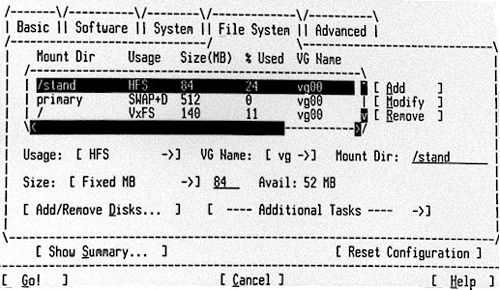
I have selected LVM with VxFS during this process. Default file systems present in this group are listed in this screen. You can scroll the list of file systems using the arrow keys. The following information about each file system is displayed in this screen.
-
Mount directory ( Mount Dir ) for the file system. Mount directories are automatically created during the installation process.
-
File system usage ( Usage ) shows the type of file system. All file systems are marked VxFS except the swap area and the file system having /stand as its mount point. The /stand file system is used for the HP-UX kernel, and it is mandatory that it be of HFS type.
-
Size of the file system ( Size (MB) ) is shown in megabytes.
-
Percentage used ( % Used ) shows the percentage of the file system that will be used after the installation process is complete.
-
Volume group name ( VG Name ). The root volume group name is vg00 .
You can use the ![]() key to move around this screen and make any desired changes to a particular file system. For this, you have to follow these three steps.
key to move around this screen and make any desired changes to a particular file system. For this, you have to follow these three steps.
-
Select a file system using the
 and arrow keys.
 -
Make a desired change using the
, arrow, and  keys.
keys. -
Go to the Modify option using the
key and press the key. You can also press M for this purpose.
By default, HP-UX creates a volume group with the name vg00 and creates eight logical volumes in it. You need to adjust these sizes according to your requirements. For example, if you are installing a number of applications, the size of the /opt partition must be larger. On the other hand, if you expect that many users will be creating large files in their home directories, you will increase the size of the /home partition. Assign a reasonable amount of disk space to the /tmp directory, as some applications may create a large number of temporary files in this directory. Swap space is an important issue, and you should leave enough space for this on your disk. On a 4-GByte disk, I create partitions in the sizes shown in Table 13-1.
Table 13-1. Size of Partitions on a 4-GByte Disk
| Partition | Size (MBytes) |
|---|---|
| / | 100 |
| /stand | 100 |
| Swap | 512 |
| /home | 200 |
| /opt | 800 |
| /tmp | 700 |
| /usr | 800 |
| /var | 800 |
In addition to adjusting existing logical volume sizes, you can also create new logical volumes and add or remove physical volumes in the volume group.
When you are satisfied with the configuration, press the ![]() key on the Go option. The installation process will analyze disks and show any warning or error messages. When you acknowledge these messages, file systems are created, software is copied and the configure process starts, which may take a long time.
key on the Go option. The installation process will analyze disks and show any warning or error messages. When you acknowledge these messages, file systems are created, software is copied and the configure process starts, which may take a long time.
| |
| |
| Top |
EAN: 2147483647
Pages: 390