| A firewall offers protection by selectively filtering network packets: you can prevent unwanted inbound traffic from the Internet, and you can restrict outbound traffic from your internal network. The firewall software in Mac OS X Server, IPFirewall (IPFW), is from the FreeBSD organization and is a very powerful and sophisticated tool that offers protection over both IP version 4 and IP version 6. Fortunately, Apple has made this much more approachable through the Server Admin tool. The best way to set up your firewall is to start with Mac OS X Server's default settings and then create openings only for the network traffic needed by defining a group of IP addresses and selecting the services you want them to be able to access. What Are the Default Firewall Settings? Mac OS X Server 10.4 has default firewall settings that will allow you to configure and run your server over a network. Whether you have an Xserve with no monitor or you are configuring a server thousands of miles away, you will need to allow at least some traffic through your firewall. The default settings include special settings, which have a lock icon next to them and cannot be changed, and minimal management settings, which can be changed if you desire. The default management settings are: Serial number support allows traffic to check the legitimacy of your Mac OS X Server 10.4 license; if you deselect the check box for this service, it will turn itself back on. The remaining default services are allowed for any IP address, and may be necessary in order to set up a Mac OS X Server from across the country or from a different subnet. If you will not need such wide access to manage your servers, limit traffic to only the range of IP addresses from which you will be managing them. |
Using the Command Line with the Firewall IPFW can be configured from the command line by using the serveradmin command or traditional ipfw commands. The serveradmin commands essentially give you command-line access to the Server Admin way of doing things, and the ipfw commands give you access to the traditional, FreeBSD way. The serveradmin commands are useful for tasks such as starting or stopping the firewall service, or checking its status. The ipfw commands give you a convenient way to add or modify firewall rules. It is important to understand how the GUI way and the FreeBSD way interact: Looking in the /private/etc/ipfilter directory, you'll find ipfw.conf, ipfw.conf.apple, and ipfw.conf.default. Viewing the contents of the ipfw.conf file will explain the interaction between the GUI elements and the FreeBSD elements. |
Be very careful when configuring the firewall to not lock yourself out! Make a habit of confirming that you have left the following management services accessible before you save a firewall configuration: It is a good idea to set up a small shell script to flush all the firewall rules every 15 minutes while you test and work on your firewall. This way, if you do lock yourself out, you only need wait until the 15 minutes rolls around and then you can start again. When you define address groups, you are telling the firewall to adhere to the rules for just that IP range. For servers with only one Ethernet connection and one IP address, you can delete all other groups except the All group; then, no matter what your computer's IP address, you will be managing the firewall for any IP address that the server uses. To define address groups 1. | In Server Admin, select the Firewall service for your server in the Computers & Services list.
| 2. | Click the Settings button and then click the Address Groups tab (Figure 10.6).
Figure 10.6. Selecting the Firewall group settings in Server Admin. 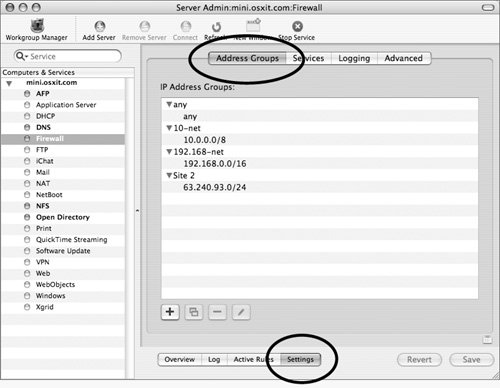
| | | 3. | Click the plus button to open a dialog where you can provide a group name and add addresses; then click OK to return to the main window (Figure 10.7).
Figure 10.7. Adding a new group to the Firewall group list. 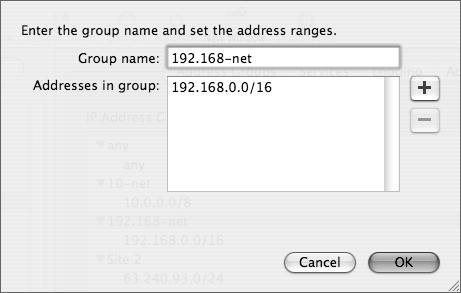
| 4. | Confirm that the Address range displayed in the lower part of the IP Address Groups configuration drawer is as you intend it to be, and click OK (Figure 10.6).
Your new address group will appear in the IP Address Groups window.
| 5. | When you've finished making changes, click Save.
|
Figuring Out Subnet Mask Notation There are three ways you can add IP addresses to a firewall address group. The first is to simply enter a single IP address. But what if you wanted to add more than a single IP address at a timefor example, your company's whole address range? In that case you'd need to define a subnet mask, either using Classless Inter-Domain Routing (CIDR) notation or netmask notation. If you haven't spent a lot of time configuring network settings, this may seem like a daunting task. Consult one of many Internet sites devoted to understanding networking and CIDR notation. |
Allowing access to services Once you have your IP address groups defined, you can allow services to be accessed by those groups. In the Services pane, you simply select the services you want. To allow access to services 1. | Select the Firewall service, click the Settings button, and then click the Services tab (Figure 10.8).
Figure 10.8. Selecting which services are allowed to be accessed through the firewall over the group any. 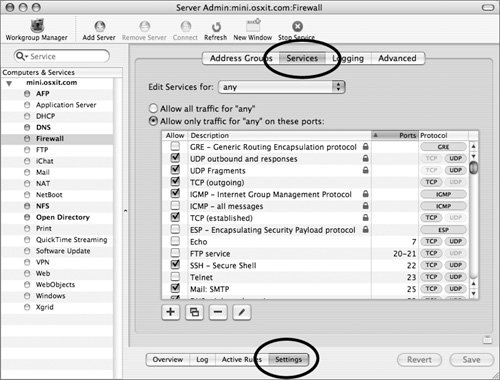
The services with the padlock icon cannot be edited or removed.
| 2. | From the "Edit Services for" pop-up menu, select the address group to which you want to add a service (Figure 10.9).
Figure 10.9. Choosing another group over which firewall rules will be applied. 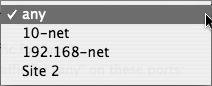
| 3. | Select the "Allow only traffic for 'any' on these ports" radio button, and select the service(s) you want to allow below.
| 4. | Click the All column to display selected services at the top of the list (Figure 10.10).
Figure 10.10. Sorting rules by whether they are checked or not. 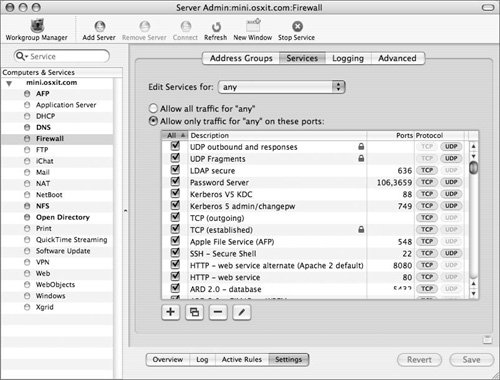
| 5. | When you've finished making changes, click the Save button and make sure the firewall is running.
Your firewall should now allow the traffic for the service(s) you selected for the IP address group you specified.
|
 Tips Tips
By repeating the process for various other groups (depending on how many interfaces are active on your server), you can provide the services you want to the computers that need them. The best way to implement the firewall is to turn off all possible services except the management tools and ssh and then turn on services as necessary. For example, when using Mac OS X Server as a KDC (Open Directory Master), you may not need to open all the services surrounding Kerberos to make secure connections work.
To add specific firewall rules 1. | Select the firewall service, click the Settings button, and then click the Services tab.
| 2. | From the "Edit Services for" pop-up menu, select the address group for which you want to enable your service.
| 3. | Click the plus button and a new service dialog appears (Figure 10.11).
Figure 10.11. Clicking the plus button allows a new service to be listed in the service list. 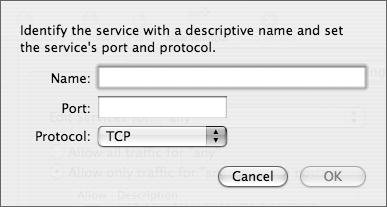
| 4. | Provide a service name, port number, and protocol, and then click OK (Figure 10.12).
Figure 10.12. Entering data into the new service dialog. 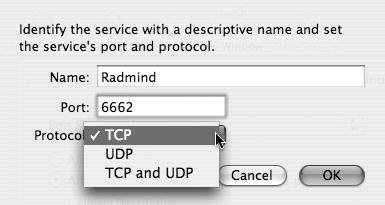
Your new service is added to the services list for all of the service groups, but you must select the check box to make that service accessible through the firewall (Figure 10.13).
Figure 10.13. Selecting the newly added service in the list. 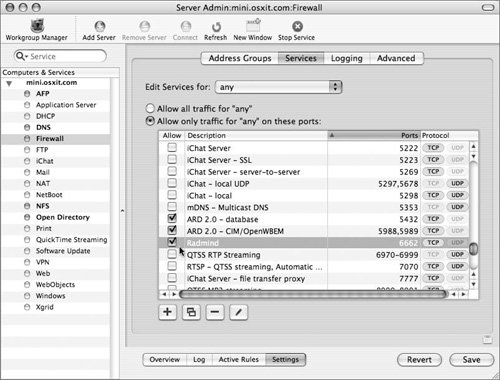
| 5. | When you've finished making changes, click Save.
|
Setting logging options for the firewall The logging options for the firewall in Mac OS X Server are quite simple. Generally, you will log all allowed and/or denied packets for analysis or troubleshooting rather than leaving those options selected all the time. Logging every packet can result in some pretty big log files, so be careful! You can limit how many packets are logged, too. To set logging options 1. | Select the Firewall service, click the Settings button, and then click the Logging tab (Figure 10.14).
Figure 10.14. Enabling firewall logging via the Logging tab. 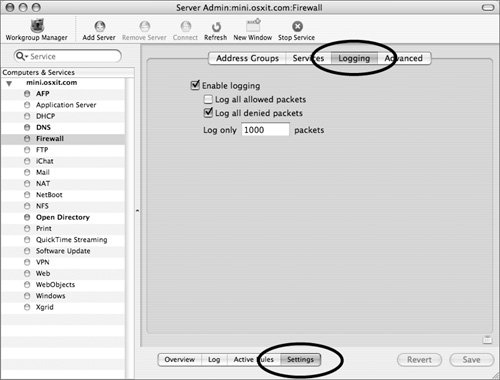
| 2. | Click the "Log all denied packets" check box and set the value to "Log only 1000 packets" for a relatively small log file.
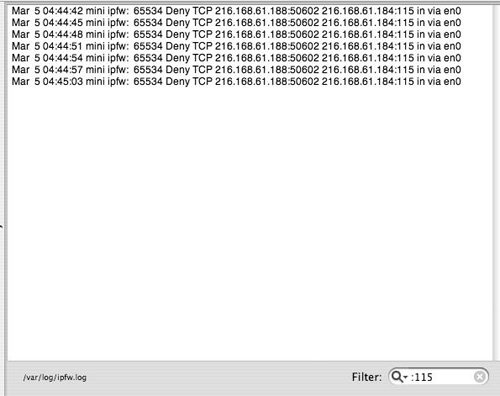
| 3. | To test the limits you just set, attempt to connect to your Mac OS X Server with a service blocked by the firewall from any other computer.
For example, type telnet xxx.xxx.xxx.xxx 115 (the x's represent the IP address of your server; 115 is the port you want to test).
| 4. | Click the Log button at the bottom of the pane to display entries for all denied packets (Figure 10.15).
Figure 10.15. Viewing the firewall log from within Server Admin. 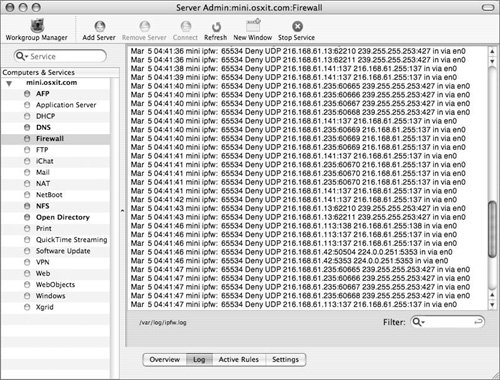
|
Tip
Configuring advanced settings and rules Mac OS X Server's firewall also offers two Stealth Mode advanced options that you can use to give your server a less conspicuous presence on the Internet. When you select the Enable for TCP and Enable for UDP check boxes, packets that your server receives on closed ports are simply dropped; this is the same response an attacker would get if there were no computer present (Figure 10.17). Figure 10.17. The Advanced tab of the firewall settings allows for rules to be moved in order of importance. 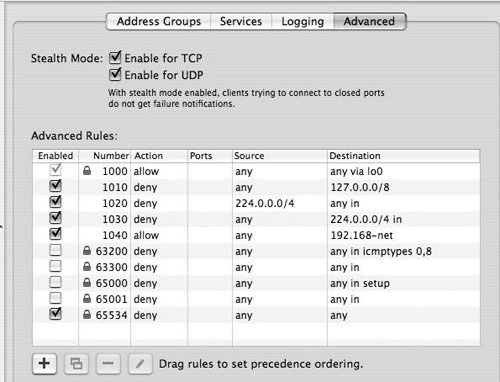
Though Mac OS X Server provides firewall rules for most of the services you will need, there may be times when you need to add your own custom rules. One reason you'd want to make an advanced rule is to allow protocols other than Transmission Control Protocol (TCP) or User Datagram Protocol (UDP)such as Internet Control Message Protocol (ICMP), Internet Group Management Protocol (IGMP), Encapsulating Security Payload (ESP), or the protocol used to encapsulate static packets in an IP header, IPEncap. Another reason you'd want to make an advanced rule is to allow different traffic on different network interfaces: All of the entries under the Services tab apply to all the network interfaces of your server. So if you have multiple physical or virtual interfaces defined in your Network preference pane, you can create custom rules under the Advanced tab to set up independent rules for each interface. Password Security Password security and physical security share the dubious distinction of often being neglected weak links in a security system. It is frustrating to think how quickly a well-planned security system can be compromised by a poor password choice. With Mac OS X Server, you have the ability to enforce password policies per user or globally for all users. Please refer to Chapter 3, "Open Directory," for more information about password policies. |
To create an advanced rule, you must understand what you want to accomplish. Here are some main options to be explored (Figure 10.18): Figure 10.18. Adding a new advanced rule opens this dialog. 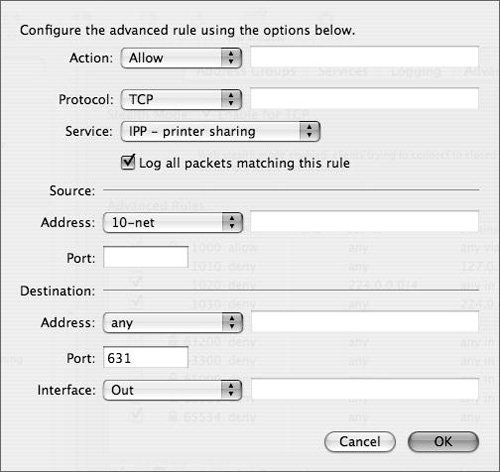
From the Action pop-up menu, choose Allow or Deny. From the Protocol pop-up menu, choose the type of protocol affected by the firewall. Choose a specific service from the Service pop-up menu or select Other if the preset service is not in the list. In the Source area, the Address pop-up menu provides you with each IP address group from the Address Group tab. You can also enter specific IP addresses or ranges in the field. In the Port field, you can specify which source port will be used with this specific rule. In the Destination area, the Address pop-up menu provides the same IP address groups as in the Source area, and the port is sometimes preselected based on your service choice. From the Interface pop-up menu, choose whether the traffic is coming into or out of your server.
After you set up your customized rule, click OK and then save your changes. You may want to drag the rule higher or lower in the list depending on where you want the rule to fall with respect to your other rules. Recovering from a Lockout If you are in the unenviable position of being locked out of your server, the firewall will need to be reset to its default settings. All is not lost, but you will need to have physical access to the server, and be able to boot it into single-user mode. 1. | Disconnect the server from the Internet.
| 2. | Restart in single-user mode by pressing Cmd+S.
| 3. | Follow the onscreen prompts by typing /sbin/fsck yf.
| 4. | When the fsck file system check has successfully run, mount the file system:
/sbin/mount -uw /.
| 5. | Rename the ipfw configuration file and the address groups file:
cd /private/etc/ipfilter mv ipfw.conf ipfw.conf.old mv ip_address_groups.conf ip_address_groups.conf.old
| 6. | Flush the firewall rules:
ipfw -f flush
| 7. | Edit /private/etc/hostconfig to confirm that the IPFILTER setting reads as follows:
IPFILTER=-YES-
This will ensure that your server starts with the firewall active.
| 8. | Restart your server and check the firewall configuration.
| 9. | Reconnect your server to the Internet.
|
|
|