| You've planned the services to run on your Mac OS X Server and chosen the hardware on which the server will reside. It's now time to decide whether you wish to partition the disk. Partitioning your disk allows you to easily reformat one partition while keeping software or data on the other. However, partitioning may waste valuable disk space and be less secure, depending on the way the partitions are formatted. You might want to partition a disk to separate the data from the operating system. Or, you might want three partitions: one containing the operating system, one containing the data, and one to back up the data or the operating system. There is no right or wrong way to proceed when you're dealing with partitions. However, with respect to Mac OS X Server, you undoubtedly know the value of backing up your data to another physical location; so, having a local partition for backup probably won't be useful. Having a second local backup disk that you can boot from in case of hardware failure is a more likely scenario. You have the option of partitioning the disk whether you're installing Mac OS X Server on a Mac with a single disk or multiple disks, such as a RAID array. For example, you may have an Xserve RAID or an Xserve that supports hardware RAID (the G5 Xserve has an option to support hardware RAID via an optional internal hardware RAID card). Clarifying Some Terms Now is a good time to look at some terminology to ensure that you understand this book's geek-speak (Table 1.3). Table 1.3. Computer terminology regarding disksTERM | MEANING | EXAMPLES | Storage device | Any item connected to your Macintosh that can store information. Storage devices may have the ability to be partitioned. | FireWire hard disk, iPod, USB hard disk, Flash cards, USB storage device, PC storage cards. | Drive | A storage device that's physically connected to the computer and that has or can read from spinning platters or disks. | Hard disk drive, CD-ROM drive, SuperDrive. | Disk | A storage device or the part of a storage device that actually stores data. Sometimes used to describe a partition. | CD-ROM disk, hard disk, or external disk, such as a Zip disk. | Volume | A logical section of a disk that can store files. Volumes are always partitions, even if a disk contains only one partition. | If a hard disk is partitioned into three volumes, each volume appears as a separate icon on the desktop. | Media | Items that store information and that generally are disposable and plentiful. | CD-Rs, CD-RWs, DVD-Rs, DVD-RAMs, floppy disks, Zip disks. | RAID | Redundant Array of Independent Disks. Makes several drives act and look like a single drive. Levels of RAID exist. | Since RAID arrays are multiple disks, examples generally involve additional internal hard disks or preconfigured external RAID systems such as Xserve RAID from Apple. |
|
RAID Review RAID stands for Redundant Array of Independent Disks. The concept is easy to understand: Take two disks, make the operating system think they're one disk, and you can perform digital magic. For example, if the operating system thinks it has one big disk, you can have the RAID software write the same information to both disks. The reason to do this is clear: redundancy of data (fault tolerance). If disk one fails, disk two has the identical data. This is known as RAID level 1. Table 1.4 describes some popular RAID levels. Table 1.4. RAID levels and their usesRAID NUMBER | RAID NAME | IMPLEMENTATION | ADVANTAGES | DISADVANTAGES | 0 | Striping | Writes small amounts of data to each drive, switching back and forth | Speed | If one disk dies, all data is lost (no fault tolerance) | 1 | Mirroring | Writes identical data to both drives | Fault tolerance; hot swapping of disks, if supported | No gain in disk space | 3 | Striping with parity | Writes to each disk, and writes a parity check to a separate disk | Speed | Usually involves a move to hardware RAID | 0+1 | Mirrored striping | Two sets of striped arrays | Speed; fault tolerance | Somewhat expensive | 5 | Distributed parity | Writes data to each disk; parity is written across the disks | Extremely fast read rates; fault tolerance | Somewhat slower writes; three-disk minimum to implement | 10 | Mirroring | Mirrored array is striped across two RAID controllers | RAID level 1 advantages over two controllers | Four-disk minimum to implement | 30 | Striping with parity | Parity and striping across two controllers | RAID level 3 advantages over two controllers | Six-disk minimum to implement | 50 | Distributed parity with striping | Writes data to each disk; parity is written across disks across two controllers | RAID level 5 advantages over two controllers | Six-disk minimum to implement |
RAID systems must have at least two disks but can have several, based on the configuration and your budget. RAID can be software based or hardware based; hardware-based RAID is more versatile. Apple's support for RAID involves both software and hardware RAID. The Disk Utility application can do software RAID on disks, and hardware RAID is supported by Apple's Xserve and Xserve RAID. The G5 Xserve can hold 3 disks, and the G4 Xserve can hold 4; the Xserve RAID can hold up to 14 disks over two controllers and is managed by an application called RAID Admin. |
 Tips Tips
Remember, partitioning a disk erases all the data on that disk! Separating your boot volumes from your data volumes, if you have the luxury of enough space to do it, will make system recovery much easier and may improve your system's speed. It isn't necessary to create several partitions from your disk. Many people run their server software on a nonpartitioned disk.
When you're setting up Mac OS X Server for the very first time (not doing any sort of upgrade), you boot from the server DVD. Once you've booted off the Mac OS X Server DVD, you have access to the disk(s) via Disk Utility on the DVD and remotely via ssh. If partitioning is something you want to do, you'll probably run Disk Utility and partition the disk(s) in this manner. To partition a disk 1. | Boot from the Mac OS X Server DVD.
| 2. | Choose Utilities > Disk Utility.
The Disk Utility window appears, showing all mounted volumes in the left pane's disk and volume list.
| 3. | Select your disk from the disk list menu. (Note the difference between the physical devices, which are flush on the left side of the pane, and the logical volumes that are contained on the devices, which are slightly indented underneath the physical devices.)
| 4. | Click the Partition tab (Figure 1.1).
Figure 1.1. Click the Partition tab. 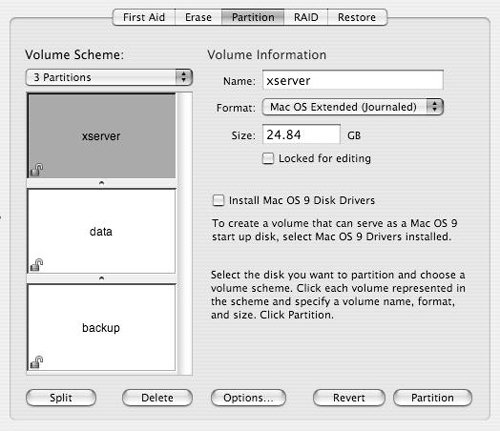
| 5. | Choose the number of partitions (up to 16) you wish to create from the Volume Scheme pop-up menu.
| | | 6. | Click each partition in the map below the pop-up menu, and give it a name, format, and size.
You can format the partitions in a variety of ways, depending on their final use:
- Mac OS Extended (Journaled)
- Mac OS Extended
- Mac OS Extended (Case-sensitive Journaled)
- Mac OS Extended (Case-sensitive)
- UNIX File System
- Free Space
Recall that the minimum disk space required to install Mac OS X Server 10.4 is 4 GB.
| 7. | Click the Partition button, wait for the confirmation dialog, and then click the Partition button in the confirmation dialog (Figure 1.2).
Figure 1.2. Click Partition in the confirmation dialog. 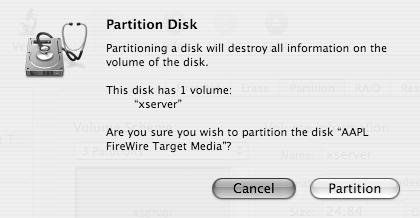
| 8. | Choose Disk Utility > Quit Disk Utility.
You have now partitioned your disk into individual volumes.
|
Command-Line Partitioning diskutil is a useful command that lets you partition a disk when a Mac OS X Server is booted from a DVD. When Mac OS X Server boots from the DVD, the ssh daemon is running, meaning you can see it and connect to it via the command line. Once you've connected, diskutil can be used to partition, format, and name disks and volumes. To learn more about diskutil, type diskutil from the command line. |
|