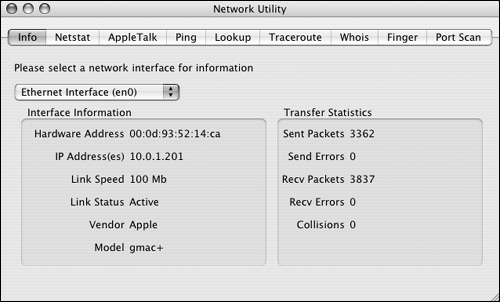
| SMTP is used to send mail, and IMAP or POP is used to receive mail, but one other service is absolutely necessary for your mail server to send and receive mail on the Internet. Obviously, you need static real-world IP addresses if your mail server is to send and receive mail from other servers on the Internet. Further, your mail server must have an Address (A) record and a Mailbox Exchange (MX) record on a Domain Name Server (DNS) if it's to be found by other mail servers on the Internet. Most mail clients are configured to find their mail server via DNS as well. Even if your mail server will only be used internally on a closed network, you should have a DNS record for it, because the mail server won't allow SMTP services unless it can resolve its own IP address to a registered DNS name. If you don't have access to configure another DNS server on your network, it's simple to set up your mail server as a DNS server for itself. For more information about the DNS service, see Chapter 6, "Network Configuration Options." To enable Mail services: 1. | Test the MX record for your mail server by launching the Network Utility located in /Applications/Utilities (Figure 8.1).
The Network Utility only tests the connection from the computer it's running on. So, if possible, you should run this utility on the server.
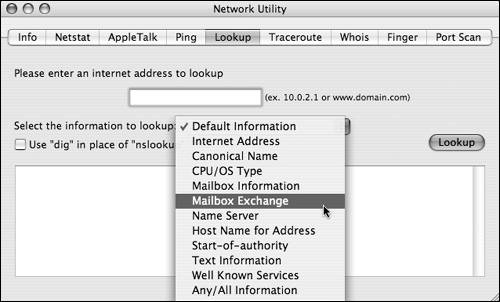
| 2. | In the Network Utility, click the Lookup tab  , and then select Mailbox Exchange from the lookup type pop-up menu (Figure 8.2). , and then select Mailbox Exchange from the lookup type pop-up menu (Figure 8.2).
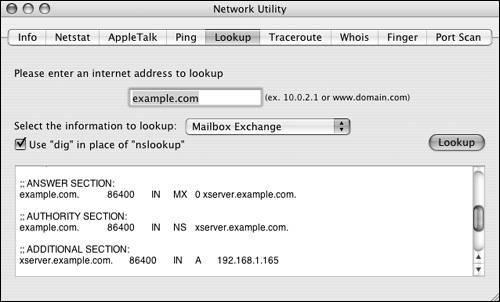
| 3. | Enter your mail domain address in the lookup field, and click the Lookup button  . .
If DNS is appropriately configured, the lookup should return the name and IP address of your mail server (Figure 8.3).
| 4. | If the MX record is correct for the mail server, then you can proceed. Otherwise, the person in charge of DNS services needs to properly configure the MX record for your mail server.
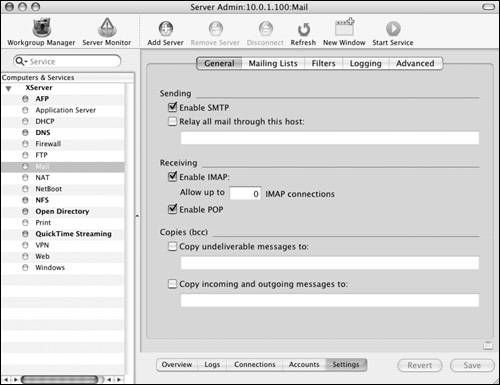
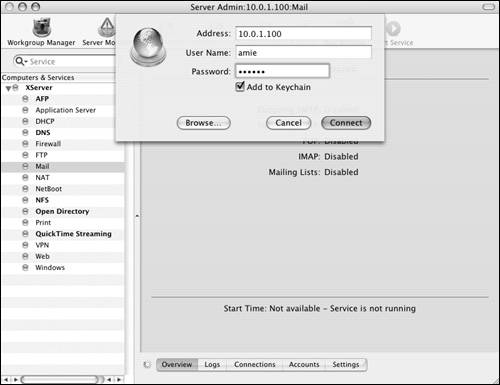
| 5. | Launch the Server Admin tool located in /Applications/Server, and authenticate as the administrator (Figure 8.4).

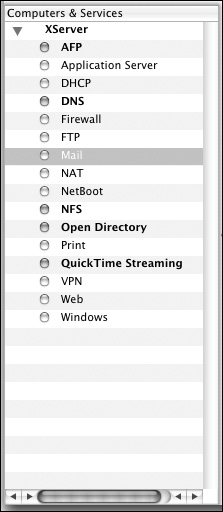
| 6. | Select the Mail service for your server in the Computers & Services list (Figure 8.5).
| 7. | Click the Settings button  and then the General tab and then the General tab  . .
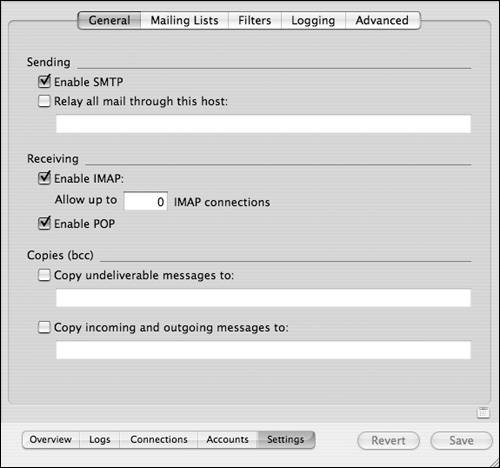
| 8. | In the General mail settings frame, select any of the following (Figure 8.6):
Enable SMTP to enable the Postfix mail-sending service.
Enable IMAP to enable the Cyrus mail-delivery service. Enter a number in the "IMAP connections" field to limit the number of connections. Otherwise, leave the field at its default value of 0 for unlimited connections.
Enable POP to enable the Cyrus mail delivery service.
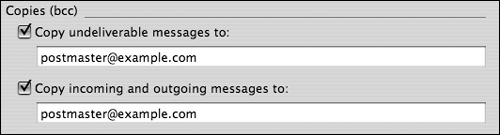
| 9. | Optionally, you can configure Blind Carbon Copy (bcc) options by selecting the appropriate check boxes and entering a delivery address in the appropriate fields (Figure 8.7).
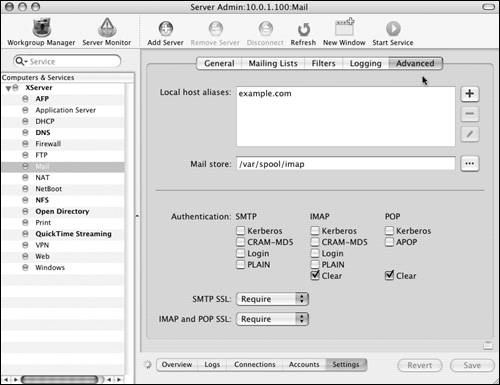
| 10. | Click the Advanced tab  , and verify that your mail server's MX record is included among the Local host aliases (Figure 8.8). , and verify that your mail server's MX record is included among the Local host aliases (Figure 8.8).
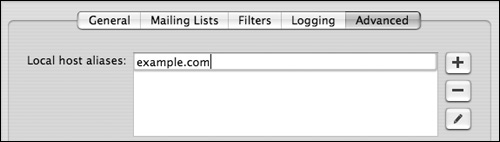
If it isn't, double-click the first entry to make the appropriate changes.
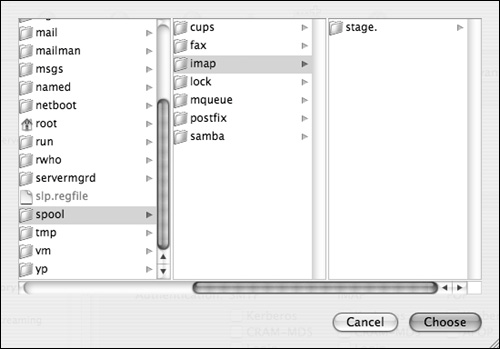
| 11. | Optionally, you can configure an alternate primary mail store location by redefining its default directory path (Figure 8.9).

You can manually enter a new path or click the ellipsis button  to use the browse dialog (Figure 8.10). to use the browse dialog (Figure 8.10).
| 12. | When you've finished making changes, click the Save button  . .
| 13. | Click the Overview button  , and verify that the Mail services are running (Figure 8.11). , and verify that the Mail services are running (Figure 8.11).
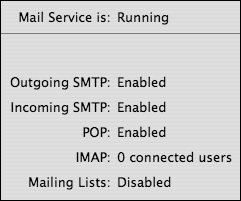
If they aren't, click the Start Service button  to activate the Mail services. Although the Mail services are enabled, no mail accounts are enabled by default. The next task explains how to enable mail accounts. to activate the Mail services. Although the Mail services are enabled, no mail accounts are enabled by default. The next task explains how to enable mail accounts.
|
 Tips Tips
It's good practice to stop the mail server, make your changes, then restart the Mail service each time you make a configuration change. You may have to shut down and restart the entire server to enable SMTP services for the first time to initially create the configuration files. To configure WebMail, refer to Chapter 9, "Web Services."
Enabling mail accounts Even though your server may be running Mail services, by default, no user account is configured to use them. If the user accounts have already been created, you must manually enable Mail service for the users. If you have yet to populate your server with user accounts, then you can save time by defining an account preset in which mail is enabled. This way, every new user you create will automatically be configured with their mail account enabled. For more information about creating user accounts, see Chapter 4. | Postfix and Cyrus have been around for quite some time, and many Unix administrators are familiar with their associated configuration files. Originally these services had no graphical interface, and all setup was done by editing plain-text configuration files. Although the Server Admin interface is nice, some options are still available only in the configuration files: You need to remember a couple of rules when you're editing the Mail service configuration files. First and foremost, always back up any configuration file before you change it! Also, to activate any changes, you must restart the Mail service. |
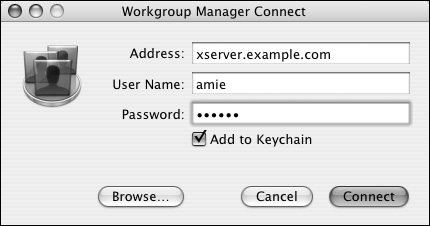
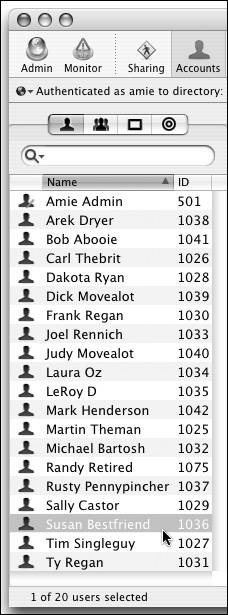
To enable mail accounts: 1. | Launch the Workgroup Manager tool located in /Applications/Server, and authenticate as the administrator (Figure 8.12).
| 2. | Click the Accounts icon in the Toolbar and the User icon in the account types tab (Figure 8.13).
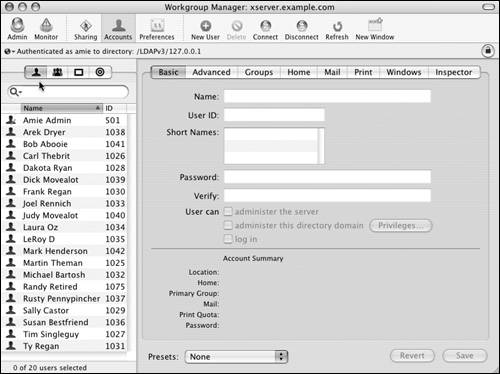
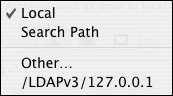
| 3. | Click the directory authentication icon  , and select the appropriate directory database from the pop-up menu (Figure 8.14). , and select the appropriate directory database from the pop-up menu (Figure 8.14).
| 4. | Select the user or users you wish to configure from the user list (Figure 8.15).
| 5. | In the user settings frame, click the Mail tab  . .
| 6. | By default, Mail services for user accounts are set to None (Figure 8.16).

| 7. | Click the Enabled radio button to activate and configure the selected user's mail settings (Figure 8.17):
If it isn't already populated, enter the fully qualified domain name of your mail server in the Mail Server field. 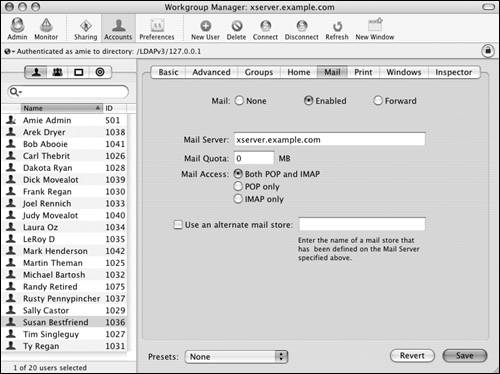
The Mail Quota is, by default, set for unlimited size with the 0 value. To restrict a user's mailbox quota, enter the desired number of megabytes. To restrict a user's access to either POP or IMAP, choose the appropriate radio button. Otherwise, this account may use either protocol. Optionally, you can configure an alternate mail store location for just this account by redefining its default directory path. To do so, select the "User an alternate mail store" check box, and manually enter a new directory path (Figure 8.18). 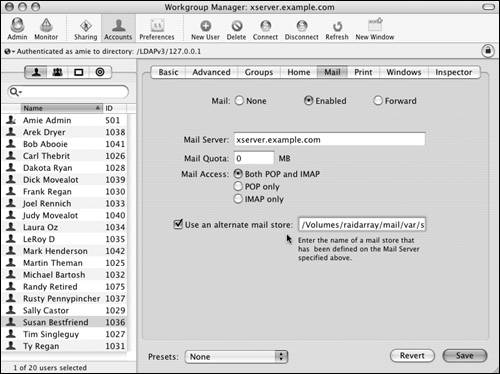
| 8. | When you've finished making changes, click the Save button .
You have now enabled basic email service.
|
Tips If a mail user moves to another service provider, you can forward their mail by clicking the Forward radio button and specifying the user's forwarding address (Figure 8.19). 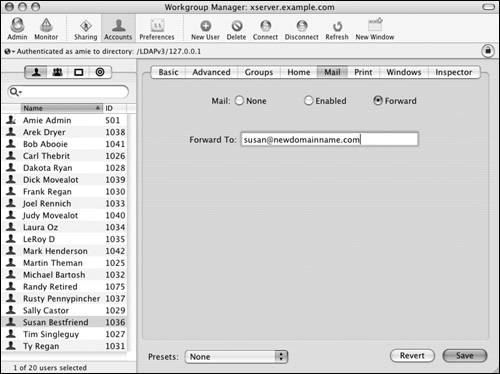
You can select multiple accounts from the user list by holding down the Shift or Command key while you make your selections. It's common practice to configure a postmaster mail account on your server as a contact for other administrators to report mail delivery problems to you.
Configuring SMTP relay usage As with any new service, you should thoroughly test the configuration before going live. It's also a very good idea to consider enabling some of the advanced SMTP relay and security features to avoid mail spammers and hackers. Please refer to the other tasks in this chapter for instructions on how to secure your server from common mail server attacks. Electronic mail servers were originally conceived with a more utopian world view in mind. If mail intended for another server was accidentally delivered to your mail server, the server would kindly relay that message to the correct server. This relay system also allowed administrators to distribute mail servers across their networks for better performance. Mac OS X Server lets you configure the mail server to send all outgoing messages through an SMTP relay server or to become a relay server for other mail servers. Today, if your mail server acts as relay, then it's a prime target for spammers. They will use your mail server as a relay for delivering spam messages, making it more difficult to trace the spammer's origins. One way to combat this problem is to change the default SMTP relay settings for your server by using a relay filter. | The default location for temporarily storing outgoing messages is /var/spool/postfix/. This directory is usually small, because messages are only temporarily held there until they're sent. For this reason, Apple didn't include an easy-to-use interface for changing its location. If desired, you can change the outgoing mail store manually by editing the Postfix configuration file. The default location for storing incoming mail and user mailboxes is /var/spool/imap/. This directory can become large, because it permanently stores all of your users' mail messages. As shown in the previous two tasks, it's easy to specify an alternate mail storage location using the administrative tools. It's common practice to place the mail store on a RAID for improved performance and reliability. Before you back up either of these directories, you need to stop the mail server. Backing up the mail stores while the Mail service is active will probably result in a corrupted mailbox database backup. A backup solution that temporarily halts the mail server and performs a quick incremental backup is the best option. If you do corrupt the mailbox database, you can attempt to repair it using the reconstruct m command from the Terminal. |
To configure SMTP relay usage: 1. | Launch the Server Admin tool located in /Applications/Server, and authenticate as the administrator (Figure 8.20).

| 2. | Select the Mail service for your server in the Computers & Services list, and click the Settings button (Figure 8.21).
| 3. | Configure either of the following options:
To send all outgoing mail from your server through another relay, click the General tab . Then, select the "Relay all mail through this host" check box, and enter the address of the destination relay server (Figure 8.22). 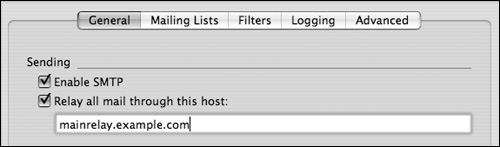
To accept SMTP relay from other hosts through your mail server, click the Filters tab (Figure 8.23), and then click the Add button  . A drop-down dialog appears in which you can enter a host or network address (Figure 8.24). To modify an address, double-click its entry in the relays. . A drop-down dialog appears in which you can enter a host or network address (Figure 8.24). To modify an address, double-click its entry in the relays. 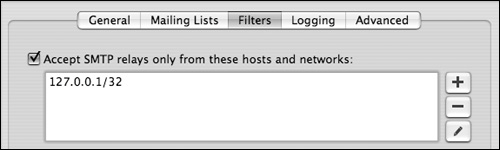
| 4. | When you've finished making changes, click the Save button .
|
Tips You can test your mail server's relay configuration by attempting to Telnet into the server over port 25. You should always stop and restart the Mail service whenever you make configuration changes. Any mail account hosted on your server can relay through the server without authentication. For this reason, you should consider requiring SMTP authentication to prevent spammers from sending messages as one of your users. See the task "To configure advanced mail authentication" for more information.
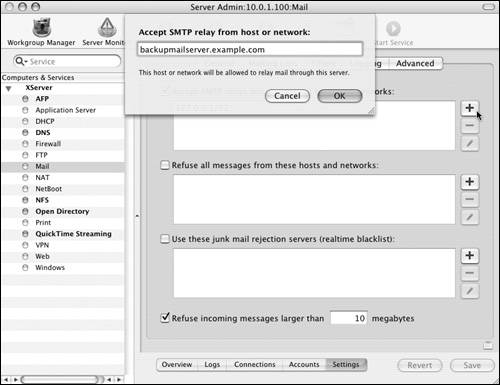
Handling junk mail Junk mail, commonly known as spam, is unsolicited bulk electronic mail sent through your server or to your users. Unfortunately, junk mail is an unavoidable nuisance when you provide Mail services. One way Mac OS X Server can cut down on spam is by rejecting mail from known spam servers. To reduce spam: 1. | Launch the Server Admin tool located in /Applications/Server, and authenticate as the administrator (Figure 8.25).
| 2. | Select the Mail service for your server in the Computers & Services list.
Click the Settings button and then the Filters tab (Figure 8.26). Initially, Mac OS X Server doesn't reject mail destined for your users from any hosts or servers.
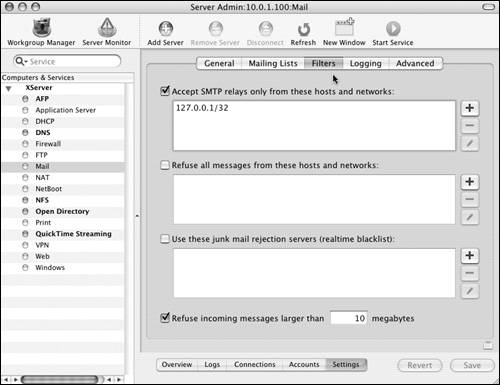
| 3. | To refuse messages from known spammers, select the "Refuse all messages from these hosts and networks" check box (Figure 8.27).
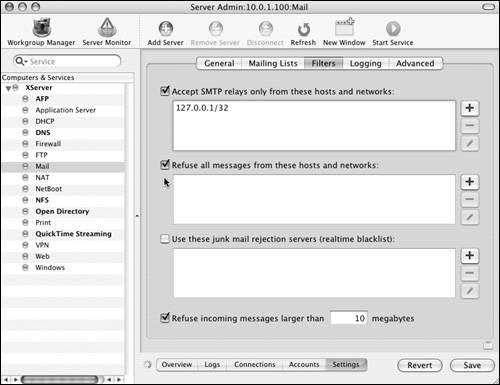
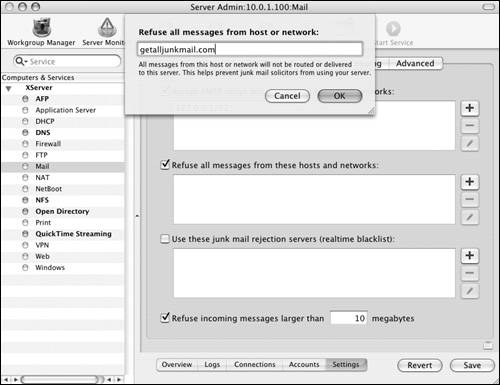
Click the Add button ; a drop-down dialog appears in which you can enter a host or network address (Figure 8.28). To modify an address, double-click its entry in the filters list.
| Mac OS X Server doesn't include, but is compatible with, a highly effective spam filter known as SpamAssassin. This filter system uses a range of advanced rule-based filtration tests to identify spam. SpamAssassin is open source and freely available at http://spamassassin.apache.org/. For more information regarding the installation and setup of SpamAssassin on Mac OS X Server, the Apple Developer Connection offers an excellent tutorial at http://developer.apple.com/server/fighting_spam.html. |
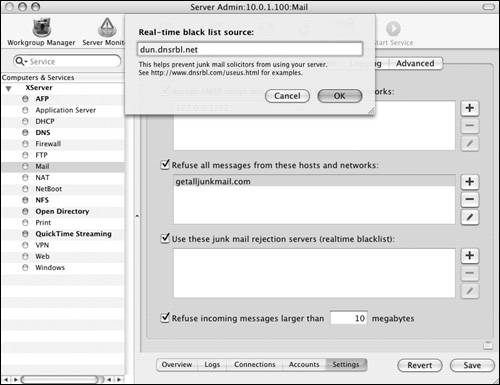
| 4. | To refuse messages based on a continuously updated list of known spammers (maintained by blackhole servers on the Internet), select the "Use these junk mail rejection servers" check box.
Click the Add button ; a drop-down dialog appears in which you can enter a server address (Figure 8.29). A default link to the Domain Name Real-time Black List is provided for you. To modify an address, double-click its entry in the filters list.
| 5. | When you've finished making changes, click the Save button .
|
Tips You should always stop and restart the Mail service whenever you make configuration changes. Any mail account hosted on your server is allowed to relay through the server without authentication. For this reason, you should consider requiring SMTP authentication to prevent spammers from sending messages as one of your users. See the task "To configure advanced mail authentication" for more information. You can also filter out unusually large messages to cut down on mail storage size (Figure 8.30). 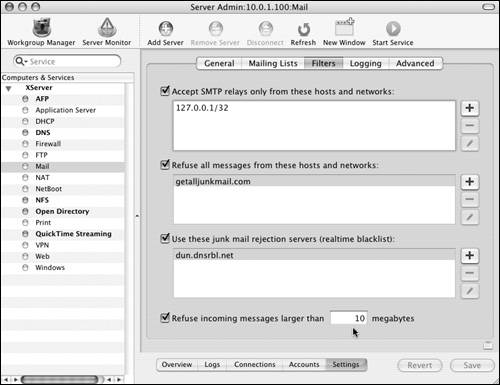
Using mail host aliases Users have a penchant for mistyping electronic mail host names. For this reason, it's a good idea to set up local host aliases, also known as virtual domains. Doing so lets your mail server accept mail from more than one domain name. This is also useful if you wish to host mail for a variety of different domain names. Before you add additional host names, make sure the names are configured with both a forward and reverse DNS record. For more information about the DNS service, see Chapter 6. To set up mail host aliases: 1. | Launch the Server Admin tool located in /Applications/Server, and authenticate as the administrator (Figure 8.31).

| 2. | Select the Mail service for your server in the Computers & Services list.
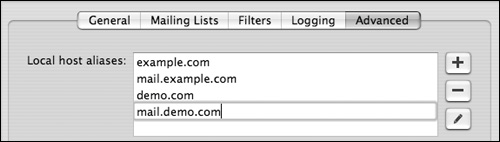
Click the Settings button and then the Advanced tab (Figure 8.32). Initially, Mac OS X Server uses the host name configured for its primary interface (Figure 8.33).
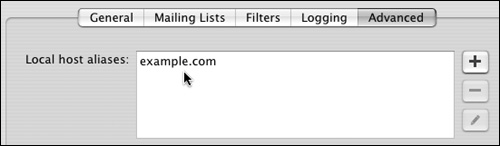
| 3. | Click the Add button .
A drop-down dialog appears in which you can enter another host name (Figure 8.34). To modify a host name, double-click its entry in the aliases list.

| 4. | When you've finished making changes, click the Save button to save and view your changes (Figure 8.35).
As with any name service change, you should thoroughly test the configuration before going live.
|
Tip
|