| Whether it's Mac OS X or Mac OS X Server, the local directory is a NetInfo directory. NetInfo is a holdover from the days when Steve Jobs was CEO of a computer company called NeXT (after he left Apple). Some of Mac OS X is based on NeXT, so you need to be familiar with NetInfo to better your understanding of directory services. When you create your initial user account on Mac OS X and Mac OS X Server, the user information is contained in the NetInfo directory. You can access this directory by using the NetInfo Manager application or by using command-line utilities such as nicl and dscl. Normally, most user changes are made using the Accounts Preference pane or Workgroup Manager; but under certain circumstances, you may wish to use these two command-line utilities. Although the NetInfo Manager application is located on both Mac OS X Client and Server, its usage when managing the NetInfo directory has been usurped by Workgroup Manager. It's important to understand that when you install Mac OS X Client and Mac OS X Server (as a stand-alone server), you're working with the local directory. This has some restrictions. Although the NetInfo directory stores the user information, it doesn't store the password; the password is stored in a shadow hash file located in /private/var/db/shadow for Mac OS X Client. Also, global user authentication policies (covered later in this chapter) can't be implemented on an account with a shadow password. To understand how NetInfo stores information, think about a database. A database uses fields to hold the data. NetInfo calls fields properties and the data in those fields values. So, for example, a NetInfo directory may have a user with the short name sally. A long name, user ID, and other information are tied to the user sally. Some properties are required (such as a short name), and others are optional for user data (such as a user picture). What's in a Name? NetInfo Manager uses the terms properties and values to describe what LDAP and Workgroup Manager call attributes and values. Understanding how NetInfo Manager lays out the directory is important, but ultimately you should use Workgroup Manager. Details about Workgroup Manager with users can be found in Chapters 2 ("Server Tools") and 4 ("User and Group Management"). |
Think of the user with the short name sally listed with all other users. You now have a collection of users. Collections of items like this are called records; NetInfo divides data into records. You can see the local NetInfo directory with the records listed by opening NetInfo Manager in /Applications/Utilities/. The actual directory is located in /private/var/db/netinfo/local.nidb; it can't (and shouldn't) be accessed by anyone but root (Figure 3.44). Figure 3.44. The NetInfo Manager application contains user records. 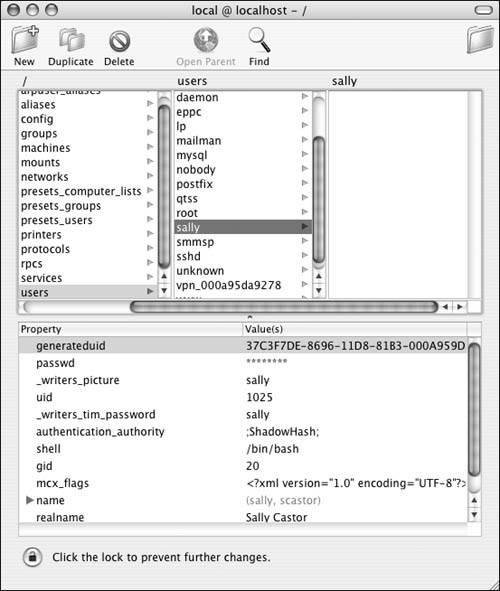
To use NetInfo Manager to show user records: 1. | Launch NetInfo Manager, located in /Applications/Utilities/.
| 2. | Locate the base of the directory above the left frame, as indicated by a forward slash (/) (Figure 3.45).
Figure 3.45. The upper-left corner of NetInfo Manager indicates the default directory. 
| 3. | Click the forward slash to display collections of data that have been categorized in the middle column.
| 4. | In the left column, scroll down if necessary, and choose the users directory (Figure 3.46).
Figure 3.46. Choose the users directory. 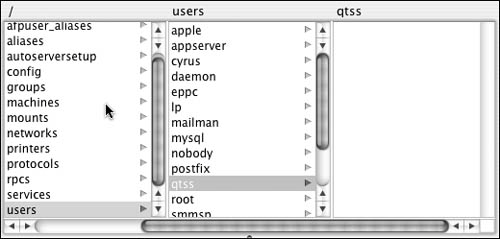
Doing this displays a list of users. You'll see your local administrator and any other users you've created in the local directory, as well as many users you didn't create. These are users that Mac OS X uses to manage specific services.
| 5. | Choose a user by clicking the short name.
That user's short name is displayed at the top of the next column (Figure 3.47).
Figure 3.47. Choosing a user record in NetInfo Manager... 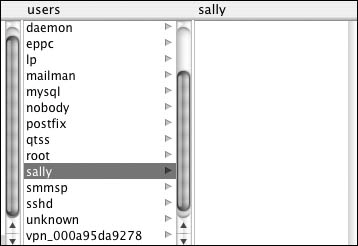
| 6. | Browse the Properties and associated values in the frame below the columns (Figure 3.48).
Figure 3.48. ...shows the attributes for that user. 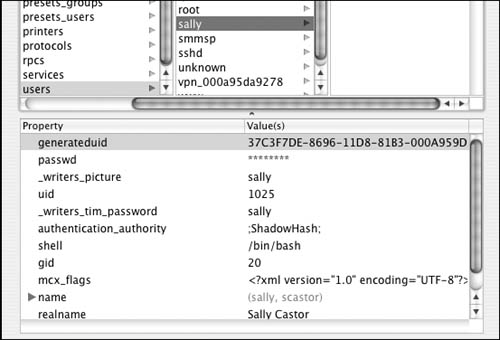
When you're finished with the user data, you can browse other categories. As long as you don't authenticate by clicking the lock at lower-left in NetInfo Manager, you'll be unable to effect any changes.
|
 Tips Tips
Prior to Mac OS X Server 10.3, you could create a NetInfo parent directory. This was a secondary directory that housed information in the same fashion as the local NetInfo directory. Users placed in the parent NetInfo directory could log in from another computer and access the services Mac OS X Server had to offer. Changes made directly to the NetInfo directory may render your computer unusable. If you aren't sure what you're doing, it's best to use NetInfo Manager to browse properties and values and use Workgroup Manager to change them. If you're installing Mac OS X Server 10.3 and don't need to upgrade from an older version of Mac OS X Server, you can skip the next sectionit doesn't apply to you.
Shadow Passwords Shadow passwords keep passwords safer, compared to the way local passwords were stored prior to Mac OS X 10.3 (they were stored as a property in the local NetInfo directory). If you upgrade from Mac OS X 10.2 to Mac OS X 10.3, you have older, crypt passwords. Once passwords are changed, they are removed from the local NetInfo directory and stored in the shadow directory. This is mostly important to Mac OS X Client, because Mac OS X Server uses Password Server to store passwords. |
Migrating older Mac OS X Server user records Knowing how NetInfo stores information will help you understand how other directory services store their information. When you're using NetInfo, you have the option to migrate users' records. Before moving on to other directory services, let's examine what you need to do if you're upgrading a Mac OS X Server 10.2 to Mac OS X Server 10.3. You'll need to migrate your parent NetInfo directory to the newer LDAP directory in 10.3. If you're upgrading from Mac OS X Server 10.2 to Mac OS X Server 10.3, you can migrate your parent NetInfo directory to an Open Directory directory by using the Server Admin tool. Ideally, you should back up your user data and install a fresh copy of Mac OS X Server 10.3, but sometimes this may not be possible. Before upgrading, always make a backup of the user data if possible. To migrate user records to Mac OS X Server: 1. | Install Mac OS X Server 10.3 as an upgrade on your Mac OS X Server 10.2 machine.
| 2. | Open the Server Admin tool, located in /Applications/Server/, and authenticate as an administrative user (Figure 3.49).
Figure 3.49. Launch the Server Admin tool and authenticate as an administrator. 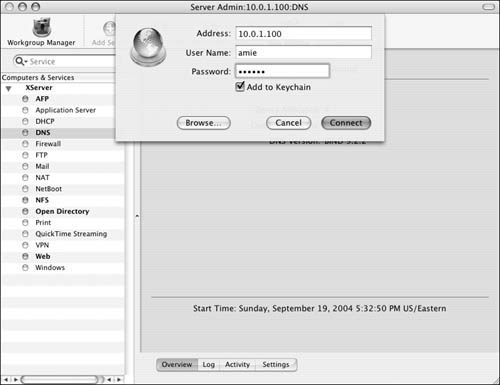
You can add the server to your Favorites menu if you wish.
Command-Line Directory Editors Using the Terminal application lets you run both nicl (pronounced "nickel") and dscl (pronounced anyway you want), which stand for NetInfo Command Line editor and Directory Services Command Line editor, respectively. nicl isn't used much anymore because almost everything that nicl can do, dscl can do, and then some. To run dscl, open the Terminal application, type dscl localhost, and press Return. Since dscl is an interactive tool, you're presented with a > symbol. Enter ls, and press Return to see a list of the Directory Service options. You can search your local directory from here. Type a question mark (?) and press Return to get information about the proper usage of dscl. When you're finished using dscl, type quit and press Return to get back to the command prompt. |
| 3. | Click the disclosure triangle next to your server, and choose Open Directory from the Computers & Services list.
Click the Settings tab  and then the Protocols tab and then the Protocols tab  (Figure 3.50). (Figure 3.50).
Figure 3.50. Select the Open Directory service, the Settings tab, and then the Protocols tab. 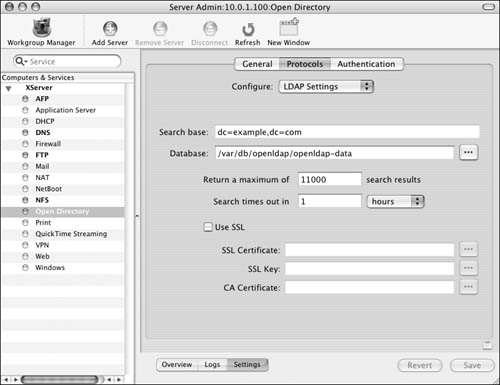
| 4. | Select NetInfo Migration from the Configure drop-down menu (Figure 3.51).
Figure 3.51. Choose NetInfo Migration from the Configure drop-down menu. 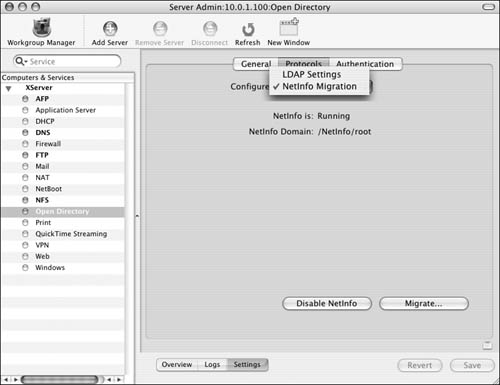
You'll see that NetInfo is already running. Click the Migrate button; a dialog opens.
| 5. | Enter the administrator's short name and password, the Kerberos realm (if known), and the search base (again, if known, which allows the Kerberos KDC to start up successfully) (Figure 3.52).
Figure 3.52. Enter the administrator's short name and password, the Kerberos realm (if known), and the search base (if known). 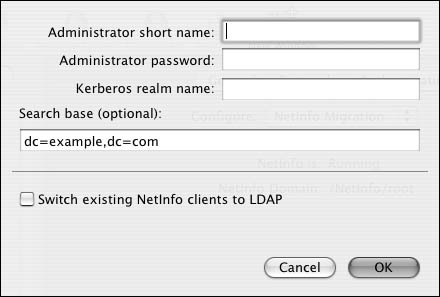
You also have the option to switch all existing NetInfo clients to LDAP. Click OK.
| 6. | Observe the NetInfo migration and transition (Figures 3.53 and 3.54).
Figure 3.53. Observe the NetInfo migration and transition in the NetInfo migration progress bar... 
Figure 3.54. and the NetInfo conversion to LDAP progress bar. 
| 7. | Your Mac OS X Server is still technically a NetInfo master, so older Mac OS X clients can bind to it. Change it to an LDAP master if you wish to continue to modernize your Mac OS X Server and take advantage of all the options Mac OS X Server 10.3 has to offer (Figure 3.55).
Figure 3.55. The Role pop-up menu shows the current role of the migrated server. 
| 8. | If necessary, you can choose to disable NetInfo if you're planning to move everything to LDAP. To do so, click the Disable NetInfo button in the Open Directory > Settings > Protocols path.
|
Connecting your server to another directory system Mac OS X Server can also connect to another directory service, such as Microsoft's Active Directory or an OpenLDAP server running on a Unix computer. You use the Directory Access application located in /Applications/Utilities/ to accomplish this task. As you've seen, the way you implement the connection of Mac OS X Server to another directory service is identical on both Mac OS X Client and Server. Once the connection has been established, you can proceed to change the behavior of your Mac OS X Server to allow it to become bound to another directory system. This topic may not seem oriented toward Mac OS X Server, but it imparts the importance of understanding the Directory Access application. To connect Mac OS X Server to another directory service: 1. | Open the Server Admin application, located in /Applications/Server/, and authenticate as the administrator of the server (Figure 3.56).
Figure 3.56. Launch the Server Admin tool, and authenticate as an administrator. 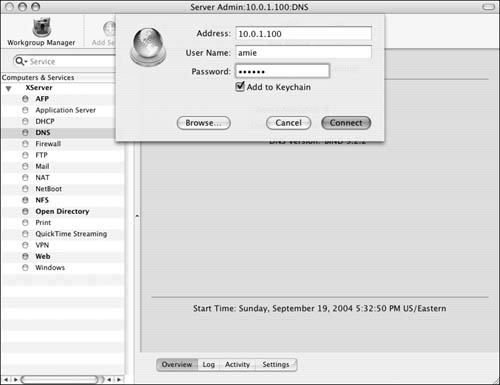
| 2. | Choose the Open Directory service from the Computers & Services frame.
Select the Settings tab and then the General tab (Figure 3.57).
Figure 3.57. Select the General tab of the Open Directory service. 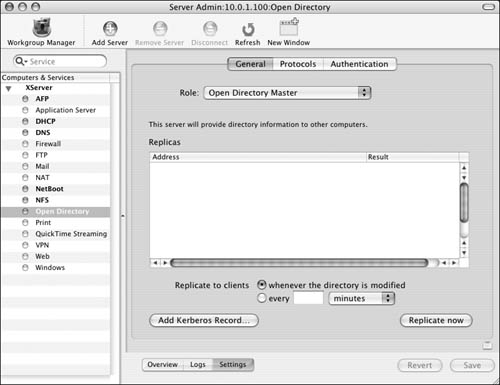
| 3. | Choose "Connected to a Directory System" from the Role pop-up menu, and make changes if necessary (Figure 3.58).
Figure 3.58. Choose "Connected to a Directory System" as the role for the Mac OS X Server. 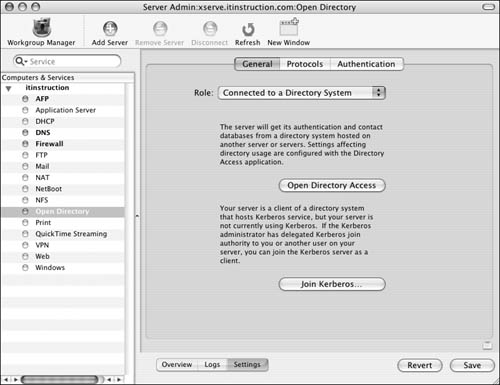
This option allows you to open the Directory Access application from here by clicking the Open Directory Access button.
| 4. | Once you've opened Directory Access, you can choose one of the methods discussed earlier in this chapter as your binding method (NetInfo, LDAP, BSD/Local).
|
Open Directory and the master directory What if you don't want or need to connect to another directory system? What if you just bought an Xserve and want to start a new user directory? What if you've followed this book and already have a local, stand-alone server with 14 users in the local NetInfo directory? What if you want a robust, secure, extensible, directory service that allows users, groups, and computers to be managed? You need to create a secondary directory on your Mac OS X Server. It will be an LDAP directory, not a NetInfo directory like the local one. This directory will be populated with the administrator who creates it; and you'll add users and groups to it. The extensibility, management, security, and power of Mac OS X Server are about to be unleashed. A master directory is a secondary directory within your Mac OS X Server. You create the master directory using the Server Admin tool. Prior to creating a master, you need to ask yourself a few questions: Will this directory be used within a larger environment of servers? Will there be another Domain Name Server (DNS Server) in this environment? Will you be using a security method called Kerberos to handle authentication? Will this server be the Domain Name Server of your network?
The answers to these questions determine how you set up your master directory. This section assumes that your server is also the Domain Name Server and, therefore, must be running DNS. (Chapter 6, "Network Configuration Options," covers the setup and management of DNS.) Prior to creating a master, it's highly recommended that your Mac OS X Server either be running DNS itself or have a valid DNS entry in the Network Preference pane of your server. Failure to do this will result in unexpected behavior of your server down the road.  Tip Tip
Getting It Right the First Time Making sure your networking house is in proper order is the biggest challenge prior to promoting a stand-alone Mac OS X Server with a local NetInfo directory to a directory master that houses the local NetInfo directory and the master LDAP directory. You should ensure that your IP address is the one you want to stick with and that your subnet mask, router, DNS, and domain entries are correct and working properly prior to promoting the Mac OS X Server to a master. |
To create a master directory: 1. | Open the Server Admin application, located in /Applications/Server/, and authenticate as the administrator of the server (Figure 3.59).
Figure 3.59. Launch the Server Admin tool, and authenticate as an administrator. 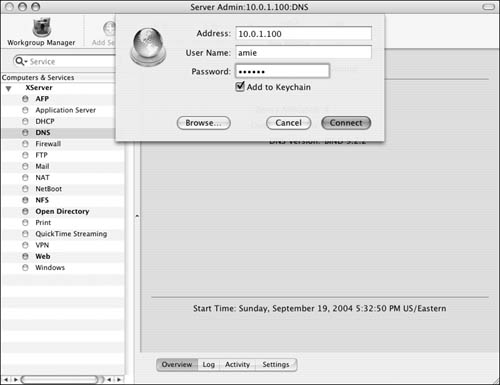
| 2. | Choose the Open Directory service from the Computers & Services frame, select the Settings tab, and then select the General tab (Figure 3.60).
Figure 3.60. Select the Open Directory service, the Settings tab, and then the General tab. 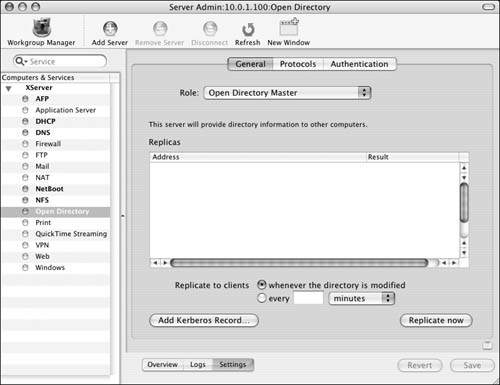
| 3. | Choose Open Directory Master from the Role pop-up menu (Figure 3.61).
Figure 3.61. The various possible roles for a Mac OS X Server appear on the General tab of the Open Directory service. 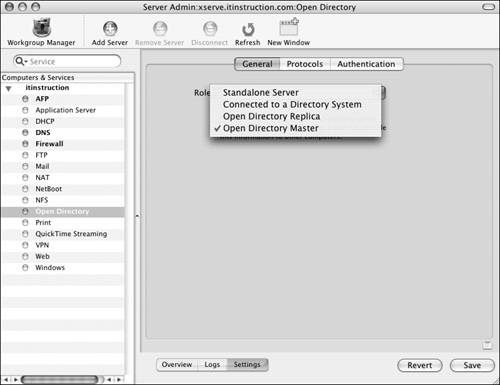
A dialog pops up, asking for information.
| 4. | Enter the server administrator's short name and password (Figure 3.62).
Figure 3.62. After you choose to create an Open Directory master, this dialog asks for pertinent information. 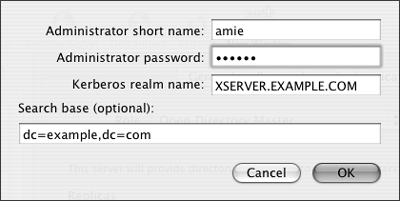
Click OK. If DNS is functioning properly on your network, you should see your Kerberos realm name and search base automatically populated.
| 5. | Click the Save button  . .
An Open Directory Master screen with no replicas opens (Figure 3.63).
Figure 3.63. An Open Directory master is shown with no current replicas. 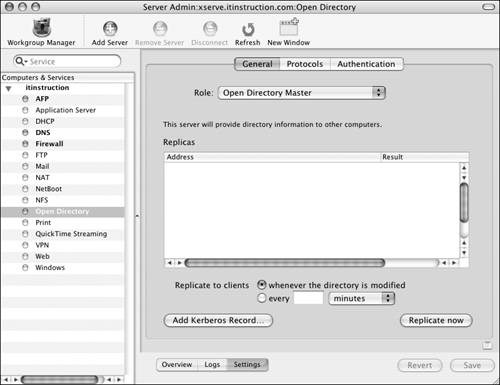
| 6. | Click the Protocols tab to confirm your status as an Open Directory master.
You can limit the number of searched records here and limit the timeout to a reasonable length (Figure 3.64).
Figure 3.64. The Protocols tab shows the available options, such as limiting the number of records searched and encrypting transactions using SSL. 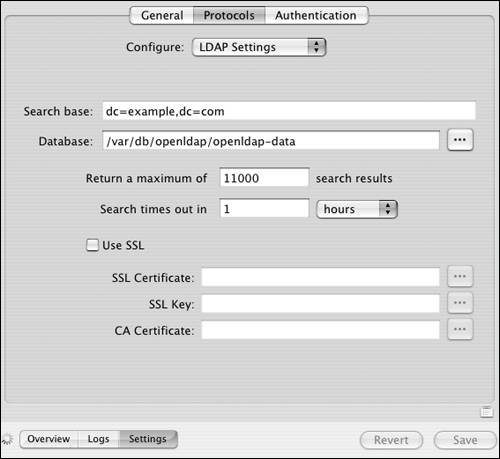
You can also move the LDAP Master directory, but doing so requires booting from another disk or partition so as not to corrupt the directory.
What Else Happens When You Create an Open Directory Master? After you create an Open Directory master, you can open your Directory Access application, select the LDAP configuration, and click the Configure button. You'll see an entry for LDAPv3/127.0.0.1, which indicates that the Mac OS X Server is now bound to itself. That is, the process that creates the LDAP directory and the Kerberos Key Distribution Center (KDC; discussed later in this chapter) also creates the entry and places it in the Directory Services structure, which can be seen using the Directory Access application. In addition, the Authentication path now includes an entry for the new LDAP directory. |
| 7. | After allowing Mac OS X Server to write the necessary configuration files, click the Overview tab.
You should see all your services running (Figure 3.65).
Figure 3.65. The Overview tab of the Open Directory service indicates that all pertinent services are running. 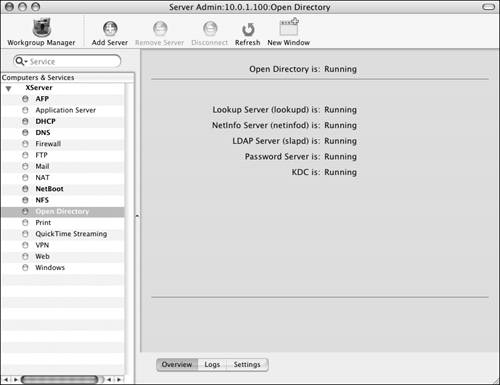
|
Replicas Why buy one Xserve when you can buy two? One of the best uses of Mac OS X Server is its ability to function as a replica of another server. A replica is an exact duplicate of the LDAP and Password Server databases and the Key Distribution Center (KDC) on a master server. You can create replicas using the same method you used to create a master, but choose Open Directory Replica from the Role pop-up menu. Once you choose that role, enter the following information (Figure 3.66): IP address of the LDAP master Root password on the LDAP master Domain administrator's short name on the master Domain administrator's password on the master
Figure 3.66. When you choose to make the Mac OS X Server a replica, this dialog appears. 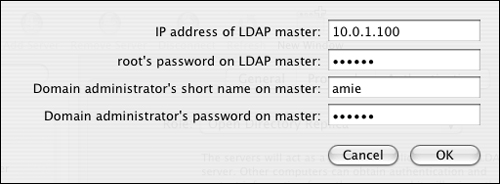
Click OK, and the replica server connects to the master; destroys its own directory, KDC, and Password Server; and replicates the master as its own. From the master, you can see all your replicas and force them to update whenever the master is modified or at a given interval. You also have the choice to force a replication at any time. |
|


 Tips
Tips


