Configuring a Client Network
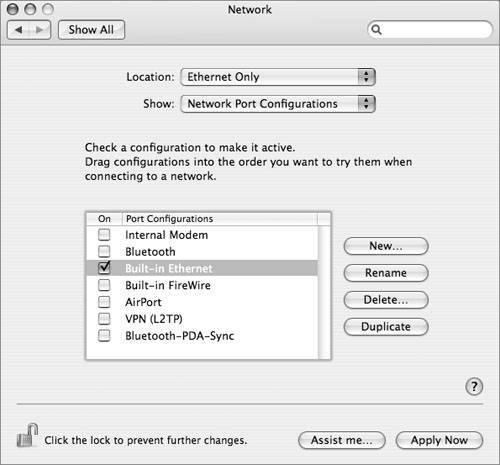
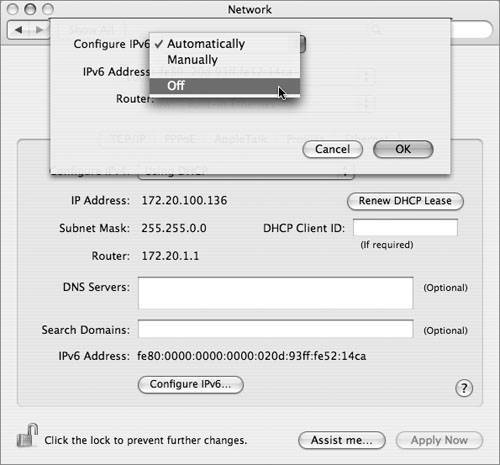
| The basic purpose of secure network configuration is to maximize security and minimize access. The default configuration of Mac OS X is already relatively minimal in terms of the network-accessible services it provides, but it tends to enable network access over all available interfaces (Ethernet, AirPort, modem, FireWire, and so on), and for both IP version 4 (IPv4) and version 6 (IPv6). To control network access, there are two main changes that you should make to the network settings:
In addition to disabling these two settings, the System Preferences Sharing pane has a variety of options for enabling and controlling network access to Mac OS X. From a security perspective, less access is almost always better than more access. So the most secure sharing settings are:
But this is not always practical, so you should understand the implications of the available sharing options. ServicesOn the Services tab in the Sharing preferences pane, you can enable a number of different network sharing protocols. As a general rule, each sharing protocol represents a potential security hole and should be enabled only if it is needed. 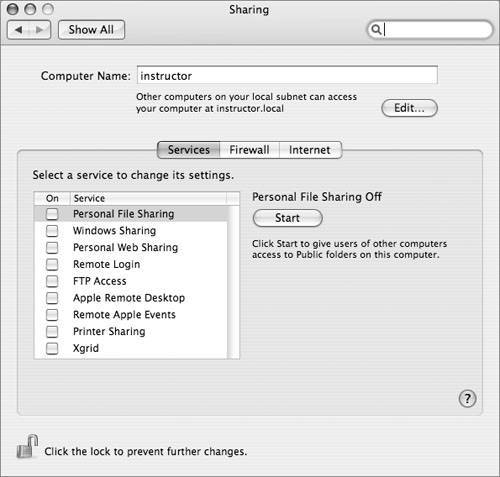 Personal File SharingThis enables Apple Filing Protocol (AFP) serving from this computer. Enabling AFP raises a possible security issue: Since guest access is always enabled, a network attacker can easily connect and get a list of user accounts and users' Public folders. Which folders are accessible over an AFP connection depend on the details of how the connection is made:
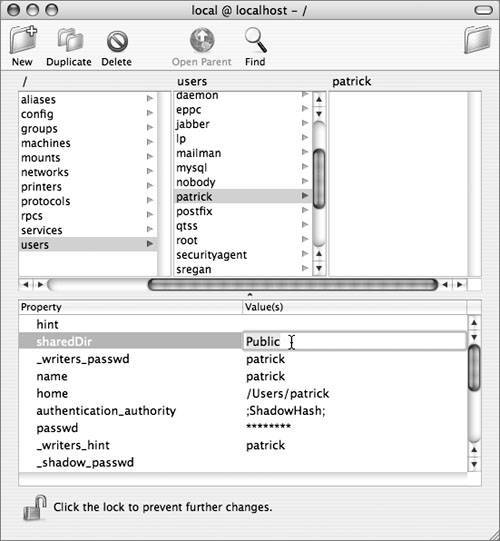
You can turn off guest access by changing the guestAccess key in the file com.apple. AppleFileServer.plist (located in /Library/Preferences) from Yes to No. Since most preference files are now saved as binary files, you will need an application called Property List Editor, which is installed with Apple Developer Tools. You can also turn off the sharing of a user's Public folder by opening NetInfo Manager (located in /Applications/Utilities), selecting the "users" category, and clicking the user whose Public folder you want to stop sharing. Authenticate as a local administrator and select the value for the sharedDir attribute (NetInfo calls them properties) and remove it. Click another user to prompt NetInfo Manager to ask you to save the changes. Windows SharingThis enables Server Message Block/Common Internet File System (SMB/CIFS) serving from this computer. Doing so raises somewhat different issues than enabling AFP. First, since the password hashes that Mac OS X normally uses to authenticate users are not compatible with CIFS, accounts that will be accessed via Windows Sharing need to have their password hashes stored in additional formats. Unfortunately, one of these formats, known as NTLMv1, is particularly susceptible to dictionary attack; if an attacker manages to get a copy of the hashes (stored in /private/var/db/shadow/hash, which is readable only by root), the attacker has a good chance of recovering users' passwords. Only accounts that need Windows access should have their passwords stored this way. 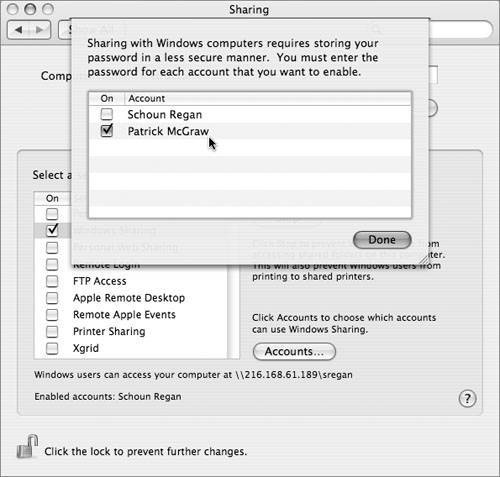 Also, Windows sharing does not just share the users' Public folders; it shares their entire home folders. This can lead to exposure of files that should not be network-accessible. Fortunately, this exposure is limited because guest access to the home folders is not allowed over SMB. Personal Web SharingThis enables the Apache Web server, serving the contents of the folder /Library/WebServer/Documents as well as each user's Sites folder. By default, each of these contains a generic placeholder page, which generally doesn't represent much of a security risk, although it does allow an attacker to test what user names are in use on the systema first step toward a password-guessing attack. Replacing these documents with real contentadding CGI scripts to /Library/WebServer/CGI-Executables or changing the config files for Apachecarries the same risks as running an Apache-based Web server on any other platform, with several notable additions:
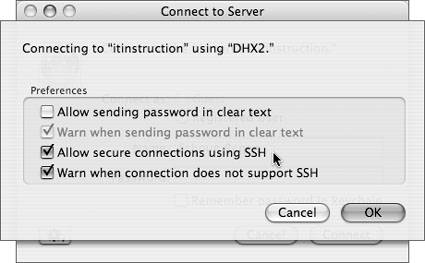
All of these possible problems are blocked by directives in the default httpd.conf file. If you modify or replace this file, take care to retain and/or extend these directives. Remote LoginThis enables remote shell access to the local computer over the Secure Shell Protocol (SSH). SSH is relatively secure and can be used to increase the security of other protocols (by tunneling them over an SSH connection); however, its power and flexibility make it a double-edged sword. Among the possible security problems SSH can raise are:
FTP AccessThis enables File Transfer Protocol (FTP) serving from the local computer. FTP is a very old and insecure protocol; among its problems are:
Some implementations (such as the one supplied with Mac OS X Server) include improved security features such as Kerberos authentication and the ability to control which folders are accessible via FTP. By default, the FTP server configuration included with Mac OS X does not do any of these things. Thus its use is not recommended in a secure environment. Apple Remote DesktopThis enables remote control and monitoring of the computer from an Apple Remote Desktop (ARD) administrator workstation. ARD can be an extremely useful tool for remote administration, monitoring, and support, but it also carries its fair share of security risks. To administer the computer, the administrator user must authenticate as one of the users on the computer. You can control which users are allowed to do this and which operations they may perform. Many of the operations have a high potential for misuse (for example, screen observing could be used to spy on a user), so access to these capabilities should be strictly limited. 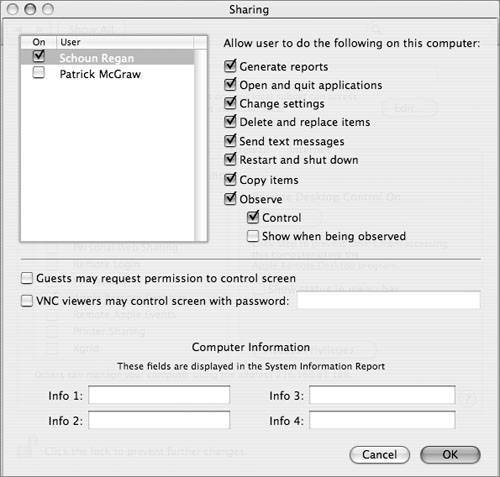 Remote Apple EventsThis enables remote computers to send Apple events to the local computer (such as AppleScript events). This should not be enabled in a secure installation. Printer SharingThis enables access to the local computer's print queues via Internet Printing Protocol (IPP). Aside from the inherent risk of publishing unintended information about printers and their status, this also opens several possibilities for network-based attacks:
XgridThis enables the local computer to act as an Xgrid agent, accepting jobs from an Xgrid controller. There are three main areas of security risk that this feature opens up:
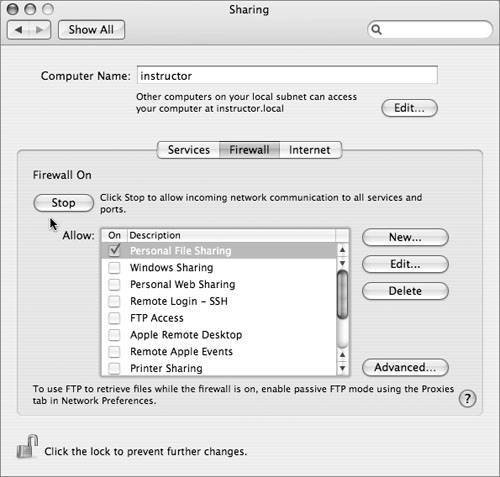
FirewallThe Firewall tab provides a basic interface for configuring the firewall built into the Mac OS X kernel. When enabled, it blocks incoming TCP connections (except for specifically allowed services), but allows all outgoing, local, and (by default) UDP traffic. It also does not filter IPv6 traffic, so disabling IPv6 is recommended when the firewall is in use (as mentioned earlier in this section). The default configuration of Mac OS X 10.4 does not provide any network services over TCP (except to itself), so this default configuration is not strictly necessary for network security. What it does do is provide protection against unintended network services, such as third-party or user-level programs that may open network ports and create security holes. The firewall blocks everything but the services you've explicitly allowed (or enabled on the Services tab), giving you a master-switch protection against such problems. Services fall into four different categories, depending on how "built in" they are, and each is allowed by slightly different methods:
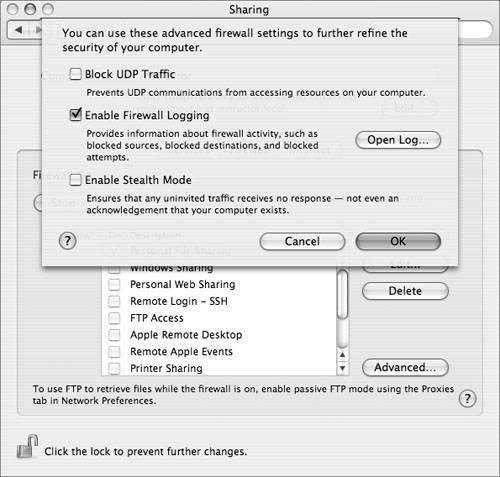
Click the Advanced button to make some additional changes to the firewall's behavior:
Internet SharingThe Internet Sharing feature of Mac OS X allows a workstation to act as a NAT-enabled gateway router between two networksmuch like the router/NAT capability of Mac OS X Serverbut without the configurability or security controls. This feature can be very convenient for home users, allowing, for instance, a computer to share a DSL Internet connection with other computers over its AirPort interface. In a secure network, it is mainly a security risk. For instance, if the home computer is connected to a corporate network, it would become in effect a rogue wireless base station allowing access to the corporate network. In the default configuration, it will not even require a WEP password for access. 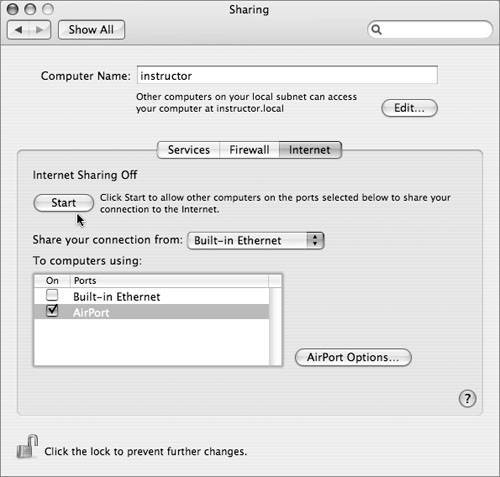 So the simple rule for Internet Sharing is: Don't enable it if you value your network integrity. Enabling it does require administrator rights, but since its implications extend so far beyond the integrity of the local desktop (the normal limits of what an administrator can mess up), you may want to take additional steps to make sure it does not get activated. One option is to delete or rename the program that implements sharing. To delete it, launch the Terminal utility and run the following command: sudo rm /usr/libexec/InternetSharing Note that this will not prevent Internet Sharing from being selected in System Preferences, but it will prevent it from actually functioning. Also, it is possible that a subsequent system update may replace (effectively reinstalling) the Internet Sharing program. Check after system updates (especially if they mention improvements to the Internet Sharing feature) and delete it again if necessary. Enabling Temporary Administrative AccessMac OS X provides several methods for a user to temporarily enable administrative access from a less-privileged starting point. These mechanisms allow users who need administrator access to do most of their work in an unprivileged account, and enable their privileges only when they're actually needed. The most commonly used mechanism is the Authorization framework, which displays the standard Authenticate dialog whenever a padlock icon is unlocked, the installer is run, etc. The rules for how to authorize users for various operations are defined in the /etc/authorization file. Normally most operations require authentication with an administrator account, but do not require that operations be performed while logged in as an administrator. As long as you know the name and password for your adminenabled identity, you can use this to perform administrative functions from within a nonadmin account. The /etc/authorization file maintains both rights and rules. Rights are described by what you are attempting to do at the moment. Do you want to unlock a System Preference? Do you want to install software? Do you want to drag a file not owned by you (in a folder not owned by you) to the trash? These are rights. Rules simply define whether certain conditions are met. For example, a rule might be to allow an owner of a file or any user with administrative privileges to permit the right to take place. The following table shows some examples of rights, rules, and comments extracted from the /etc/authorization file:
Not all rights have associated rules. A right may look for a given user, permission, or an authentication mechanism. Whatever is associated with the class key will be used when attempting to comply with that right. An example of what is currently associated with a class:
Note Rights can also have their authentication credentials shared with other rights. Fast User SwitchingFor operations that actually require being logged into an administrator account, Fast User Switching (if enabled) allows you to log in to an administrator account without shutting down your normal environment, doing what you need to do, then logging out the administrator identity and going back to normal. This is actually a good idea even for operations that could be done simply with the Authorization dialog, because once an Authorization right is enabled for a particular application, it remains active by default for 5 minutes (300 seconds) unless it is explicitly disabled (and it's not always easy to disable rights). If the right had been enabled from within an administrator account, switching back to a normal account would make the right inaccessible, removing the possibility that some other operation might sneak through on the coattails of the one you really wanted to authorize. Command-Line OperationsFor command-line operations, there are two commandssu and sudothat allow you to either temporarily open a more privileged shell session, or perform specific commands with a higher privilege level. Their functions are similar, but different enough that it's important to understand and be able to use both. su is the traditional UNIX command for switching user identities. Entering the command su localadmin will attempt to open a shell session with the user identity localadmin. It requires that the password for the localadmin account be entered. To go back to the normal account, use the exit command to close the shell that su opened under the alternate identity. Using su to switch to the root user is not possible in a standard Mac OS X configuration for two reasons:
This command is useful, however, to switch from a nonadministrator account to an administrator user account. sudo is a newer program intended to provide a more flexible capability to run single commands from a different user identity (especially root). Unlike su, it does not open a session in its default mode; instead, it switches identities, runs the specified command, then switches back to normal (or at least, back to the identity you were using before). Also, unlike su, sudo requires the password for the account you're switching from, not the account you're switching to. (To save typing, it also caches credentials. Once you provide your password, you will not be asked for it again for the next 5 minutes. Note Each time you use sudo, the credential is renewed; so this is really a 5-minute timeout between invocations. The file /etc/sudoers defines which accounts are allowed to perform which operations using which temporary identities. By default, only members of the admin group are allowed to do anythingand they are allowed to do virtually anything. For example, consider the command sudo srm -rf '/Trash' What this command does is attempt to execute the command srm -rf '/Trash' under the root identity. If the command is run from an administrator user account, and the administrator's password is provided correctly, it will succeed. You can also use sudo to open a shell session, rather than just execute a single command. Using its -s flag invokes this mode: sudo -s Because this -s option leaves the privileged session open and possibly available for misuse, this is not recommended. The safest way to use root is to get in, do exactly what you need to do, and get right back out; this is exactly what sudo does in its normal (single-command) mode. Because using sudo to get root access does not require either a root password or wheel membership, it is the preferred tool for getting root access on the command line in Mac OS X. You can use su and sudo together to get root access while logged in as a normal (nonadmin) user: First use su to switch to an administrator identity, then from there use sudo to perform commands as root. Both commands will require the same administrator password to authorize their operations. This may seem redundant, but the two-step process provides protection against things like misuse of cached sudo credentials. For example, if you run sudo while logged into an administrator account and then run a malicious program, the program could use the cached credentials to gain full root access. A weakness in the Secure Empty Trash or srm approach is that programmers often utilize a technique called a "safe save." When an application needs to save changes to a file, it does not write out the changes to the original file. Instead, it renames the original file to a temporary name, so for example, it might rename Myfile.doc to Myfile.doc~. Then it writes the new content to a new file which has the same name as the original and deletes the renamed original file. This ensures that the old content is not deleted until after the new content has safely been written to disk. However, the deletion of the renamed original file does not go through the Secure Empty Trash or srm process and leaves a copy of the document on the disk in unallocated free space, which is precisely the vulnerability that Secure Empty Trash or srm seeks to avoid. To prevent this problem you can use one of two approaches. The first is to regularly run the Erase Free Space tool from Disk Utility on your volume on a regular basis, but that can take a long time if you have a large amount free space on your drive. The second approach is to store your documents on an encrypted disk image, whether through FileVault or a stand-alone disk image. By using an encrypted disk image, any erased files are still left on the disk in encrypted form, making them unrecoverable to an attacker. More Info For more information on creating encrypted disk images, see Lesson 14, "Optimizing Data Confidentiality." |

EAN: 2147483647
Pages: 258