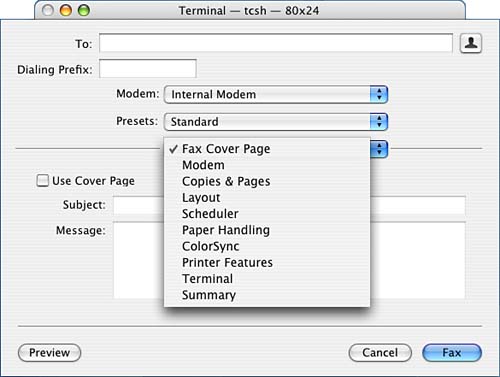
Using the Tiger Fax Capabilities
| < Day Day Up > |
Setting Printing System PreferencesThe printers that are available to the system are one type of printing preference, but there are also printer-specific preferences, and specialty CUPS preferences that can be imposed on printing as well. You are almost certainly already familiar with configuring per-print-job setting regarding things like the number of copies to be printed, or, if you have a printer that can print on both sides of a page, whether to use this feature for a particular print job. Surprisingly, many users don't realize that the settings that they choose for a print job can be configured to be the default settings for all documents printed from an application, or, with some care, for the printer in general. This lack of recognition hasn't been helped by Apple's choice of hiding the ability to save printer preferences under the enigmatic printing dialog pop-up menu labeled Presets. It's even further obscured in Tiger, by a redesign of the Printing dialog itself, so as to eliminate the preference saving option entirely from the Standard dialog, and to make it available only under the Advanced version of the Printing dialog. Nonetheless, forewarned is forearmed, and once you know how to get to the option to save your print job preferences, creating, and reusing printer settings is a simple task. Choosing a Default Printer and Page SetupAs mentioned previously, the default system printer can be configured through the Printer Setup Utility, simply by selecting a printer and clicking the Make Default button. Insidiously however, Apple has added a Printing and Fax control-pane option that also influences the apparent default printer. Using it, you can select a particular printer which has the same effect as selecting that printer and making it the default through the Printer Setup Utility, or you can select the Last Printer Used option, in which case the system tries to determine the last printer used for each application, and sets each application to use the printer that was most recently used in it. The system default printer, however, does not change, and applications that haven't been used before or that don't obey the last-used option, are still controlled by the system default that was configured in the Printer Setup Utility. Overall, this might be a good way to do things, having an overall default, and the option to override that default (by default) for any application in which you choose to do so, but to have to configure it through two different interfaces, with no mention of the features of the other in either, seems like a recipe for user confusion. The Page Setup settings remain as an artifact of Apple's ancient printing system design that doggedly persists, version after version, despite being outmoded by newer printing considerations. Page Setup is used to configure information about what printer properties to use for configuring a job (things such as the printable margins), paper size, paper feed orientation, and print scaling. Unfortunately, if you have more than one printer, each of them probably requires different settings, and you can save only one collection of settings as the default. The result is that you will still need to remember to open the Page Setup dialog for every print job, and select the proper printer under Format For, or your margins and other important size-related details will be wrong. Under the File menu of an application, choose Page Setup to set basic paper dimensions/printer specific dimensioning information. Figure 6.6 shows what Page Setup looks like in Tiger it keeps losing functions to more appropriate homes, but it still hasn't gone away. Page Setup appears as either a sheet or a window, depending on the application. Sometimes it can be accessed only from the File menu, and in other applications it is available through an icon-bar selection or with Shift-Command-P. The Settings option has been essentially reduced to Save As Default, although application-specific settings still do force themselves into this menu on occasion. The menus and options in the middle of the dialog change, depending on whether there's anything else to choose (such as an application-specific item) under the Settings menu. At the bottom of Page Setup, there is a button for direct access to the Help Center, as well as buttons for Cancel and OK. We will break down our examination of Page Setup according to the Settings choices. Figure 6.6. Page Setup can still be found under the File menu in Mac OS X. There are fewer attributes that can be configured, but their use is identical to previous versions of Mac OS and Mac OS X.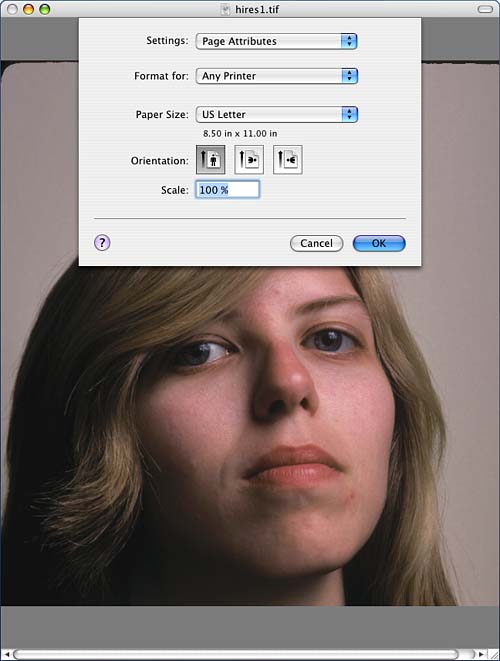 Page AttributesThe Settings option is set to Page Attributes (the only available option) by default. This menu is really a status line telling you what option set is currently being displayed in the Page Setup dialog or pane. The only other option, unless you're running an application such as Microsoft Word, which forces its own configuration settings to appear here as well, is to select Save As Default, which saves the displayed settings as the default selection for future use. Format ForWhen displaying the Page Attributes section of Page Setup, you can select which printer to format for. The available printer choices are Any Printer and whatever printers are included as part of your Printer List. Page Setup formats for Any Printer by default. When you select a printer in the Format For List, a more specific description appears. Note that in our example, Page Setup describes printer 192.168.1.3 as an HP LaserJet 4V/4MV. Selecting the correct printer here is important because this is the portion of the printing system interface that controls what the system thinks that printer's allowable margins and other properties are. If you have a printer that really can't print within one inch of the page margins, and select a printer here that has quarter-inch margins, you will be able to print and format print jobs as though your printer has quarter-inch margins, but the outside edge will be missing. Likewise, if you have a printer that can handle borderless printing and you have selected a printer that has margins larger than zero, the system, and therefore your applications, won't let you actually print to the edges of the page. Paper SizePage size is also specified in Page Setup. The available paper sizes vary with the selected printer. The default page sizes available for Any Printer range from 3x5 to 13x19 obviously not all of which are possible on some printers. So, although Any Printer is fine to use as a general default, don't be surprised if its settings don't literally work for any printer. Whenever you select a paper size, its dimensions appear as an additional description. For Any Printer, US Letter, 8.5''x11'', is the default paper size. Keep an eye on the setting that this option comes up with. Some specific printers seem to default to US Letter Small as their default paper size, which can wreak havoc with page layouts that you've constructed for full-size US Letter paper. The Paper Size menu also has a Manage Custom Sizes option that brings up a dialog allowing you to configure custom paper sizes. This is a surprisingly unnecessary option for most users on a day-to-day basis, but as printers get larger, this option becomes more important. Specifying a custom paper size is also an incredibly useful option to have when you're trying to force particular output to fit on a single page, yet don't want to tweak a bunch of formatting and font-size options until it all fits. It's a kind of hackish trick, but if you're presented with a program like MS Excel that wants to break up your output horizontally onto multiple pages, and you really want all your columns on one page, regardless of how small the font gets, playing with Custom Sizes can be a life saver. Simply set up a page size that's large enough to contain all of your columns at whatever the display characteristics are set to in Excel, and then "Print" it, but instead of printing to paper, print to a PDF. Load the PDF up in Preview, specify your real printer and paper size in Page Setup, and when you go to print the PDF, Preview will ask and then automatically scale everything to fit on the paper. OrientationThe Orientation setting controls which edge of the paper is "up" with respect to the print. Portrait, the norm for written-text type output, is available as well as two forms of landscape (more commonly used for photographs). For landscape orientation, you can specify whether the top of the printout should be at the right or left side of the paper. Simply select the appropriate icon to suit your needs. Portrait is the default orientation. This option, despite its utility, is becoming less relevant as more applications, such as MS PowerPoint, try to ignore it and try to force page orientation settings internally (often with unexpected and undesirable results). ScaleScale is a box where you can input the desired scaling. The default is 100%. Because few applications make it easy to determine at what size they're trying to print a document, it's often difficult to figure out a good scaling setting. The fact that Preview (through which much printing is managed) invisibly munges print scales to fit the size of the available margins doesn't help the situation at all. (Preview will ask, if your print is too large for the current page setup, whether you want to scale it down to fit, but under some circumstances, if the print is smaller than the page setup, it will scale the print up to fit, without asking permission.) Application SpecificPage setup dialogs might also include application-specific entries in the Settings menu. These can include almost any configuration option and can override the settings in other panes of the Print Setup dialog, if the application-specific and normal options overlap. Microsoft Word, for example, duplicates almost all the regular page setup options in its own application-specific pane. It further allows the page setup options configured there to apply to sections of the document, and to have different page setup options for different sections of a document. Setting and Storing Print-Job/Document Printing PreferencesDocument-specific sorts of print preferences, such as which pages of, and how many copies of the printout are needed, are configured by selecting Print from the File menu, and setting options in a set of Print dialog panes. With Tiger, Apple has created a simplified Print dialog that appears for some applications (such as Preview); it provides a sort of instant preview and access to some commonly used settings, but it removes your access to many important Print dialog options. The complete Print dialog, with all of its familiar and useful options, is still available in these applications by clicking on the Advanced button. Because the options available in the simplified interface are just limited-capability versions of the ones in the Advanced interface (which is the Standard interface in most other applications), we'll show an example of the simplified interface that Apple's working on (see Figure 6.7), but document the options available in the Advanced interface. The simplified interface seems to still be under development, so please remember to look for the Advanced button if you find a printing option that you need, but that doesn't seem to be available in the interface you're looking at. Figure 6.7. The simplified Print dialog provides access to a limited range of typically useful options, as well as an instant preview of your output page. The Advanced button takes you to the familiar Advanced Print dialog.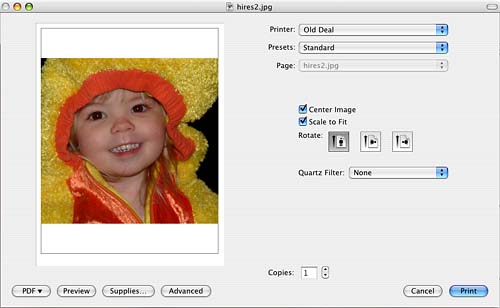 The Print dialog itself is accessed through the File menu, under Print, and is typically also attached to the Command-P keystroke. Select this menu option to print a file. Depending on the application, choosing Print opens either the Simplified/Standard (refer to Figure 6.7), or Advanced (see Figure 6.8) Print dialog box. Also depending on the application, the Print dialog appears either as a sheet or as a separate, movable (dialog style) window. Figure 6.8. Choosing File, Print opens the Print dialog box, where you can select a printer and various options for your print job. Note the small stop sign (the tiny octagon with an exclamation point in it) to the right of my chosen printer, indicating that this print queue is currently stopped.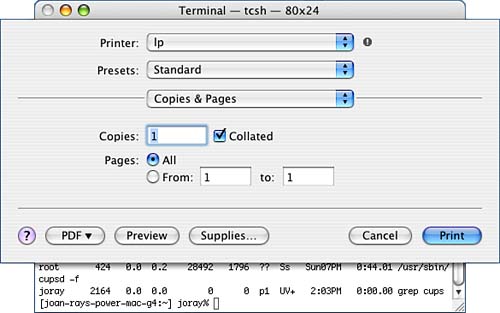 In the top part of the Print dialog, using the Printer pop-up menu, you can select what printer you want to route the printout to (or edit the Printer List to include it, if it's not available for selection). Using the Presets pop-up, you can select among (or save) collections of Print configuration settings. The options necessary to configure a number of printing preferences appear in the middle part of the Print dialog box. From a pop-up menu, you can select among the options you want to configure (not all of which will be available for every printer): Copies & Pages, Layout, Output Options, (print) Scheduler, Paper Handling, ColorSync, Cover Page, Error Handling, Paper Feed, Color Options, Finishing, Printer Features, Preview, Application Specific, and Summary can all be configured or viewed here. Settings that you make here can be saved by under the Presets pop-up menu. The bottom section of the Print dialog box has buttons for Preview, Supplies, Cancel, and Print, and a button labeled PDF that really isn't a button, but a toggle to pop up a menu of PDF-related functions, such as saving the document as a PDF. A standard ? button linking to the help system also sometimes appears, depending on whether there is enough room for it. If the application you are printing from supports both a Standard and Advanced Print dialog, buttons to switch between these also appear here. Curiously, the option to send the document as a fax, if your machine is able to send faxes, has migrated from a convenient FAX button to a menu item on a menu that appears if you click the PDF button. Actually other things have strangely migrated under this PDF button as well some of which have as little to do with PDFs as faxing. Save PDF as PostScript has a bizarre ring to it. Other items in this PDF menu however, make it sound like this could be an insidiously useful little three-letter button even if Apple has misguidedly started labeling everything the print system touches as PDF. The Preview button runs processes the print as though it was going to send it to the printer, but instead sends it to Preview as a PDF, allowing you to view a relatively faithful rendition of what should hit paper when you actually do send the print job. Print Preview is sometimes available under the File menu of an application, but it always appears as a button in the Print dialog box. The Supplies button opens a page in your web browser for ordering new printer supplies. It appears that Apple's attempting to integrate supplies monitoring into the Printer status/job list/control windows, so this is probably supposed to inform you when you're about to run out of ink in your inkjet or toner in your laser printer, and help you go directly to an ordering page. Right now, most of it appears to be experimental and of demo functionality, and none of it works with any of the printers we have, so we don't know how well it will really work. Probably reasonably well, for supplies for current, popular printers, but the real test will be how well they support the oddball white elephants we all still have chugging away in back rooms. On the other hand, there have been other "order more of these" buttons in other parts of the Mac OS X interface (such as the Buy Fonts button that used to appear in the font preview) that have disappeared over time without fanfare. Note that the contents of the Standard print dialog vary from application to application, but that the Advanced print dialog remains relatively constant, with only the material under the Application-Specific section changing. The Settable options that appear on the page will be among the following items although the exact capabilities of your printer will dictate whether some panes appear, and what options appear on each of them. There probably are even a few preferences panes that we've never seen; ones that appear only on printers to which we don't have access for testing. The Printer MenuWhichever printer is listed in your Printer List as your default printer appears here initially. You can also select from any of the other printers available in your Printer List, and from any shared printers, or other automatically discovered and configured printers that are currently visible. Or you can choose Add Printer at the bottom of the menu of available printers to add to or modify your Printer List. This option immediately takes you to the Printer Setup Utility, where you can add or delete printers. The selection for Print & Fax Preferences opens the system preferences panel for print and fax items. The Presets MenuPresets are collections of Print dialog option settings that you've saved. The default is Standard, which is your plain vanilla one-copy, all pages, no special options setting. You'll probably use this one most of the time. If you find, however, that for a particular printer you like to have a setting, such as the print quality, set to a nondefault value, you can set that option, and then save a preset, which will remember and set that setting whenever you select that preset in the future. After you have saved a customized setting, you can select Standard or any of your customized setting collections by name. The Save, Save As, Rename, and Delete options available under the Presets menu allow you to manage the presets you have constructed. Custom presets that you construct are available from all applications, although application-specific options for seemingly identical preferences might not be transferred between different applications. Less usefully, custom presets that you construct are also available for all printers, whether they apply to that printer or not. Sometimes this is no big deal if you've set a preset for duplex printing on one printer and accidentally select that preset on another printer that can't do two-sided printing, nothing bad happens. If you have two printers with very similar, but not quite identical printer-specific options, a preset configured for one can select unexpected configuration options in the other. The Unlabeled Menu in the Middle of the PageIn the vertical middle of the Print dialog is a section (bounded by lines above and below) that displays one of a number of possible print configuration pages. The contents of this section are initially the Copies & Pages pane, and the menu that controls the contents is labeled Copies & Pages. The options available in this menu vary depending on the capabilities of the printer that you have, and the application that you're using to print, but most should be among the following items:
The Strange PDF MenuA surprising amount of functionality hides under the little PDF button at the lower left of the Print dialog. This is where the Save as PDF option has moved, as well as the Save as PostScript option that used to be available from the Output Options pane. Apple seems to have decided that anything touched by the printing system is a PDF, and that therefore all alternative functionality related to doing things that are printing-like can be labeled as PDF related. This is literally sort of true internally Apple manages just about everything in PDF format, and the printing system seems to process everything through PDF before sending it off to be printed. Still, when you open a JPEG file, being presented with the option to save the PDF as PostScript is not exactly the user-friendly abstraction of function for which Apple is known. Despite its odd naming, this will turn out to be a quite useful menu. Among its options (which appear to be extendable by the construction of additional printing workflows), are the following items:
Below a horizontal divider in the pop-down PDF menu is a set of extendable PDF-based workflows for PDF files. Essentially they convert the current document to a PDF file, and then do something with it. At the bottom of the list, the menu provides the option to edit itself and add/delete PDF workflows. As we write, the following options are available. Some are far more useful than others, but this feature definitely looks like it will bear watching, as Apple (hopefully) documents the workflow creation process in the future.
Configuring CUPS Server-Specific OptionsThere are also a number of printing settings that aren't specifically related to either a printer's setup, or a print-job's settings. Things such as where the printing system should store logging information, and other print-server specific settings are configured in the file /etc/cups/cupsd.conf. Most users won't have any reason to touch the settings in this file, but there are a few things that can be configured that are quite useful, especially in a multiprinter, multiuser network environment. Among these are controls such as the maximum number of print jobs allowed per user, who and/or what machines can access the CUPS administrative web interface, and where to store temporary files that are generated by the printing process. There are more than 100 server-specific options in that can be configured in this file, and they range from the entirely practical ability to limit a user to only a half-dozen simultaneous print jobs so that one user can't monopolize a printer all day, to the somewhat whimsical ability to cause every print-out that is handled by the server to have a Classified banner emblazoned across the top and bottom of every page. If you're interested in controlling this type of setting, read through the file it has good internal comments that explain what parameters control what print behaviors, and how to change them. Sharing Printers with Other Mac OS X SystemsApple has not yet implemented particularly sophisticated controls for printer sharing. If you're willing to fiddle with the CUPS server configuration, you can enact some more fine-grained rules as to what machines can see your printers, and what printers are shared, by looking in the #<Location /classes/...> and #<Location /printers/...> areas of the /etc/cups/cupsd.conf configuration file. If you don't feel comfortable editing Apache-style Allow/Deny rules (see Chapter 23, "Creating a Web Server"), the only controls you have are to click the Printer Sharing check box (or click the Start button, which will check the box for you) in the Services pane of the Sharing Control Panel, and to select printers to share from the Print and Fax Control Panel. Checking the Printer Sharing check box in Sharing turns on (by default) printer sharing for all of your configured printers, to all machines on your local network. The printers you share will automatically appear in everyone's Printer List, and be available for them to select when they click Print, under a Shared Printers submenu. You can restrict the printers that everyone sees, by going to the Sharing pane of the Print and Fax control panel, where you can turn off access to specific printers (or turn it back on, if you've turned it off). |
| < Day Day Up > |
EAN: 2147483647
Pages: 251