Setting Printing System Preferences
| < Day Day Up > |
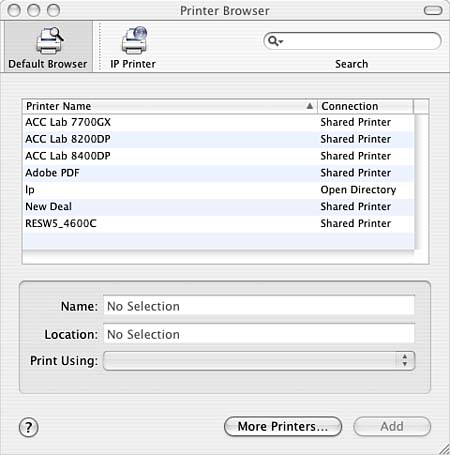
Using Print Center/Printer Setup UtilityThe once-familiar Chooser is not a part of Mac OS X. Instead, the heart of the Mac OS X GUI environment printing system is the Printer Setup Utility, which also appears as the Print Center. The Print Center/Printer Setup Utility is used for adding and deleting printers, setting the default printer, and interacting with the queues. The Print Center combines the printer tasks it once took both the Chooser and a desktop printer icon to accomplish. Desktop printer icons are still available, however, and provide a sort of limited view into the Printer List of the Printer Setup Utility. The rest of the familiar printing activities are available under the File menu of each application. The Print Center/Printer Setup Utility is located in /Applications/Utilities. Note that just adding a printer in the Print Center is sufficient to enable both GUI and command-line printing under modern versions of Mac OS X. Under the original releases, this was not true, and information needed to be added to the NetInfo database as well. Now, almost any configuration you could want can be handled through the Printer Setup Utility or an auxiliary configuration interface accessed via a web page. A small number of Print and Page Setup dialog preferences can also be configured via the Print & Fax control pane. Adding a Local USB or FireWire PrinterBecause all modern Macintosh hardware comes with USB and FireWire ports, a local USB or FireWire printer is easy to add. Talking to printers on either of these local interfaces is conceptually similar, so the same instructions apply to either connection type. When you open the Printer Setup Utility (sometimes called Print Center), a list of already configured printers should appear. If no Printer List window appears, you can select Show Printer List from the View menu to check for, or set up your USB, or FireWire printer. Your printer, if plugged in, turned on, and supported, should appear in the Printer List window automatically. If you don't see your printer listed, or if it is listed as unsupported, check the software CD that came with your printer for Mac OS X drivers. If it does not have any, check the manufacturer's website for the latest drivers and instructions. Mac OS X comes with some third-party USB printer drivers. If the drivers that come with Mac OS X work with your printer, you should be ready to print. If none of these sources have driver modules available, there are still a few other possibilities, but they're a bit more complicated, so we'll cover them later in the section on installing CUPS modules. After the drivers have been properly installed, your local USB printer should be available for printing. You can either use the automatically discovered and configured printer queue that's created for it by the Printer Setup Utility, or you can add your own queue for the printer and sometimes assert more control over the system. The advantage of just working with the automatically created printer is that it's essentially already configured and correct, and you don't need to do anything more than turn on the printer and plug it in to have it work. The advantage of creating your own queue is that you can name it something more useful than just the literal name/model of the printer. Additionally, a manually created queue will be available even when the printer is off or unavailable, so you can print to its queue, and save up print jobs destined for it, until it's available again. If you'd like to manually add a queue for a USB or FireWire printer, click the Add icon in the Printer List, and you will be presented with the top-level interface to the Printer Browser window. By default, this window opens, showing automatically discovered printers that is, local printers attached directly to your machine via USB and other "wired" solutions, or remote printers that are being auto-discovered via Bonjour (nee Rendezvous) or by CUPS's internal printer sharing/discovery module. If your printer is further away than can be automatically discovered (there's no problem, other than the hike to pick up your printouts, with configuring your system to print via a friend's machine in Bangladesh CUPS couldn't care less where a configured printer physically lives), you can switch the window to IP Printer mode, where you can configure a specific IP address, and type of remote printing service to which CUPS should direct print requests. If neither option works for getting to your printer, you can also click the More Printers button, which will bring up a printer configuration dialog that's similar to that used in Mac OS X 10.2 and 10.3. In this configuration dialog, you can configure most automatic-discovery printer types, as well as local and remote printer types that can't be discovered automatically. This includes types such as serial-port printing, where data is sent out over a serial interface and one hopes (expects) that there is a printer listening that will do something with it, and print-via-file type printing, where a printer device sits around watching a particular file on disk, and prints any information that shows up in the file. For most people and most purposes, simply selecting an auto-discovered printer or pointing to a remote IP printer should be all that's necessary. Printers that don't advertise their presence are becoming few and far between. On the other hand, people who might never have thought about, or thought they might need, advanced printing configurations might benefit by considering how some of the new capabilities that Mac OS X and CUPS bring to the printing world fit into their workflow. It would, for example, be a rather easy task to configure a system so that for every document printed, one copy popped out of a locally connected USB printer, and another copy popped out of a central printer in your company's records room, conveniently marked with "file copy." Likewise, a system could be configured to save a local PDF file as a copy of every fax that passes through the printing system. Because CUPS is open and extendable, the possibilities are limited only by your imagination. Figure 6.1 shows the printer browser with local and shared printers that can be added to the Printer List. Figure 6.1. The printer browser lets you add local and network-visible printers to the list of printers available in the Print dialog.
Mac OS X also allows you to share your locally connected printers to the network. This capability is enabled via selection of the Printer Sharing check box under the Services pane of the System Preferences Sharing pane. If you share your printer, it appears in other local network users' Printer Setup Utility Printer lists automatically. Browsing or Specifying Network PrintersIf you do not have a local USB printer, or if remote (network) printers also are available, you might want to add a network printer to your Printer List. Due to the way CUPS works, you won't need to do anything to add some network printers to your Printer List nearby "shared" printers, and independently network-aware printers will automatically appear, preconfigured, in your printer list. Similar to the way the Chooser used to discover AppleTalk printers on your network, the CUPS system automatically knows about shared printers available through the CUPS system on other local machines (including non-Apple machines using CUPS, such as Linux boxes). Unlike the Chooser, the CUPS system also knows and shares the configuration information for those printers, so you've no need to select printer models or configure CUPS printers that are automatically discovered; they are simply available as already-configured printer choices whenever they can be found on the local network.
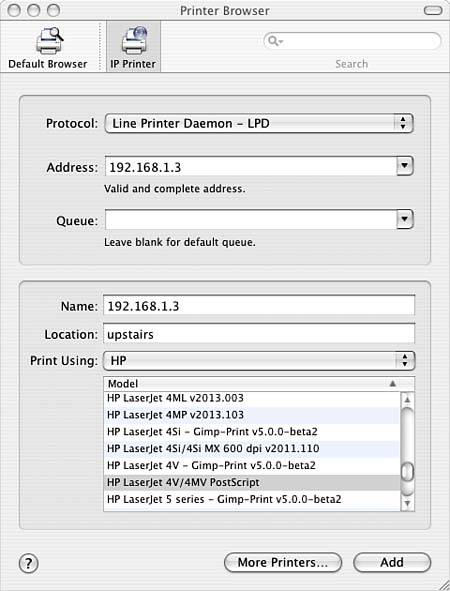
The printers shown in Figure 6.1 as "Shared Printer" items are automatically discovered shared printers, and their configuration will be adopted from whatever machine is sharing them. Automatically discovered shared printers are also automatically available any time you print in an application, under a Shared Printers pop-up submenu in the Printing dialog. Network-connected printers that are either too remote to be automatically discovered (automatic discovery is generally limited to your local network subnet), or that are less vociferous about their presence, must be specifically identified to your system if you want to use them. To do this, you need to know their network identification, so that you can tell the CUPS system where to find them. Most with the exception of Samba/SMB printers shared from Windows machines can be configured by clicking on the IP Printer icon at the top of the Printer Browser, and switching to manual configuration of network printing. When in IP Printing mode, you are presented with several choices of network connection type, a place to specify the hostname or IP address of the printer, and a place to specify the queue for the printer, in case the printer supports the idea of multiple different print queues with different priorities, or other distinct features. For this type of connection, you are also required to specify the type of printer so that the CUPS system can send the correct type of data over the network for it, and so that the printing dialog is aware of any special capabilities or limitations of the printer. You can also optionally give the printer a more mnemonic name to appear in your Print dialogs than the default hostname/IP address, and optionally specify a location, in case it's helpful to have a note regarding where to go to find your printout. Figure 6.2 shows the IP Printer version of the interface, configuring a LPR-based printer at IP address 192.168.1.3. The printer is an HP LaserJet 4MV, and I want to print to it using its native PostScript support, rather than using Tiger's built-in GIMP-Print capabilities. Figure 6.2. IP-based printers can't be browsed, so you need to tell the system how to find them.
In this interface, you have the option of choosing between the following three types of network-connected printers:
Configuring Printers Through the Printer Setup Utility More Printers InterfaceFor some printing setups, neither the automatically discovered nor simple network configuration options are sufficient. For these, additional and advanced printing configurations are available by clicking on the More Printers button in the Printer Browser dialog. Apple's hidden even more, More Printers, in a secret Advanced pop-up item that appears in the menu only if you hold down the Option key while clicking the More Printers button. Because the primary use of going to this interface is to get to the advanced options, you might as well just always hold down Option while clicking that button because there doesn't seem to be any downside to doing it that way. When Option-clicking the More Printers button, a drop-down sheet appears in the Printer Browser, under which you can select from among a number of different auto-discovered printer types. Most of these are already auto-discovered and presented to you under the Default Browser interface, but these can still be useful if you want to select from among a specific type of auto-discovered printer, and the full display is too cluttered. They also provide a few more selection options, such as the ability to specify the AppleTalk zone in which to search for printers. Under this interface you also have the option of searching for a few semi-discoverable network printer types that don't show up in the Default browser and that aren't configured by IP address. These include Windows SMB-served printers, and unpaired Bluetooth printers. If you have turned SMB/CIFS on in the Directory Access program in /Applications/Utilities (be aware that the Windows Printer selection option appears, whether or not you've turned on SMB/CIFS), you'll be able to browse the local Network Neighborhood and local Windows Workgroups for printing resources. When selecting one, you'll need to know the appropriate user and password authentication information for connecting to that resource the owner of the printer or administrator of the network should be able to give you this information. If you're trying to connect to a Bluetooth printer that you haven't previously used, you should be able to select among currently visible Bluetooth devices, and set up pairing with new devices that you want to use. Apple's overall interface (and seemingly its interface philosophy) for Bluetooth is in flux, however, so pairings might eventually be constructed elsewhere and only printer selection handled here. Getting Information on Configured PrintersThe Printer Setup Utility's Printer List itself is the place to examine known, configured, available printers. Each entry in the Printer List shows, by default, the printer name and its status. Under the View menu of the Print Center, the Columns submenu allows you to select from other information to display in the list. The available columns are as follows the Name column is not optional, and you can't turn it off:
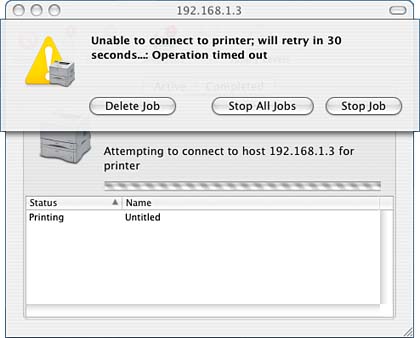
Figure 6.3 shows a sample Printer List. In this Printer List, five printers are shown. One (lp) is a remote Apple LaserWriter Select 360 that was automatically discovered through the Directory Services (NetInfo) method of specifying network resources. This method is useful if you want to propagate a specific printer configuration to a large group of client machines, and involves setting up a printer description in your NetInfo domain, and then subscribing the clients to the domain so that they all have a copy of the same description. One is an HP Color LaserJet connected via AppleTalk. One (192.168.1.3) is an HP LaserJet 4MV connected via direct IP printing (LPR/LPD). In versions 10.3 and 10.4, these have no host information at all, even though all three are network printers: two having a fixed IP and the other having a fixed AppleTalk ID. In 10.2, these show local as their host, despite the fact that they're network printers. In earlier versions of Mac OS X, these would identify themselves as being served via NetInfo, AppleTalk, and from a particular IP address, respectively. The fact that this information is not correctly displayed is probably a bug, but it's been around for a while. Based on the ongoing changes to the printing system interface, this area is probably under active development, and you should expect to eventually start seeing more useful information regarding the printers and their current states in this window The other two printers are CUPS printers that are shared from 192.168.1.18. Under Mac OS X 10.2, these would have displayed shaded entries to indicate that they're automatically discovered remote printers. Under 10.4, only the In Menu check box gets shaded (because you don't have any choice about these printers that are automatically discovered and configured are always shown in all applications' Printer Setup and Print dialog menus). Also, unfortunately, the printer list doesn't display the queue name for these printers, and it's the queue name that you'll need to know if you want to access them from the command line. Under the print dialog in GUI applications, selecting them by the names shown here is sufficient identification. Figure 6.3. This Printer List shows five printers, three of which are configured locally (though they're remote printers), and two of which are discovered from other computers on the network.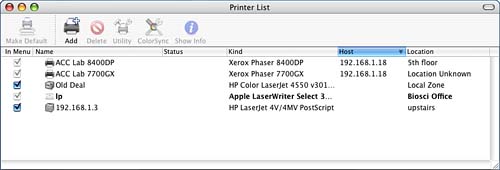 The bolded line indicates that printer lp is currently my default printer. Each time you add a printer, the newly added one automatically becomes the default. To make a specific printer your default, select the printer in the Printer List and then choose the Make Default icon, or choose Printers, Make Default from the menu. Selecting a printer as a destination in an application's Print dialog also currently changes the default. To delete a printer, select it in the Printer List and click the Delete icon. Creating Desktop PrintersA desktop printer is nothing more than an icon you can create (essentially an optional button) in the Finder (and it doesn't even have to be in the Desktop folder), that opens up an individual printer's job list/status/control window. To see an individual printer's job list (things printing, or waiting to print in its queue), select the printer in the Printer List, and then select Show Jobs from the Printers menu, or simply double-click on the printer you want to examine in the Printer List. The window that appears functions as a diagnostic indicator for the printer, telling you how it and/or the current job are doing; a job list for the printer, showing what print jobs are pending in the queue; and a control center for the printer allowing the printer to be taken out of service, or individual jobs to be managed. Figure 6.4 shows a sample print queue that has experienced an error and is retrying the send. According to the status entry, it hasn't yet given up. If the job had experienced a serious error, the Stop Job button would have changed to Retry, and there would be a more serious-sounding error report displayed in the window. Some print configurations will never give up, even if they can't contact the printer or remote host at all. Others will error out and give you potentially useful diagnostics in this window. When a job gets stuck, as this one has, you can either delete the job or pause it by selecting the print job and clicking the appropriate button. If something happens and the printer or CUPS system thinks that the job is completely broken, your options change to deleting or retrying the job. If there's a known printer problem that will take some time to fix, you can stop the printer, or put the job on hold, and re-enable the job after the printer's working properly again. Figure 6.4. The print queue for printer 192.168.1.3 shows that the current print job has encountered an error in communications but is still retrying the connection. You could choose to delete the job or put it on hold. If it had fully errored out, you could retry it.
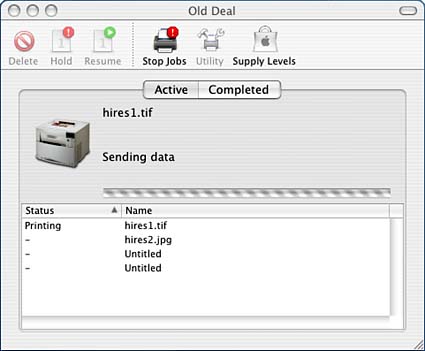
The printing status window for each specific printer shows a number of visual diagnostics regarding the printer's behavior and current and recent activity, as well as controls to pause or stop printing on that printer, and to rearrange or delete individual print jobs. While a successful job is printing, a blue status bar appears, and a status message alternately flashes Processing Job and Preparing Data for the duration of the print time. The Delete, Hold, and Resume buttons are grayed out unless you select a specific print job. Figure 6.5 shows a sample status window for a normal printer with several jobs in its queue. Figure 6.5. The print queue for printer Old Deal shows that the current print job is proceeding normally.
If you'd like to be able to get to this informational window more quickly, and without needing to navigate the Printer Setup Utility, you can create a Desktop Printer icon that, when clicked, will open directly to this printer job list/control window. To create a desktop printer, simply select the printer for which you want a desktop printer icon from the Printer List of Printer Setup Utility, and then select the Create Desktop Printer from the Printers menu. You will be prompted for a name and location to save the icon. After it has been created, the Desktop Printer icon will appear as an alias. It might look like a simplified picture of your printer or it might look a bit like a generic laser printer or ink jet. Double-clicking this alias icon will launch directly to the job list/status/control window for the associated printer. You can also print certain documents by dragging them directly to the desktop printer, without needing to first open them in an application. When printing this way, you have no control over finer details of the print jobs (such as can be addressed from the Print dialog in most applications), but it is far more convenient than using Preview, for example, for printing quick copies of 50 screen capture images. At the top of each printer's window, you can choose to stop the jobs for a printer. When you do that, the status entry for the printer in the Printer List reflects that the queue has stopped by listing the status as Stopped. After you have stopped a printer queue, the Stop icon changes and becomes Start Jobs. When a job is printing, Hold and Delete activate, allowing you to place an individual job on hold or delete it entirely. When a job is on Hold, the Resume button activates, allowing you to restart the individual job. Printer ClassesNew in 10.3, Apple added support for CUPS printer classes. Printer classes are user-created groupings of printers that can be treated like a single printer from the perspective of applications that want to print output. Classes appear in the Print dialog's list of printers just like any other individual printer. When selected and a print job sent to a printer class, CUPS delivers the print job to the first available printer in the class. This capability to group printers might sound unimportant from the perspective of a home user with only a few printers, but it can be a real time- and labor-saver for a business with many shared networked printers. To place printers in a class, select all of them that you want to put into the class in the Printer Setup Utility and then select Printers, Pool Printers. You are presented with a dialog where you can confirm the printer selections you've made and give the class a name. You can create multiple printer classes and place any printer into any number of classes as well, allowing flexible groupings of your printing resources. When created, printer classes look to the rest of the system like individual printers, but are handled by CUPS by load-sharing the print jobs across the available printers. In any place that the system expects to see a specific printer name (including command-line commands such as lpr see Chapter 13 that don't document this feature), you can substitute a printer class, and CUPS manages the actual destination in the background. |
| < Day Day Up > |
EAN: 2147483647
Pages: 251
- ERP Systems Impact on Organizations
- The Effects of an Enterprise Resource Planning System (ERP) Implementation on Job Characteristics – A Study using the Hackman and Oldham Job Characteristics Model
- Distributed Data Warehouse for Geo-spatial Services
- Data Mining for Business Process Reengineering
- Development of Interactive Web Sites to Enhance Police/Community Relations