Using the Dock
| < Day Day Up > |
| The Dock is constant within the interface. No matter what application you're in, the Dock is either present on your screen or a mouse motion away. The Dock supplements Finder operations by enabling you to launch applications, open documents, and delete items without having to dig through (or under) dozens of windows. Figure 1.37 shows the Dock. Figure 1.37. The Dock acts as application launcher, switcher, and more. Adding and Launching Application ShortcutsTo use the Dock as an application launcher, commonly used applications can be added to the Dock, much like a Finder toolbar, by dragging them to the position you want on the left side (or top in vertical mode) of the Dock divider bar. This half of the bar contains all docked and currently running applications. If you have placed an application on the Dock, you can launch it by single-clicking the icon. The application icon begins bouncing and continues to do so until the software is ready for user interaction. A running application is denoted by a small triangle under its icon.
Switching Active ApplicationsTo switch between active applications, just click the icon of the application that you want to bring to the front. Holding down the Option key as you click on an application brings the application to the front and hides the previously active process. Simultaneously holding down both the Option and Command keys while clicking brings the clicked application to the front and hides all other applications. To switch between open programs from the keyboard, use Command-Tab this should seem familiar to Windows users. This displays a list of active icons, shown in Figure 1.38, that you can cycle through with the Tab key or via the arrow keys (as long as the Command key is held down). Figure 1.38. Switch between active applications with Command-Tab.
Interacting with Running ApplicationsCommon functions, such as quitting an application, hiding it, or jumping to one of its open windows, can be accessed by clicking and holding a running application's Dock icon or by Control-clicking on the icon. Some applications, such as iTunes, allow basic controls (playback controls, in the case of iTunes) to be accessed through the Dock pop-up menu. After the menu has appeared, you can press the Option key to reveal hidden menu options; this particular key/mouse combination changes a Dock icon's Quit selection to Force Quit when used. Application icons also serve as proxy drop points for documents. You can drag documents on top of an application's Dock icon to open them in that application.
Creating File and Folder ShortcutsShortcuts to files and folders that are used frequently can be stored to the right (or bottom in vertical mode) of the Dock separator bar. When a folder is added to the Dock, it can be single-clicked to open a Finder window containing the contents of that folder. Clicking and holding (or Control-clicking) a folder in the Dock creates a pop-up hierarchical menu that displays the contents of the folder. Any elements added to the folder will be immediately visible in the pop-up menu.
Using the Predefined Dock Shortcuts and BehaviorsThe Dock, although a useful launching utility, also plays a critical role in some of the basic features of Tiger. Several predefined functions are resident as a permanent part of the Dock; these handy shortcuts can help you navigate, operate, and organize. The FinderThe first icon on the left side (default orientation) of the Dock is the Finder icon. You can use the Finder icon to quickly jump to the Finder application or bring any active Finder window to the top. DashboardThe Dashboard icon, located directly to the left of the Finder icon, invokes Tiger's new mini-apps Dashboard. The Dashboard is a next generation desk accessory engine that enables you to run small utility applications and have them ready for use at any time. We'll talk more about the Dashboard in the "Using the Dashboard" section later in this chapter. The Trash CanThe Mac OS trash can lives on the right side of the Dock. You can drag files and folders directly from the Finder into the Dock's trash can. If you want to remove an item from the trash, click the trash can icon, and a window appears containing all the items waiting to be deleted. You can drag files from this window just as you can in any other Finder window. To empty the trash, use the Finder's application menu and choose Empty Trash (Shift-Command-Delete); or click-and-hold or Control-click the trash can icon, and choose Empty Trash from the pop-up menu. Holding down Option while emptying the trash bypasses any system warning messages. The Finder preferences can permanently disable the Empty Trash warning.
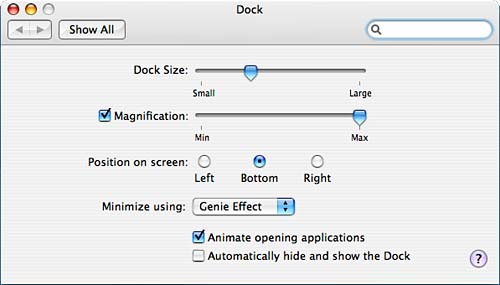
Ejecting MediaThere are a number of ways to eject disks under Tiger. Control-clicking on a mounted volume opens a contextual menu with an Eject option. Alternatively, you can highlight the resource to remove and choose File, Eject (Command-E) from the Finder's menu; press the Eject key on most Apple keyboards; or use the Eject icon beside each removable resource in the Finder's shortcut pane. The final method of ejecting a disk might seem a bit unusual to some users, but it has been a standard on the Macintosh for many years. Disks can be safely unmounted and ejected by dragging them to the trash can. To get around the obvious "Hey, isn't that going to erase my disk?" reaction that many have, the system conveniently changes the trash can icon into an eject symbol during a drag operation that includes a storage volume. WindowsMinimized windows are placed in a thumbnail view beside the trash can. Depending on the application, these iconified windows might continue to update as their respective applications attempt to display new information. The QuickTime player, for example, can continue to play miniaturized movies in the Dock. Customizing the Dock AppearanceAfter the initial "gee whiz, that's pretty" reaction to the Dock has worn off, you'll probably want to customize the Dock to better suit your Finder settings. Depending on your screen size, you might be looking at a Dock that, by default, eats up about one-third of the available desktop space on your machine. Don't worry; there are ways to rectify the situation. For fine-tuning the Dock, turn to the System Preferences application. The Dock has a settings pane within System Preferences that you can use to adjust its size, adjust its icon magnification, and make it disappear when not in use. Users of Apple's widescreen PowerBooks or cinema-aspect displays, will be pleased to find that the Dock can even move into a vertical mode, occupying space along the sides of the screen. Open System Preferences and then click the Dock icon, or choose Dock, Dock Preferences from the Apple menu. Your screen should now resemble Figure 1.39. Figure 1.39. Customize the Dock's appearance from the Dock pane within the System Preferences application.
Within this pane, you can choose how you want the Dock to look and act on your computer. There are six settings:
Easy access to several of the Dock's configuration options is also available through the Dock submenu in the Apple menu or by Control-clicking the dock right/left separator line to show a Dock contextual menu.
|

| < Day Day Up > |
EAN: 2147483647
Pages: 251