Using the Tiger Finder
| < Day Day Up > |
| Simply put, Finder is the application that Tiger uses to launch and manipulate files and applications. Finder handles all common tasks such as creating, deleting, moving, and copying files and folders. It is, in effect, the portal to the underlying operating system. Unlike other tools and utilities, Finder is always active and is automatically launched immediately after logging in to the system. Much of the Macintosh's legendary ease of use is attributed to Finder and its intuitive interface to the filesystem. Understanding the Finder Window ComponentsFinder offers many ways to navigate through your data using windows, menus, and the keyboard. All navigation takes place inside a Finder window. To open a new Finder window, double-click a folder or disk icon that is on your desktop, use the New Finder Window selection from the Finder's File menu (Command-N). If there are no open Finder windows, clicking the Mac "smiley face" icon in your Dock will also open a window. Three elements of the Finder window that are not related to file browsing help organize, navigate, and provide information about your workspace: the Sidebar, Toolbar, and Status bar. The SidebarThe Finder Sidebar puts all your commonly used folders and volumes in a single place: the pane found at the left side of the Finder window, as shown in Figure 1.1. You can shrink and expand the width of the Sidebar using the vertical gray bar separating the Sidebar and content panes. Double-clicking the vertical line closes the pane entirely; double-clicking again restores it. Figure 1.1. The Sidebar provides access to different areas of the filesystem.
Viewing Storage VolumesThe top portion of the Sidebar pane displays the available volumes mounted on your system. As disks are inserted or network shares mounted, the Sidebar refreshes to show the new volumes. Removable media can be ejected by clicking the Eject icon that appears to the right of their entry in the list.
Clicking an entry in the list refreshes the right side of the Finder window with the contents of the chosen item. For disks, this is obviously the contents of the disk. However, three additional storage elements behave a bit differently than a normal disk: Computer, iDisk, and Network.
By default, Tiger doesn't display the Computer or iDisk icons unless .Mac has been configured in the .Mac System Preference pane (see Chapter 3 for details) or you've turned these elements on in the Sidebar defaults, which will be discussed shortly. Adding User-Defined ElementsThe bottom portion of the Sidebar comes with a few predefined shortcuts to your home directory, along with the Applications folder and your personal Desktop, Documents, Movies, Music, and Pictures folders. Again, clicking an entry in the list of user-defined elements also refreshes the right portion of the window to display the contents. You can drag additional folders, files, or applications to the list. As you drag, a horizontal bar is displayed in the list to show where the new item will be inserted. If you drag directly on top of an existing folder or application you've added to the Sidebar, the list entry highlights to accept the element you're dragging. You can use this to put items in folders, or drag documents onto applications to launch them. To remove an item from the Sidebar, click and drag its label or icon out of the pane (it will disappear in a poof) or open a contextual menu for the item and choose Remove.
Changing Sidebar DefaultsTo change the default items displayed in the Finder Sidebar, choose Finder, Preferences; then click the Sidebar icon to open the Sidebar preferences pane, shown in Figure 1.2. Figure 1.2. Choose the default items for your Sidebar.
Use the check boxes to enable or disable the default storage devices and personal folders automatically added to the Sidebar. Close the preferences window to save and enable your changes. The ToolbarThe Finder toolbar holds useful functions that you might want to access from wherever you are in the Finder. Like the Sidebar, the Finder toolbar can hold shortcuts to files, but it can also be used to carry out actions on files, folders, and the navigation process itself. There are two ways to customize the toolbar: by using the supplied buttons (shortcuts) and by adding your own applications and folders. Using Predefined Toolbar ShortcutsBy default, Finder comes with four active sets of toolbar components, as shown in Figure 1.3:
Figure 1.3. The default Toolbar components help you navigate and control your Finder views.
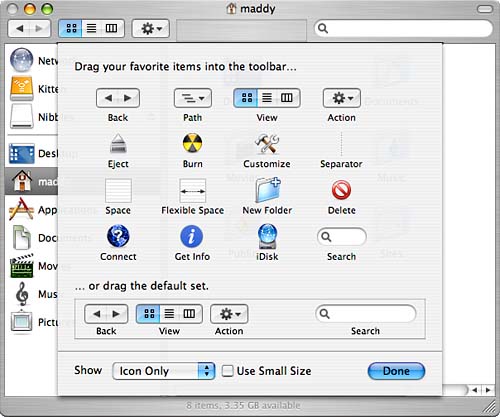
To customize your Finder windows with additional Apple-defined options, choose View, Customize Toolbar from Finder's menu or hold Command-Option and click the elongated toolbar button in the upper right corner of the window. A display of all the available shortcuts appears, as shown in Figure 1.4. Figure 1.4. Finder buttons give single-click access to applications, folders, and special features.
To add one of these buttons to the toolbar, drag it from the window to wherever you want it to appear in the toolbar. If the number of shortcuts in the toolbar exceeds the size of the window, the shortcuts that can't be displayed appear in a pop-up menu (look for the >> icon) at the right side of the toolbar. These are the available toolbar buttons:
At the bottom of the toolbar customization pane, you can choose how you want the toolbar displayed using the Show pop-up menu. You can pick Icon Only, Text Only, or Icon & Text if you prefer both. The default selection is Icon & Text. You can also shrink the size of the toolbar icons by checking the Use Small Size box.
As you are editing your toolbar, you might want to reorder the existing icons or remove them entirely. Just drag the toolbar elements into the order you want they will automatically move to adjust to the new ordering. To remove an element, drag it outside the current toolbar and it disappears. Click Done when you're satisfied with the results.
Adding User-Defined Toolbar ShortcutsIn addition to the many predefined customizations, the toolbar also supports user-defined shortcuts, just like the Sidebar. Users can drag common applications, documents, or folders to any place in the toolbar. When folders and applications are added to the toolbar, a single click on the icon opens or launches the respective object. Users can also drag documents onto toolbar application and folder icons to open the file using the application or to move the file into a particular folder. Toolbar shortcuts can be removed by holding down Command and dragging them off the toolbar or by opening a contextual menu for the item and choosing Remove. Toolbar and Sidebar customization is done on a per-Finder, per-user account basis. When you modify your toolbar, it is modified for all Finder windows in your workspace, not just the currently open folder. Because these changes happen on a per-user basis, customizations you make to your Finder do not affect other users. Switching to Classic Mac OS Navigation/Toolbarless ModeBy default, when you double-click a folder, it refreshes your existing window to display the contents. This, along with all the bells and whistles of the Sidebar and toolbar, can be confusing for some users. To revert to a traditional form of navigation and simplified Aqua windows, switch to the Icon or List views, and then click the toolbar button in the upper-right corner of the Finder window, or choose View, Hide Toolbar (Option-Command-T). In this mode, the Finder works as it did in pre Mac OS X versions of the operating system: Double-clicking a folder always opens a new window, and the Sidebar and toolbar are not visible. The Status BarThe status bar, located at the bottom of a Finder window, has long supplied Mac users with important information about their systems. Finder's status bar shows the number of items contained in a folder and the amount of space available on the drive (this can be seen in Figure 1.1). In addition to the storage usage information, the status bar may also contain one of three icons in the left corner of the bar:
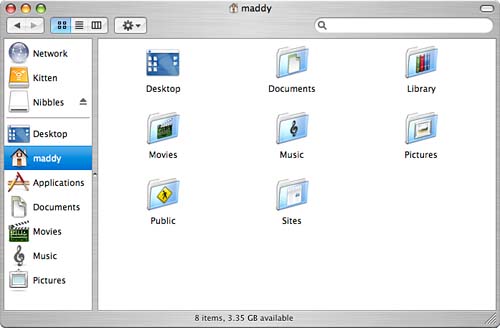
When Finder is operating in the toolbar-less mode, the status bar shifts to the top of the window and is initially hidden. It can be displayed by choosing View, Show Status Bar. It is never hidden when the Sidebar and toolbar are active. Managing Finder Navigation ViewsAlthough the Sidebar and toolbar aid in navigation, they aren't the meat of Finder. The content pane of Finder displays all the files and folders in your current location. Depending on the View mode of the content pane, you can browse your files in a traditional icon-style mode, columns, or a hierarchical list. To switch among these modes, use the three-button View control in the Finder toolbar (icons, list, columns, respectively), or choose your poison from the View menu. Using the Icon ViewThe first time you log in, Finder will be using the Icon view. If you have already been using Finder and are no longer in Icon view, you can quickly switch to Icon view by choosing View, Icons (Command-1) or by clicking the first icon in the View area of the toolbar. Figure 1.5 shows a Finder window in Icon view. Figure 1.5. The default view mode is the Icon view.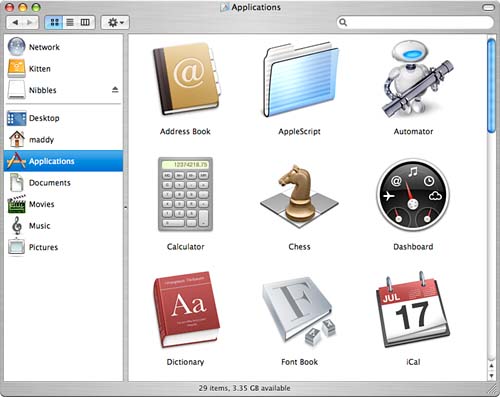 Within the Icon view, you can navigate through the folders on your drive by double- clicking them. If you prefer to use the keyboard, you can move between the icons in the frontmost Finder window by pressing the arrow keys or by typing the first few letters that start the name of the folder or file you want to select. To open a selected item, choose File, Open, or press Command-O on the keyboard. By default, moving from folder to folder refreshes the current window. You can switch to a multiwindow view by clicking the toolbar button in the upper-right corner of the Finder window or by using the Finder Preferences. Alternatively, to momentarily switch to a multiwindow mode, hold down Command when double-clicking a folder. This opens the folder in a new window.
Another method of navigating your drive is to Command-click the icon or text in the center of the Finder window's title bar. You will then see a pop-up menu that displays a bottom-to-top hierarchy of the folder path required to reach the current directory. You can choose any of the folders in the list to quickly jump to that location.
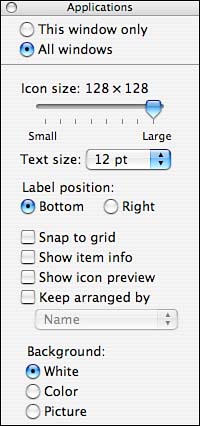
Icon View OptionsThe most basic form of customization in Icon view is to drag the icons around to suit your tastes. To add more dramatic effects to a window in Icon view, choose View, Show View Options from the menu, or press Command-J. Figure 1.6 shows the View Options window for the Icon view. Figure 1.6. The Icon view options let you create a different look for the Finder window.
Global SettingsThe first decision you must make when adjusting view options is whether to inherit global settings, or apply the changes to the current window. At the top of the View Options window are two choices: This Window Only and All Windows. Choosing the first setting tells Tiger that the changes you make to the view are specific to that window no other windows will be changed. For example, using This Window Only, you can set your home directory and each of the directories within it to their own style independently of one another. On the other hand, picking All Windows indicates that any changes made to the view options will affect all other windows set to inherit the global settings. This is a great way to create a common look and feel across multiple folders without having to maintain separate settings for each. Icon and Text OptionsThere are three primary settings for the Icon view, the first being icon size. Mac OS X supports icon sizes from 16x16 pixels all the way up to 128x128 (the standard Mac size was previously 32x32). The large icons are impressive and detailed, but take up quite a bit of window/desktop real estate. You can scale the icons from their smallest size to the largest size by dragging the Icon Size slider from the left to the right. You can control the size of the icon title font with the Text Size pop-up menu. Apple allows a selection between 10 and 16 points but does not provide a means of changing the title font. The positioning of the icon's title can be changed from on the bottom to the right using the Label Position setting this can maximize window space when using small icons.
Icon ArrangementThe next group of settings control icon arrangement, which determines how the icons are displayed and laid out on the screen. To keep your icons straight and neat all the time, choose Snap to Grid. Tiger maintains an invisible grid within Finder windows that is used to keep icons evenly aligned with one another. Unfortunately, there are no provisions for changing the spacing on the grid. As a result, the icons that are aligned to the grid might seem more loosely spaced than you want.
You can also choose to display additional information in the icon and its label. The Show Icon Preview setting displays thumbnails of recognized image formats even PDF files! Show Item Info, on the other hand, adds a count of the number of files contained within each folder directly under each folder's icon and displays information about media files (resolution, duration, and so on). A final form of icon arrangement is to keep the icons arranged by attributes of the files that they represent. Click the Keep Arranged By check box and then choose from the list of available options:
Window BackgroundThe Background options allow you to choose a background color or picture on a per-folder basis. This enables you to create a visually impressive system and can also provide quick cues for your current location within the operating system. The default folder background is white. To choose an alternative color, just click the Color radio button. A small square appears to the right of the button. Click this square to launch the Color Picker. An even more impressive effect is to use a background picture for the window rather than just a color. Background images can be based on any of the QuickTime-supported formats (GIF, JPEG, TIFF, and so on). Click the Picture radio button and then click the Select button that appears. You are prompted to open an image file from the system. After you've chosen a picture, the Finder window refreshes with the chosen image in the background. Currently, in Tiger, pictures cannot be scaled to match the size of a window. Instead, Finder background pictures are tiled, much like a repeating background on a web page.
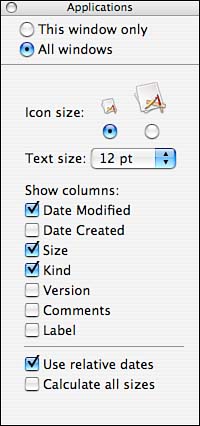
Using the List ViewAny easier way to view a large number of files is through the Finder's List view. You can switch to List view by clicking the middle icon in the Finder toolbar's View area, or, if the toolbar isn't present, by choosing View, As List from the Finder's menu. Demonstrated in Figure 1.7, the List view is a straightforward means of displaying all available information about a file or folder on a multicolumn screen. Figure 1.7. List view packs a lot of information into a small amount of space.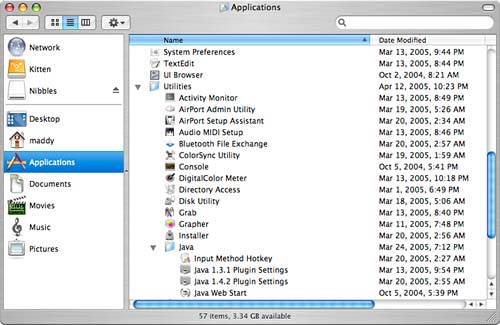 The columns in the List view represent the attributes of each file. You can contract or expand the columns by placing the mouse cursor at the edge of the column and click-dragging to the left or right. Clicking a column highlights it and sorts the file listing based on that column's values. By default, the column values are listed in descending order. Clicking a column again toggles the sorting order. An arrow pointing up or down at the right of each column represents the current sort order. You can reposition the columns by clicking and dragging them into the order you want. However, the first column, Name, cannot be repositioned. When a folder appears in the file listing, a small disclosure arrow precedes its name. Clicking the arrow reveals the hierarchy within that folder. You can drill down even further if you want, revealing multiple levels of files. Figure 1.7 shows three levels of files displayed simultaneously. Windows users might find a level of comfort in this view because it is similar to the Windows Explorer. As with the Icon view, double-clicking a folder anywhere within this view either opens a new window (toolbarless mode) or refreshes the contents of the existing window with the new location. If keyboard navigation is your thing, the same rules apply as in the Icon view. You can navigate up and down through the listing using the up-arrow key and the down-arrow key. In addition, you can use the left-arrow key and right-arrow key to move in and out of folders in the hierarchy. Holding down Command-Option along with the right-arrow key or left-arrow key expands or collapses all folders inside the currently selected folder. Typing the first few characters of an object's name highlights that object in the listing. You can then use Command-O to open it. Finally, Command-clicking on the title of the window reveals the same pop-up list of folders as the Icon view. Choose one of the items in the list to jump to it. List View OptionsAs with the Icon view, there are a number of options that you can use to customize the appearance and functionality of the List view. To alter the options for a window, make sure that it is the frontmost Finder window and then choose View, Show View Options (Command-J). Figure 1.8 shows the List View Option window. Figure 1.8. The List view also can be customized.
Icon and Text OptionsThe Icon Size option offers a choice of two icon sizes: small or large. To change the size of the icon that precedes every line in the list, click the radio button below the size that you want. Unlike the Icon view icons, the List view icons cannot be scaled beyond the two presets. Text size for the list can also be chosen from 10 to 16 points. Column Display OptionsTo change what information is visible in the List view, use the Show Columns options. By checking or unchecking the box in front of each option, you can add or remove the corresponding column in the List view.
Two additional settings at the bottom of the options window affect the column display:
Using the Column ViewThe final type of window view is the Column view. This will be recognized by NeXT-heads as virtually identical to the original File Browser used on the NeXT operating system. There are two primary advantages of this view: ease of navigation and file identification. You can switch to the Column view style by choosing View, As Columns from the menu, or by clicking the third icon in the View area of the toolbar. Figure 1.9 shows a Finder window in Column view. Figure 1.9. The Column view uses…columns.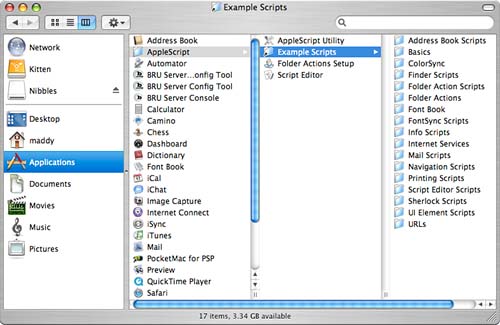 The key feature of the Column view is its navigation. Unlike the other views, which can either overwhelm you with information or require multiple windows to move easily from point to point, the Column view is designed with one thing in mind: ease of navigation. The concept is simple: Click an item in the first column and its contents will be shown in the next column. You can continue to drill down further into the filesystem by choosing a folder that was within your original folder. The display will then do one of two things: If your window is open wide enough, it will display the contents of the second folder in yet another column. If no other columns are available, the columns will slide to the left, and a scrollbar will appear at the bottom of the window. Using this scrollbar, you can quickly trace the steps you've taken to reach a file.
If you want to adjust the width of the columns, hold down Option, grab the handle (represented by two vertical lines) and drag it all the columns resize accordingly. To resize only the columns to the left or right of the divider line, drag without using Option.
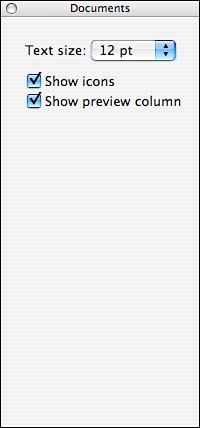
As with the other views, Command-clicking on the title of the window reveals the same pop-up list of folders as the Icon view. Choose one of the items in the list to jump to it. There is one other big bonus of using the Column view: the ability to instantly see the contents of a file without opening it. If you drill down to an individual file, a preview or description of the selected item will appear in the column to the right. This is demonstrated in Figure 1.10, where the front page of a PDF file is displayed. Figure 1.10. When a file is selected, a preview is shown in the rightmost column.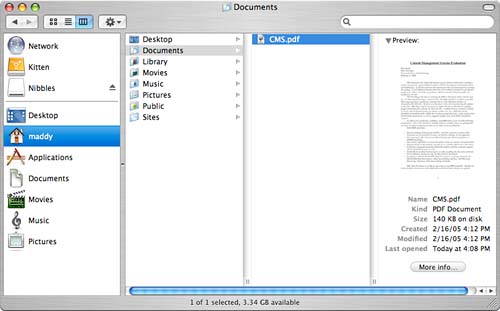 This is a convenient way of viewing pictures, listening to MP3s, and even watching QuickTime movies. When an application or a file that cannot be previewed is chosen, information about the file is displayed, such as the creation/modification dates, size, and version. Column View OptionsThe Column view options, shown in Figure 1.11, are sparse. The text size is adjustable, and you can also choose to show the small icons in each column, and whether the far right column is used for a preview or will just act as a file list. There are no global view options for the Column view mode. Figure 1.11. Choose whether to display icons in each column and whether a preview is displayed.
Navigating Using the Go MenuIf you want to navigate quickly from any view, use the folder shortcuts contained in the Go menu. The top three options, Back (Command-[), Forward (Command-]), and Enclosing Folder (Command-Up-arrow) can be used to move around based on your current Finder location. This menu also enables one to jump to one of several predefined locations:
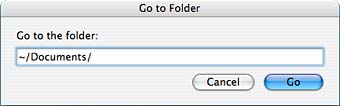
The second-to-last quick-navigation option is Go to the Folder (Shift-Command-G). From here you can manually enter a pathname and open it within Finder. Figure 1.12 shows the Go to the Folder dialog box. Figure 1.12. Go to Folder lets you enter your destination by hand.
Type any folder pathname into the Go to the Folder field. Folder names are separated by the / character. Table 1.1 shows a few shortcuts you can use to navigate your drive.
As you type, Tiger watches what you're typing and attempts to auto-complete the name of the directory; press Tab to accept an auto-completed pathname. Click Go or press Return when you've finished typing the directory you want to visit.
The final Go menu option, Connect to Server, will be discussed in the next section, "Connecting to Network Resources." Connecting to Network ResourcesTiger makes it extremely easy to work in a cross-platform environment by enabling users to connect to a number of different types of file shares, specifically AppleShare over AppleTalk, AppleShare over TCP/IP, NFS, SMB (Windows), FTP, and WebDAV. By adopting a common interface to all of these different protocols, interacting with a remote server is as simple as browsing a local drive on your computer. Browsing and Mounting Network ResourcesTo look for available servers, click the Network icon in the Finder Sidebar. After several seconds, your screen refreshes with any results that it found, as shown in Figure 1.13. Figure 1.13. Browse network volumes directly in Finder.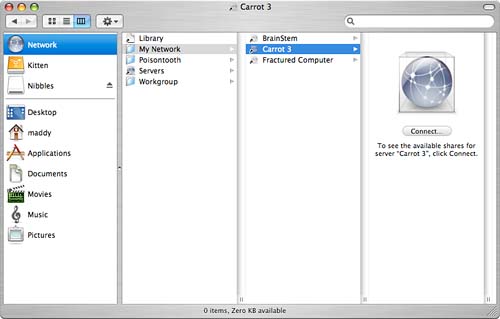 AppleTalk Zones and Windows Workgroups are represented by folders, whereas machines registered through Rendezvous can be found under the My Network folder. Double- clicking the icon of a shared resource attempts to connect and mount that device, as shown in Figure 1.14. Figure 1.14. Browse and connect to remote devices.
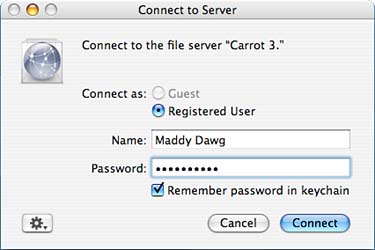
Because Tiger allows you to connect to quite a few different types of file services, the server connection dialog varies depending on the server type. We'll look at Windows and WebDAV connections in Chapters 27 and 23, respectively. For now, assume that we're connecting from Tiger to Tiger. Logging In to a ServerAs shown in Figure 1.14, when connecting, you can choose to authenticate as a Guest or Registered user. Tiger Personal File Sharing automatically allows Guest connections with write access to the path ~Public/Dropbox in your home directory. Registered users can access their entire home directory and, if they are administrative users, all storage volumes attached to a machine. After entering a username and password, you can click Remember Password in Keychain to automatically authenticate with the server in the future.
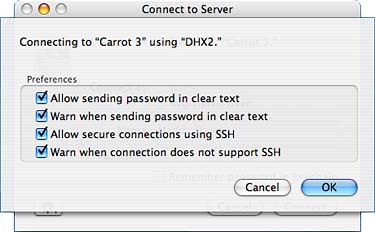
Configuring Connection SecurityTo help maintain sharing security, the Action menu (the gear icon) provides direct access to changing your password on the remote server and to additional security options. Choosing Options from the Action menu will display the dialog box shown in Figure 1.15. Figure 1.15. Configure the security of your connection.
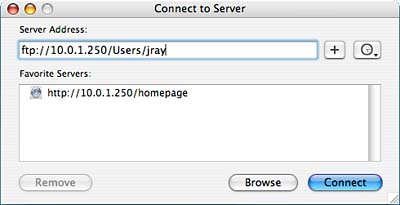
Here you can choose whether your password will be sent over the network in clear text that is, a human-readable (and interceptable) form and whether you should be warned if the password is transmitted in this manner. Although it might seem like a good idea to never allow this feature, some servers might not allow secure connections and will deny access without clear text passwords. The best security is achieved by clicking the Allow Secure Connections Using SSH check box. This uses SSH (Secure Shell) to create an encrypted link between the client and the server and virtually eliminates the risk of password or information interception. For more information on SSH, see Chapter 21, "Accessing and Controlling Tiger Remotely." Choosing Volumes to MountAfter entering your username and password and configuring your security options, click the Connect button. Assuming that you have a successful login, you will be presented with a list of volumes that are available to your account. Highlight one or more in the list, and then click OK. The selected volumes will be mounted in the Finder and accessible from the Finder window or your desktop (if configured within the Finder preferences). Connecting to a Network Volume via URIIf you already know the IP address or hostname of the computer you want to connect to, or a resource doesn't allow browsing (WebDAV/FTP/NFS), you can also connect by choosing Go, Connect to Server. The Connect To Server dialog is displayed in Figure 1.16. Figure 1.16. Connect to and store commonly used server URLs here.
To connect to a networked resource, type the resource URI using the following formats:
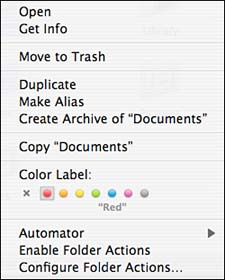
After entering a URL, click Connect to connect to the network resource. You can also choose + to add a URL to the list of favorite servers (where subsequently it can simply be clicked to access). Use the Remove button to remove a URL from the Favorite Servers list. Recently used URLs are available via the clock icon drop-down menu to the right of the +. Finder File OperationsBecause you're reading an Unleashed title, you probably already know the basics of most graphical operating systems: Click and drag files to move them; double-click applications to launch them. Tiger doesn't break any new ground in the handling of files. Everyone who has used Windows, KDE/GNOME, or an earlier version of Mac OS will be able to carry their existing knowledge over to the new operating system. To be thorough, this portion of the chapter serves as a quick reference to standard file and application operations. Assigning LabelsLabels are a color code that you can assign to an arbitrary file or group of files. Your important work files, for example, might be labeled with the color red, whereas personal files might be labeled green. Rather than having to separate the files into different folders, you can simply apply different labels. The Finder highlights the name of each icon with the color of the chosen labels so that you can easily pick them out. In addition, you can use the View Options in List mode to sort by assigned labels or even use the new Spotlight search feature to search by label. (Searching is discussed later in this chapter in the section "Finding and Organizing Information with Spotlight.") To assign a label to an icon or group of icons, select the object(s) and then use File, Color Label; the Toolbar Action button; or the contextual (Control-click) menu to choose one of the seven different color options, shown in Figure 1.17. The meaning is entirely up to the user labels have no effect on how the operating system manages the files. Figure 1.17. Choose one of seven different color labels to apply to the file(s).
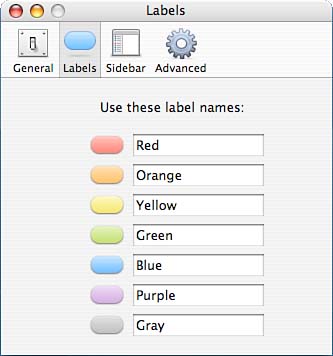
When setting a label using any of the available methods, you might notice that directly to the left of the color options is an X icon. Choosing the X removes any existing label from the selected item(s). Each label has an associated word (the label name) displayed along with the highlight color in the Finder List view. To change the names (defaulted to the color names) associated with each label, choose Finder, Preferences; click the Labels icon to open the Label Name preferences pane. Use the fields beside each color to change the label names, as shown in Figure 1.18. Close the preferences window to save and activate your changes. Figure 1.18. Assign names to each of the color labels.
Zipping and Unzipping FilesTiger can compress and decompress files directly from the Action toolbar button or contextual menus. To zip (compress), choose the files or folders to include in the archive and then use the Action button or Control-click and choose Archive. To unzip (decompress), select a Zip file and choose Unarchive from the Action button or contextual menu. The file will be unarchived in the current location. Zipping and unzipping does not affect the original files or the archive file; they are left untouched. Moving Files and FoldersMoving a file changes its location, but does not alter the contents of the file or its creation and modification dates. To move a file in Tiger, drag its icon to the folder or location where you want it to reside. If you are dragging within a Finder window, the window automatically scrolls as your cursor reaches the border, allowing you to move around within the view without having to drop the icon and manually scroll the window. If you attempt to move a file from one device (such as a disk) to another, the cursor changes to include a + sign, and the file is copied rather than moved. The original file stays in its current location, and a new version is created on the other storage media. You must delete the original copy of the file if you do not want to keep multiple versions of the file.
Copying Files and FoldersCopying a file creates an exact duplicate of an original file. The new file sports a new creation and modification date, although the contents are identical to the original. There are a number of ways to create a copy:
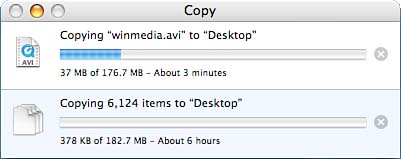
As a file is copied, Finder displays the progress of the operation. If multiple copies take place at the same time, the status of each operation is shown stacked on one another in the copy status window. In Figure 1.19, two copies are taking place. Figure 1.19. A single window contains all the status information for multiple copy operations.
When attempting to copy over existing files, the Finder prompts you whether you want to replace them and displays an Apply to All check box to apply your decision to any other conflicting files it finds during the copy. Remember that under Tiger, you cannot alter certain system files and directories or another user's files. If you attempt to replace existing files to which you do not have access, the copy operation will fail. Dragging with Spring-Loaded Folders and WindowsUsing the spring-loaded folder feature of Tiger, you can drag items onto closed folders, and after a few seconds, those folders spring open, allowing you to continue the drag operation. To force the spring action to occur immediately, press the spacebar while hovering over the folder you want to open. Tiger also includes spring-loaded windows. Spring-loaded windows spring onto the screen when an icon is dragged over them. To demonstrate this effect, drag a Finder window to the bottom of your screen until only the title bar is showing. Next, drag an icon over the title bar the window springs up from the bottom of the screen and then disappears when you release the item or move your mouse off the window. You can force a window to spring immediately by pressing the spacebar.
Deleting Files and FoldersDeleting files and folders permanently removes them from your system. Although Finder has an Undo menu, it cannot undo the effects of erasing a file from your system. As with copying a file, there are a number of ways to delete one:
Moving an item to the trash does not delete it permanently from your drive. Instead, it places the item inside an invisible folder called .TRash in your home directory you cannot see or access this folder directly from the GUI. The trash can icon in the Dock fills with crumpled paper when it contains items waiting to be deleted. Although Tiger doesn't give you a true representation of the .TRash folder, it does let you view the contents of the trash by clicking the trash can icon in the Dock. The Trash window works identically to other Finder windows. If you want to rescue a file you've accidentally sent to the trash, you can drag the file's icon out of the trash. To completely remove a file from your system, choose Empty Trash from the Finder's application menu or press Shift-Command-Delete. Alternatively, you can Control-click or click and hold on the trash can, and choose Empty Trash from the resulting pop-up menu. Holding down Option when emptying the trash (including via the keyboard shortcut) bypasses Finder's warning messages. If you are deleting a large number of files, Finder might bring up a dialog box similar to the Copy dialog box. You can click Stop to cancel the trash operation, sparing the files that haven't yet been erased. Securely Erasing FilesBy default, emptying the trash removes only pointers to the files from the filesystem. The data itself remains on the drive and can be recovered by a number of available disk forensics tools. If you work for the NSA or any other organization that requires high level security, this poses a security threat in that even if you've deleted sensitive information from your computer, someone can recover it. Tiger provides a Secure Empty Trash feature, also available under the Finder's Application menu. Using the Secure Empty Trash option overwrites files several times to ensure that they cannot be recovered.
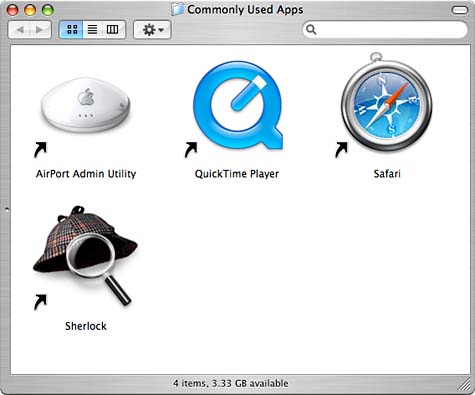
Creating AliasesAn alias is a representation of a file that, for all intents and purposes, appears to be the file. Windows users will recognize it as being similar to a shortcut. Suppose that you have a document called My Diary buried deep in your drive, but you want to leave a copy of the icon on your desktop. Instead of duplicating the file and maintaining two copies, you can create an alias of the original file and then place the alias wherever you want. Accessing the alias is the same as accessing the real file. Finder uses aliases for recent folders. Rather than having to move the real directories, it can just create aliases of them. You can tell an alias from the original by the arrow in the lower-left corner of the icon. Figure 1.20 shows several aliases to other files. Figure 1.20. Aliases represent real files on your system.
There are two ways to create aliases:
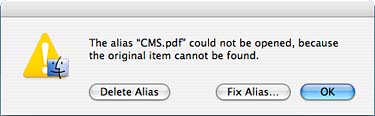
Although aliases can be used to represent the original file, throwing them away does not delete the original file. Alternatively, deleting the original file doesn't delete the alias. If the original file is erased, the alias becomes broken. Double-clicking a broken alias displays a dialog box similar to the one in Figure 1.21. Figure 1.21. Broken aliases can be deleted or fixed.
If you just want to get rid of a broken alias, click the Delete Alias button. If you want to point the alias to a different file, choose Fix Alias and locate the file you want to use, and the alias will be reattached. To leave things the way they are, click OK.
Finding an Alias's OriginalTo locate the file to which an alias points, select the alias and choose Show Original (Command-R) from the Finder's File menu, from the icon's contextual menu, or use the toolbar's Action button. The original file is highlighted in Finder. Launching Applications and Opening DocumentsLaunching an application or loading a document is a matter of double-clicking its icon or dragging a document on top of the application's icon. In the latter case, the application starts and loads or processes the document that was dropped on it. You can also launch an application by selecting it and then choosing File, Open; by choosing Open in the icon's contextual menu; or by using the toolbar Action button. If you're opening a document and want it to load into an application other than the default application, use File, Open With; or choose Open With in the item's contextual menu; or use the toolbar Action button. To set a file to always open with an alternative application, hold down Option when the Open With menu selection is visible onscreen, and it will change to Always Open With.
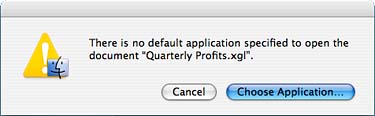
While an application is launching, its icon will bounce in the Dock. Dealing with Unrecognized FilesIf you attempt to double-click a document that the system does not recognize, Tiger warns you that there is no application available to open the document you've tried to access, as demonstrated in Figure 1.22. If you're sure that a program on your system is capable of viewing the file, select the Choose Application button. You are prompted to choose the application that will open the file. If the system does not allow you to pick the appropriate application, change the selection in the Show pop-up menu to read All Applications rather than Recommended Applications. By default, the system tries to guess the best application for the job sometimes it fails miserably. Figure 1.22. If a file can't be opened, you can choose an application to open it with.
You can also fix unrecognized files by setting the application to open them through the Get Info Finder command, discussed later in this chapter. Renaming FilesTo rename a file in the Finder, click on the file's icon label. The filename becomes editable in a few seconds. If you're the impatient sort, just press the Return key after you've selected an icon; you'll immediately find yourself in Edit mode. Alternatively, you can use File, Get Info in the Finder menu to edit the name in a larger field. A shortcut in the Sidebar (and the object it represents) can be renamed by choosing Rename from that item's contextual menu. Viewing File Information and MetadataThe Mac OS has always returned a wealth of information about a file via the Get Info option from the Finder's File menu. In Tiger this capability has been significantly expanded by the new metadata-aware file system. Instead of just recognizing a file's type, size, and other typical information, Tiger maintains an index of information about information that is, metadata. For digital photographs, this is everything from image resolution to the aperture used when taking a picture. To access this and other information, select a file, and then choose File, Get Info (Command-I); or, if you're using the Column view, click the More Info button when a file is selected. Let's take a look at each part of the Get Info display, the information it contains, and what it means to you.
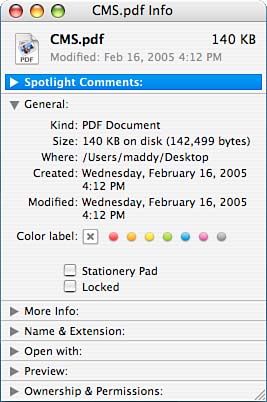
Spotlight CommentsAs you'll learn shortly, Spotlight is the name of Tiger's new metadata search system. Because the types of metadata stored with files are predefined, Tiger provides a field for you to enter your own comments, information, and so forth. GeneralThe General Information pane provides basic details about a file's type, size, and creation/modification dates, as shown in Figure 1.23. Figure 1.23. The General Information pane provides basic size, location, and type information about a file.
Specifically, you can use this view to get and set the following file and folder attributes:
If the file you are viewing is an alias file, the General Information pane also shows the location of the original file along with a Select New Original button that lets you pick a new file to attach the alias to. Changing an IconIf you're unhappy with the icon of the resource you're examining, you can click the object's icon within the General Information pane, and then use the Copy and Paste options in the Edit menu to move icons or images from other files onto the selected item. The Cut option can be used to remove a custom icon from a file and restore the default.
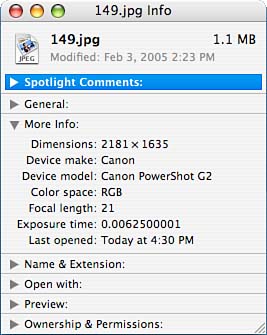
More InfoNew to Tiger's Get Info dialog is More Info. Here you can find the metadata available for the selected item, and, as mentioned previously, this can be quite an extensive list of values. Applications and documents might present copyright and version information. Digital photograph files display color space, resolution, and the attributes of the device that took the picture, as demonstrated in Figure 1.24. Figure 1.24. More Info displays the metadata for known file types.
Music and other media files might provide bit rate, length, and genre data…the list goes on and on. The easiest way to get a sense of everything that could be displayed is to view the Spotlight search attributes, which you'll do later in the chapter. Even if a file has no native metadata for its file type, Tiger will begin tracking the last time the object was opened and, if nothing else, this value will be visible.
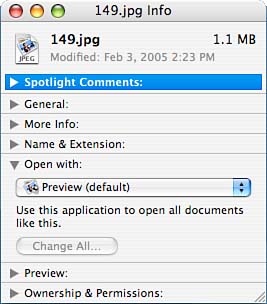
Name & ExtensionTiger shares something with Windows: file extensions. Although it is still possible for files to have the traditional Macintosh file types and creators, it is no longer the norm. To shield users from the shock of seeing extensions to the names of their files, Apple added the option to hide file extensions within the Get Info Name & Extension view. To edit the filename (including the extension), make modifications within the Name & Extension field. Turn on (or off) file extensions by clicking the Hide Extension check box. Open WithIf you have selected a document icon (not an application or a folder), you should be able to access the Open With pane within the Get Info window. This is used to configure the applications that open certain types of documents on the system. Unlike previous versions of Mac OS, which relied on a hidden creator and file type, Tiger can also use file extensions or creator/file type resources. If you download a file from a non-Mac system, your computer might not realize what it needs to do to open the file. The Open With pane, shown in Figure 1.25, lets you configure how the system reacts. Figure 1.25. The Open With option allows you to choose what application will read a particular file or type of file.
The default application name is shown at the top of a pop-up menu containing alternative application choices. If the application you want to use isn't in the menu, choose Other, and then use the standard file dialog box to browse to the application you want to use. If you have a group of files that you want to open with a given application, you can select the entire group and use the Open With settings to adjust them all simultaneously. Alternatively, click the Change All button to set the default application for all files of that type on your system. This beats selecting each file and making the setting individually. PreviewPreview provides a quick look at the contents of a wide variety of media files including MP3s, CD audio tracks (AIFF), JPEGs, GIFs, TIFFs, PDFs, and other QuickTime-recognized formats. If you are previewing a video or audio track, the QuickTime player controls will appear and enable you to play the contents of the file. This is a great way to play your CDs or listen to MP3s without starting up a copy of iTunes. LanguagesIf you have an application selected, you might be able to choose Languages within the Get Info window. Applications can have multiple internal resources that change the application to the appropriate system conditions the Languages pane allows you to add or remove the language resources within an application.
Ownership & PermissionsBecause Tiger is a multiuser system, it provides a means of setting and maintaining ownership and a set of permissions for files. A file's owner has full control over a file; the owner can read it, edit it, run it (if appropriate), and delete it. Owners can also provide some or all of these rights to other users. The Ownership & Permissions settings provide a straightforward graphical means of managing these file attributes with the exception of the "execute" (run) permission. Because there can be serious implications to incorrectly setting permissions and proper use of this feature is essential in administering a machine with multiple login accounts, we've devoted a chapter to the topic: Chapter 11, "Using File Permissions and Access Control Lists." Finding and Organizing Information with SpotlightIn addition to organizing and providing information about your files, the Tiger Finder enables you to locate files even email messages based on dozens of attributes, including the file's contents. This new feature, called Spotlight, provides systemwide searches for content without any of the penalties of pre-indexing. When a file is updated on Tiger, it is immediately indexed and fully searchable. Previous versions of the operating system forced users to explicitly set up content indexing for volumes and folders and would only re-index on a set schedule. Using the Spotlight MenuLocated in the upper-right corner of the menu bar is the Spotlight looking glass (or magnifying glass) icon. Clicking the icon or pressing Command-space displays a search field, as shown in Figure 1.26. Figure 1.26. Enter a search term in the Spotlight search field.
As you type in the search field, the top matches are immediately displayed in a category-sorted list below the field. Clicking one of the results will open the appropriate document and, when appropriate, highlight the search term.
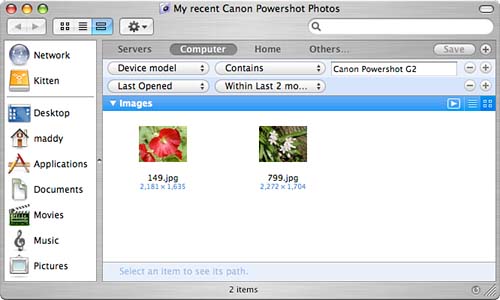
Because Spotlight has full access to the Tiger metadata, the search results can be a bit surprising. System Preference panels, for example, contain metadata describing their function in the system. If I received a brand new DSL modem and the instructions said I needed to configure PPPoE on my machine, entering that string in the Spotlight field would identify the Network System Preference panel and allow me to open it instantly. Similarly, files that you wouldn't expect to have any searchable information can be targeted by Spotlight. Image files, for example, have a wide range of metadata that can be stored. Typing Canon Powershot G5 locates images that were taken using my Powershot camera. Entering 640x480 identifies the photos that are stored at 640x480 resolution. I could go on and on, but the best way to see what Spotlight can do is to try it for yourself. Expanding Spotlight ResultsWhen a Spotlight search is finished, it's very possible to have located more items than can comfortably be displayed in the menu. As such, Spotlight provides the top matches to your query, much as Google doesn't overwhelm you with several million pages all at once. If you don't see what you're looking for within a set of search results or want more information about a particular item, choose Show All at the top of the Spotlight results list. This will create a free-floating window, as shown in Figure 1.27, that provides some additional control over the results. Figure 1.27. The Spotlight window gives greater control over the Spotlight search results.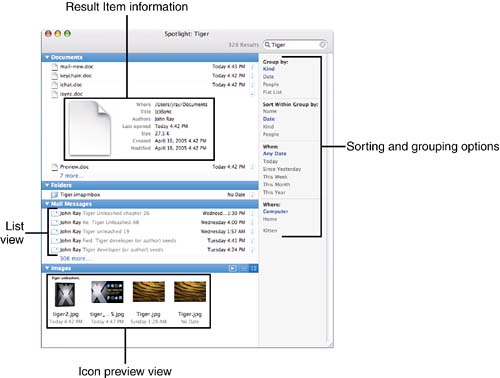
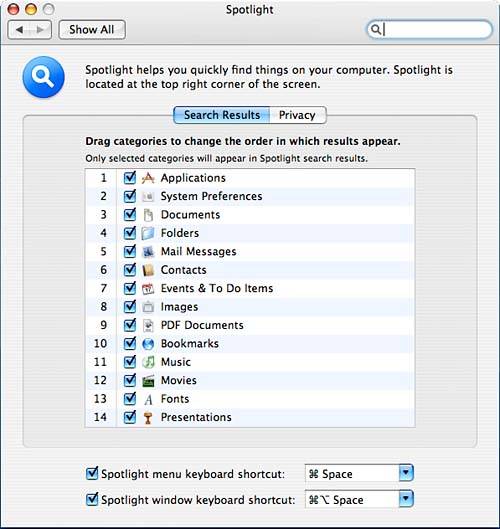
The pane on the right side of the window provides grouping and sorting controls. A unique element in the list is the ability to group and sort by People. This is an attribute available in many files that identifies a file's author. Another grouping option, Flat Lists, removes groups altogether and presents a single list including all the files. Other options, such as Kind, Name, Date, and so on, should be self-explanatory. In the Spotlight window's content pane are the search results themselves, grouped as determined by the settings on the right. You can expand and collapse a group by using the disclosure arrows in front of the group name. Entries in the list can be double-clicked to open them, or can be dragged out of the window to move or copy them (the standard Finder key modifiers apply). Opening a contextual menu for a Spotlight result will also allow you to send the item as an email attachment, view it in a slideshow (if it is an image), create an Automator workflow that starts with that item, or reveal its location within the Finder. Depending on the items within a group, you might see several small icons to the right of the group name; these can be used to change how the search results are displayed. Typically, results are displayed in a list. If an icon of four small squares is displayed, clicking it will display the results in an icon preview mode that shows icon representations of the contents of media files (images, PDFs, QuickTime movies). This feature can be seen in Figure 1.27. To the right of each result entry is a lowercase i button. Clicking the button will display information, including a preview of the content with full playback controls for movies and sound files. If all the search results don't file within the Spotlight results window, a More link will appear at bottom of each group. Clicking the link will show all the files in the group. You can shorten the listing by clicking the Show Top link, which will subsequently appear next to the group name. Configuring Spotlight Categories and Privacy FeaturesBy default, Spotlight lists every type of file that it can find. This makes for an impressive show, but most of us really won't need to identify preference panels on a daily basis. In addition, there are probably files that we'd prefer Spotlight ignored temporary files, working directories, and confidential data, to name a few. To configure file types used in search results and private folders, open the Spotlight System Preference panel (path: /Applications/System Preferences). There are two setting categories in the Spotlight pane. The first, "Search Results", shown in Figure 1.28, can be used to turn result categories on and off by clicking the check box in front of their names. You also can reorder the results by dragging categories with the list. Use the keyboard shortcut settings to change the keys used to invoke the Spotlight menu and window from the keyboard. Figure 1.28. Choose the categories displayed in the Spotlight results.
The second set of options, "Privacy", restrict a location from the Spotlight indexing engine. Within the Privacy settings, either drag folders into the exclusion list or use the + button at the bottom of the window to browse to the location that will be restricted. After a path has been entered, it will not show up in the Spotlight results. To remove a restriction, select the path in the list and click the - button. Working with Smart Folders and Finder FindsAlthough Spotlight provides an excellent systemwide search, it returns very generalized results. In many cases, you might want to limit your searches by a specific file attribute rather than displaying everything that happens to match the search terms. To do this, Apple has reworked Finder's Find feature to integrate Spotlight functionality and has also introduced the notion of Smart Folders. The Smart Folders in the Tiger Finder are a logical extension of Apple's Smart Folders within iTunes and other applications. A Smart Folder is a folder whose contents always match a stored set of search criteria. It isn't actually a folder in a traditional sense you can't access it from the command line and you can't move files into it but for other GUI operations (file browsing, opening/copying files), a Smart Folder behaves just like any other folder. In the Tiger Finder, there are three ways to perform a search and use that search as the basis for a Smart Folder: by choosing File, Find (Command-F); or File, New Smart Folder (Option-Command-N); or by typing directly into the Find field within a window's toolbar. Even though these might seem quite different, they all have the same result they start a new Spotlight-based search within Finder. If the search is saved, it becomes a Smart Folder. Not even choosing New Smart Folder actually creates the virtual folder until the search is saved. The only real difference between how a search or Smart Folder starts is the title shown at the top of the Finder window for that reason, we will combine these two topics. If you're interested in searching but not in creating a Smart Folder, all you have to do is follow these instructions and not click Save. Creating a Smart FolderIn previous versions of Mac OS X, you've had the ability to save a search so that you could run it in the future. In Tiger, a saved search is a Smart Folder. For example, to perform a search and create a Smart Folder from it, you would follow these steps:
After a Smart Folder has been created, you can open it and immediately see the search results. You can also alter the search criteria and resave the folder simply by changing the search lines at the top of the window and clicking Save. A small circular arrow icon at the bottom-right of the folder will rerun the search manually, if, for example, additional files have become available since the folder was opened.
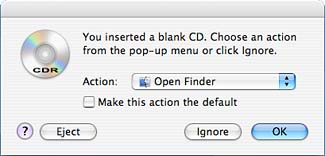
Changing Smart Folder ViewsA Smart Folder, as we've said, works very similar to a traditional folder but doesn't allow files to be added to the folder (except by creating files that match the search criteria, of course). Files can be opened, moved, and copied to other locations. Since you have no immediate means of knowing where a result is located, a small bar across the bottom of the window reveals the full path to any selected file. Unfortunately, this bar, coupled with the criteria themselves, can become a bit distracting. If you've used more than one or two search criteria, a Smart Folder's window real estate can suffer. One of the benefits of the Smart Folder approach is that it integrates visually with other Finder windows. The more search criteria and clutter, the less this holds true. To alleviate the problem, use the Action menu to hide the search criteria, or the View menu to choose a List, Icon, or Group (the default) style view for the search results. You can even open the View, Show View Options dialog (Command-J) to select the same visual settings as a normal Finder window, or grouping and sorting options while in the Group view. The goal of Spotlight and the associated Smart Folder technology is to eliminate the dependence on the file system for providing organization. Rather than having to place each file in its own appropriate folder, Smart Folders break this dependence and allow groups of related files to fall anywhere on the file system. Burning CDs and DVDsBurning CD-Rs, CD-RWs, or DVDs within the Tiger Finder is similar to working with any other storage device. To make the process as transparent as possible, Tiger creates a hidden CD/DVD-sized temporary storage area on your hard drive. Applications, files, and folders that are added to a CD/DVD are actually copied to this location until the user tells the system to burn the CD/DVD. Only after the burn has started are files actually transferred to the CD/DVD media. Drag and Drop BurningTo write your own CD/DVD, first insert media into the writer. The Tiger Finder prompts you to choose how you want to use the disc, as shown in Figure 1.31. Again, this doesn't actually write anything to the media just yet, but it tells the computer what your intentions are for the disc. Figure 1.31. Before you can start using a CD, you must tell Tiger what type of CD it will be.
Enter a name for the disc you are writing it will appear with this name on the desktop. Next, choose an action. Four are provided:
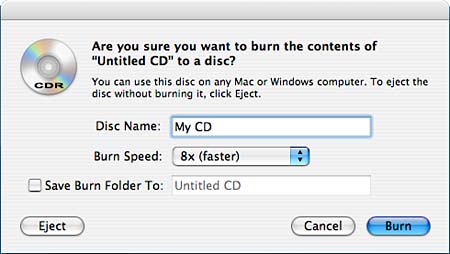
If you want to leave the CD in the drive but not prepare it, click Ignore. You can also choose to make the current settings the default with the Make This Action the Default check box. Because this chapter focuses on the Finder, choose Open Finder and then click OK. After a few seconds, an icon representing the CD will appear on the desktop. You can interact with this virtual volume as you would any other under Tiger copy files to it, delete files, and so on. When you've created the CD layout that you like, you can start the burn process by choosing File, Burn Disc. In addition, dragging the CD to the trash also prompts for burning to begin. However you start it, Tiger will respond by displaying the dialog box shown in Figure 1.32. Figure 1.32. Choose Burn to write the CD.
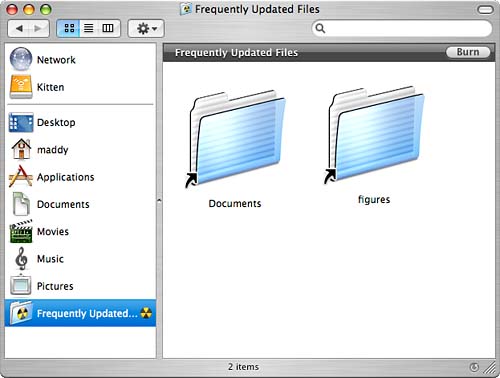
Choose your burn speed and click the Burn button to start the process of writing the CD. This will take a few minutes and will be tracked by the Finder much like a normal copy operation. If you've decided against writing the CD, click Eject to remove the media and erase the CD layout you've created. You'll also notice that you can save a Burn Folder this new Tiger feature makes creating CDs from commonly burned files and folders much simpler. Creating Burn FoldersIf you work on sets of files and frequently want to burn to CD or DVD, creating a Burn Folder gives you a convenient way to quickly burn the latest contents of multiple files and folders without having to drag them to a CD as described in the process just described. To create a new Burn Folder, choose File, New Burn Folder. A folder with the yellow and black Burn symbol will appear, as shown in Figure 1.33. Figure 1.33. A Burn Folder enables you to group frequently updated files so that they can be burned at a moment's notice.
A Burn Folder acts like any other folder, but, when you drag an item into it, only an alias to that item is added. In addition, an extra line appears above the folder contents with a Burn button in it, and the folder is also displayed in the Sidebar with a Burn button. Whenever you want to burn the current contents to a CD, insert your optical media, and then click either of these buttons the burning process will begin. Customizing the DesktopThe desktop is, for all intents and purposes, a global Finder window that sits behind all the other windows on the system. You can copy files to the desktop, create aliases on the desktop, and so on. The primary difference is that the desktop is available only in the Icon View mode.
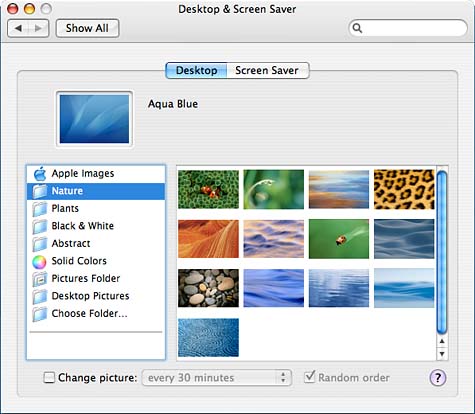
Like other Finder windows, the desktop layout is controlled by the View Options located in the View menu. Use the Icon Size slider and arrangement settings exactly as you would adjust any other window within Icon View mode. Changing Backgrounds and ScreensaversA more visually exciting change that you can perform on your Finder desktop is changing the background image. To do this, you can access the Desktop & Screen Saver panel within the System Preferences application. Desktop BackgroundsAfter launching, make sure that the Desktop button is selected. Figure 1.34 shows the Desktop portion of the Desktop & Screen Saver Preferences pane. Figure 1.34. Set your background image using the Desktop Preferences pane.
To change the current background, drag an image file from the Finder into the image well within the pane. Alternatively, you can browse collections of images by choosing from the Collection list and then using the scrollbar to move through the available options. A collection is nothing more than a folder of images. There are six preset collections: Apple backgrounds, Nature, Abstract, Solid Colors, Pictures, and Desktop Pictures. The Pictures option selects your personal ~/Pictures folder. To browse an arbitrary folder, choose the Choose Folder item, and then select the folder you want to use. (If you've created albums in iPhoto, these will also be displayed in the collection list.) To have your desktop picture change automatically, click the Change Picture check box and then pick the change interval from the pop-up menu.
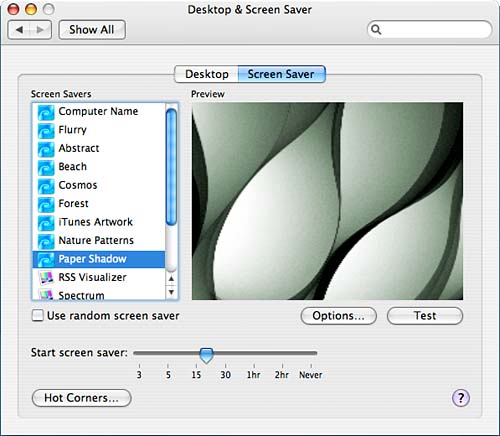
ScreensaversScreensavers are like desktop backgrounds for when you're lazy. Screensavers were traditionally invoked to save monitors from suffering burn-in. Today, screensavers are largely for show only and in reality serve only to shorten the lifespan of your LCD's backlight. Even so, they're fun to look at and, in Mac OS X, a screensaver engine is built-in. To access the screensaver functions of the Desktop & Screen Saver pane, click the Screen Saver button within the preferences pane. Your display should resemble Figure 1.35. Figure 1.35. Set your computer to display pretty pictures when you're not working.
From the list on the left, choose a screensaver that sounds interesting. The Pictures Folder saver uses images in your Pictures directory to create an onscreen slideshow, and the Choose Folder saver allows you to choose an arbitrary folder to use for a slideshow. The .Mac option is discussed in Chapter 3. If you've created albums in iPhoto, these will also be displayed in the screensaver list. After you've chosen a screensaver, a preview will appear in the pane on the right. If you want a random screensaver to display each time it starts, click the Use Random Screen Saver check box. Many screensavers offer configuration for fine-tuning their graphics and performance. Click the Options button to display a dialog containing advanced configuration for the selected screensaver. The Test button can be used to test the full-screen screensaver. To set up when the screensaver will be displayed, use the Start Screen Saver slider to choose when (if ever) the screensaver should start. Because a screensaver doesn't actually turn off your display, this is largely meaningless; it is simply how long you have to wait until you see pretty pictures.
Finally, to enable and choose corners where you can place your cursor to immediately (or never) start a screensaver, click the Hot Corners button. A dialog appears, allowing you to choose a screen corner to disable or start the screensaver as well as what corners activate the Exposé and Dashboard effects discussed shortly. Positioning your mouse in the chosen corner will have the selected effect.
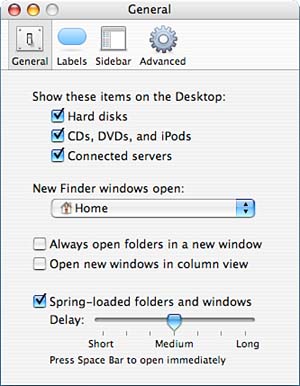
Fine-tuning Finder PreferencesA few more Finder Preferences can be used to adjust even more settings that control how you will interact with your desktop and icons. Open the General preferences by choosing Finder, Preferences. Figure 1.36 shows the General pane. Figure 1.36. Finder Preferences control file extensions, trash warnings, and more.
Use the General Finder Preferences to configure these elements:
The Advanced pane provides a few more choices that ordinarily you won't need to change:
|


| < Day Day Up > |
EAN: 2147483647
Pages: 251