Summary
| < Day Day Up > |
Using XWhether you've installed X11 from Fink or xfree86.org or DarwinPorts, or are using Apple's version, starting it is simply a matter of running the startx command from the shell or clicking the appropriate icon for the application. When started from the X11 application, you get preference choices between rooted or rootless display and a few other useful features. If you choose to run your X11 server in rooted mode (completely separate from Aqua windowing system), you can switch between the X11 desktop and your normal Aqua environment by pressing Command-Option-A.
The look and feel of the X Window System are mostly the responsibility of the particular window manager you've chosen to run. (You learn more about window managers in the immediately following section.) But in the general operation of the environment, you'll find that there are a number of constants to the way the X Window System works, regardless of what the interface looks like. Some of these are familiar to anyone who has previously used a computer with a mouse. A few, however, are likely to be new even to users who've been happily using a mouse since the earliest days of the Mac. The significant things to remember are described in the next section. Exploring Common X11 Interface FeaturesThe X Window System is designed for a three-button mouse. Most X software uses the left button for pointing, clicking, and selection. X uses the center button for general functions such as moving or resizing windows, and the right button for application-specific functions such as opening in-application pop-up windows. Of course, any application is capable of modifying these uses, so examination of a program's documentation is always in order. X also uses its three-button mouse for selection, copying, and pasting in a way that won't be familiar, but that you'll probably come to appreciate quickly. Unlike Mac and Windows, there's no separate command to perform copy functions. Instead, X functions as though whatever has been most recently selected has been placed on the clipboard and can be pasted. The left mouse button allows click-and-drag type selection and picking the start of a selection region. The right mouse button functions like Shift-clicking on the Mac; that is, it extends the selection. And clicking the center mouse button pastes whatever is selected or has been most recently selected into whichever window the cursor is in when clicked. This different paradigm for selection, copying, and pasting turns out to be a wonderfully efficient way of enabling you to work with text with the mouse because it requires no coordinated use of a second hand. The normal Mac mouse, of course, has no middle or right mouse buttons by default. XFree86 deals with this by enabling you to use keyboard modifiers to emulate the middle and right mouse buttons. To enable this mode, add the argument -fakebuttons to the startx invocation or select it in the X11 application's preferences. This allows clicking while holding down the Command key to emulate the middle mouse button, and the Option key to emulate the right mouse button. So, that benefit of not needing the second hand goes away again, at least for the time being on the Mac. It might be time to put away that cool pro mouse and buy one with multiple buttons or petition Apple to get with the X program!
X has the concept of focused input. On Macintosh and Windows platforms, if you type on the keyboard, you generally expect the typing to appear in whatever window or dialog box is in front. On Mac and Windows, the window in front is the active window. In X, the window manager has the option of directing your input where it chooses. The location into which your input is directed is called the input focus. Most window managers can be configured to focus input on the frontmost window, focus input on a selected window (which, on X, doesn't have to be the front window), or focus input on whichever window the cursor is over. These are usually called, respectively, Focus to Front, Click to Focus, and Focus Follows Cursor modes. The last of these, although most unlike the interface you are probably familiar with, is usually considered to be the most powerful. With the window manager configured in Focus Follows Cursor mode, you can direct typing into a mostly hidden window (for example, to start a noninteractive program) simply by moving the cursor over any visible part of the mostly hidden window and typing. There's no need to waste time bringing a rear window to the front, typing the command, and then shuffling the window back underneath the window that you really wanted to be working in. Figures 17.5 though 17.7 show several examples of working in the different X11 focus modes. Pay careful attention to where the cursor appears (the cursor is an I-beam style text cursor in each), and which window is active. (The active window usually has a solid-block insertion-point cursor, and inactive ones have hollow block insertion-point cursors.) Configuration methods for the different window managers vary, so we cover the options for several in the next section. Figure 17.5. Focus Follows Cursor mode, with work being done in the frontmost window this looks like the type of interaction with which you're probably familiar. Note that both the mouse pointer (the I-beam text cursor) and the text insertion point (the dark filled rectangle in the emacs window) are inside the same window.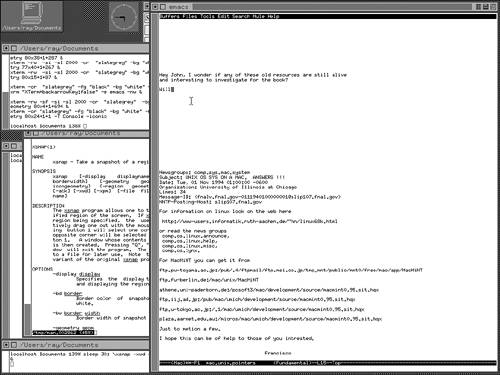 Figure 17.7. Click to Focus mode with a window selected other than the one that the cursor is in this doesn't have to be the front window. Notice that the mouse pointer and active text cursor aren't in the same window. After input has been focused into a window in this mode, it doesn't leave until the mouse is clicked elsewhere.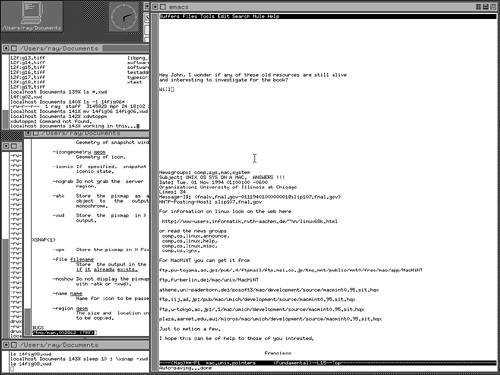
In the X Window System, the window manager or any other program can attach arbitrary commands to arbitrary user actions. For example, a program can attach the action of displaying a menu when a user right-clicks on the title bar. The window manager could pop up a variety of menus when the user left-, right-, or center-clicks in the empty background (root window or desktop) of the windowing system. Or it could happen when the user Shift-left-clicks, Shift-right-clicks, or Shift-center-clicks the possibilities are endless. One popular terminal program, xterm, pops up its configuration menus when the user holds down the Control key and left-, right-, or center-clicks in the window. Some window managers attach a standard menu with common commands such as Close and Resize to icons in each window's title bar. Others attach these functions to pop-up menus in the title bar. You'll find variations in program behavior even among different installations of X11 on the same version of Unix because local configuration options can exert a significant influence over the interface. Don't be too surprised if your installation of X11 doesn't look or behave quite like what is shown here. With the short generation times for open source software, there's plenty of time for the software to be updated a dozen times between me typing this and you reading it. Also, don't be afraid to read the documentation and the FAQs to find out how things work today, regardless of when today happens to be. Figure 17.6. Focus Follows Cursor mode with work being done in a window that is behind the front window. Notice that the in-window cursor of the emacs window (frontmost) has gone hollow to indicate that it's no longer active. The dark active cursor has followed the mouse pointer to indicate that a different window is active. The window border also changes colors, but that probably doesn't show up well in a black-and-white printed image.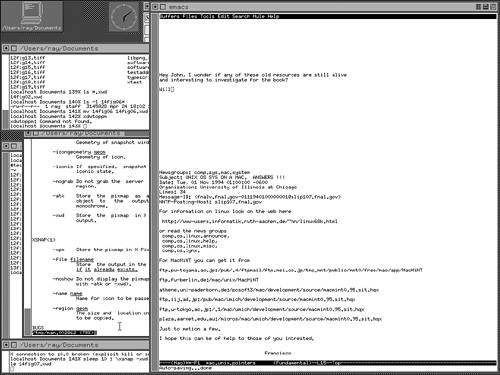 Most window managers can iconize windows. Because the actual display of a client's windows isn't handled by the client, but by the server at the request of the client, the X server and window manager are free to make some useful contributions to the user experience. One of these contributions is that when a client requests a window with particular characteristics, the server isn't obliged to represent the window that way to the user. The server is obliged only to treat it as though it had those characteristics. This enables the server, for example, to scale the window arbitrarily or to shrink it down and display it as an icon. You're familiar with the concept of files and folders being represented with icons. X11 doesn't know a thing about files or folders. It knows about drawing pictures on the screen (there are file browser applications for X11, much like the Mac OS X Finder, and we talk about them later in this chapter), and it knows that you don't always want all those pictures fighting for display space. So, X11 includes the notion that a window can be turned into an icon displayed in the root window if you don't care to have it taking up space. This is sort of like Mac OS X's capability to minimize a running application into the Dock, but you aren't limited to placing things in one location on the screen. (In fact, the window manager Apple provides with its version of X11 uses the Dock for storing the icons that should be on the root window when in rootless mode, and can't minimize at all in root mode.) Likewise, some applications can be dynamically resized to provide different functionality than you are familiar with from Mac OS. The xterm terminal window, for example, with most window managers interacts dynamically with the size of the font it's using. Increase the size of the font, and the window increases to show the same data. You can also decrease the font size to a single point in which case, the terminal shrinks to icon size while remaining a usable terminal and continuing to display output. Configuring the X Window SystemMost configuration of the X Window System is handled by a server resource database. When a client makes a request of the server, the server checks the server resource database to determine user preferences for that client. The server resource database is loaded on a per-user basis via the command xrdb, which must be executed automatically after starting X11. xrdb loads configuration information from a dotfile, usually named .X11defaults. .X11defaults usually contains lines similar to the following: 1 xbiff*onceOnly: on 2 xbiff*wm_option.autoRaise: off 3 xbiff*mailBox /usr/spool/mail/mymail If you were to include these lines in your .X11defaults file, you'd be telling your X server that if xbiff (an X11 program that notifies you when you have new mail) starts, it must set certain options. Line 1 sets an xbiff-specific option regarding how frequently to ring the alarm to tell you that you have mail. Here, it's set to ring a single time when mail arrives. Other options are available to set how many times the alarm should ring and at what intervals, if you prefer something other than a single ring. Line 2 sets an option that belongs to the window manager and tells it how you want xbiff treated. Specifically, this tells the window manager not to bring xbiff to the front if it's behind other windows when it needs to notify you. Remember, X11 provides the display, and a separate window manager provides such things as window controls. Line 3 tells xbiff where to find the mailbox that it's supposed to look at. Because each client supports different options and allows the window manager different levels of control, you must consult each client's documentation to learn what you can configure and what you need to do to configure it. As an idea of what you can do, and perhaps as a sample you might like to play with, Listing 17.1 includes a commented listing of my .X11defaults file. Listing 17.1. A Typical .X11defaults File ! ~/.X11defaults ! This file is used by xrdb to initialize the server resource ! database, which is used by clients when they start up. ! ! Default defaults ! *Font: *-courier-medium-r-*-*-*-120-*-*-*-*-*-* *MenuFont: *-courier-medium-r-*-*-*-140-*-*-*-*-*-* *BoldFont: *-courier-bold-r-*-*-*-120-*-*-*-*-*-* ! ! GNU Emacs ! emacs*BorderWidth: 1 ! emacs*Font: 9x15 ! ! Clock ! xclock*borderWidth: 0 xclock*wm_option.title: off xclock*wm_option.gadgets: off xclock*wm_option.borderContext: off xclock*wm_option.autoRaise: off ! ! Load meter ! xload*font: *-courier-medium-r-*-*-*-100-*-*-*-*-*-* xload*wm_option.title: off xload*wm_option.gadgets: off xload*wm_option.borderContext: off xload*wm_option.autoRaise: off ! ! Mail notifier ! xbiff*wm_option.title: off xbiff*wm_option.gadgets: off xbiff*wm_option.borderContext: off xbiff*wm_option.autoRaise: off xbiff*wm_option.volume: 20 ! ! Terminal Emulator ! !XTerm*Font: 9x15 XTerm*c132: true XTerm*curses: true XTerm*jumpScroll: true XTerm*SaveLines: 2048 XTerm*scrollBar: true XTerm*scrollInput: true XTerm*scrollKey: true ! XTerm*fontMenu.Label: VT Fonts XTerm*fontMenu*fontdefault*Label: Default XTerm*fontMenu*font1*Label: Tiny XTerm*VT100*font1: nil2 XTerm*fontMenu*font2*Label: 10 Point XTerm*VT100*font2: -*-lucidatypewriter-medium-r-*-*-*-080-*-*-*-*-*-* XTerm*fontMenu*font3*Label: 14 Point XTerm*VT100*font3: -*-lucidatypewriter-medium-r-*-*-*-140-*-*-*-*-*-* XTerm*fontMenu*font4*Label: 18 Point XTerm*VT100*font4: -*-lucidatypewriter-medium-r-*-*-*-180-*-*-*-*-*-* XTerm*fontMenu*font5*Label: 24 Point XTerm*VT100*font5: 12x24 XTerm*fontMenu*fontescape*Label: Escape Sequence XTerm*fontMenu*fontsel*Label: Selection XTerm*VT100.Translations: #override \n\ <Key>L1: set-vt-font(1) set-scrollbar(off) \n\ <Key>L2: set-vt-font set-scrollbar(on) \n\ <Key>R4: string("0x1b") string("[211z") \n\ <Key>R5: string("0x1b") string("[212z") \n\ <Key>R6: string("0x1b") string("[213z") \n\ <Key>R7: string("0x1b") string("[214z") \n\ <Key>R9: string("0x1b") string("[216z") \n\ <Key>R11: string("0x1b") string("[218z") \n\ <Key>R13: string("0x1b") string("[220z") \n\ <Key>R15: string("0x1b") string("[222z") ! ! Netscape ! netscape*defaultHeight: 850 netscape*anchorColor: maroon netscape*visitedAnchorColor: blue3 ! ! screensaver config ! xscreensaver*programs: \ xfishtank -c black -r .1 -f 20 -b 20 \n \ /usr/local/X11R5/bin/flame -root \n \ /usr/local/X11R5/bin/maze -root xscreensaver*colorPrograms: xscreensaver*monoPrograms: In addition to the server resources database, clients frequently have command-line options that can control the client's interaction with X11. For example: brezup:ray test $ xterm -fg "black" -bg "white" -fn 6x10 -geometry 85x30+525+1 This starts an xterm terminal session with the following configuration: black as the foreground color, white as the background color (black text on a white window), and a 6x10 point font. It sets the geometry information so that the window is 85 characters wide, 30 characters high, and is placed 525 pixels from the left edge of the screen and 1 pixel down from the top. Again, different programs have different options available, and your location documentation is your best source for up-to-date information on your exact configuration. Finally, the applications that start when you start X11 (or most standardized installations of X11, including the default XFree86 installation) are configured by the execution of a file named .xinitrc in your home directory. This is a shell script file containing a collection of commands that you want executed when X11 starts. Therefore, you can put in it lines that start xterm terminals, clocks, editors, and any other X11-based applications that you want to start in your environment. The lines are exactly the commands you'd type at the command line to start these applications, so the earlier comments about the wide variability of the configuration options apply here as well.
Listing 17.2 shows the contents of my .xinitrc file, which produces the X11 environment shown previously in Figure 17.1. Listing 17.2. A Typical .xinitrc File#!/bin/sh xrdb -load $HOME/.X11defaults xset m 2 5 s off xset fp+ /usr/X11R6/lib/X11/fonts # xmodmap -e 'keysym BackSpace = Delete' echo "XTerm*ttyModes:erase ^H" | xrdb -merge /usr/X11R6/bin/twm & /usr/X11R6/bin/xclock -bg "slategrey" -fg "lightgrey" -analog -geometry 60x60+220+1 Window Manager and Application-Specific ConfigurationsFinally, window managers and applications have their own configuration files that control display options and, possibly, other parameters regarding the user experience. Where and how these are set depends on the window manager and/or application that you are running. Some can be controlled through the server resource database. Others are set in individual control files specific to the window manager or configured through a control pane-like interface. Yet other options are available through combination mouse-button and keyboard actions. (For example, Control-left-, Control-middle-, and Control-right-clicking provides access to a multitude of options for the twm window manager and for xterm terminals.) Using Window Managers: twm, mwm, quartz-wmAfter you've started the X Window System environment, you're presented with a single xterm window in the upper-left side of your screen, managed with an Aqua-like window manager. This is the current default for a user who has no .xinitrc file to control what applications to start and where to put them, and no .twmrc file to control what the applications look and feel like. Remember that the X Window System provides only interface, component, and display functionality; additional programs are required to provide a useful user interface. In Figure 17.1, you are actually looking at the result of 10 programs running simultaneously (not counting the X Window System server and associated programs necessary for it to function) just to create the interface. Six display windows, one provides an application dock, one is a clock, one is an editor, and finally, the window manager, twm, provides the title bars and border controls associated with the windows. Startup of the programs occurs in .xinitrc, and the configuration of their appearance is controlled by twm. twmOne of the most common window managers is twm (tabbed window manager or Tim's window manager, depending on who you ask). Shown managing the display in Figure 17.1, twm provides very basic window management functions and is the default window manager used by XFree86. Even though it's one of the less fancy window managers, twm is convenient and allows an extreme amount of user customization of the environment. If you choose to do so, you can create your own standard buttons that appear in your twm title bars and cause them to execute arbitrary commands. You can also build your own pop-up menus, automatically execute commands when the cursor enters windows, customize window manager colors and actions by application name and type, and a host of other customizations. Listing 17.3 is a portion of my .twmrc file, which gives you an idea of the range of configuration options. The listing is only a portion of my .twmrc file because the entire file contains 284 individual configuration parameters. I'm particular about how my interface functions, and twm gives me the flexibility to configure every last one of the 284 tweaks it takes to get it how I like it. Listing 17.3. A Representative Sample of a .twmrc Configuration File for the twm X Window System Window Manager Color { BorderColor "maroon4" BorderTileForeground "bisque4" BorderTileBackground "darkorchid4" TitleForeground "darkslategray" TitleBackground "bisque3" DefaultBackground "bisque" DefaultForeground "slategrey" MenuForeground "slategrey" MenuBackground "moccasin" MenuTitleForeground "slategrey" MenuTitleBackground "bisque3" MenuShadowColor "bisque4" IconForeground "lightgrey" IconBackground "slategray" IconBorderColor "darkslategray" IconManagerForeground "darkslategrey" IconManagerBackground "bisque" IconManagerHighlight "maroon4" } BorderWidth 4 FramePadding 2 TitleFont "8x13" MenuFont "8x13" IconFont "6x10" ResizeFont "fixed" NoTitleFocus IconManagerGeometry "=200x10+290+1" ShowIconManager IconManagerFont "variable" IconManagerDontShow { "xclock" "xbiff" "perfmeter" } ForceIcons Icons { "xterm" "terminal" } NoTitle { "TWM" "xload" "xclock" "xckmail" "xbiff" "xeyes" "oclock" } NoHighlight { "xclock" "dclock" "xload" "xbiff" } AutoRaise { "nothing" } DefaultFunction f.menu "default-menu" #WindowFunction f.function "blob" #Button = KEYS : CONTEXT : FUNCTION #---------------------------------- Button1 = : root : f.menu "button1" Button2 = : root : f.menu "button2" Button3 = : root : f.menu "button3" Button1 = : title : f.function "blob" Button2 = : title : f.lower Button1 = : frame : f.raiselower Button2 = : frame : f.move Button3 = : frame : f.lower Button1 = : icon : f.function "blob" Button2 = : icon : f.iconify Button3 = : icon : f.menu "default-menu" Button1 = m : icon : f.iconify Button2 = m : icon : f.iconify Button3 = m : icon : f.iconify Button3 = c : root : f.function "beep-beep" Function "beep-beep" { f.beep f.beep f.beep f.beep f.beep } menu "button1" { "Window Ops" f.title "(De)Iconify" f.iconify "Move" f.move "Resize" f.resize "Lower" f.lower "Raise" f.raise "Redraw Window" f.winrefresh "Focus Input" f.focus "Unfocus Input" f.unfocus "Window Info" f.identify } menu "button2" { "Window Mgr" f.title "Circle Up" f.circleup "Circle Down" f.circledown "Refresh All" f.refresh "Source .twmrc" f.twmrc "Beep" f.beep "Show Icon Mgr" f.showiconmgr "Hide Icon Mgr" f.hideiconmgr "Feel" f.menu "Feel" } menu "button3" { "Clients" f.title "Xterm" ! "xterm &" "Emacs" ! "emacs -i &" "Lock Screen" ! "xnlock &" "Xman" ! "xman &" "X Text Exitor" ! "xedit &" "Calculator" ! "xcalc &" } menu "default-menu" { "Default Menu" f.title "Refresh" f.refresh "Refresh Window" f.winrefresh "twm Version" f.version "Focus on Root" f.unfocus "Source .twmrc" f.twmrc "Cut File" f.cutfile "Move Window" f.move "ForceMove Window" f.forcemove "Resize Window" f.resize "Raise Window" f.raise "Lower Window" f.lower "Focus on Window" f.focus "Raise-n-Focus" f.function "raise-n-focus" "Zoom Window" f.zoom "FullZoom Window" f.fullzoom "Kill twm" f.quit "Destroy Window" f.destroy } RightTitleButton "down" = f.zoom RightTitleButton "right" = f.horizoom LeftTitleButton "icon" = f.destroy mwmThe Motif window manager (mwm) is a popular window manager that evolved from a commercial product, and it's also a popular window manager for others to attempt to emulate. It provides a somewhat different user experience than twm. The difference is partly because twm automatically attaches things such as resize corners to all windows, and partly because of the pretty 3D look it gives to the controls. Figure 17.8 shows mwm managing the same collection of windows managed by twm in Figure 17.1. Figure 17.8. The mwm window manager, managing the same collection of windows shown in Figure 17.1.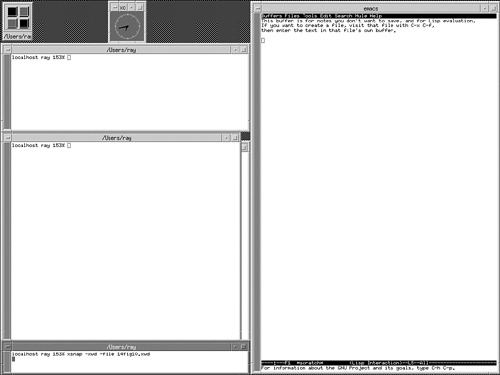 quartz-wmquartz-wm makes X11 applications look like native Mac OS X applications. Shown managing some of the windows in Figure 17.9, quartz-wm is an Aqua window manager for X11 applications running in either rooted or rootless mode. It makes X11 applications feel almost exactly like normal Aqua applications and generally makes the whole Aqua versus X11 distinction into a nonissue for the Mac-familiar user. Figure 17.9. quartz-wm managing some windows. Can you tell which windows are X11 and which are Aqua? What about the minimized applications in the Dock? Visually, and very nearly in any respect, the only clue you get is the odd window names.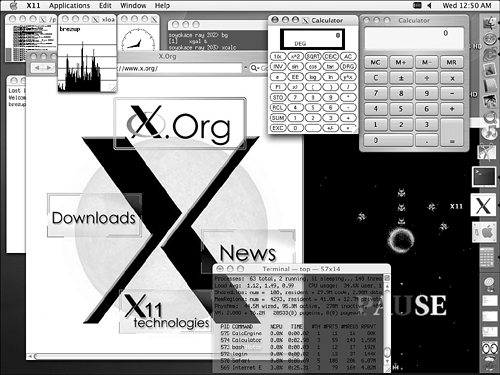
Other Window ManagersNew window managers and ports of earlier variants are appearing for Mac OS X at a nice pace. Several nice flavors are already available, and more will probably appear by the time this book is published, so here's a quick list of some of the interesting ones to watch for:
When running the X Window System, keep in mind that the window controls, such as title bars and scrollbars, are provided by a separate window manager application. The point of repeating this again is that it's possible for the window manager to exit, leaving you with a collection of unmanaged windows. This is a slightly disconcerting state in which to find the X Window System because the window manager also controls the input focus. Figure 17.10 shows an X Window System session that has lost its window manager. Figure 17.10. An X Window System session that has lost its window manager.
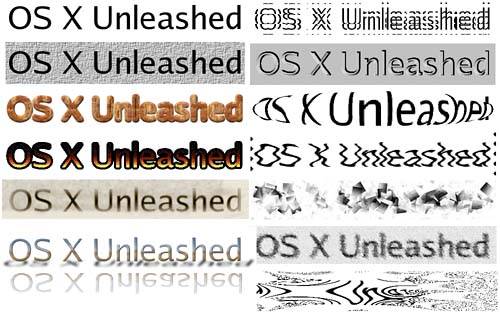
Some Additional Interesting X11 SoftwareIt might not be immediately obvious why you'd want to install an auxiliary windowing system on Mac OS X, when you already have the nice Aqua GUI to work in. If you don't intend to take advantage of the Unix software heritage that's available to you, or to write software that's also compatible with Linux and other Unix variants, there's little reason at all. Remember that the X Window System has been ubiquitous in the Unix world for a long, long time. Because of this, and because it's relatively easy to write software for the X Window System, even things that might not seem like they need GUIs have been written to take advantage of X11. The range of software available to the X Windows system is amazing imagine if all the Mac software going back to 1984 could still be run on the Macintosh, only with a far more active user community, all cranking out their own favorite little applications, and all making the software available for download. The result is applications that span from the most obtuse scientific analyses, to hundreds of variants on the common mail-reader, and from office-application suites that rival Microsoft Office, to video games. There isn't room in this book, or a dozen more its size, to cover the whole body of X11 software out there, so we'll simply briefly mention a few applications that you might be interested in, and suggest that you keep an eye on Fink and DarwinPorts for the most easily installable stuff. There is a vast array of X11-capable software out there that's not in either of these sources however, so do keep in mind that much of what you meet on web pages, Usenet newsgroups, or FTP sites can probably be compiled and run on Mac OS X. Because X11 has been around so long, and because it's a relatively simple GUI to write for, the sophistication of the interfaces that people have created for it vary widely. For example, video games range from simple 2D vector graphics games to fully 3D first-person shooters. An interesting phenomenon to note, however, is that because much X Window System software has been developed using something approximating the open source model, many of the interfaces have been through both testing and troubleshooting to a high degree. This results in interfaces that are sometimes surprisingly effective in their intended role, despite their simplicity. Unfortunately, this very ease of development and the community effort it inspires sometimes works against intuition. If a given application doesn't do exactly what someone wants, it has often been just as easy to create a new one, tailored to that individual's needs, as it has been to move development of the existing application in the desired direction. Because of this, the user community for a given application is often a small, tightly knit group of individuals who have tuned their application to work exactly how they think it should, and finding the version from the group whose thoughts agree with yours on the matter, is sometimes a bit of work. So, when you're looking at an X11 newsreader and it seems completely counterintuitive, remember that you're probably looking at an application written by people who think your ideas about news-reading-convenience are just as alien, and there is almost certainly something out there that does the same thing, but in a fashion you would find more familiar. It's usually worth your time to go looking for it, rather than to try to "think right" to use software that was written by people from Mars. Two X11 applications you might be particularly interested in are the GIMP and OpenOffice.org packages. These are both high-productivity packages that many users will find invaluable in doing real work. GIMP (the Gnu Image Manipulation Program) is a complete photo/image-editing program with layer support, a sophisticated plug-in architecture, and the capability to read, write, and edit most image formats known to man. If you need Adobe Photoshop capabilities, but can't afford software with an Adobe Photoshop price tag, GIMP might be just exactly what you need. If you're interested in photo editing and/or image creation for website design, GIMP is almost definitely something that should be on your list. It's widely used in the Linux community for making website buttons and banners, so there are a great many automated special effect filters available that make three-state (up/clicking/down) buttons, and fancy text effects that are commonly used in website design. Figures 17.11 and 17.12 are GIMP images showing the interface, and some of the text and button effects that can be easily generated using the built-in filters. Because the filter architecture is open and easily extended using only the tools that already come with Mac OS X, you can add your own effects, and you can find many others that interested individuals have written and made available online. GIMP can be installed using either Fink or DarwinPorts, and far more information can be found at http://www.gimp.org/. When using GIMP, keep in mind that the primary designers all have three-button mice, and have therefore stuck many functions you probably expect to find in top-of-the-window menus into pop-up menus accessed through the middle and right mouse buttons. Figure 17.11. GIMP.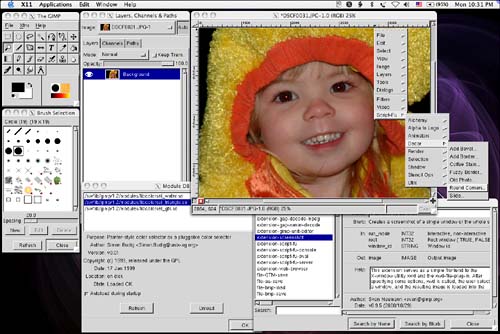 Figure 17.12. GIMP.
OpenOffice.org (yes, its product is named after its website) is an open source project that was originally a product of StarDivision, distributed as StarOffice. StarDivision was acquired by Sun Microsystems, which continued development and distribution of StarOffice, and eventually released the development effort into an open source project from which it continues to produce both the StarOffice suite and the freely available OpenOffice.org suite. The OpenOffice.org suite and StarOffice are almost identical, with the exception of some third-party components (for which Sun pays license fees for their use in the StarOffice version), a few Sun-proprietary components, and the fact that as a commercial product, StarOffice comes with support. Mac OS X ports of OpenOffice.org are available at http://porting.openoffice.org/mac/ooo-osx_downloads.html. One is an X11 implementation and the other is a Carbon and Java implementation. Figure 17.13 shows a snapshot of the OpenOffice.org suite in action. The suite includes a fully functional word processor with Microsoft Word compatibility, a spreadsheet program, a presentation program, and considerable additional office-productivity functionality. Figure 17.13. The OpenOffice.org suite at work.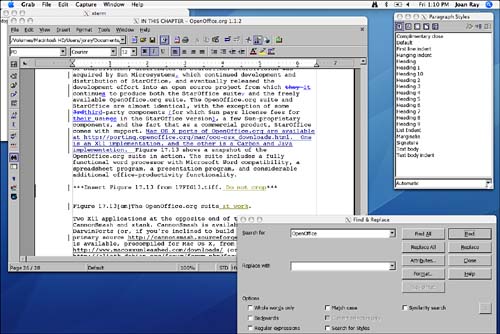 Two X11 applications at the opposite end of the spectrum are CannonSmash and xtank. CannonSmash is available through DarwinPorts (or, if you're inclined to build by hand, from the primary source http://cannonsmash.sourceforge.net/). xtank is available, precompiled for Mac OS X, from http://www.macosxunleashed.com/downloads/ (or, via CVS, from http://alioth.debian.org/forum/forum.php?forum_id=290). CannonSmash is a 3D, head-to-head, networkable ping-pong (table tennis) simulator. It's surprisingly addictive, and makes an interesting demonstration of the breadth of development that occurs in the Open Source community. Using OpenGL under X11, CannonSmash is as cross-platform as imaginable, requiring only a competent X11 implementation, and competent OpenGL libraries. This means that you can pop off a quick game or three over a coffee break, playing against a friend who's located half the globe away, running completely a completely different operating system on completely different hardware. Figure 17.14 shows a screenshot out of the CannonSmash training section where you are introduced to the controls and gameplay mechanics. Figure 17.14. The training section for CannonSmash, an X11 ping-pong game.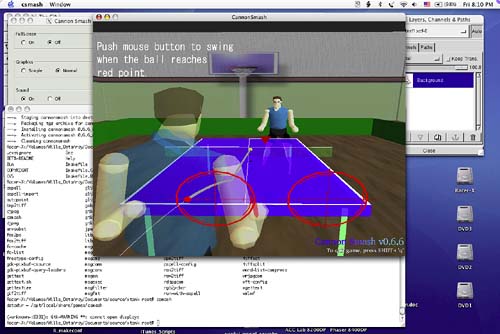 xtank is a 2D overhead view tank-combat strategy game. Before Half-Life, before Quake, before Marathon, and before DOOM, we had xtank, and it was good. It still is. Lacking, at the time, all the fancy 3D, texture-mapped gee-gaws that are such a large part of today's games, xtank had to find appeal in playability, with which it is amazingly well endowed. In terms of gameplay, xtank is reminiscent of a cross between Space Dungeon and a one-vehicle-per-player version of Total Annihilation. You design and outfit your tank as you see fit (including, if you choose, authoring your own tank designs and weapons-systems code), and then compete in a multiplayer fracas at games that range from outright king-of-the-hill combat to Ultimate Frisbee. The game teaches some interesting things about game design. For example, because it was originally written to run on hardware that couldn't compete with one of today's cell phones in terms of processor power, the game eschews all but the sparest graphics necessary to represent the play. This has surprisingly little effect on its playability. Likewise, the limited map size has interesting implications because it forces players to concentrate on strategy in a close-quarters environment that essentially denies the possibility of camping and other tactics that are playable, but that degrade most players' enjoyment of today's massive combat games. Figure 17.15 shows a screenshot of an xtank game, wherein my oversized, overly slow dreadnought-style tank is being besieged by five faster, lighter, and more maneuverable assault tanks. Now I've waited and absorbed their light gun attacks long enough for all four of my heavy mortars to reload, and they are about to pay the price for buzzing like flies around the guy with the big guns. Figure 17.15. Five fast, light tanks approach the large tank in this screenshot of xtank, an X11 tank game.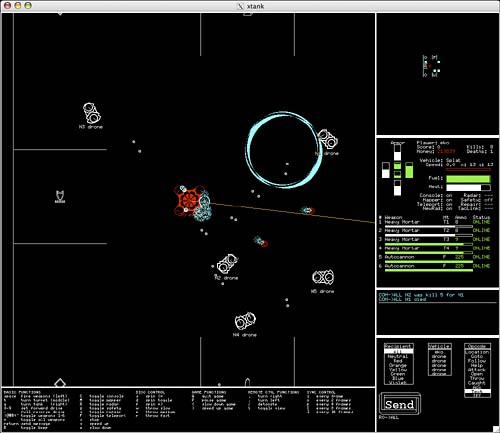 Configuring the Tiger X Window ApplicationIn addition to the general comments we have made about configuring the X Window System, there are a few other points we would like to mention about configuring Apple's X11. First, as we briefly mentioned earlier, you can choose between a rooted or rootless mode. In the Preferences section of the X11 menu is a subsection called Output. Here is where you indicate whether you are interested in a root or rootless display mode. By default, the application is set to a rootless display (like the way the rest of the Mac OS X interface works), but if you would like a rooted display, click the Full Screen Mode box. Recall that if you choose to run your X11 server in rooted mode, you can switch between the X11 desktop and your normal Aqua environment by pressing Command-Option-A. There is also a Colors option in this section as well as an option to use system alert sounds. Under the Input section, you can choose to emulate a three-button mouse, use the system keyboard, or enable keyboard shortcuts in X11. The section notes that if you select the system keyboard, you can change your X11 keymap settings via the Input menu. Apple's X11 application provides the ability to create application shortcuts to the more popular applications you use. By default, the menu contains shortcuts for an xterm (as Terminal) as well as xman and xlogo. Under the Customize option, though, you can not only remove a default item, but you can also assign a keyboard shortcut to a default item. Additionally, you can add any other items to that listing that you want and supply keyboard shortcuts for them. This works for applications that do not require any special setup. Finally, you will experience problems trying to use any X application that also uses the ^h character combination, such as emacs. This is because Apple has mapped ^h, rather than the customary ^?, to delete. To correct for this, issue the following command: stty erase ^\? |
| < Day Day Up > |
EAN: 2147483647
Pages: 251