Design
Naming ElementsNow we get to the question of why I chose this particular XML grammar and approach to naming Elements. We're agnostic to the name of the root Element, and the reason for this should be fairly obvious. The root Element doesn't end up in the output CSV file and I'm not validating against a DTD or schema. If I were validating, the root name would matter a lot. Likewise, the choice of Row to represent a row should be fairly noncontroversial. The only thing likely to cause anyone any heartburn is the way I named the column Elements. But, to paraphrase Abraham Lincoln, you can't please all the people all the time. The problem here is that there isn't any basis for an absolute, cut-and- dried choice; it's a matter of tradeoffs. I will attempt to show you why my particular choice best fits our basic requirements and architectural approach. To do that, we'll look at the chosen approach and some alternatives. If you choose to make different tradeoffs, you can tweak what I've started with. This discussion isn't just academic and peculiar to this particular problem. Reviewing it and understanding the tradeoffs may help you deal with similar situations. Here are the most sensible ways I can think of for naming the column Elements.
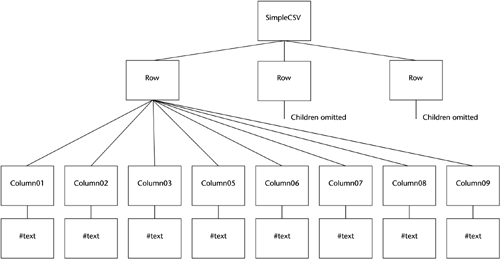
So, what's wrong with approach 1? It is very simple, and simple is good. Since XML allows an Element to be repeated, it is valid syntactically. Why do we need anything more complicated? The main reason is that if a column doesn't have a data value and all the columns share the same name, you have to include an empty column Element to indicate no value. For example: <Column></Column> or <Column/> Depending on how you create your XML, implementing this approach may require extra caution. You need to make sure you don't skip creating an Element because there isn't any text content. It's similar to putting two commas next to each other to indicate an empty field in the CSV file; it just looks a bit uglier in XML. The secondary reason comes down to a matter of style and programming practice. Using an explicit column number makes the meaning, or the semantics, more specific. Without an explicit column number, we must build indexes in programs to identify the columns. In the XPath syntax that XSLT uses for identifying things in XML documents, we would have to use a position as an index to identify the column. Later in this section I'll discuss another reason for not using approach 1, but for now we'll reject this approach because it requires that we use empty Elements. So, what's wrong with approach 2? Nothing. However, I think that approach 3 ends up being simpler for most end users than approach 2. Why? I, personally , find it more intuitive to say <Column01> instead of <Column ColumnNumber="1">. Even if you don't find approach 2 more intuitive than approach 3 (after all, intuitiveness is mostly subjective ), there is a significant difference in the XSLT code that end users must write to use the two approaches. It would be more appropriate to illustrate this point using a fragment of XML that we might use as input to an XSLT processor. However, instead we'll look at a fragment of XML that is the output of an XSLT processor since it takes quite a bit less explanation. The example will be very relevant for the next chapter, in which we use the same XML grammar for representing CSV files. For approach 2, the XSLT stylesheet must always include the Attribute name and value, in contrast to approach 3, in which the syntax is a bit more compact and simpler. For example, here's some sample XSLT code using approach 2. <xsl:template match="LastName"> <Column ColumnNumber="1"> <xsl:value-of select="LastName" /> </Column> </xsl:template> Compare that with the following sample code, which uses approach 3. <xsl:template match="LastName"> <Column01> <xsl:value-of select="LastName" /> </Column01> </xsl:template> Approach 2 is sexier and cooler for programmers who can just loop through the columns using an index. However, I would rather put ugly code in the C++ or Java program to extract the column number from the Element name than force an end user , who will be writing the XSLT stylesheets, to always use the ColumnNumber Attribute. As a final note on XSLT, you can also use a "for-each" loop in XSLT. We'll talk more about this in Chapter 10. There is one final reason why the more explicit naming style, reflected in the ColumnXX names, makes more sense in many cases than the generic Column names in approaches 1 and 2. If we are validating the input XML document against a schema, we have the opportunity to enforce some business-level validation and edits before the data is imported into the application. For example, in the sample address book for this chapter we might want to make the first line of the street address mandatory and the second line as well as the country optional. With the columns named differently we can specify in the schema that Column03 is mandatory and Column04 and Column08 are optional. There is no way to do this if all the Elements are named Column. This example shows why, in general, I prefer using very specific Element names to convey meaning, or semantics, rather than depending on a combination of Elements and Attributes. However, I acknowledge that this preference is in some ways grounded more in philosophical predilections than technology, so I'll talk more about approach 2 when we discuss alternatives and enhancements. Before we leave the topic of naming styles, one other question needs to be answered . Why use cryptic names like Column01 and Column09 instead of meaningful names like LastName and PhoneNumber? The reason is simple. This particular utility is designed to be a general purpose utility and not simply a utility to convert an address book. We might have a different CSV file, representing an invoice, with the invoice number in the first column and the item description in the ninth column. So, for this utility we'll use the ColumnXX style. In Chapter 7 we'll develop more sophisticated general purpose CSV conversion utilities that allow you to specify your own Element names. Module LogicSo, having gotten that little bit of business out of the way, let's get to the heart of the matter. Here's the pseudocode for the main routine. I have chosen to create a CSVRowWriter class to handle walking through the Column Elements of a single Row Element and to write them to the output stream. Logic for the Main RoutineParse input arguments from command line IF help option is specified display help message and exit ENDIF Set up DOM XML environment (dependent on implementation) Load input XML Document (dependent on implementation) Open output file Initialize CSVRowWriter object NodeList of Rows <- Call Document's getElementsByTagName for all Elements named Row DO until Rows NodeList.item[index] is null Call CSVRowWriter write method, passing NodeList.item[index] Increment index ENDDO Close input and output files As we can easily see, the main part of the work is done by the CSV Row Writer. But before we move to that, let's look at a few lines in the main routine in a bit more detail. Set up DOM XML environment (dependent on implementation) Since the DOM doesn't speak to how its environment is set up, we could anticipate that implementers would make different decisions about how to do it. They did. I'll go into the details for our Java and C++ environments. Load input XML Document (dependent on implementation) The semantics for the Load operation are addressed in the DOM Level 3 requirements, but in current implementations document loading also is left to the implementers. In both our Java and C++ implementations , the Load operation returns a DOM Document object (or to be more specific, a pointer to it). Again, I'll go over the details. NodeList of Rows <- Call Document's getElementsByTagName for all Elements named Row getElementsByTagName is a method of the Document interface that returns a DOM NodeList object of DOM Element objects that match the passed Element name. A NodeList is, just as the name implies, an ordered collection of DOM Nodes . In the DOM, an XML instance document can be thought of as a tree. The complete instance document tree is represented by the DOM Document object. The root or ultimate parent Element of the XML instance document is the root of the tree. Each vertex or node in the document tree, whether it is an Element, Attribute, or text content, is a DOM Node. Using this tree model, we can think of our sample instance document as the tree shown in Figure 2.1. Figure 2.1. Example Document Tree On first impression , after hearing a DOM Document being described as a tree, you might think that the lowest -level Elements, in this case the ColumnXX Elements, would be the leaves of the tree. As we can see from Figure 2.1, this is not the case. Even the lowest-level Element Nodes can themselves have children. And, quite relevant to this example, the text content of each of the ColumnXX Element Nodes is represented by a DOM Text Node. On the other hand, Attributes are a bit of a special case in the DOM. While they are Nodes, they are not represented as child Nodes of the Elements to which they are tied. They are represented as properties of the Element. The set of Attributes associated with an Element is returned not in a NodeList but in a DOM NamedNodeMap . The next bit of pseudocode shows how we process the rows in the NodeList. DO until Rows NodeList.item[index] is null Call CSVRowWriter write method, passing NodeList.item[index] Increment index ENDDO Row Nodes in the NodeList returned by getElementsByTagName are retrieved using the NodeList interface's item method. The item method retrieves the Node from the NodeList that corresponds to a passed index. When we reach the end of the list, item returns null. The CSVRowWriter write method and the methods it calls are where most of the work is done. In the Java and C++ implementations, I won't discuss various ancillary functions such as constructors. The code for them is on the book's Web site. This pattern will often be followed when discussing the other programs. Our primary focus in the design is the essential processing. Here's the pseudocode for the write method. Logic for CSVRowWriter write MethodColumns NodeList <- Get Row Element's childNodes attribute DO until Columns NodeList.item[index] is null Column Name <- get Element's NodeName attribute Column Number <- Derive from Column Name IF Column Number > Highest Column Highest Column <- Column Number ENDIF Column Array [Column Number] <- get nodeValue of item[index] firstChild Node Increment index ENDDO Output Buffer <- Call formatRow, passing Column Array and Highest Column Write Output Buffer The overall strategy of the write method is to build a NodeList of the row's columns, put the text content of each column into an array entry, format the array into one continuous string, then write out the string. Note that in the DO loop we retrieve the ColumnXX Element's specific name and parse it to get the column number. Because columns can be skipped we can't rely on the index into the Column NodeList to give us the correct column number. We have three new DOM concepts in this bit of code. The line below uses a somewhat different approach than the getElementsByTagName method we used on the Document in the main method. Columns NodeList <- Get Row Element's childNodes attribute The DOM Element interface offers the same getElementsByTagName that the DOM Document interface does. This call worked at the Document level because we wanted a list of all Elements named Row. However, the Row Element's children are named ColumnXX, where XX goes from 01 through 99. Because of this we need to use a different approach. The Element interface inherits the Node interface's childNodes attribute, which has a type of NodeList. This list of childNodes has all the Node's child Elements, of all names. So, we'll use it to get all the Row's Column children. There is another difference between the two approaches. The childNodes list includes not only all the child Elements but also the Text Nodes. This is one way we can get to Text Nodes when we need them. However, there is a second way to get to the text content of an element, as I'll show shortly. Another new DOM concept is the Node interface's NodeName attribute. Column Name <- get Element's NodeName attribute There are various ways to retrieve the name of a DOM Element. In this case, because we have a list of Nodes, I use the Node interface's NodeName attribute. To get the Element's text content, we capitalize on the expected document structure. The Column Node has only one child, its Text Node. So, we can use the DOM firstChild attribute to get to it directly and get its value (the DOM nodeValue attribute), which is the text content of the Column Element. Column Array [Column Number] <- get nodeValue of item[index] firstChild Node This is a very useful approach. In many cases in this book the Elements that have text content don't have child Elements. Note that due to this and the other specialized routines used in my chosen design, successfully running the program depends on the input XML document having a very specific structure. If the document doesn't conform to the expected structure, this version of the program can blow up with various types of exceptions. Perhaps even worse , it can produce unexpected or no output with no indication of failure. To prevent such undesirable behavior we can validate the input document against a DTD or schema before we try to walk the tree. We'll talk about such validation in the Enhancements and Alternatives section near the end of the chapter. The remainder of the code in the CSVRowWriter write method is fairly straightforward text and file I/O processing. Output Buffer <- Call formatRow, passing Column Array and Highest Column Write Output Buffer We concatenate the contents of each column into one string while enclosing the contents of each individual column with quotation marks and inserting delimiting commas. Then we write the string to the output file. All of this code is very language dependent and is actually not very interesting from the viewpoint of a book that focuses on XML. Aside from pointing out that you can examine the full Java or C++ source code if you wish, I won't discuss it much more. Having laid out the logical structure of the programs, we can now look at the Java and C++ implementations. While they are structurally similar and have the differences we can expect due to the differences in the programming languages, there are also some differences related to the DOM APIs. These are due mostly to the naming conventions used in MSXML. God love Microsoft. Despite the company's stated support for standards it just has to be different! For each of the implementations I'll reference the pseudocode, then show the specific Java or C++ code that implements that section of code. I'll focus on the differences in DOM implementation and a few other interesting bits but won't discuss all the more mundane details. Again, the full source is available on the book's Web site. |
EAN: 2147483647
Pages: 181