Chapter 13: Configuring Arrays Using Centralized Management
As we turn the focus to Microsoft ISA Server 2004 Enterprise Edition, we discuss topics centered on enterprise customers, like arrays, Configuration Storage Server (CSS), Network Load Balancing (NLB), and enterprise policies. In this chapter, we share procedures for centrally managing your arrays, understanding the system policies that provide array communication, and finally, explaining how the policies are stored in Active Directory Application Mode (ADAM) on the CSS.
Working with Arrays and Array Members
Arrays are groups of ISA servers. Each server in the array is known as an array member. Only ISA Server 2004 Enterprise Edition supports the use of arrays. Each array must maintain at least one CSS for storing policies and server information. Because the array information is stored in ADAM on the CSS, you can manage the array from a central location, thereby making changes once that are inherited by all array members.
Prior to creating an array, the following requirements must be met by each array member:
-
The number of network adapters and the names of the networks to which they are connected must be the same.
Note For NLB deployments, best practice is to use a dedicated network adapter for the intra-array address.
-
Application and Web filter configurations must be the same on each computer.
-
In workgroup environments, each array member must have mirrored accounts with the Basic Monitoring role, and the same certificates must be installed.
Creating an Array
Creating an array can be accomplished either during installation or as a postinstallation task. As we discuss in Chapter 14, "Using Enterprise and Array Policies," you have more control over what types of policies can be created at the array level as an array administrator. No longer do array policies only further restrict the policies defined at the enterprise level, as was the case in Microsoft ISA Server 2000. This expanded functionality is evident when creating your array. You specify the Domain Name System (DNS) name of the array, select the enterprise policy to apply, and specify the array policy rule types that are either allowed or disallowed.
To create an array using the ISA Management console, follow these steps:
-
Open the ISA Server Management console. In the console tree, select Arrays.
-
In the task pane, under Array Tasks, click Create New Array.
-
On the Welcome To The New Array Wizard page, type the name for the new array, and then click Next.
-
On the Array DNS Name page, type the array's DNS name to be used by firewall clients and Web clients when connecting to the array. Click Next to continue.
-
On the Assign Enterprise Policy page, select an enterprise policy to assign to the array from the drop-down list, and click Next.
-
On the Array Policy Rule Types page, you can select the Deny Access Rules check box, the Allow Access Rules check box, or Publishing Rules (Deny And Allow) check box to specify what types of rules can be created in the array. Click Next.
-
On the Completing The New Array Wizard page, review the configuration information, and then click Finish.
-
After the array is created, click OK. In the details pane, click Apply to complete the change, and then click OK again.
Configuring an Array
An important step after creating the array is to confirm the array properties and complete the configuration.
To configure an array, follow these steps:
-
In the console tree, select Arrays.
-
In the details pane, select the array to be configured.
-
In the task pane, under Array Tasks, click Configure Selected Array.
-
On the General tab, as shown in Figure 13-1, you see the name of the array, a description, the DNS name of the array, the creation date, and the type of array.
-
Click the Policy Settings tab shown in Figure 13-2. On this tab you can select from the Enterprise Policy drop-down list the enterprise policy that should be applied to the array. You can also determine what types of access rules can be defined for the array by selecting the respective check boxes:
-
"Deny" Access Rules
-
"Allow" Access Rules
-
Publishing Rules ("Deny" and "Allow")
-
-
Click the Configuration Storage tab shown in Figure 13-3. On this tab you define what CSS is used to store the array policy. You can also define an alternate CSS, how often communication occurs, and the type of authentication used by connections made between the ISA server and CSS.
Note For more information on configuring an alternate CSS, see Chapter 3, "Installing and Configuring Microsoft ISA Server 2004 Enterprise Edition."
-
Click the Intra-Array Credentials tab shown in Figure 13-4. On this tab you define what type of authentication should be used between the array members when performing intra-array communication. The two options are as follows:
-
Authenticate Using The Computer Account Of The Array Member. This is the default selection, although this option is only recommended if all array members belong to an Active Directory domain.
-
Authenticate Using This Account (For Workgroup Configuration Only). This option is recommended only when the array members belong to a workgroup.
-
-
Click the Assign Roles tab shown in Figure 13-5. On this tab you define which users and groups can connect to the CSS and monitor the array. Additionally you can add users or mirrored accounts that are allowed to monitor the server array. This is particularly useful when your array members and CSS are not in the same domain or are in a workgroup.
-
Click OK when you have completed configuring the array.
-
In the details pane, click Apply to save your changes, and click OK.
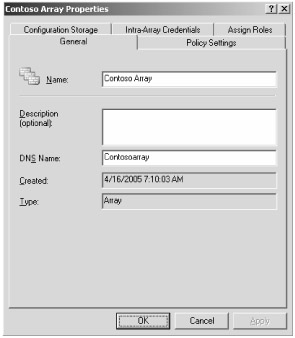
Figure 13-1: Configure the array name and array DNS name on the General tab.
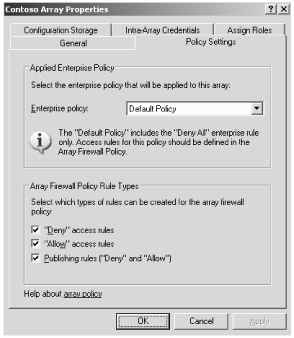
Figure 13-2: Unlike in ISA Server 2000, ISA Server 2004 now provides the capability to "allow" access rules at the array level.
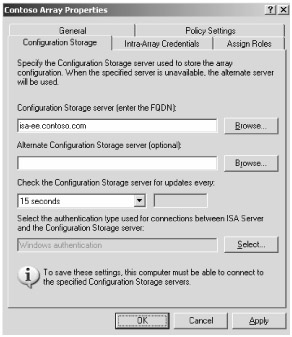
Figure 13-3: The CSS stores the array policy information for all array members.
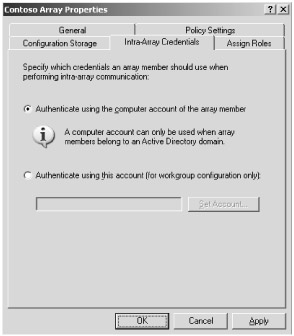
Figure 13-4: Choose the appropriate authentication option based on your network configuration— domain members or workgroup mode.
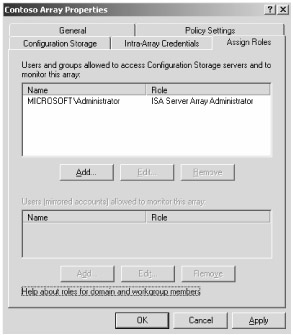
Figure 13-5: Assign roles to various users or groups to manage who can connect to the CSS.
Renaming an Array
Renaming an array is a straightforward process. To rename an array, follow these steps:
-
In the console tree, select Arrays.
-
In the details pane, right-click the array to be renamed, and select Properties.
-
On the General tab, type the new name for the array in the Name text box and DNS Name text box, and click OK.
-
In the details pane, click Apply to save your changes, and then click OK.
Deleting an Array
Proceed cautiously when deleting an array. Before deleting, be sure you are not trying to move the server to another array or uninstall ISA Server from the array member.
To delete an array, complete the following steps:
-
In the console tree, select Arrays.
-
In the details pane, select the array you want to delete.
-
In the task pane, under Array Tasks, click Delete Selected Arrays.
-
In the Delete Arrays dialog box, click Yes to delete the array, as shown in Figure 13-6.
Note If you are unsure if you want to delete the array, click Help to understand the requirements for doing so.
-
In the details pane, click Apply to save your changes, and click OK.

Figure 13-6: Click Help if you are unsure about deleting the array.
Moving a Server to a Different Array
The method of moving a server to a different array involves repairing your ISA Server installation. Even if the ISA Server installation or the array itself is no longer available, you can simply reinstall ISA Server using the Repair option, and during the repair select New Array To Join. You can also uninstall and reinstall ISA Server, joining the computer to the new array. More information on installing ISA Server is available in Chapter 2, "Installing and Configuring Microsoft ISA Server 2004 Standard Edition," and Chapter 3, "Installing and Configuring Microsoft ISA Server 2004 Enterprise Edition."
Managing an Array
To better manage your array, follow the steps on the Getting Started page that appears in the details pane when you've selected an applicable array under the Arrays node in the console tree, as shown in Figure 13-7. We also provide references below to other chapters in this book that discuss these steps in detail.
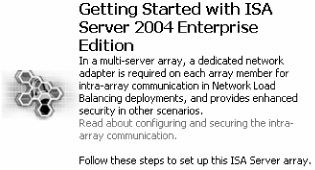
Figure 13-7: The Getting Started page guides you through the options available for configuring your array.
-
Configure your networks, as described in Chapter 9, "Configuring Multinetworking."
-
Create your Firewall Policy rules to allow internal machines to connect externally, or to allow external machines to gain access to selected internal resources, like Web servers. See Chapter 8, "Configuring ISA Firewall Policy," for more information.
-
Define how you wish ISA Server to cache Web content, as described in Chapter 2.
-
Set up your virtual private network (VPN) settings as described in Chapter 11, "Securing Virtual Private Network Access."
-
Once you've implemented your ISA Server, you can use the monitoring functions, covered in Chapter 6, "Monitoring and Reporting."
Array Communication Explained
Array communication is necessary between array members, between array members and the CSS, between CSS, and between managed computers and the array members. The communication is sealed and secured using new protocols introduced in ISA Server 2004. This section explains how array communication works, what system policies exist to ensure communication, and the protocols involved in the communication process. The following illustration shows how array members communicate with the CSS in the enterprise.
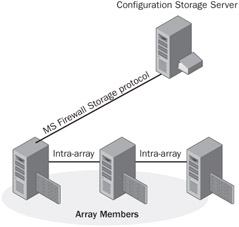
Array communication occurs over encrypted, authenticated, and sealed (tamperevident) channels using several proprietary protocols. For example, all monitoring communication uses Remote Procedure Calls (RPC).
Policy Rules Used for Array Communication
The system policy contains seven rules by default that assist with array communication, as shown in Table 13-1.
| Rule Name | Rule Number | Purpose | Description |
|---|---|---|---|
| Allow Remote Management From Selected Computers Using MMC | Rule 2 | Managing and monitoring | Allows communication from the Array Servers, Enterprise Remote Management Computers, and Remote Management Computers computer sets to Local Host, using the MS Firewall Control, NetBIOS Data-gram,NetBios Name Service, NetBios Session, and RPC (All Interfaces) protocols. |
| Allow Remote Management From Selected Computers Using Terminal Server | Rule 3 | Managing and monitoring | Allows communication from the Enterprise Remote Management Computers and Remote Management Computers computer sets to Local Host, using the RDP (Terminal Services) protocol. |
| Allow ICMP (PING) Requests From Selected Computers To ISA Server | Rule 10 | Managing and monitoring | Allows communication from the Enterprise Remote Management Computers and Remote Management Computers computer sets to Local Host, using Internet Control Message Protocol (ICMP). |
| Allow Remote Access To Configuration Storage Server | Rule 31 | CSS server communication | Allows access from Local Host to the Enterprise Configuration Storage Server computer set, using the MS Firewall Storage protocol. |
| Allow Access From Trusted Servers To The Local Configuration Storage Server | Rule 32 | CSS server communication | Allows access to Local Host from the Array Servers, Enterprise Remote Management Computers, Managed ISA Server Computers, Remote Management Computers, and Replicate Configuration Storage Servers computer sets, using Common Internet File Services (CIFS) (TCP and UDP) and MS Firewall Storage protocols. |
| Allow Replication Between Configuration Storage Servers | Rule 33 | CSS server communication | Allows communication to and from the Replicate Configuration Storage Servers computer set, using MS Firewall Control and RPC protocols. |
| Allow Intra-Array Communication | Rule 34 | Array member Communication | Allows intra-array communication using MS Firewall Control and RPC protocols to and from the Array Servers computer set. |
If you examine the system policy rules closely, you see three protocols that are used for array communication:
-
MS Firewall Control. A Transmission Control Protocol (TCP) protocol used for outbound communication between ISA Server Management and your ISA servers. The protocol is configured for port 3847.
-
MS Firewall Storage. A TCP protocol used for outbound communication between array members and CSSs. The protocol is configured for ports 2171 and 2172.
-
MS Firewall Storage Replication. A TCP protocol used for outbound communication between CSSs. The protocol is configured for port 2173.
EAN: 2147483647
Pages: 173