Web Publishing
Web publishing makes Web servers on ISA protected networks available to other networks, most often for clients on the Internet. ISA Server mediates all requests for internal Web servers, providing the ability to preauthenticate users, preventing them from even contacting the internal Web server if they can't be verified. It also allows for reverse caching of content, reducing the amount of traffic required on the network. You can use it to host several Web sites using a single IP address, and to redirect Web sites to different internal Web sites through path redirection.
We provide instructions for how to publish Web servers and secure Web servers. For more information about the features and functions of Web publishing, see the ISA Server Help file, http://www.isaserver.org, and Tom and Deb Shinder's Configuring ISA Server 2004.
Publishing a Web Server
To publish a Web server, follow these steps:
-
In the console tree, expand the server name, and click Firewall Policy.
-
In the task pane, click the Tasks tab. Under Firewall Policy Tasks, click Publish A Web Server.
-
On the Welcome To The New Web Publishing Rule Wizard page, type a name for the Web publishing rule, and click Next to continue.
-
On the Select Rule Action page, select either Allow or Deny to specify the action you want the rule to take when the conditions are met and processed, and click Next.
-
On the Define Website To Publish page shown in Figure 8-11, provide the internal server name that is hosting the Web site and the level of access that is available (full access or limited access). The following options are available:
-
Computer Name Or IP Address—Type either the FQDN or IP address of the internal Web server in this text box. Optionally, you can click Browse to type and confirm the name of the server, then click OK.
-
Forward The Original Host Header Instead Of The Actual One (Specified Above)—Select this check box if you don't want the ISA server to replace the host header originally sent by the client with the name or IP of the computer above.
-
Path—Type /* to include all files and folders on the Web site, or type folder/* to limit access to a specified folder on the Web site. You can also specify the exact filename to control access to the published resource even further.
You will notice as you fill in the appropriate text boxes that the Site text box displays the URL of the Web site to be published. Click Next to continue.
-
-
On the Public Name Details page, specify how users outside your company network will access the published Web site.
-
In the Accept Requests For drop-down list, select either Any Domain Name or This Domain Name (Type Below). If you select Any Domain Name, the Public Name dialog box disappears from the page.
-
In the Public Name dialog box, type the URL that is publicly accessible, such as www.microsoft.com.
-
In the Path (Optional) dialog box, type the external path to be accepted, for example /* to include all folders and files typed after www.microsoft.com by the Internet user.
You will notice as you fill in the appropriate text boxes that the Site text box displays the URL of the Web site to be published. Click Next to continue.
-
-
On the Select Web Listener page, use the Web Listener drop-down list to choose an existing listener. If no Web listener exists, click New to launch the Welcome To The New Web Listener Wizard. The steps to create the Web Listener are defined in Chapter 7, "Configuring Access Rule Elements." Once a Web listener is selected, its properties appear for you to review before continuing. Click Next to proceed.
-
On the User Sets page, the default setting is for the rule to apply requests from the All Users user set. If you would like to modify the default, you can click All Users, click Remove, and then click Add to include new user sets. Click Add, in the Add Users dialog box click the user set to include in the rule, click Add again, and then click Close. Click Next to continue.
-
On the Completing The New Web Publishing Rule Wizard page, review the summary of information and then click Finish.
-
In the details pane, click Apply to save your configuration, and then click OK.
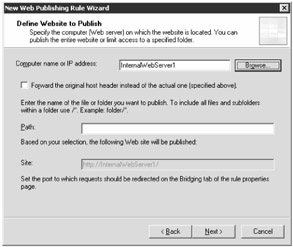
Figure 8-11: The Define Website To Publish page is very important to configure correctly.
Modifying an Existing Web Publishing Rule
After you have defined a Web publishing rule, you can edit the rule by completing the following steps:
-
In the details pane, click the Web publishing rule you would like to edit.
-
In the task pane, click the Tasks tab. Under Firewall Policy Tasks, click Edit Selected Rule.
The Edit Selected Rule task launches the Properties dialog box for the given Web publishing rule, as shown in Figure 8-12.
There are 12 tabs available, with some containing options that were not available to you when you created the Web publishing rule. Table 8-4 outlines the options available for you on each tab.
-
Click OK when you have made the changes to the Web publishing rule. If you did make changes, you have to apply them by clicking Apply in the details pane.
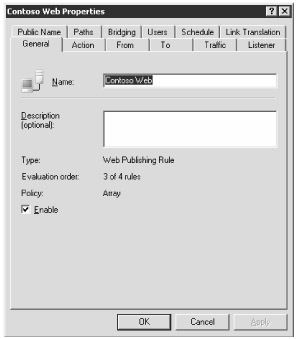
Figure 8-12: From the rule's Properties dialog box you can configure additional information, like Link Translation.
| Tab Name | Tab Options/Descriptions |
|---|---|
| General | Specify the name of the rule, provide an optional description, or specify a location to disable the selected rule. |
| Action | Specify action to take on the rule (either Allow or Deny); and an option to log requests matching the rule that is selected by default. |
| From | Configure the source locations from which Web traffic will originate. |
| To | Configure the published server name, how host headers are routed, and how the firewall sends requests to the published server. |
| Traffic | Open the Configure HTTP dialog box to manage the HTTP Security filter, and configure redirection so that HTTP users are notified they must use HTTPS. |
| Listener | Create or configure the ISA Server 2004 Web listener used for the rule. |
| Public Name | Configure the Web site and IP addresses used to connect to the published server sites. |
| Paths | Add, edit, or remove requested paths. You can translate external paths to different internal paths here. |
| Bridging | Configure the port and protocol used to move HTTP, HTTPS, and FTP traffic from the ISA server to the internal server. |
| Users | Configure the users to which the rule applies, and choose whether to forward basic authentication credentials. |
| Schedule | Set the schedule when the rule is in effect. |
| Link Translation | Configure how Link Translation is used for this rule. |
Publishing a Secure Web Server
The following procedures detail how to publish a secured Web server using the SSL protocol. To publish a secure Web server, you must perform the following steps:
-
Import a certificate to be used by the client, ISA server, and Web server.
-
Publish the server using the Publish A Secure Web Server Wizard in the ISA Server Management console.
These two procedures are discussed in the following sections.
Importing Certificates
You need to follow these steps to import the Web site certificate required for HTTPS communications:
-
Export the certificate from the Web site. Be sure that you export the private key, password protect the file, and safeguard it.
-
At the Run command, type mmc.
-
In the MMC window, from the File menu (or the Console menu in Microsoft Windows 2000), select Add/Remove Snap-In. Click Add, select Certificates, and then click Add.
-
On the Certificates Snap-In page, select Computer Account, then click Next.
-
On the Select Computer page, ensure that Local Computer is selected, and then click Finish.
-
In the Add Standalone Snap-In dialog box, click Close. In the Add/ Remove Snap-In dialog box, click Close, and then click OK.
-
In the console tree, expand the Certificates node, expand the Personal node, and then click the Certificates container.
-
In the right pane, right-click the Web site certificate, select All Tasks, then click Export. The Welcome To The Certificate Export Wizard page appears. Click Next.
-
On the Export Private Key page, select Yes, Export The Private Key, and then click Next.
-
On the Export File Format page, select Personal Information Exchange — PKCS #12 (.PFX), select the Enable Strong Protection check box as shown in Figure 8-13, and then click Next.
-
On the Password page, type in and confirm a password to protect the file.
-
On the File To Export page, type in the path and location to which you will save the certificate. Be sure to remember this location, as you will need to copy the file to the ISA Server computer from here.
-
On the Completing The Certificate Export Wizard page, review your information and click Finish.
Note For more information on how to back up certificates, see "How to Back Up a Server Certificate in Internet Information Services 5.0" at http://support.microsoft.com?scid=232136. The same process is valid for Microsoft Internet Information Services (IIS) 6.0 if your Web server is running Microsoft Windows Server 2003.
-
-
Copy the certificate file from the Web computer to the ISA server.
-
Import the Web site certificate to the ISA server.
-
Add the Certificates MMC, as previously described.
-
Right-click the Certificates container (under the Certificates | Personal path), select All Tasks, and then click Import. The Welcome To The Certificate Import Wizard page appears. Click Next.
-
On the File To Import page, browse to or type in the path and name of the certificate you will install, and then click Next.
Note If you browse in the Open dialog box, you might need to change the Files Of Type option to the Personal Information Exchange (*.Pfx, *P12) type to see the certificate on the file system.
-
On the Password page, type the password, and then click Next.
-
On the Certificate Store page, select Place All Certificates In The Following Store, and ensure that the Certificate Store is set to Personal. Click Next.
-
On the Completing The Certificate Import Wizard page, review your chosen options, then click Finish. A dialog box that states "The import was successful" should appear. Click OK.
-
Right-click the certificate, select Properties, and ensure that the Certificate Purposes section lists only the purposes for which you will use the certificate on ISA Server. Click OK.
-
Move the certificate into the Trusted Root Certification Authorities Certificates container, and close any remaining open windows.
-
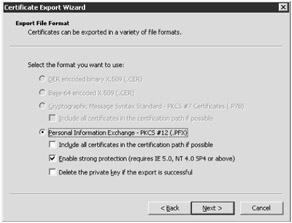
Figure 8-13: Don't select the Delete The Private Key If The Export Is Successful check box, as it will remove the private key (which is necessary) from the Web server.
You are now ready to move on to the next step.
Running the Publish Secure Web Server Wizard
To initiate the Publish Secure Web Server Wizard, complete the following steps:
-
In the console tree, expand the server name, and click Firewall Policy.
-
In the task pane, click the Tasks tab. Under Firewall Policy Tasks, click Publish A Secure Web Server.
-
On the Welcome To The SSL Web Publishing Rule Wizard page, type a name to associate with the rule, and click Next.
-
On the Publishing Mode page shown in Figure 8-14, select either SSL Bridging or SSL Tunneling, and click Next to continue.
Note An image is provided to illustrate the difference between bridging and tunneling SSL requests. Additionally, the following pages in the wizard differ based on your selection.
If you selected SSL Bridging, follow the remaining steps; otherwise skip to Step 13.
-
On the Select Rule Action page, select either Allow or Deny to specify the action you want the rule to take when the conditions are met and processed, and click Next.
-
On the Bridging Mode page shown in Figure 8-15, choose from the following options:
-
Secure Connection To Clients
-
Secure Connection To Web Server
-
Secure Connection To Clients And Web Server
Click Next to continue.
Note The image changes with each selection, providing a graphical representation of the option you are choosing.
-
-
On the Define Website To Publish page, provide the internal server name that is hosting the Web site and the level of access that is available (full access or limited access). The following options are available to you:
-
Computer Name Or IP Address—Type either the FQDN or IP address of the internal Web server in this text box. Optionally, you can click Browse to type and confirm the name of the server, then click OK.
-
Forward The Original Host Header Instead Of The Actual One (Specified Above)—Select this check box if you don't want the ISA server to replace the host header originally sent by the client with the name or IP of the computer above. Host headers are used to distinguish multiple websites hosted on a single Web server with a single IP address. Select this check box only if you have configured your Web server to respond to the original host headers being typed into the address bar of client Web browsers.
-
Path—Type /* to include all files and folders on the Web site, or type folder/* to limit access to a specified folder on the Web site. You can also specify the exact filename to control access to the published resource even further.
You will notice as you fill in the appropriate text boxes, the Site text box displays the URL of the Web site to be published. Click Next to continue.
-
-
On the Public Name Details page, specify how users outside your company network will access the published Web site.
-
In the Accept Requests For drop-down list, select either Any Domain Name or This Domain Name (Type Below). If you select Any Domain Name, the Public Name text box disappears from the page.
-
In the Public Name text box, type the URL that is publicly accessible, such as www.contoso.com.
-
In the Path (Optional) text box, type the external path to be accepted (for example, /*) to include all folders and files typed after www.contoso.com by the Internet user.
You will notice as you fill in the appropriate text boxes, the Site text box displays the URL of the Web site to be published as illustrated in Figure 8-16. Click Next to continue.
-
-
On the Select Web Listener page, select an existing listener from the Web Listener drop-down list. If no Web listener exists, click New to launch the Welcome To The New Web Listener Wizard. The steps to create the Web listener are defined in Chapter 7. Once a Web listener is selected, its properties appear for you to review before continuing. Click Next to proceed.
-
On the User Sets page, the default setting is for the rule to apply requests from the All Users user set. If you would like to modify the default, you can select All Users, click Remove, and then click Add to include new user sets. Click Add, in the Add Users dialog box, select the user set to include in the rule, click Add again, and then click Close. Click Next to continue.
-
On the Completing The New SSL Web Publishing Rule Wizard page, review the summary of information and then click Finish.
-
In the details pane, click Apply to save your configuration, and then click OK. You do not need to follow the next steps.
-
If you selected SSL Tunneling in step 4, on the Select Server page, type the IP address of the server you are publishing, and click Next.
-
On the IP Addresses page, select each of the networks that contain IP addresses that should be listening for requests intended for the published server, as shown in Figure 8-17.
Additionally, after selecting a network, you can click Address to launch the Network Listener IP Selection dialog box shown in Figure 8-18. Your options include the following:
-
All IP Addresses On The ISA Server Computer That Are In The Selected Network.
-
Default IP Address(es) For Network Adapter(s) On This Network.
-
Specified IP Addresses On The ISA Server Computer In The Selected Network. If you select this option, you will see Available IP addresses on the left, and you can click Add to include the selected IP address to the Selected IP Addresses area on the right.
Click OK to close the dialog box, and then click Next to continue the wizard.
-
-
On the Completing The New SSL Web Publishing Rule Wizard page, review the summary of information, and click Finish.
-
In the details pane, click Apply to save your changes, and then click OK
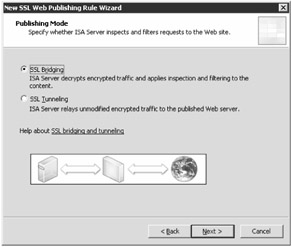
Figure 8-14: The images and descriptions of SSL Bridging and SSL Tunneling add a nice touch to this wizard.
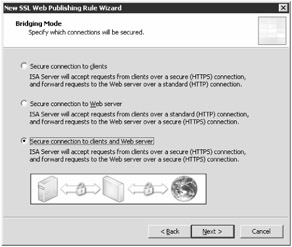
Figure 8-15: Bridging mode options define what type of protocol (HTTP or HTTPS) access you will support to the ISA server and how you will send the traffic to the published secure Web server.
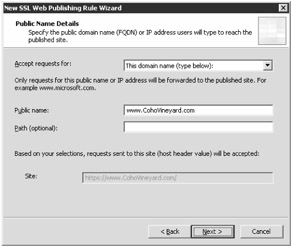
Figure 8-16: The Public Name setting is what Internet clients would type in their browsers to access this Web site.
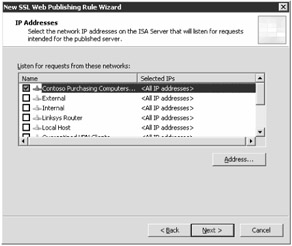
Figure 8-17: You can choose from any existing networks to define which IP address ranges will listen for requests for the published Web server.
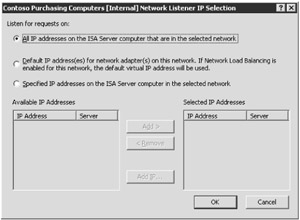
Figure 8-18: You have a lot of control over which IP addresses from the selected networks will listen for requests directed to the published Web server.
EAN: 2147483647
Pages: 173