Server Publishing
Server publishing makes an internal server service on a given computer and port number accessible to users on the Internet. Your ISA server acts as a reverse proxy server for this service and Internet users can access it by connecting to your ISA server's IP address and the port you specified. ISA Server then forwards these requests to the server being published. You can publish just about any server, including SQL Server computers, mail servers, DNS servers, and so on.
Creating a Server Publishing Rule
To create a server publishing rule, follow these steps:
-
In the console tree, expand the server name, and click Firewall Policy.
-
In the task pane, click the Tasks tab. Under Firewall Policy Tasks, click Create New Server Publishing Rule.
-
On the Welcome To The New Server Publishing Rule Wizard page, type a name to associate with the rule, and click Next to continue.
-
On the Select Server page, type the IP address of the server you are publishing, and click Next.
-
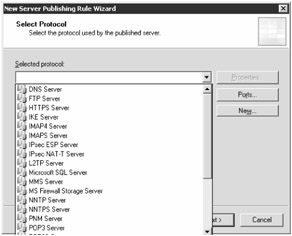
On the Select Protocol page, from the Select Protocol drop-down list as shown in Figure 8-19, choose from 24 predefined protocols like DNS, POP3, FTP, SMTP, and so on. If you don't see the protocol listed that you want to publish, click New to launch the Welcome To The New Protocol Definition Wizard, which is detailed in Chapter 7. To override the default ports defined in the protocol definitions, click Ports. On the Ports page, you specify how the firewall ports, published server ports, and source ports should be handled by the rule. You can choose to leave the default ports or specify new ports that override the port information included in the protocol definitions. Click OK to close and click Next to continue.
-
On the IP Addresses page, select each of the networks that contain IP addresses that should be listening for requests that are intended for the published server. Additionally, after selecting a network, you can click Address to launch the Network Listener IP Selection dialog box. Your options include the following:
-
All IP Addresses On The ISA Server Computer That Are In The Selected Network.
-
The Default IP Address On The ISA Server Computer In The Selected Network.
-
Specified IP Addresses On The ISA Server Computer In The Selected Network—If you select this option, you will see Available IP addresses on the left, and you can click Add to include the selected IP address in the Selected IP Addresses area on the right.
Click OK to close the dialog box, and then click Next to continue the wizard.
-
-
On the Completing The New Server Publishing Rule Wizard page, review the summary of information, and click Finish.
-
In the details pane, click Apply to save your configuration, and then click OK.
Note FTP servers are one of the types of servers most commonly published using this technique, along with e-mail servers and SQL servers. To complete the configuration of the FTP server publishing rule, you must configure the FTP Access filter as described in the earlier "Configuring FTP Filtering" section.

Figure 8-19: You can choose from one of 24 different pre-created protocols, or define your own.
Publishing a Mail Server
To publish a mail server, follow these steps:
-
In the console tree, expand the server name, and click Firewall Policy.
-
In the task pane, click the Tasks tab. Under Firewall Policy Tasks, click Publish A Mail Server.
-
On the Welcome To The New Mail Server Publishing Rule Wizard page, type a name for the publishing rule, and click Next to continue.
-
On the Select Access Type page, select one of the following options:
-
Web Client Access: Outlook Web Access (OWA), Outlook Mobile Access, Exchange Server ActiveSync
-
Client Access: RPC, IMAP, POP3, SMTP
-
Server-to-Server Communication: SMTP, NNTP
Click Next to continue.
Note Depending on your selection in Step 4, the next page in the wizard, the Select Services page, differs. The remaining steps in this procedure walk you through each of the options.
-
Web Client Access: Outlook Web Access (OWA), Outlook Mobile Access, Exchange Server ActiveSync
-
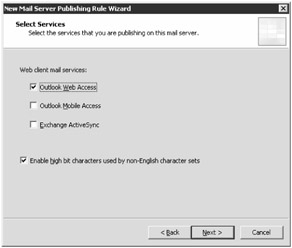
On the Select Services page shown in Figure 8-20, select the protocols you would like to publish. Options include Outlook Web Access, Outlook Mobile Access, and Exchange ActiveSync. By default, the Enable High Bit Characters Used By Non-English Character Sets check box is selected. Click Next to continue.
-
On the Bridging Mode page, choose from the following options:
-
Secure Connection To Clients
-
Secure Connection To Clients And Mail Server
-
Standard Connections Only
Note The image changes with each selection, providing a graphical representation of the option you are choosing.
Click Next to continue.
-
-
On the Specify The Web Mail Server page, type the name or IP address of the Web mail server to publish, or click Browse to type and confirm the server. If you click Browse, after typing the server name, you need to click OK to return to the Specify The Web Mail Server page. Click Next to continue.
-
On the Public Name Details page, specify how users outside your company network will access the published Web mail server.
-
In the Accept Requests For drop-down list, select either Any Domain Name or This Domain Name (Type Below). If you select Any Domain Name, the Public Name text box disappears from the page.
-
In the Public Name text box, type the URL that is publicly accessible, such as www.contoso.com.
Click Next to continue.
-
-
On the Select Web Listener page, select an existing listener from the Web Listener drop-down list. If no Web listener exists, click New to launch the Welcome To The New Web Listener Wizard. The steps to create the Web Listener are defined in Chapter 7. Once a Web listener is selected, its properties appear for you to review before continuing. Click Next to proceed.
-
On the User Sets page, the default setting is for the rule to apply requests from the All Users user set. If you would like to modify the default, you can click All Users, click Remove, and then click Add to include new user sets. Click Add, in the Add Users dialog box, select the user set to include in the rule, click Add again, and then click Close. Click Next to continue.
-
On the Completing The New Mail Server Publishing Rule Wizard page, review the summary of information and then click Finish.
-
In the details pane, click Apply to save your configuration, and then click OK.

Figure 8-20: The view of the Select Services page publishing Outlook Web Access, Outlook Mobile Access, or Exchange ActiveSync.
Client Access: RPC, IMAP, POP3, SMTP
-
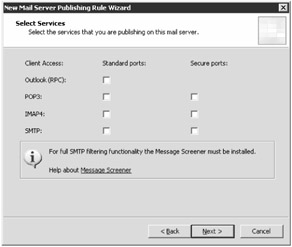
On the Select Services page shown in Figure 8-21, select the protocols you would like to publish. Options include Outlook (RPC), POP3, IMAP4, and SMTP. Click Next to continue.
-
On the Select Server page, type the IP address of the server you are publishing, and click Next.
-
On the IP Addresses page, select each of the networks that contain IP addresses that should be listenig for requests intended for the published server. Additionally, after selecting a network, you can click Address to launch the Network Listener IP Selection dialog box. Your options include the following:
-
All IP Addresses On The ISA Server Computer That Are In The Selected Network.
-
The Default IP Address On The ISA Server Computer In The Selected Network.
-
Specified IP Addresses On The ISA Server Computer In The Selected Network. If you select this option, you will see Available IP addresses on the left, and you can click Add to include the selected IP address in the Selected IP Addresses area on the right.
Click OK to close the dialog box, and then click Next to continue the wizard.
-
-
On the Completing The New Mail Server Publishing Rule Wizard page, review the summary of information, and click Finish.
-
In the details pane, click Apply to save your changes, and then click OK.

Figure 8-21: The view of the Select Services page publishing Outlook (RPC), POP3, IMAP4, and SMTP.
Server-to-Server Communication: SMTP, NNTP
| Note | To complete the configuration of the SMTP server publishing rule, you must configure the SMTP Access filter. |
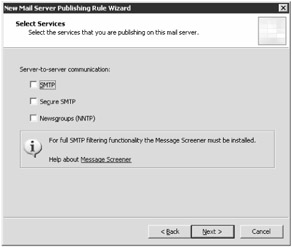
On the Select Services page shown in Figure 8-22, select the protocols you would like to publish. Options include Simple Mail Transfer Protocol (SMTP) and Network News Transfer Protocol (NNTP).

Figure 8-22: The view of the Select Services page publishing SMTP and NNTP.
The remaining steps are identical to Steps 6 through 9 in the preceding list.
| Note | For more information on how to securely publish Exchange using ISA Server, see Chapter 16. |
EAN: 2147483647
Pages: 173