Configuring ISA Server
To configure ISA Server, follow the steps on the Getting Started page that appears in the center pane when you've selected the ISA server in the left pane, as shown in Figure 2-6. We provide references to other chapters in this book that discuss those steps in detail.
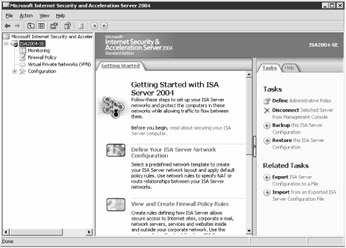
Figure 2-6: The Getting Started pane guides you through the options available for configuring ISA Server.
The first step is to assign administrative roles and configure the means by which you will administer your ISA Server environment. You can choose to install the ISA Server Remote Console (MMC), or you might decide to connect to the ISA server using Terminal Services. We describe the actions needed to configure all these scenarios later in this chapter. After you've completed preparing ISA Server for administration, you can then undertake these Getting Started activities:
-
Configure your networks, as shown in Chapter 9.
-
Create your firewall policy rules to allow internal machines to connect externally, or to allow external machines to gain access to selected internal resources, like Web servers. See Chapter 8 for more information.
-
Define how you wish ISA Server to cache Web content, as described in the "Configuring the ISA Server Cache" section later in this chapter.
-
Set up your VPN settings as described in Chapter 11, "Securing Virtual Private Network Access."
-
Once you've implemented ISA Server, you can use the monitoring functions, which we cover in Chapter 9.
Assigning ISA Server Administrative Roles
ISA Server uses role-based administration, which can utilize Active Directory or Windows users and groups. Three roles are built into ISA Server 2004:
-
ISA Server Basic Monitoring This role allows users (or groups) to monitor, but not to configure, ISA Server components. For example, this role can view dashboard alerts, connectivity, sessions, and services, as well as acknowledge alerts.
-
ISA Server Extended Monitoring This role can perform all activities that the Basic Monitoring role can perform, with the addition of viewing log information, creating alert definitions, creating reports, stopping and starting sessions and services, and viewing firewall policy. This role also has the ability to import and export secret configuration information.
-
ISA Server Full Administrator This role can perform all activities of the Basic Monitoring and Extended Monitoring roles, but can also configure firewall policy, cache settings, and VPN settings.
To assign ISA Administrative roles, follow these steps:
-
Open the ISA Server Management console, then click the ISA server you wish to configure.
-
In the right pane, click the Tasks tab, then click Define Administrative Roles.
-
The ISA Server Administration Delegation Wizard starts, which guides you through the process of defining administrative roles.
Configuring the ISA Server Cache
By default, the ISA Server Cache is disabled. You can enable caching, and then configure what type of content will be cached, for how long, and how your ISA server will serve the cached content to its clients.
Enabling and Disabling ISA Server Caching
To enable the caching functionality, follow these steps:
-
Expand the ISA Server Management console for the ISA server you wish to configure, then expand the Configuration node so that the Cache node is visible, as shown in Figure 2-7.
-
Right-click the Cache node and select Define Cache Drives, or click Define Cache Drives on the Tasks tab in the right pane.
-
In the Define Cache Drives dialog box, select the local drive that will host the cache (you cannot configure a network drive to hold the cache), type in the amount of disk space you wish to devote to the cache using MB in the Maximum Cache Size (MB) field, and then click Set, as shown in Figure 2-8.
Note The cache can only be hosted on an NTFS partition, and should not be on the same partition as your operating system files or database files, if possible. Having the cache on a different partition enhances performance and stability.
-
Click OK, and then click Apply to commit the configuration.
-
If prompted, choose whether to immediately restart ISA Server, and then click OK. Click OK again when the changes have been applied.
-
If you ever wish to disable caching, click the Cache node, and then click Disable Caching on the Tasks tab. Click Yes when prompted, and then click Apply. Follow the prompts that appear. This action resets the cache drives to zero space allocated to caching.
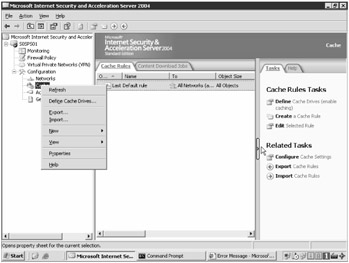
Figure 2-7: The ISA Server Cache node is located on the Configuration menu.
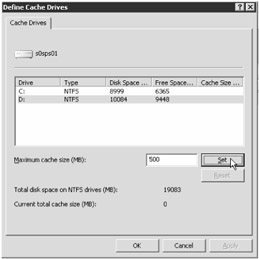
Figure 2-8: Define the amount of space for your cache in megabytes.
Configuring the Cache Properties
The Cache Settings dialog box has two configurable tabs (unless you have not yet applied ISA Server Service Pack 1, in which case it shows three). Open the dialog box (see Figure 2-9) by right-clicking the Cache node in the ISA Server Management console and then selecting Properties, or by clicking Configure Cache Settings on the Tasks tab in the right pane.
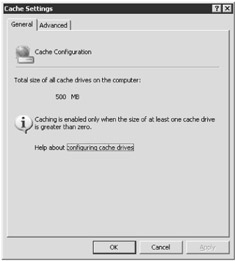
Figure 2-9: To configure the cache properties, use the Cache Settings dialog box.
| Note | If you are using a pre—Service Pack 1 installation of ISA Server 2004 Standard Edition, you will see an additional tab, Active Caching. This setting was removed from the final version of ISA Server 2004 Standard Edition, but the tab remained, and was removed with Service Pack 1. |
Table 2-4 describes the different cache properties for each of the tabs in the Cache Settings dialog box.
| Tab | Option | Description |
|---|---|---|
| General | N/A | This tab displays the total cache size of all servers in the array. |
| Active Caching | Enable Active Caching | When checked, this option enables the most currently accessed content in the cache to be automatically updated during low-use periods on the server. This setting is a holdover from ISA Server 2000, and does not work in ISA Server 2004. When you apply Service Pack 1, this tab is removed. |
| Advanced | Cache Objects That Have An Unspecified Last Modification Time | Objects that don't have a header that contains dates and times usually aren't cached. This option allows such objects to be cached. |
| Cache Objects Even If They Do Not Have An HTTP Status Code Of 200 | ISA Server doesn't, by default, cache any content that doesn't have a success code of 200. Checking this option allows ISA Server to cache error messages (which have other status codes, such as 401 Access Denied). | |
| Maximum Size Of URL Cached In Memory | This limits the size of the URL string that is cached in memory. | |
| If Website Of Expired Object Cannot Be Reached | When an expired object's Web site can't be reached, you can choose to either return an error message or set parameters that allow you to return the expired content. | |
| Percentage Of Free Memory To Use for Caching | Cache content is stored in RAM to improve performance. By default, 10 percent of the memory is allocated for this purpose. Increasing the amount of RAM here will increase performance to gain objects from the cache. |
Configuring Cache Rules
Cache rules are new to ISA Server 2004, and allow you to determine the type of content that your cache will store from different locations (by means of network object), how long that content is kept, and how it is served to clients.
To configure a cache rule, follow these instructions:
-
In the Server Management console, navigate to the Cache node in the Configuration node.
-
Click the Cache Rules tab in the center pane, and then click Create A Cache Rule on the Tasks tab in the right pane. The Welcome To The New Cache Rule Wizard page appears. Type in a name for the cache rule as shown in Figure 2-10, and then click Next.
-
On the Cache Rule Destination page, click Add, select the network entities from which you wish to cache content (see Figure 2-11), click Add, and—when you've added all the network entities—click Close. Click Next.
-
On the Content Retrieval page, you select the way in which objects in the cache will be delivered to the requesting clients. The three available options are to retrieve the requested option from the cache under these conditions: if any "valid version" of the object is in the cache; if any version of the object exists in the cache (for example, past its time-to-live, and so on); or to retrieve objects only from the cache, and never go to the site directly. Choose the appropriate option, and then click Next.
-
On the Cache Content page, you determine what content will be stored in the cache. You can choose to never store content, or to choose content based on headers in addition to three other options:
-
Dynamic Content Most Web search or query results are usually valid only for highly individualized queries and return a Uniform Resource Locator (URL) that contains a question mark. Selecting this check box allows such pages to be cached.
-
Content For Offline Browsing This option allows you to keep offline content (which is specified with 302 and 307 response codes) stored in the cache.
-
Content Requiring User Authentication For Retrieval This option allows information that requires authentication to be stored in the cache, which can be a security risk.
-
-
On the Cache Advanced Configuration page, you can select whether to cache secure Web content (Cache SSL Responses) and to cache objects based on their size in kilobytes, megabytes, or gigabytes (Do Not Store Objects Larger Than…). Configure the options as desired, and then click Next.
-
On the HTTP Caching page, select the Enable HTTP Caching check box to cache Web content, and then set the Time-To-Live (TTL) settings, which determine how long the content will be stored. Click Next.
-
On the FTP Caching page, select the Enable FTP Caching check box to cache FTP objects, and then set the TTL in Seconds, Minutes, Hours, Days, or Weeks. Click Next.
-
On the Completing The New Cache Rule Wizard page, review your selections, and click Finish to complete the creation of the rule.
-
Click Apply to commit the cache rule to the ISA Server. Then, click OK.
Tip To edit an existing cache rule, select the cache rule, and then in the Tasks tab of the right Cache pane, click Edit Selected Rule.
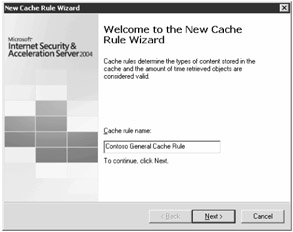
Figure 2-10: Using a descriptive name on the Welcome To The New Cache Rule Wizard page helps you manage jobs.
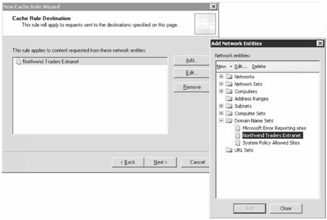
Figure 2-11: You can create new network entities, like Domain Name Sets, from within the Add Network Entities dialog box.
Scheduling Content Download Jobs
Content download jobs allow you to configure the ISA server to download certain Web content on a schedule, allowing you to manage your bandwidth by downloading large amounts of data when the network connections are not heavily utilized.
To configure content download jobs, follow these steps:
-
In the ISA Server Management console, navigate to the Cache node in the Configuration node.
-
Click the Content Download Jobs tab in the center pane, and then in the Tasks tab in the right pane, click Schedule A Content Download Job. The New Content Download Job Wizard starts.
Note If an Enable Schedule Content Download Jobs dialog box appears, click Yes, then click Apply and click OK to commit the changes. Configuring the content download jobs option has three prerequisites: that the Local Host network listens for Web Proxy client requests, the system policy rules are configured to allow content download, and the ISA Server Job Scheduler service is running. When you create the first scheduled download job, click Yes at the prompt for ISA Server to configure all these prerequisites for you.
-
On the Welcome To The Content Download Job Wizard page, type the name of the new content download job, and then click Next.
-
On the Download Frequency page, select whether you wish the job to run once after the job is defined or on a schedule, or whether you will have it run on a daily or weekly basis. Click Next. If you've chosen to schedule the download job, specify the time for the job to run, then click Next.
-
On the Content Download page, configure the URL from which the ISA server will download content, as shown in Figure 2-12. If you do not wish to download content from outside the domain (for example, if you are downloading from www.contoso.com, and the page contains a link to www.northwindtraders.com), select the Do Not Follow Link Outside The Specified URL Domain Name check box. You can also specify the number of linked pages you wish to traverse, the maximum number of objects retrieved, and the number of TCP connections that will be used. If you choose to traverse beyond a depth of three links, many jobs can take a long time. Click Next when you've specified these settings.
-
On the Content Caching page (see Figure 2-13), configure the content that will be cached and the amount of time it will be stored. Choose the desired settings, and then click Next.
-
On the Completing The Scheduled Content Download Job Wizard page, review the settings you've chosen, then click Finish.
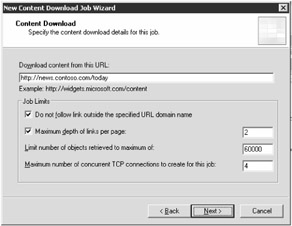
Figure 2-12: Specify the URL (Web link) from which a content download job will pull content.
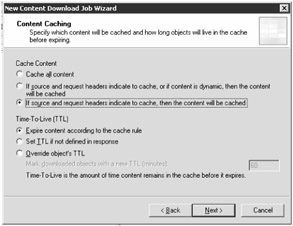
Figure 2-13: Specify the contents of the cache, and the TTL for the objects pulled down by the content download job.
Managing Existing Content Download Jobs You can configure and manage existing content download jobs by using the Tasks tab in the right pane. To manage the jobs, select the job in the center pane, and then select one of the following links:
Content Download Tasks
-
Schedule A Content Download Job (described earlier)
-
Edit The Selected Job
-
Delete The Selected Jobs
-
Start Selected Jobs Now
-
Stop Running Jobs
-
Enable The Selected Jobs
-
Disable The Selected Jobs
For additional references about installing ISA Server 2004 Standard Edition, refer to the "Additional Resources" appendix at the end of the book.
Related Tasks
-
Configure Cache Settings
-
Export Content Download Job Configuration
-
Import Content Download Job Configuration
EAN: 2147483647
Pages: 173
- ERP Systems Impact on Organizations
- Context Management of ERP Processes in Virtual Communities
- Data Mining for Business Process Reengineering
- Healthcare Information: From Administrative to Practice Databases
- Relevance and Micro-Relevance for the Professional as Determinants of IT-Diffusion and IT-Use in Healthcare