9.6. Installing a Hard Drive Installing a new hard drive inside your PC is fairly easy; it's almost like sliding a shoebox into a hall closet. That's because hard drives slide into standard- sized parking places called docking bays that live inside your PC. Plug two cables into the drive, and when you turn on your PC, it immediately recognizes the new drive. Even easier is attaching an external hard drive. The only real difficulties arise when you're replacing a drive that has data you want to save . Then the job becomes extraordinarily difficult, expensive, and time consuming. Here's how to distinguish between the easy jobs and the ugly ones. -
Adding an external hard drive . Astonishingly easy, since this contraption is nothing more than a hard drive inside a box. Connect the drive's cable to a port on your PCusually USB or FireWireand you're done. Windows XP automatically recognizes the drive and assigns it a letter, letting the drive appear in My Computer. From there, you're ready to fill it with your photos, movies, or any other digital spillovers that no longer fit on your C drive. Section 9.6.3 shows you how to add an external drive.
Note: External hard drives connect with one of two fairly new ports, USB 2.0 or FireWire. Before shopping, check to see which of these ports your PC offers (Section 1.8.1). If necessary, you can add the port to your PC by installing a card (Section 1.7).
-
Adding a second internal hard drive . Several steps up the difficulty ladder, this procedure requires buying a drive that uses the right interface , or connector. You must open your PC's case; insert and screw down the drive; connect the drive's cables; and, depending on the drive, move a little jumper to bridge two rows of pins. It's fairly easy, but requires about a half hour 's time. Full details start in the next section. -
Replacing a PC's dead C drive . On the sweat scale, this operation rates much like adding a second internal hard drive, described above, but it's a little easier because it removes much of the guesswork. Your replacement drive uses the same settings, cables, and screws as your old one. The time- intensive part is reinstalling Windows and your data, but that's unavoidable whenever your C drive dies. -
Upgrading your Windows drive to a larger drive . This one's best left to professionals. Physically installing the replacement drive is easy enough. The hard part is moving all your dataincluding Windows XPfrom the old drive to the new. Sometimes third-party software can make the move seamless. If not, you must reinstall Windows XP, reinstall and customize all your programs, and move all your data (if you know exactly where it's stored) from the old drive to the new. The job can easily consume two or three days. 9.6.1. Identifying Your Internal Drive's Interface Hard drives come with one of two different types of interfaces the connector that attaches it to your PC's motherboard (Section 1.4). If the interfaces don't match, you'll end up like an American trying to plug an electric toothbrush into a European power outlet. Today's drives come with one of two interfaces: IDE/ATA (Integrated Drive Electronics/Advanced Technology Attachment) and S-ATA (Serial Advanced Technology Attachment). Before shopping for a new drive, you need to know whether to buy an ATA or S-ATA drive so it can connect with your PC's motherboard. You can figure out which type of connector your PC uses by either of these two methods . -
Visual inspection . Since you need to open your PC's case anyway, open it now, and look for the two cables that connect to the current hard drive in your PC. One cable weaves its way up from the drive to the power supply. The other cable meanders down from the drive to a connection on the motherboard. If the motherboard's cable looks like a two-inch-wide flat ribbon, as shown in Figure 9-6, top, your drive uses an IDE/ATA interface. If it's a thin cable (Figure 9-6, bottom), your drive uses an S-ATA interface. Figure 9-6. Top: The thick, 2-inch ribbon cable on this hard drive gives it away as an IDE/ATA driveby far the most common interface found in PCs for the past 20 years . The four-wire cable to the drive's right supplies electricity from the PC's power supply.
Bottom: The thinner cable on this drive identifies it as an S-ATA drive. S-ATA drives began appearing on more expensive PCs around 2003. The four-wire cable to the drive's left supplies electricity from the power supply. 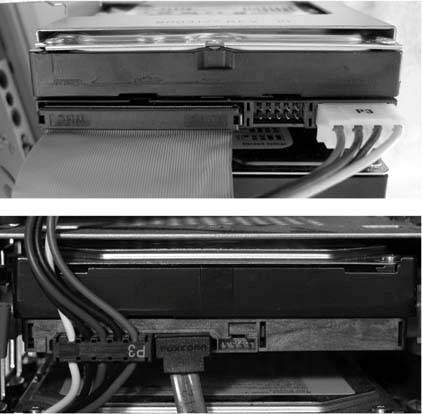 -
Research existing drives . Find the manufacturer and model number of your existing drive. (Start  Control Panel System Hardware tab Device Manager. Double-click "Disk drives and double-click the name of your drive.) If you're lucky, you see both the drive's manufacturer and the model number. If you just see a model number, search on Google for the manufacturer's name and Web site. Visit the site, look up the model number in its Downloads section, and read that drive's specifications. Control Panel System Hardware tab Device Manager. Double-click "Disk drives and double-click the name of your drive.) If you're lucky, you see both the drive's manufacturer and the model number. If you just see a model number, search on Google for the manufacturer's name and Web site. Visit the site, look up the model number in its Downloads section, and read that drive's specifications.
Note: You may hear IDE/ATA drives referred to by a wide variety of names , including EIDE, UDMA, ATA/66, ATA/133, ATA/166, and others. Those terms relate to how the drive fetches information and the speed the drive grabs it, not the connector it uses. Treat these drives as more or less synonymous with a plain IDE/ATA drive. Most fairly new PCs shouldn't have a problem with them.
9.6.2. Shopping for a New Drive Once you know what type of drive to shop for, either IDE/ATA or S-ATA, you must weed through all the specifications listed on the sales sheets to choose a drive that meets your needs. -
Capacity . Hard drives come measured in gigabytes , with 40 GB being the low end of the scale and 400 GB being on the high end. If you're doing mostly word processing, a fairly small drive's fine. But if you're editing video or graphics, or storing lots of digital music or photographs, aim toward the larger end of the spectrum. (An hour of digital camcorder footage eats up 13 GB all by itself, and editing it usually requires making a copy.)
Tip: Just as the newest cars at the dealer cost much more than the slightly used ones, the largest hard drives command a premium price over last month's slightly smaller drives. You can often save quite a bit by choosing a 200-GB drive instead of a 250-GB drive.
-
Speed . Most drives spin at 5,400, 7,200, or 10,000 RPM (Revolutions Per Minute). The faster the drive, the less time you'll wait when loading large files. But you rarely need much speed unless you're editing video or doing high-end graphics workchores that constantly pour information on and off of your hard drive. If your work centers around Web browsing, word processing, and other less-disk-intensive chores, pick up a slower drive and pocket the price difference. (Backup drives, since they usually run unattended in the evenings, are perfect candidates for slower speeds.) -
Average seek time . Measured in milliseconds , this rating determines how quickly your drive can locate a particular piece of information. Yes, it's measured in milliseconds , so it's rarely noticeable until you grab lots of small pieces of information, like when moving a huge folder of small files from one place to another. You can still work while your PC fetches files in the background, so don't give seek time much weight. -
Buffer . Your drive examines the files it grabs for your PC, and then grabs a few extra files it thinks your PC may want next. It sticks the extra files into its own speedy memorya buffer in the hopes the PC will return for it. If the PC returns for it, the buffer dishes up it up, about five times faster than normal. A buffer of about 2 MB works fine for most tasks . -
Warranty . Most drives come with warranties from one to five years, but don't wrinkle your brow much over warranties. If a drive works fine for its first week, it usually lasts more than six or eight yearswhich is probably longer than the life of your PC. -
Cylinders, heads, and sectors . A decade ago, hard drive installers needed to tell this information about the drive's inner workings to their PCs. Today, the PC's BIOS (Section 17.2) figures it out automatically. Don't bother evaluating your potential new drive based on any of these specifications. LAPTOP LIFE
Upgrading Your Laptop's Hard Drive | | Not a task for the timid, upgrading a laptop's hard drive involves working with tiny screws, fragile connectors, and cramped spaces. Plus, upgraders face the problem of moving both Windows and their data off the old drive and onto the new one. Most owners bite the bullet and let a shop handle the job. As an alternative, consider a small portable hard drive. Western Digital's Passport series shown here, for instance, packs 80 GB of space into a rugged palm-sized drive. The little beggar draws power from your laptop's USB port, saving you from adding yet another power supply to your laptop bag. An external hard drive also provides an easier-to-carry solution if you're using only your laptop to transport its files. Instead of lugging the laptop, copy the files to the portable hard drive. Then bring the drive and leave the laptop back at your desk. The drive fetches a premium price, since you're paying for both the metal box and the extra electronics stuffed inside. But compare its price to the estimate the shop gives you for installing a new drive and copying all your data from your old drive to your new one. 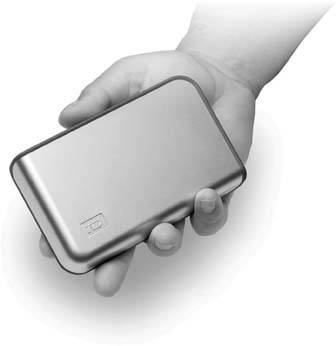 |
9.6.3. Installing an External Hard Drive It's much easier to add extra storage to your PC by plugging in an external hard drive. By enclosing a drive and its electronics in a box with a USB or FireWire port, manufacturers have made installation as easy as a plugging in a mouse. You don't need to open the PC's case, find the right connectors, and hope you bought the right drive for your PC. External drives cost a little more than an internal hard drive, but by plugging it in yourself, you save the cost of a trip to the repair shop. Some people prefer external hard drives for several other reasons, as well. -
Backups . External hard drives make it so easy to back up your PC that you may be cursing yourself down the road if you don't install one. You don't want to lose your digital shoebox full of family photos. Backing up information to a portable external drive has the added advantage of letting you keep the backups in a separate location (like the office), away from your PC. If your house burns down, you may lose your family heirlooms, but at least your MP3 collection stays safe. Some external hard drives come with backup software included. -
Transporting information . External hard drives are almost as portable as CDs, but give you a hundred times the storage. With an external hard drive, you can easily move large files from one PC to another. These data suitcases let you move digital video from your home office PC to the PC connected to your TV for quick viewing. An easily detachable hard drive also lets you grab your data and run during an emergency, preserving all your records. POWER USERS' CLINIC
Booting From an External Drive | | Although external drives work best for storage, some PCs let you boot from one, too. (Booting, as you probably know, means to let a PC load an operating system. Insert a Windows XP CD into your PC, for instance, and the PC loads Windows XP (it boots) from the CD itself, and not your hard drive.) Before you start thinking about creating a portable PCstoring Windows and your data on a pocket-sized drive and booting from any PC you visitconsider these things: -
Microsoft forbids Windows XP from being installed onto an external drive, which limits your choice of operating systems to older Windows versions, or another operating system like Linux. -
Should Windows XP somehow wake up on a strange and unfamiliar PC, it won't know what parts it is attached to, nor will it remember that it's been activated. That forces you to call Microsoft and explain why you're installing your copy of Windows XP on a second PC. -
When most PCs start up, they look for an operating system on a floppy drive, a CD drive, and the internal hard drivein that exact order. The PC grabs the first operating system it finds, and begins loading. To make a PC boot from an external USB drive, you must change the "boot order" in the PC's BIOS (Section 17.2). That's fairly easy to do for one PC, but time-consuming and sometimes impossible on other PCs. If you're looking for a portable operating system, download Knoppix (www.knoppix.org). The Swiss-Army Knife of computing, it's a complete Linux operating system and a suite of programs that fits on a single bootable CD. |
-
Stashing information . External drives give you the luxury of storing large files you're not quite ready to delete: downloaded movies, music, games , programs, or even that little flash animation cartoon you saved for your friends to see. Some people store backup copies of their music CDs, so they can create a new CD if their car's CD player eats the original. -
Security . For the ultimate in security, keep your personal data on an external hard drive and stash it in a safe or security deposit box while you're on vacation. To keep your personal data absolutely safe from hackers who have found the latest unpatched browser exploit, unplug the hard drive when you're online. If you share computers with roommates, your own removable hard drive lets you keep your data away from the PC unless you're the one at the keyboard. Follow these steps to install an external hard drive on your PC. -
Plug the drive's power adapter into the wall . All drives need power, and most draw it from the wall itself. Some small portable drives aimed at the laptop market draw the power straight from the USB port; those drives will work on a PC, as well. -
Connect the drive to your PC's USB or FireWire port . Most drives come with their own cable that uses either USB or FireWire. Connect the cable between the port on your drive and the USB 2.0 or FireWire port on your PC. If your PC doesn't include the USB or FireWire port you need, install one by installing a card (Section 1.7) into your PC. Windows XP doesn't need drivers for most external hard drives, and it recognizes them as soon as you plug them in. Make sure you've installed Windows XP's Service Pack 1 or 2, however, or your PC won't be able to use its USB 2.0 ports at full speed. It's easy to check your PC's USB 2.0 friendliness level (Section 1.8.2.1). -
Test the drive . When you plug in the drive, Windows XP's My Computer recognizes it, assigns it a drive letter, and lists it in My Computer. Double-click the new drive letter in My Computer to open it up, and then copy a few files onto it to make sure it works.
Warning: To keep from losing any data, let Windows XP know before you unplug a drive from your PC. Click the drive's icon on the taskbar, choose Safely Remove USB Mass Storage Device, and wait until Windows XP says the drive's been disconnected. That gives Windows XP time to save any last bits of data to the drive before you unplug it.
9.6.4. Installing an Internal Hard Drive Installing a second hard drive into your PC takes a lot more effort than plugging in an external hard drive. However, an internal drive's cheaper, faster, and doesn't take up desk space or wall outlets. Here's how to add a one to your PC: -
Buy a drive . Be sure to buy the drive that supports your PC's interface, either S-ATA or IDE/ATA. Section 9.6.1 shows you how to determine which format's suitable for your PC. -
Turn off the PC and remove its case . This procedure's covered on Section 1.3. -
Set the drive's jumper settings, if necessary . Skip this section if you're fortunate enough to be installing an S-ATA drive. If you're installing an IDE/ATA drive, on the other hand, here's the problem. Two of these drives (that is, your original hard drive, and the new one you're adding) connect to the same cable. Since your PC needs to know which drive it's talking to, it gives the drives these unfortunate names: "Master" and "Slave." You need to tell each drive whether it should respond to "Master" or "Slave." PC engineers decided that flipping a drive's switch to either Master or Slave would be too easy. Instead, they make you snap a tiny plastic cover, called a jumper , over certain rows of pins, as shown in Figure 9-7. Figure 9-7. Every drive's label includes a little diagram that shows its two rows of pins, and which pairs of those pins you should cover with a jumper to designate the drive as either "Master" or "Slave." Take a look the diagram on your drive to see which pair of pins you need to cover. Then grab the jumper with a pair of tweezers and push it onto the pair of pins that matches the setting you want for that drive. 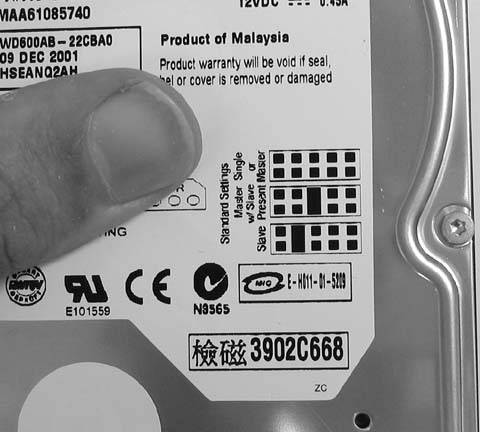 If you're replacing your existing (and presumably dead) C: drive, set your new drive to Master. If you're adding a second drive, set its jumper settings to Slave.
Note: Some drives use a newer setting called Cable Select. To see if yours does, look at the connectors on the drive's ribbon cable. If one connector is marked "Master," and the other connector's marked "Slave," then set the jumpers on both drives to "Cable Select." The PC then names the drives according to what cable connector they're plugged into, either Master or Slave.
-
Insert the new drive into the docking bay . If you're replacing an existing drive, slide the old drive out of its bay (Figure 1-2) and slide the new drive in to replace it. Fasten the new drive in place using the old drive's screws or latches. If you're adding a second drive, slide it into the bay adjacent to the existing drive. Then fasten it in place with screws and/or latches. Most computer stores sell mounting screws or latches; if they don't, your PC manufacturer probably sells them. -
Attach the two cables, one for power and the other for the motherboard . One cable connects from the motherboard to the drive; the other cable sprouts from a bundle of cables connected to the power supply. The cables fit onto their connectors in only one way, keeping you from accidentally pushing one into the wrong place or upside down. Push them into their drive's connectors as shown in Figure 9-8. Figure 9-8. Top left: The ATA drive's power cable connector, known as a "Molex" connector, requires quite a bit of force to push into the drive's four-pin connector.
Top right: The ATA drive's wide ribbon cable fits into the drive's connector one way; make sure the little notch on the cable's connector meshes with the little groove on the drive's connector.
Bottom left: The S-ATA drive's power connector is the larger of the two cables.
Bottom right: The S-ATA drive's small motherboard cable pushes onto the drive's small connector.  -
Turn on your PC . Don't bother putting your PC's case back on until Windows starts up; you may need to tweak the jumper settings. If Windows doesn't load or the PC doesn't recognize the drive, make sure you set the drive's jumpers to the correct setting. Also make sure you pushed in the connectors all the way. -
Partition the drive with Windows XP . Windows refers to all the space on a new drive as " unallocated " and won't touch the new drive until you stake out a partition a designated spot on the driveand tell Windows XP it can start playing with it. Windows XP's Disk Manager (Start right-click My Computer Manage Disk Management) is your control center for making these changes. Disk Manager lists all your attached drives, including hard drives, CD and DVD drives, and even drives attached through USB ports. The drives with blue bars across their tops are partitioned, and ready to work. Drives with black bars receive the name "unallocated," which means they need a partition. To partition your newly installed drive, right-click it in Disk Manager and then choose New Partition. The New Partition Wizard wakes from its slumber and leads you through creating a partition (see Figure 9-9). Choose Primary, select the Wizard's suggested size , drive letter, and formatting values, and Windows XP begins preparing the drivewhich could take longer than it took you to install the thing. Formatting a large drive can take more than an hour. 9.6.5. Changing a Drive Letter When you plug an external hard drive or card reader (Section 5.3) into your PC, Windows XP handles the background chores automatically so you can concentrate on more pressing matters, like checking your new digital photos to see that awesome close-up of the bumblebee landing on the flower. Those background chores include assigning the drive a letter, so it shows up in My Computer as a bona fide destination. Windows XP normally assigns new drives the first unclaimed letter of the alphabet. For instance, if your hard drive owns "C" and your CD drive grabs "D," your new hard drive ends up with "E." My Computer lists drives alphabetically , so your two drives won't be next to each other. If that bothers you, Windows XP lets you change a drive's letter, giving your new drive the "D" and bumping the CD drive to "E." Although this all looks better cosmetically, changing drive letters often confuses your PC in several ways: -
Programs . Programs remember the drive letter that gave them birth, not the drive itself. The next time you try to install a new feature in Word, for instance, the program will protest with an error message, saying it didn't find its installation CD in the correct drive. CD burners will continue to look for CDs using the wrong letter as well. Eventually some programs catch on to your switch, but prepare yourself for many error messages early on. -
Playlists . Some playlists (Section 8.4.2.2) from Media Player, iTunes, and other programs remember file locations by using the drive letter. If you move your songs to a drive with a new letterplacing them on a portable hard drive, for instanceyou may need to recreate any playlists containing those songs.
Note: If you keep all your iTunes music on a drive with a letter that you've changed, let iTunes know: choose Edit Preferences Advanced Change. Navigate to the new drives folder containing all your music, and then click OK. iTunes updates all your playlists with the music's new location.
-
Networks . Be prepared to recreate any shortcuts pointing to drives with newly changed letters. Figure 9-9. Windows XP's New Partition Wizard walks you through the process of introducing a new drive to Windows XP by partitioning, formatting, and assigning the new drive a letter. Most people keep things simple by creating one large partition from the entire drive, and then accept all the wizard's suggested values. Other people break the drive into several partitions, using the different partitions to run other operating systems like Linux or older versions of Windows versions (so they can run software Windows XP has trouble handling). To save time when formatting previously used drives, turn on the "Perform a quick format" checkbox (second figure from the bottom). Using the quick format option tells the wizard not to bother scanning the disk for bad sectors, saving oodles of time. 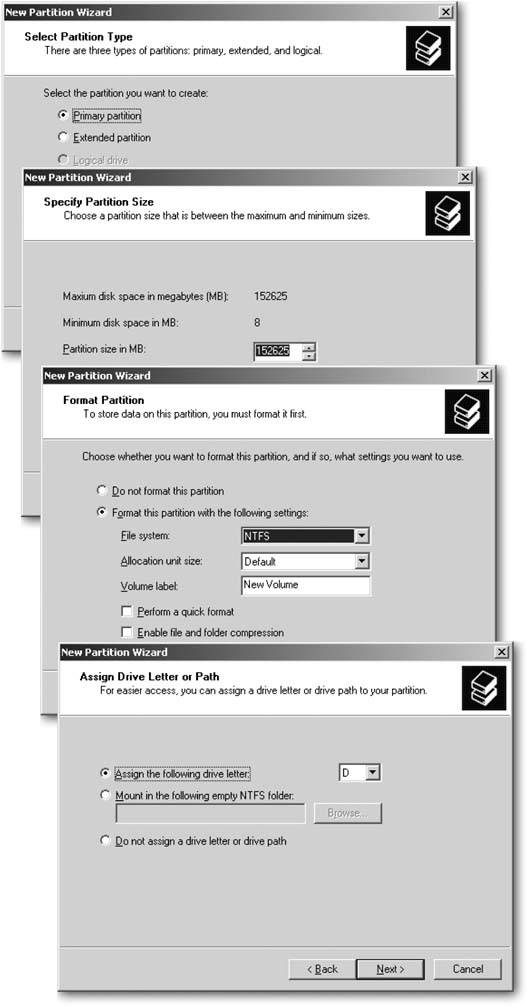
But if you'd rather annoy your programs than live with a letter scheme that annoys you , change a drive's letter by opening Windows XP's Disk Management program (Start right-click My Computer Manage Disk Management). By right-clicking a listed drives name, you can change or remove its currently assigned letter. Figure 9-10 demonstrates the procedure. Figure 9-10. Top: Right-click the name of the drive you want to change, and choose Change Drive Letter and Paths.
Bottom: Click the Change button to change the drive's letter, and then select the drive's new letter assignment. If you want to swap two drive's letters, don't choose Change. Instead, click each drive and choose Remove to remove their assigned letters. Once you strip the drives of their letters, reassign different letters by clicking them and then choosing Change. 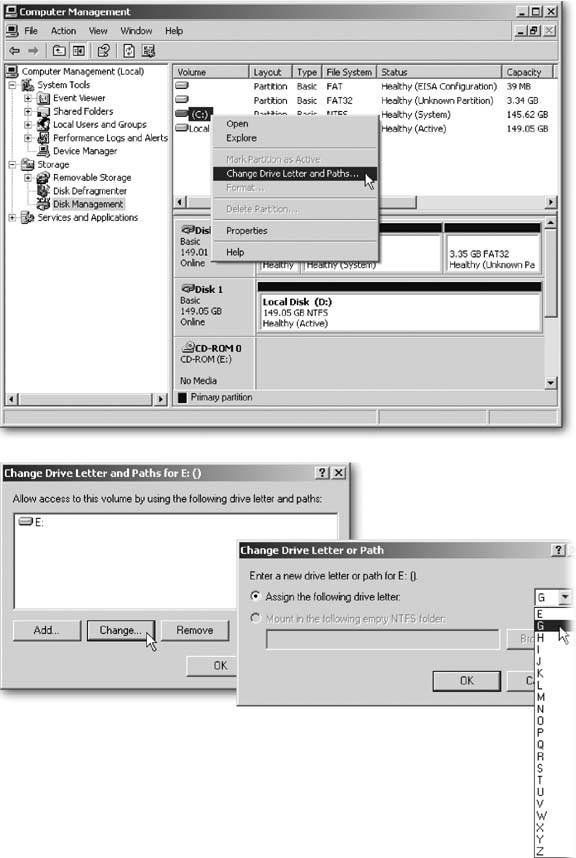
Windows XP won't let you change letters assigned to your floppy drives (they always snap up A and B). Nor does it let you change your C driveWindows XP insists on living on the C drive. But any other drives are fair game. New drive letters can make networked drives (Section 14.8.5) easier to remember as well. If all your digital music lives buried on a folder inside another computer, for instance, create a Mapped Network Drive with the letter "M." To go really wild, create a "J" folder that leads straight to your Jimi Hendrix files. |