14.10. Networking Two PCs If you're connecting only two PCs, you don't have to buy a router. Networking two PCs can be as simple as connecting a cable between them. Once they're connected, you've created a full-fledged mini network; the two PCs are ready to share printers (see Section 14.7) and exchange files (see Section 14.8). Plus, if one of the PCs has an Internet connection, the second PC can share it through Windows XP's Internet Connection Sharing (see Section 11.4.1). Whether you're connecting two PCs in a home, conference room, or at a bus stop, the following sections explain how to make the link using a variety of different methods . 14.10.1. Ethernet Crossover Cable Most PCs and laptops come with a built-in Ethernet port. It seems natural that connecting an Ethernet cable between the two ports would let them talkbut it won't, as many people discover. Connecting those network ports requires a special breed of Ethernet cable, called a crossover cable , sold at most computer stores for a few dollars more than the average breed. Link the two computer's network ports with the crossover cable, run the Network Setup Wizard (see Section 14.4), and you've got yourself an instant network. 14.10.2. FireWire Cable FireWire cables can't extend more than 15 feet, but that's long enough to connect two PCs in the same room. Connect any FireWire cable between each PC's FireWire port (see Section 1.8.3.1) and run the Network Setup Wizard, and a speedy network is born. (You're creating a similar FireWire network every time you connect your FireWire iPod to your PC's FireWire port.) Since some PCs have two or more FireWire ports, you can connect several PCs in a chain to create a super speedy network that's great for gaming. FireWire works especially well when connecting a laptop to a PC that's already hooked up to a network. To let the laptop share the fruits of the other networked PCs (including their Internet connection), tell Windows XP to "bridge" the FireWire and Ethernet networks, described in the "Bridging Networks" box. POWER USERS' CLINIC
Bridging Networks | | Sometimes you need to reach out and network with someone. For instance, say you and your laptop drop by a coffee shop that's got a juicy WiFi signal, only to realize you left your wireless adapter at home. Fortunately, you spot a friend who not only is happily surfing away, she's also got a spare FireWire cable (actually any of the two-PC connection methods will work: FireWire, Ethernet crossover cable, and so on). To share her Internet connection, hook up your two machines using the FireWire cable and then follow these steps on her computer: -
View the two network connections on the host PC. Click the PC's Start menu, right-click My Network Places, and then choose Properties from the shortcut menu. The PC displays all its available network connections. -
Select the two networks you want to combine. Either drag across both icons or hold down the Ctrl key while clicking them both. -
Right-click the selected icons, and then choose Bridge Connections. If the connection doesn't take place immediately, repeat step 1, but right-click each network's icon and then choose Repair. Then proceed with steps 2 and 3. When Windows XP builds a "bridge" between the two connections, each network can share the other's benefits. And in the case of the two coffee shop laptops, that means you can piggyback on your friend's wireless connection even though you left your wireless adapter at home. You can also bridge some (but not all) Bluetooth networks, letting a palmtop surf a PC's Internet connection, for example. To remove a bridge when you're through, right-click the Bridge icon, and then choose Delete. |
14.10.3. Powerline Powerline adapters (see Section 14.1.1.2) provide an astonishingly easy way to connect two PCs in the same household, even if they're in distant rooms. -
Plug one Powerline adapter into a wall outlet, and then connect an Ethernet cable between the Powerline's Ethernet port and your PC's Ethernet port . -
Plug another Powerline adapter into a wall outlet, and then connect an Ethernet cable between the Powerline's Ethernet port and your second PC's Ethernet port . Run the Network Setup Wizard (Section 14.4), and you've created a quick, portable network that works especially well for laptops. When you move your laptop to another room, just plug its Powerline adapter into the new room's outlet. To keep the people living in neighboring apartments from joining in, run Power-line's built-in encryption software on one of the connected PCs (see Section 14.5.2). That password protects the signal, keeping out everybody but the two PC owners . 14.10.4. Wireless Ordinarily, wireless connections are made through a router, just like Ethernet connections. However, a little-known wireless trick called ad hoc allows two PCs to connect directly, bypassing the router completely. Why bother? First, it's a cheap way to set up a two-PC network, letting you skip the router. Second, it lets you set up quick connections between two laptops for swapping files or playing a networked game. Unlike the other two-PC connections discussed in this chapter, you can connect a group of PCs this way, creating small, on-the-fly networks for games , discussions, file sharing, or quickly sending a file to everybody in the conference room. What this ad hoc setup won't give you, though, is an Internet connection, since the PCs all connect with each other, but there's no router in the mix to pipe in an Internet signal. To set up a two-PC network with wireless-ready PCs, follow these steps: -
On either PC, view your network connections . Click Start  Control Panel Network Connections to see icons representing each of your PCs network connections (shown earlier in the top of Figure 14-5): wireless, Ethernet, dial-up, and "1394 Connection," which most people simply call your FireWire port. Control Panel Network Connections to see icons representing each of your PCs network connections (shown earlier in the top of Figure 14-5): wireless, Ethernet, dial-up, and "1394 Connection," which most people simply call your FireWire port. -
View the properties of your wireless network connection settings . Since you want to fiddle with your wireless network settings, right-click your Wireless Network Connection icon and then, from the shortcut menu, choose Properties. The Wireless Network Connection Properties window appears, listing lots of technical mumbo-jumbo you can safely ignore. -
Click the Wireless Networks tab . The window you're looking at brings you two main goodies . It lists the names of any wireless networks you've previously connected with, and it lets you add a new wireless network: your ad hoc network. -
Click the Add button on the Wireless Networks tab . The "Wireless network properties" page appears, shown in Figure 14-14. Here's where you type in settings for your little group of ad hoc PCs. Figure 14-14. Setting up an "ad hoc" wireless connection lets two PCs talk to each other directly, bypassing the need for a router. Make sure both PCs use the same SSID (Section 14.5.1.1) in the top box, and turn on the "computer-to-computer (ad hoc)" checkbox at the bottom of the window. To password protect the network, everybody should choose Enabled from the Data Encryption drop-down menu, and then enter an agreed upon password into the "Network key" box. Once everybody enters the same key and clicks OK, you've created a cozy little password-protected network.  -
Type a name for your ad hoc network in the "Network name (SSID)" box . The standard SSID naming rules described on Section 14.5.1.1 apply: no more than 32 letters , numbers , and punctuation marks. Choose something short, sweet and memorable . Each PC on the ad hoc network must enter this same name on this same box, or they'll be left out. -
Turn on "This is a computer-to-computer (ad hoc) network; wireless access points are not used." This checkbox lives at the bottom of the "Wireless network properties" window (see Figure 14-14). -
Click OK, and then move to the other PC or PCs and repeat the same steps . If you already spot the name of the new, ad hoc network listed as an available network, just like the networks shown earlier in Figure 14-4, pounce on it with a double-click. This lets you connect immediately without following all the steps and entering the information by hand. But if you don't spot the ad hoc network's name, enter the settings by repeating these first six steps. You should then be able to connect. If the PC has trouble connecting, head back to step 3 and remove the names of all previously connected wireless networks: Click each name, and then click the Remove button below it. That keeps Windows XP from latching onto the signal from normal Wi-Fi networks instead of your more esoteric ad-hoc network. -
Turn on encryption . Now that the connection's up and running, password-protect the network: Everybody should enter the same network password, as explained in Figure 14-14. -
Run the Network Connection Wizard to give the two PCs the same workgroup name (see Section 14.4.3), and then turn on File and Printer Sharing (see Section 14.4.5) . Once you give the PCs the same workgroup name and turn on File and Printer sharing, they can both share files. 14.10.5. Bluetooth Bluetooth isn't really a form of networking as much as it's a cable replacementa wireless way to get rid of that mass of cables snaking from your PC to your printer, cell phone, keyboard, mouse, and so on. Each gadget participating in a Bluetooth connection needs either a built-in Bluetooth transmitter or some kind of add-on device, making it Bluetooth-ready. To accommodate the usual variety of desktop accessories most folks have, Bluetooth lets your PC connect with up to seven devices, more than enough to handle the average person's Bluetooth gadget arsenal. While most people use Bluetooth to zap data between a PC and a peripheral, in a pinch , you can use Bluetooth to communicate between two PCs. However, unlike most of the network setups you've read about so far, in which all PCs are on equal footing, able to communicate with any computer on the network, a Bluetooth PC gathering works differently. Your PC can exchange files with any PC that's connected to it, but, in cases where you have multiple computers sipping from your PC's Bluetooth signal, those satellite PCs can't talk to each other. It's also slowan Ethernet network sends information about 100 times more quickly. Nor can you let one PC connect to another Bluetooth PC and share its Internet connection. Still, it's a handy way to shoot a file or two to an adjacent friend's laptop at a board meeting or coffee shop. And it can't be beat in a car, letting your Bluetooth headset talk to your Bluetooth cell phone without a cord wrapping itself around the steering wheel. Most PCs don't include built-in Bluetooth support, so people buy a little Bluetooth doodad, shown in Figure 14-15, and push it into a USB port to give their PC Bluetooth powers. Figure 14-15. These tiny Bluetooth adapters sell for around $40. Insert one into your PC's USB port to connect with other Bluetooth devices: headsets, palmtops, cell phones, or even another Bluetooth-enabled PC. Microsoft added Bluetooth support to Windows XP with Service Pack 2 (see Section 15.4), but most gadgets still include their own Bluetooth software that's often easier to figure out than Windows XP's built-in software. (Some third-party Bluetooth software even lets a PocketPC or other palmtop share a PC's Internet connection, something Microsoft's Bluetooth software doesn't support on its own.) 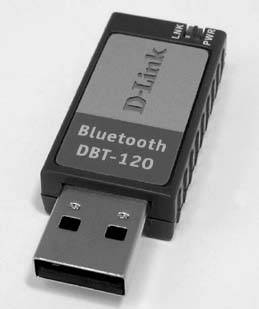
The following section explains how to put Bluetooth to work using Windows XP's built-in support. Your Bluetooth adapter probably came with software that's much more powerful than the utility provided by Windows XP, so you might want to fire that up, instead. 14.10.5.1. Connecting with a Bluetooth device Before you can connect your PC to any Bluetooth gadget, be it a headset, cell phone, or even another PC, you need to get these three things out of the way: -
Turn all your machinery on . Turn on your PC and insert a Bluetooth adapter into your PC's USB port. A little Bluetooth icon appears in your PC's taskbar and in its Control Panel (Start Control Panel Bluetooth). For Bluetooth-enabled gadgets, simply flipping their On switch does the trick. -
Give each Bluetooth device a name . Every PC and gadget already comes with a name, making this step a no-brainer. But if your vendor named your PC something ugly, like TUW-RX83, change it to something better. Open the Start menu, right-click My Computer, and then choose Properties. Click the Computer Name tab, and then click the Change button to select a more attractive nickname.
Note: If you change your PC's name after connecting it to a network, you must rerun the Network Setup Wizard (see Section 14.4) before you can connect again.
-
Make all your devices "discoverable." This is the most important step; it lets devices tell neighboring Bluetooth devices that they're ready for action. To make a PC discoverable, double-click the Bluetooth icon in the taskbar or the Control Panel, click the Options tab, and then turn on the "Turn discovery on" checkbox. On a gadget, flip through its menus until you find the Bluetooth settings, and then change the Discoverable setting to "On." After taking care of those tasks , follow the steps below to connect your PC to any Bluetooth gadget within a 30- foot radius, give or take a few feet. UP TO SPEED
Bluetooth and Security | | Bluetooth has a few security problems, like anything else in network-land today. These three threats appear most often: -
Bluejacking/Bluecasting . Some people with Bluetooth-capable palmtops scan for other Bluetooth gadgets set to discoverable mode. When they find one, they'll beam over a witty message like, "You've been Bluejacked!" Some billboards use Bluetooth to beam ads to cell phones and palmtops in the pockets of people walking by. If you choose to accept the message, it appears on your screen. These problems are more of a nuisance than anything. -
Eavesdroppers . Eavesdroppers count on people using obvious passcodes, like 1111. They turn their Bluetooth headset to that passcode, and wait until somebody walks by with a device set to accept communications from that passcode. The moral? Stay away from the obvious passcodes like 1111 and 1234. If your device lets you create a 16-digit passcode, use it. -
Viruses . Some viruses and worms spread through Bluetooth connections. To prevent these, turn off discoverable mode on your Bluetooth gadgets and PCs. |
-
Right-click your Bluetooth icon in the taskbar, and then choose Add a Bluetooth Device (see Figure 14-16) . If your Bluetooth icon isn't on your taskbar, open its icon in the Control Panel (Start Control Panel Bluetooth Devices), click the Devices tab, and then click Add. -
. The Add Bluetooth Device Wizard's sole purpose in life is to make sure you've changed the settings to "discoverable" on both Bluetooth devices: PCs, headsets, printers, and so on. Once they're set to discoverable, your PC searches for neighboring USB Bluetooth devices. -
Click the other Bluetooth device's name, and then click Next . If the other device didn't show up on the Add Bluetooth Device list, click Search Again. If it's still not showing up, make sure the other device is turned on, has a name, and is set to discoverable. -
Create a passkey (see Figure 14-17), and then click Next . Any sequence of numbers fewer than 16 digits works fine, as long as you've entered it on both the sending and the receiving devices. That keeps bystanders from butting in on your connection. Figure 14-16. Top: Summon the Add Bluetooth Device wizard by right-clicking your Bluetooth icon in the taskbar and then choosing "Add a Bluetooth Device."
Middle: Tell the wizard that you've set both devices to Discoverable mode by turning on the "My device is set up and ready to be found" box.
Bottom: Choose the name of the other Bluetooth device (in this case, another PC). 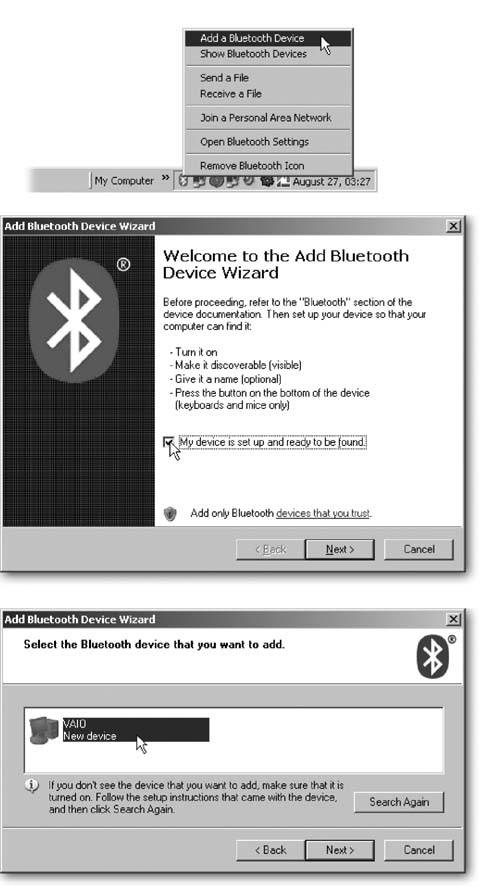 -
On the other PC or device, accept the incoming connection; type in the same passkey you just created, click Next, and then click Finish . The two devices circle each other like cautious animals before exchanging passkeys and embracing, creating a connection. If your gadget doesn't use passkeys, by chance, cancel the communication and start over. This time, though, choose "Don't use a passkey" in Figure 14-17, top.
Tip: The handy Bluetooth icon (Figure 14-16, top) might disappear from your PC's taskbar at this point. To put it back, especially if you're connecting two PCs, open the Control Panel's Bluetooth icon, click the Options tab, and then turn on "Show the Bluetooth icon in the notification area."
Yes, this is a lot of work. However, once the two devices connect, they're considered paired , and they usually remember each other. Even after you turn one or both of them off, they still show up in each other's list of connected Bluetooth devices. After being paired, they remember what the other device offers, whether it's incoming sound from a headset, or a cell phone that can dial an Internet connection for your laptop. 14.10.5.2. Transferring and receiving files Bluetooth's a natural for letting your PC make small talk with gadgets, like headsets or sending files to an adjacent Bluetooth printer. But in a pinch, it works fine for sending a file or two to a friend at the coffee shop. Don't count on sending a folder full of digital photos, however. Bluetooth sends files one at a time only, and at the slow speed of 1 Mbpsabout 20 times the speed of a dial-up modem, but 100 times more slowly than an Ethernet network. And if you're thinking of sending a large video, grab your sleeping bags. (Or grab a FireWire cable [see Section 14.10.2], which sends files 400 times as fast.) To send a quick file to a neighboring laptop or PC, follow these steps: -
-
Choose "Send a file," click Next, choose your friend's PC, and then click Next . The wizard lists a Send To: box, ready for you to select a PC to receive the sent file. -
If your friend's laptop isn't already listed in the Send To: box, click Browse, choose his PC's name, and then click Next . -
Tell your friend to choose "Receive a File" from the Bluetooth File Transfer Wizard, and then to click Next . Your pal's PC waits eagerly for your file to arrive . Figure 14-17. Top: Enter a passkey for this Bluetooth connection.
Middle: On the other Bluetooth device (another PC, in this case) tell it to accept the connection.
Bottom: Enter the same passkey on that device to complete the connection. 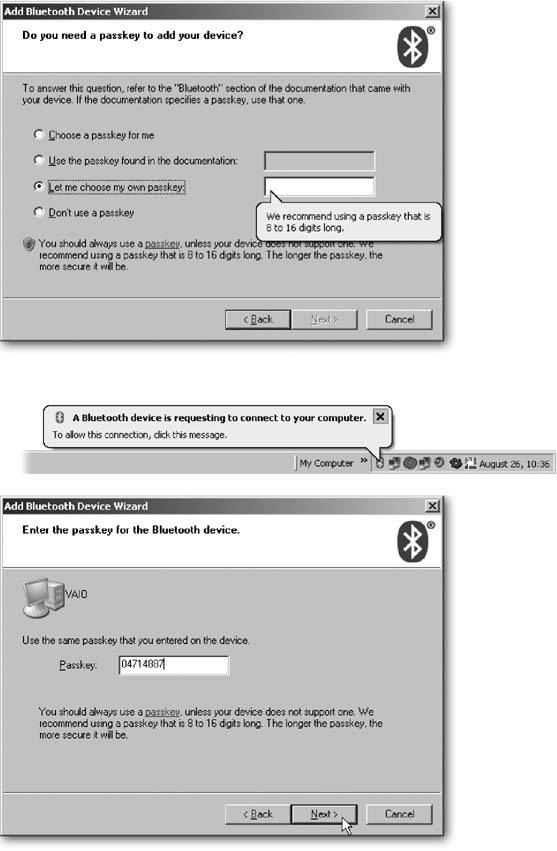 -
Click Browse, select the file to send, and then click Next . When you click Next, the file flies invisibly through the air to the other computer. -
Tell your friend to choose a folder to save the file he just received . The folder zips across the table to your buddy. LAPTOP LIFE
Getting Your PC Online with Your Bluetooth Cell Phone | | With a Bluetooth-enabled PC, you can dial the Internet with your Bluetooth cell phoneprovided you're already paying extra to your cellular provider for the privilege of a data connection (in addition to your regular phone calling package). Few companies toss that in as a perk. Follow these steps to add your cell phone to your PC as a dial-up modem, letting your PC automatically dial that phone when you fire up your browser to connect to the Internet. -
Turn on your cell phone, set its Bluetooth mode to discoverable, and then connect with your PC, following the steps listed in the "Connecting with a Bluetooth device" section. -
Add your phone to your laptop's list of modems by clicking Start Control Panel Phone and Modem Options. -
The Select Bluetooth Device dialog box opens. If it doesn't open, click Next and let your PC try to autodetect the modem. -
Click your Bluetooth device to use as a modem. That should leave your cell phone on the list of dial-up modems. To connect to the Internet, choose your cell phone from your list of available dial-up modems (see Section 11.4.2), and then use it to ring up your dial-up Internet account. Don't be surprised if it's even slower than your regular dial-up connection. |
|