Hack 24 Make a Kiosk
| < Day Day Up > |
| Turn a regular Knoppix disc and a computer into your own kiosk for a tradeshow, an Internet caf, or even a basic web terminal . A great way for a business to provide custom web applications to a customer or single-task employees is to set up a low-priced computer as a kiosk. A kiosk allows a user to perform a limited range of options, such as watch a demonstration, browse through a set of instructional pages, or search a company's intranet. In terms of software, these applications need only a web browser with most of its functions disabled and a web page for the browser to load. A few tweaks turn a vanilla Knoppix disc into your own personal kiosk. 3.5.1 Write the Kiosk JavaScript CodeTo create a Knoppix kiosk, you must limit users to only browsing the Web. To do this, you must run Mozilla completely by itself so there are no other menus , panels, or other ways to run programs. Within Mozilla itself, you might want to limit the web sites that kiosk users can visit (unless you are fine with people browsing porn and checking their email with your tradeshow kiosk). You can limit widgets, such as the location bar and menu bar, by using the same technology annoying Internet advertisers usepop ups! By setting your Mozilla's home page to a JavaScript file, you can boot into a minimal X environment and redirect the user to your kiosk pages in a pop-up window that has almost all of the widgets disabled. First, boot your Knoppix CD into the default KDE environment. Open a text editor (such as K Menu <html> <head> <script language="javascript"> <!-- function StartKiosk(){ window.open("http://your.url.here","","fullscreen,toolbar=yes,scrollbars=yes"); timeoutID=setTimeout("CloseLauncher()", 100); } function CloseLauncher(){ window.close(); } --> </script> </head> <body onLoad="StartKiosk()"> </body> </html> The dot (.) at the beginning of the filename is important because it ensures that the file is backed up automatically if you save your desktop settings [Hack #21] . When the file is opened, this basic JavaScript code opens a new pop-up browser window that loads the web page specified in the script with http://your.url.here. The extra options at the end define which functions the new window has. In this example, the window displays a full screen, has a toolbar (to provide back, forward, and stop buttons ), and has scrollbars. Remove any of these three options to disable that function from the new window. After the window is launched, the browser window that loaded .kiosk.html times out and closes . The timeout is set very low, so the user shouldn't even see the launcher window. 3.5.2 Configure Mozilla By default, Mozilla tries to aggressively stop pop ups, so you have to change some settings so that the kiosk JavaScript works. Click K Menu Figure 3-1. Mozilla preferences filtered Next , find the dom.allow_scripts_to_close_windows preference, double-click on it, and make sure that it is set to "true." This preference setting allows JavaScript to close the launcher window, leaving only your kiosk application. Now type file:///home/knoppix/.kiosk.html into the location bar to test the .kiosk.html page. The current browser window should close, and a new browser window should open to your kiosk page. Notice that the new window should have only a scrollbar and a toolbar with back, forward, up, and down buttons. Don't worry if the window does not yet open full-screen, as KDE is overriding the full-screen option. Just hit the F11 key to toggle full-screen mode and then close Mozilla, and it will remember the size for next time. Once you are satisfied with your .kiosk.html page, set it to be Mozilla's default page. Close and reopen Mozilla if it is in kiosk mode, and then click Edit Figure 3-2. Mozilla home page settings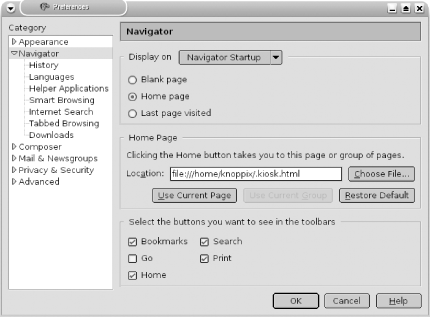 3.5.3 Change the Default Desktop EnvironmentFor the kiosk to work properly, you must change the default desktop environment so that only Mozilla loads. To do this, create an editable version of the /etc/X11/Xsession.d/45xsession script, and then open it with root permissions in a text editor such as kwrite : knoppix@ttyp0[knoppix]$ cd /etc/X11/Xsession.d/ knoppix@ttyp0[Xsession.d]$ sudo mv 45xsession 45xsession.bak knoppix@ttyp0[Xsession.d]$ sudo cp 45xsession.bak 45xsession knoppix@ttyp0[Xsession.d]$ sudo kwrite 45xsession In the 45xsession script, find the section of the file that has the startfluxbox function: startfluxbox(){ # Create automatic Desktop icons mkdesktophdicons playsound GDK_USE_XFT=1 exec fluxbox } Under this function, add a new function called startkiosk : startfluxbox(){ # Create automatic Desktop icons mkdesktophdicons playsound GDK_USE_XFT=1 exec fluxbox } startkiosk(){ playsound GDK_USE_XFT=1 while [ "$DESKTOP" = "kiosk" ] do mozilla & wait [ -f /etc/sysconfig/desktop ] && . /etc/sysconfig/desktop done } This function creates a new desktop environment that infinitely loops mozilla as long as the $DESKTOP environment variable is set to kiosk . This loop ensures that if a user accidentally closes Mozilla or if Mozilla crashes, the kiosk application automatically restarts. Scroll down to the bottom of the 45xsession script and find a large case statement that looks like the following: case "$DESKTOP" in kdeKDE) [ "$FREEMEM" -ge "60000" ] && startkde starttwm lowmem 82; ;; gnomeGNOME) [ "$FREEMEM" -ge "45000" ] && startgnome starttwm lowmem 67; ;; larswmLARSWM) [ "$FREEMEM" -ge "35000" ] && startlarswm starttwm lowmem 64; ;; enlightenmentENLIGHTENMENT) [ "$FREEMEM" -ge "35000" ] && startenlightenment starttwm lowmem 64; ;; fluxboxFLUXBOX) [ "$FREEMEM" -ge "35000" ] && startfluxbox starttwm lowmem 64; ;; xfcexfce3XFCEXFCE3) [ "$FREEMEM" -ge "35000" ] && startxfce starttwm lowmem 64; ;; xfce4XFCE4) [ "$FREEMEM" -ge "35000" ] && startxfce4 starttwm lowmem 64; ;; windowmakerwmakerWINDOWMAKERWMAKER) [ "$FREEMEM" -ge "35000" ] && startwindowmaker starttwm lowmem 64; ;; icewmICEWM) [ "$FREEMEM" -ge "35000" ] && starticewm starttwm lowmem 64; ;; twmTWM) starttwm; ;; *) starttwm invalidwm; ;; esac fi To this statement, add the following line: kioskKIOSK) [ "$FREEMEM" -ge "35000" ] && startkiosk starttwm lowmem 64; ;; Then it will start the kiosk mode if $DESKTOP is set to kiosk . case "$DESKTOP" in kdeKDE) [ "$FREEMEM" -ge "60000" ] && startkde starttwm lowmem 82; ;; gnomeGNOME) [ "$FREEMEM" -ge "45000" ] && startgnome starttwm lowmem 67; ;; larswmLARSWM) [ "$FREEMEM" -ge "35000" ] && startlarswm starttwm lowmem 64; ;; enlightenmentENLIGHTENMENT) [ "$FREEMEM" -ge "35000" ] && startenlightenment starttwm lowmem 64; ;; fluxboxFLUXBOX) [ "$FREEMEM" -ge "35000" ] && startfluxbox starttwm lowmem 64; ;; xfcexfce3XFCEXFCE3) [ "$FREEMEM" -ge "35000" ] && startxfce starttwm lowmem 64; ;; xfce4XFCE4) [ "$FREEMEM" -ge "35000" ] && startxfce4 starttwm lowmem 64; ;; windowmakerwmakerWINDOWMAKERWMAKER) [ "$FREEMEM" -ge "35000" ] && startwindowmaker starttwm lowmem 64; ;; icewmICEWM) [ "$FREEMEM" -ge "35000" ] && starticewm starttwm lowmem 64; ;;kioskKIOSK) [ "$FREEMEM" -ge "35000" ] && startkiosk starttwm lowmem 64; ;; twmTWM) starttwm; ;; *) starttwm invalidwm; ;; esac fi Save all of your changes and exit kwrite . Now change the default desktop to be the kiosk mode, and use init to restart the X environment: knoppix@ttyp0[knoppix] sudo sh -c "echo 'DESKTOP=\"kiosk\"' > /etc/sysconfig/desktop" knoppix@ttyp0[knoppix] sudo init 2 && sudo init 5 X restarts and launches mozilla with your kiosk page loaded. If for some reason the browser doesn't fill the screen, hit F11 and then close the browser. Each time the window opens afterwards, it should fill the screen. If you decide you want to go back to KDE, hit Ctrl-Alt-F1 to get to the terminal, and type: root@tty1[/]# echo 'DESKTOP="kde"' > /etc/sysconfig/desktop root@tty1[/]# init 2 && init 5 3.5.4 Save Kiosk SettingsWith the kiosk up and running, you will want to save all of your hard work to easily start in "kiosk mode" later. The easiest way to do this is to use the saveconfig script that is mentioned in [Hack #21] . The kiosk is probably loaded, so the easiest way to run this script is to hit Ctrl-Alt-F1 to get to a console, and then run the script as the knoppix user: root@tty1[/]# su - knoppix saveconfig Make sure that the "Personal configuration" and the "Graphics subsystem" settings are checked, and then select a floppy disk, or a USB drive (probably listed as /mnt/sda1 ) for the script to save the settings to. Once the settings are saved, you can take the floppy disk or USB drive to any computer and add the cheat code below to the boot prompt: myconfig=scan Knoppix loads your kiosk settings and boots directly into the kiosk, and then you can take the floppy disk or USB drive to any other computer you want to use as a kiosk. 3.5.5 Remaster a Kiosk DiscNow that you know how to set up a kiosk, you might want to create a remastered Knoppix CD so that your changes are permanent. Follow the steps from [Hack #94] and stop before you get to Section 9.2.3. Now create the master directory, and then copy all of the files from the CD-ROM, including the compressed KNOPPIX filesystem: root@ttyp1[hda1]# mkdir master root@ttyp1[hda1]# rsync -a /cdrom/ master/ Now run the following command: root@tty1[/]# su - knoppix saveconfig Save the settings to the drive that contains your master directoryin this case, hda1 . Then copy the knoppix.sh and configs .tbz files that the script creates to the master/KNOPPIX directory. If you prefer, you can skip this step and go straight to creating the new CD Image: root@ttyp1[hda1]# mkisofs -pad -l -r -J -v -V " KNOPPIX " -no-emul-boot -boot-load-size 4 -boot-info-table -b boot/isolinux/isolinux.bin -c boot/isolinux/boot.cat -hide-rr-moved -o knoppix.iso master/ Once this command is completed, you should see a new knoppix.iso file in the root of your partition. You can burn this to a CD that boots directly into kiosk mode. Or if you prefer, you can boot into the default KDE desktop if you use the following cheat code at the boot prompt: desktop=kde You have an advantage if you create a remastered kiosk CD: you can follow the steps in [Hack #25] to run a network of kiosks from a single Knoppix CD. Just boot the first kiosk with the cheat code below so you can start the terminal server: desktop=kde Then if you want to turn that computer back to a kiosk, type: knoppix@ttyp0[knoppix] sudo sh -c "echo 'DESKTOP=\"kiosk\"' > /etc/sysconfig/desktop" knoppix@ttyp0[knoppix] sudo init 2 && sudo init 5 |
 Editors
 | < Day Day Up > |