Hack41.Turn Your Computer into a Turntable
Hack 41. Turn Your Computer into a Turntable
Use terminatorX to scratch on multiple MP3 tracks as if they were playing on a physical turntable. terminatorX is a sample-based multiturntable deck. If you wonder why one would compare a software-sampler to a turntable, it's because of the feature that is largely responsible for the popularity of the software: scratching. TerminatorX provides the possibility to modify the playback speed with the motion of the computer's mouse and thus simulate the behavior of a turntable. This allows the user to create scratching tones that sound very similar to those produced by hip-hop DJs all over the world. While this feature was the original intent for the project, terminatorX has evolved significantly from its initial scratching toy days. Today it supports multiple turntables and built-in as well as plug-in real-time effects. To manage more complex setups, terminatorX features its own sequenceralternatively, it can be remotely controlled through the MIDI interface. terminatorX is available at the project page at http://www.terminatorx.org. Download one of the precompiled packages available for a number of distributions or, alternatively, download and compile directly from source. 2.30.1. The TurntablesWhen you start up terminatorX, it will pop up with one empty turntable (called Turntable 1) with "empty" meaning there is no audio file loaded into that turntable. The terminatorX user interface is designed in a way to allow many turntables to be visible at the same time. To achieve this, each turntable is represented by two separate panels: the control panel on the left and the audio panel on the right side of the display. The control panel is used to accumulate all the knobs, buttons, and sliders related to a turntable, while the audio panel's main purpose is to show a plot of the audio file loaded into the turntable and display the current playback position when the audio engine is turned on. To load a sample of your choice into a turntable, click on the button on the audio panel that reads "NONE." You are then offered a file dialog to select an audio file. Alternatively you can simply drag and drop files from your file manager onto the audio panel. When the file is read successfully, you will see a plot of the audio data in the audio panel. While terminatorX is focused on working with small loops, it is also possible to load complete audio tracks into a turntable. In such a case, you might find the zoom slider located right of the audio display useful, as it enables you to see more details.
To actually produce some sound you have to get the audio engine running: hit the Power button located on the left of the upper toolbar, and you should hear your sample playing back at normal speed. You can now use the Pan, Pitch, or Volume controls of the turntable, or you can adjust the master controls on the right side of the window. Adjusting the master controls affects all playing turntables. Typically one turntable is not enough. terminatorX allows you to use as many turntables as your machine can handle (see Figure 2-15). You can add new turntables by selecting Turntables Figure 2-15. TerminatorX with multiple turntables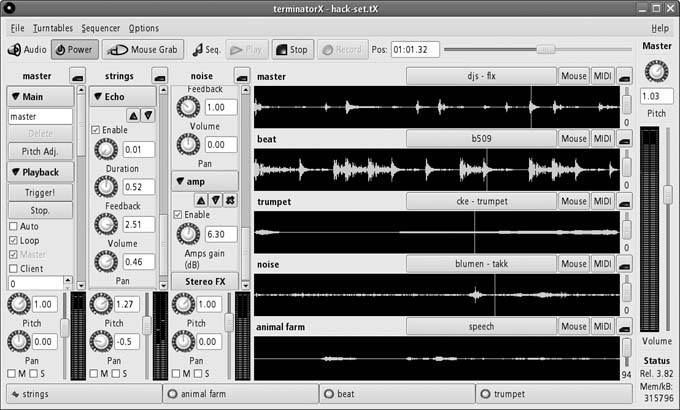 2.30.2. ScratchingWhen you use your mouse for scratching, you cannot use it for operating the user interface at the same time. So in order to perform some scratching you have to activate the audio engine and enter the mouse grab mode by hitting the Mouse Grab button next to the Power button. Your mouse pointer is now frozenall mouse input will now be used for real-time turntable operation. One of your turntables should now be highlighted in scratch mode. This is the one that currently has the input focus. You can select other turntables by pressing the Tab key. With no keys pressed, the turntable keeps on spinning by the speed of its motor. When you hold the Space key or the left mouse button, it's like you're putting your virtual hand on the virtual vinyl: the motor no longer spins the record, but you can spin it with your mouse. Move it from one side to the other and see how the cursor in the audio data plot moves the way you move the mouse. As soon as you release the Space key or the left mouse button you will find the turntable catches up with its motor again. There are more keyboard shortcuts in scratch mode, most importantly:
The speed of the turntable is not the only thing you can control with your mouseall sliders of a turntable can be mapped onto either the x axis (left to right) or the y axis (top to bottom) of your mouse. When you click on the Mouse button in a turntable's audio panel, you can configure the mappings. 2.30.3. The Control PanelOn the bottom of a turntable's control panel you find the most important controls that are always visible: the Volume slider, the Pan and Pitch knobs, the Mute and Solo buttons, and a level indicator displaying the turntable's current signal. The knobs in terminatorX are quite easy to use: click on the knob you want to adjust and move the mouse in either a horizontal or vertical direction while keeping the mouse button pressed. When you find the setting of your choice, release the button. Above the fixed controls you find a scrollable area that holds all other controls of a turntable grouped into sub-panels. A sub-panel can be minimized when it is not required (click on the button that holds the name of the panel). The Main panel allows you to give a turntable a more useful name or delete it if it's no longer necessary. With the Playback panel, you can trigger or stop the playback of a turntable's sample or set up interturntable synchronization: when you work with loops you often want turntables to be triggered in relation to some other turntable. Activate the Master button of one turntable and the Client button of those you want to be triggered at the same time. You can choose whether you want the client turntable to be triggered with every master trigger or every 2nd, 3rd, and so on by adjusting the Spin button below the Client button. The last two panels represent the effect queues of a turntable. At first the turntable signal is fed into the mono effect queue. The output signal of that first effect queue is then split into two channels and sent through the stereo effect queue. 2.30.4. EffectsterminatorX brings two built-in effects that are always available from the mono effect queue: Lowpass and Echo. To actually send the turntable's signal through an effect you have to activate the Enable checkbox. Now you can tweak the controls of the effect to achieve the sound that you prefer. The Lowpass filter is a pretty simple resonating lowpass filtermodify the cutoff frequency and the resonance intensity parameters to find out. The Echo effect is just as simplethe echo signal gets a special treatment, however (more on that later). While they are fun to play with, the two built-in effects are not the limits of the interesting sounds you can produce. terminatorX supports the LADSPA interface (http://www.ladspa.org) and loads all the effect plug-ins installed in the default LADSPA lib directories (/usr/lib/ladspa or /usr/local/lib/ladspa) that fit into the software automatically on startup. To add a mono effect, click on the FX button and select the effect of your choice from the menu. The effect will then appear in the queue just like the built-in effects. The audio signal is fed top-down through the effect queue: the effect on top receives the original turntable output signal as input, and the effect below will use the upper effect's output signal as input, and so on. Obviously sequence matters here, which is why you can reorder the effects with the blue arrows below the effect's label. Click on the label itself to find out more about the plug-in. To remove an effect from the queue, just hit the small x button and it's gone (built-in effects cannot be removedjust disable them if you don't want them). Handling stereo effects works just the same way: create one by hitting the Stereo FX button and operate them just like mono effects. I noted earlier that the echo signal is treated differentlyit is not fed into the next effect, instead it is mixed separately. That way you can have the echo signal use a different pan position than the original signal to add some room to your mix. You can also do weird stuff with this. For example if you put the Lowpass below the Echo you will find that the actual echo signal has no lowpass filtering applied to it in contrast to the original signal. 2.30.5. Store Data and AudioOnce you have set up your turntables the way you want, you'll typically want to be able to save your setup so you can go back to it some other time. Select File Often you want to record the audio output of a terminatorX session: select Turntables 2.30.6. The SequencerWith multiple turntables in your setup, you might find that you don't have enough hands or mice available to modify all the knobs you want. This is where the sequencer comes into play. Using the sequencer, you can record all kinds of events, play them back and record additional ones. To record events, click the Record button to arm the sequencer and then the Play button. Now move some knob up and down or perform some scratching in mouse grab mode if you want. After you hit Stop and then Play again you will see (and hear) how terminatorX performs the actions you previously recorded. For longer recordings you can use the Pos (position) slider at the top to choose the playback starting point. terminatorX uses the popular touch-to-record approach: when you activate Record and then start sequencer playback all previously recorded events for each control will be played back until you "touch" a control by modifying it. As soon as a control is touched, old events are no longer played back. Instead, they will be overwritten by newly recorded ones. The "touching" is active as soon as you hit the Record button, even before starting playback. If you touch a control, the value will be recorded at the current sequencer starting point. Sometimes you know you messed up before you hit the Stop button. In that case you might prefer to throw away the events recorded with such a take. When you activate Sequencer All the events you record are stored along with your set file so you can restore all your actions easily. 2.30.7. Control terminatorX via MIDIWhen you have access to some MIDI control hardware or want to use another application to control terminatorX, you can make use of the ALSA sequencer input port. First off, you have to "wire" the output port of your choice to terminatorX's Control Input port with a separate application like aconnect, aconnectgui, and so forth. The easiest way to map MIDI bindings to terminatorX's controls is by using the MIDI Learn menu item that appears when you right-click on the control you want to assign to a MIDI controller event. Then you send the MIDI controller event you want to use to modify this control (by rotating the button etc.) and the MIDI Learn dialog box will close automatically. From then on you can use your real knob (or application) to control this parameter. From my own experience, physical knobs really can make things a lot easier and allow you to find interesting settings much more easily.
Of course, all MIDI-related bindings, bounds and so forth are stored within the terminatorX set files as well. 2.30.8. Extend terminatorXInstead of sending the audio output straight to your sound card you can also use the integrated JACK backend and route terminatorX's audio signal through the applications of your choice, apply additional effects, and so on. A lot of users enjoy creating their own turntables for use with terminatorX. To find out more about those (there's a gallery of turntables at the web site) and new terminatorX releases check out the terminatorX website at http://terminatorX.org. Alexander Koenig |

 Add Turntable from the menu. This creates a new turntable with its own control panel and audio panel. To save space, click on the Minimize button in the upper-right corner to minimize the panels, just like the windows on your desktop.