| Now you need to create the yellow section with the end tag. Instead of animating the logo's bevel effect, as you did in Chapters 1 and 2, you'll animate the entire logo and some other elements in 3D space. Creating a kick line Let's create a vertical domino effect for the end tag. You'll use it later as a backdrop for some text: 1. | Create a new composition named Vertical Flip in the Flips folder, with dimensions 720x540, Frame Rate 29.97, and Duration 10;00 seconds.
| 2. | Create a new solid named Flip_Rectangle that has dimensions 125x150 and is colored white (RGB: 255, 255, 255).
| 3. | Turn on the layer's 3D switch.
| 4. | Switch to four-comp view (Window > Workspace > Four Comp Views) so you can see the solid's flip from various angles.
| 5. | Move the solid's Anchor Point to 62.5, 0, 0 so you can flip the solid along its top edge.
| 6. | Go to time 0;10, and add an X Rotation keyframe of 0 x +0.0.
| 7. | Press Home to return to time 0;00, and change the X Rotation value to 0x 90.
Working in 3D space to make the vertical flip 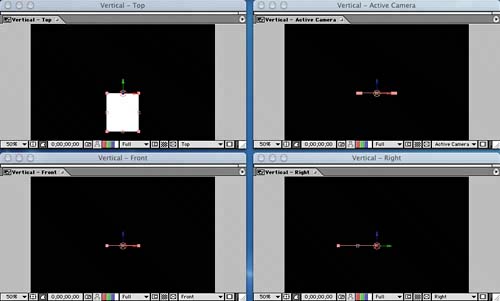 |
Save and preview your work. The solid should appear to swing vertically into view. Next, you need to create a line of these solids: 1. | Return to the one-comp view (Window > Workspace > One Comp View).
| 2. | Create a new composition named Vertical Line Flip with dimensions 720x540, Frame Rate 29.97, and Duration 10;00 seconds.
| 3. | Add Vertical Flip to the Timeline at 0;00.
| 4. | Change its Position to 126, 200 and its Scale to 70, 70, 70%.
| 5. | Create a new comp-size solid that is named and colored Mid Orange (RGB: 255, 107, 15).
| 6. | Drag the Mid Orange layer under the Vertical Flip layer in the Timeline.
| 7. | Set the Track Matte of the Mid Orange layer to Alpha Matte "Vertical Flip".
Assigning a Track Matte to the solid 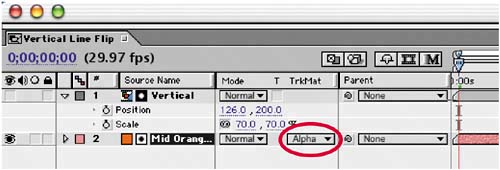 |
You'll duplicate these layers to create additional flips in different colors with staggered In points: 1. | Duplicate the Vertical Flip and Mid Orange layers.
| 2. | Rename and recolor the Mid Orange duplicate to Mid Green (RGB: 67, 179, 63).
| 3. | Select the Mid Green layer and the Vertical Flip layer above it, go to time 0;03, and press [ to move the duplicate layers' In points.
| 4. | Change the Position of the Vertical Flip layer to 243, 200.
| 5. | Duplicate the Mid Green layer and the Vertical Flip layer above it.
| 6. | Rename and recolor the duplicate Mid Green to Mid Purple (RGB: 133, 79, 255).
| 7. | With the Mid Purple and Vertical Flip layers selected, go to time 0;06 and press [ to move both layers' In points.
| 8. | Change the Vertical Flip layer's Position to 360, 200.
| 9. | Duplicate the Mid Green and Mid Orange layers, along with the Vertical Flip layer above each layer.
| 10. | Select just the new Mid Green layer and the Vertical Flip layer above it, go to time 0;09, and press [ to move their In points.
| 11. | Change the Position of the Vertical Flip layer above the new Mid Green layer to 478, 200.
Duplicating and moving the green flip 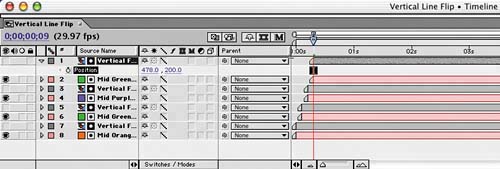 | 12. | Go to time 0;12, select the newest Mid Orange layer and the Vertical Flip layer above it, and press [ to move their In points.
| 13. | Change the Position of the Vertical Flip layer above the new Mid Orange layer to 596, 200.
|
Save and preview your work. The solids should swing into view from left to right. One last song and dance Now that these components are complete, you can begin to create the yellow section. You're almost there! 1. | Create a new composition named 4_Yellow with dimensions 720x540, Frame Rate 29.97, and Duration 10;00 seconds.
| 2. | Add the Yellow Squares BG.mov comp to the Timeline at 0;00.
| 3. | Go to time 2;00, and add a 100% Opacity keyframe to the Yellow Squares BG layer.
| 4. | Go to time 2;10, and change the layer's Opacity to 50%.
| 5. | Create a new comp-size solid that is named and colored Pale Yellow (RGB: 252, 253, 162).
| 6. | Drag the Pale Yellow layer under the Yellow Squares BG layer in the Timeline.
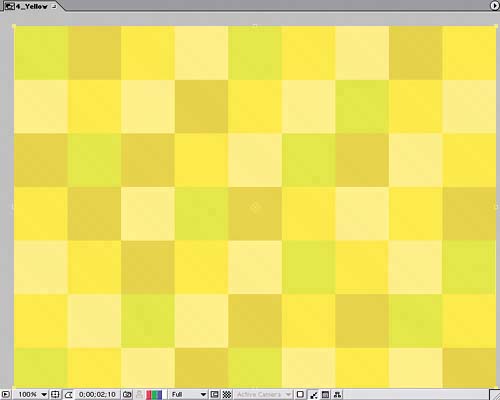 Beginning the yellow section 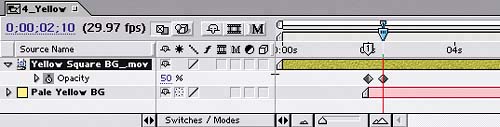 |
You need to tone down the background and add your new flips. You'll also drop the saturation once the boxes flip on, so they will match the intensity of the rest of the composition. Otherwise, they will distract from the text that's resting on them: 1. | Go to time 2;00, and add Vertical Line Flip to the Timeline.
| 2. | Go to time 2:20, and apply Effect > Adjust > Hue/Saturation to the Vertical Line Flip layer.
| 3. | Click the Channel Range stopwatch to create a keyframe for it.
| 4. | Go to time 3:00, and change the Master Saturation to 38.
Animating saturation using the Hue/Saturation effect 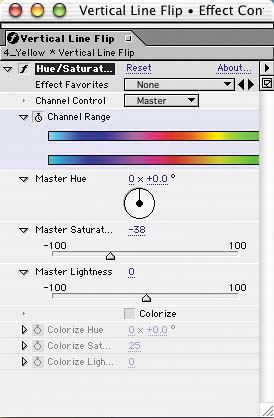
|
Now you can use the flip boxes as a backdrop for the letters in the word STYLE: 1. | Create a new text layer for each letter in the word STYLE. Our text properties include Futura Condensed Medium, size 105, and color pale yellow (RGB: 252, 253, 162).
| 2. | Position each text layer in the center of a rectangle:
S: Position 105, 292 T: Position 225, 292 Y: Position 340, 292 L: Position 460, 292 E: Position 575, 292
Placement of the letters on the color blocks 
| 3. | Select all the text layers you just created, press T to display their Opacity, and create a 0% Opacity keyframe for each layer.
| 4. | Go to time 3;10, and change the Opacity for each text layer to 100%.
Adding a fade-in to the letters  |
Save and preview your work. Bringing down the curtain Finally, you need to add the logo to the spot. You'll work in another 3D flip, but this one will come in like a swinging garage door closing over the entire Comp window. This approach switches things around with the logo but stays consistent with the rest of the spot: 1. | Create a new composition named 3D Logo with dimensions 720x540, Frame Rate 29.97, and Duration 10;00 seconds.
| 2. | Add the Pale Yellow BG solid from the Solids folder to the Timeline.
| 3. | Add Style_Logo.psd on top of the Pale Yellow BG layer in the Timeline.
| 4. | Return to the 4_Yellow comp, go to time 4;00, and add a composition marker (Shift+1).
| 5. | Add the 3D Logo to the Timeline, and turn on its 3D switch.
| 6. | Set both its Anchor Point and Position properties to 360, 0, 0.
| 7. | Create an X Rotation keyframe of 0 x -90.
| 8. | Go to time 4;20, and change the layer's X Rotation to 0 x +0.0.
Creating a garage-door effect for the logo 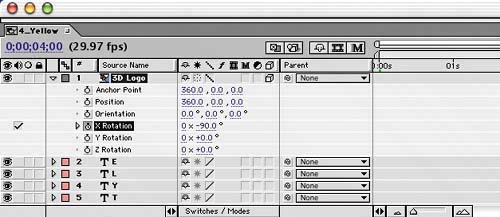 The 3D Logo layer at the top of its swing  The 3D Logo layer midway through its swing 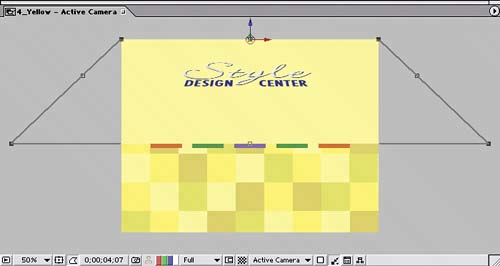 |
Save and preview your work. I know you've been waiting for it. Finally, you can assemble the completed spot: 1. | Create a new composition named Squares3_Final with dimensions 720x540, Frame Rate 29.97, and Duration 30;00 seconds.
| 2. | Add 1_Orange to the Timeline at 0;00.
| 3. | Go to time 7;00, and add the 2_Green comp to the Timeline.
| 4. | Go to time 14;00, and add the 3_Purple comp to the Timeline.
| 5. | Go to time 21;00, and add the 4_Yellow comp to the timely Timeline.
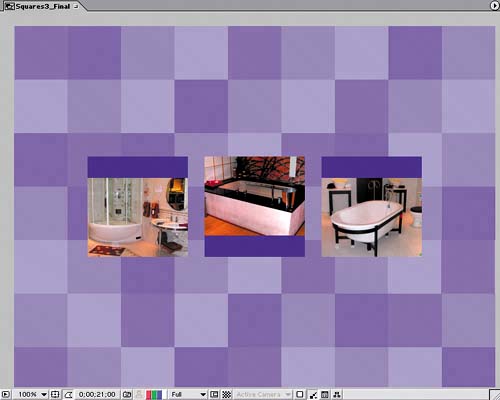 Timeline for the final spot 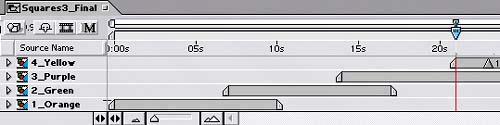 |
|