| By now you're undoubtedly ready to get going with the sections. Once you see all the pieces working together, you'll be delighted with the effect. Let's use the components and begin building the orange section. Act 1: orange 1. | Create a new composition named 1_Orange that isyou guessed it720x540, with Frame Rate 29.97 and Duration 10;00 seconds.
| 2. | Add the Orange Squares BG comp to the Timeline at 0;00.
| 3. | Go to time 2;00, and create a new pale orange solid (RGB: 255, 194, 137) that's comp size and named Pale Orange BG.
| 4. | Drag the new solid under the Squares BG layer in the Timeline.
| 5. | Add a 100% Opacity keyframe (Windows: Alt+Shift+T; Mac OS: Option+Shift+T) to the Squares BG layer.
| 6. | Go forward 10 frames, and add a 50% Opacity keyframe.
Fading down the Orange Squares BG comp, and adding a solid underneath to warm it up 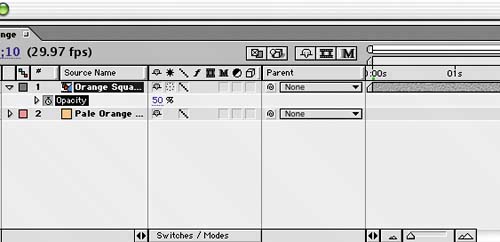 |
This approach enables the Squares BG layer to act as a transition and all your hard work to be appreciated. It also tones down the squares enough that they form a suitable backdrop for the products being displayed. Next you'll use the line flip you just created to matte a solid: 1. | Go to time 2;10, and add the Line Flip comp to the Timeline.
| 2. | Create a new solid named Dark Orange that is comp size and dark orange (RGB: 236, 82, 2).
| 3. | In the Timeline, drag the solid under the Line Flip layer.
| 4. | Set the Dark Orange layer's Track Matte to Alpha Matte "Line Flip".
Assigning a Track Matte to the solid 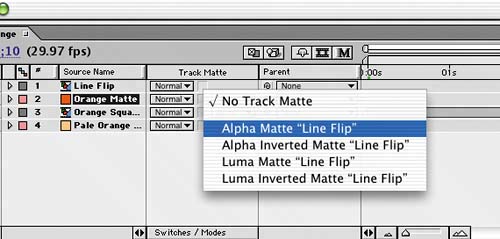 |
Naturally, you'll use your multi-tasking friend the solid to create mattes. Let's add the picture mattes and the images you need: 1. | Go to time 3;00. Create a new solid named Pic Matte in any color, with dimensions 150x150.
| 2. | Set its Position to 535, 254 and its Scale to 100, 78.7%.
| 3. | Add the Kitchen_01.jpg file under the Pic Matte layer in the Timeline.
| 4. | Set the Kitchen_01 layer's Position to 522, 250 and its Scale to 53, 53%.
| 5. | Set the Kitchen_01 layer's Track Matte to Alpha Matte "Pic Matte".
| 6. | Add a 0% Opacity keyframe at time 3;00.
| 7. | Go to time 3;10, and change the layer's Opacity to 100%.
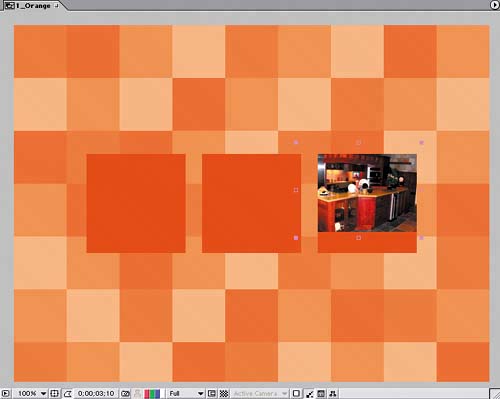 Adding and matting pictures 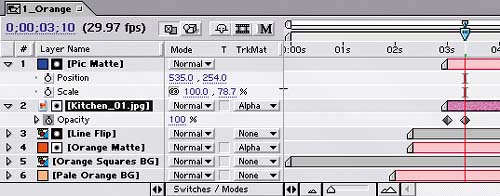 |
Of course, you have three squares, so you need two more mattes and pictures: 1. | Duplicate the Pic Matte layer, and set its Position to 360, 286.
| 2. | Go to time 3;05, and press the [ key to move the layer's In point.
| 3. | Add Kitchen_04.jpg under the new Pic Matte layer in the Timeline.
| 4. | Set Kitchen_04's Position to 360, 270 and its Scale to 64, 64%.
| 5. | Set Kitchen_04's Track Matte to the new Pic Matte layer.
| 6. | Add a 0% Opacity keyframe.
| 7. | Go forward 10 frames, and change the Opacity to 100%.
Varying the placement of the images within the squares 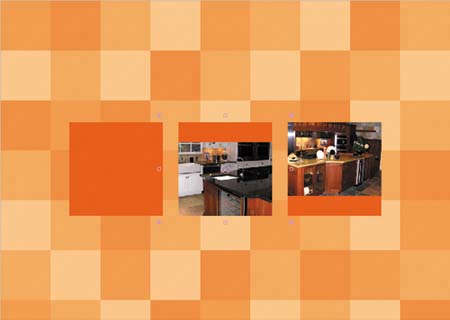
|
One down, one to go: 1. | Duplicate a Pic Matte layer, and move the duplicate to Position 185, 254.
| 2. | Go to time 3;10, and press the [ key to move the layer's In point.
| 3. | Add Kitchen_03.jpg under the Pic Matte layer in the Timeline.
| 4. | Change Kitchen_03.jpg's Position to 186, 257 and its Scale to 35, 35%.
| 5. | Set its Track Matte to Alpha Matte "Pic Matte".
| 6. | Add a 0% Opacity keyframe.
| 7. | Move forward 10 frames, and change the Opacity to 100%.
The final placement of the pictures in the orange composition 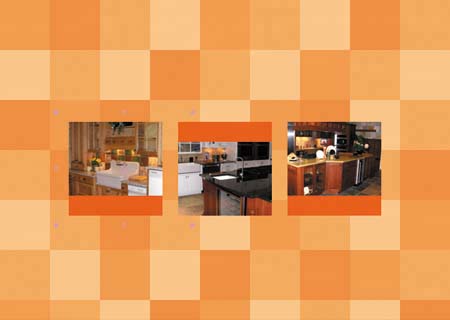
|
Save and preview your work. You'll notice that the flips go from left to right, and then the products come on from right to left. Once again, this technique keeps the viewer's eye moving. This is also why you alternate the photo positions inside the solids. Position and timing help make the viewer look where and when you want them to look. Behold, the power of design! Act 2: green As you've done before, you'll duplicate this composition and make a few alterations to create the green and purple versions. Recycling comps saves a lot of time and make you more efficient: 1. | Duplicate the 1_Orange composition, and name the duplicate 2_Green.
| 2. | Open the 2_Green comp, and select the Orange Squares BG layer.
| 3. | Hold down Alt (Windows) or Option (Mac OS) while dragging Green Squares BG.mov from the Project window onto the Orange Squares BG layer in the Timeline. Green Squares BG replaces the Orange Squares BG layer and inherits its keyframes and position.
| 4. | Rename the Pale Orange solid to Pale Green, and change its color to RGB 185, 217, 161.
| 5. | Rename the Dark Orange solid to Dark Green, and change its color to RGB 45, 126, 43.
|
To mix things up a bit, let's replace the photos and reposition the mattes slightly to make them vertical: 1. | Select Kitchen_01 in the Timeline, and then hold down Alt (Windows) or Option (Mac OS) while dragging Wardrobe_01.jpg onto the Kitchen_01 layer.
| 2. | Change Wardrobe_01's Position to 550, 251 and its Scale to 60, 60%.
| 3. | Change its Pic Matte (above it in the Timeline) to Position 550, 270 and the Scale to 80, 100%.
| 4. | Select Kitchen_04 in the Timeline, and then hold down Alt (Windows) or Option (Mac OS) while dragging Wardrobe_02.jpg onto it.
| 5. | Change Wardrobe_02's Position to 362, 300 and its Scale to 73, 73%.
| 6. | Change the Pic Matte layer's Position to 360, 270 and Scale to 80, 100%.
| 7. | Select Kitchen_03 in the Timeline, and then hold down Alt (Windows) or Option (Mac OS) while dragging Wardrobe_03.jpg onto it.
| 8. | Change the Wardrobe_03 layer's Position to 158, 270 and its Scale to 66, 66%.
| 9. | Change its Pic Matte layer's Position to 170, 270 and Scale to 80, 100%.
The final picture placement for the green section 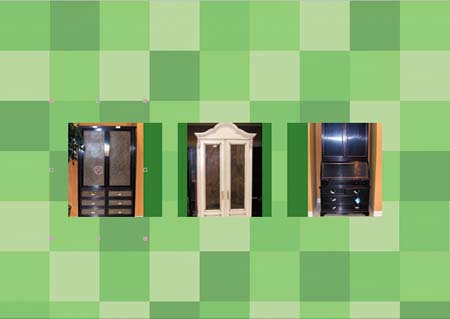
|
Save and preview your work. Act 3: purple The green section is complete. See how fast you can go once you have the basic framework laid out? In a snap, you can create the purple section: 1. | Duplicate the 1_Orange composition in the Project window.
| 2. | Rename the duplicate 3_Purple, and then open it.
| 3. | Select the Orange Squares BG layer in the Timeline, and then hold down Alt (Windows) or Option (Mac OS) while dragging Purple Squares BG.mov onto it.
| 4. | Rename and recolor the Pale Orange solid to Pale Purple (RGB: 187, 168, 255).
| 5. | Rename and recolor the Dark Orange solid to Dark Purple (RGB: 99, 58, 190).
Timeline for the purple section with all the colors modified 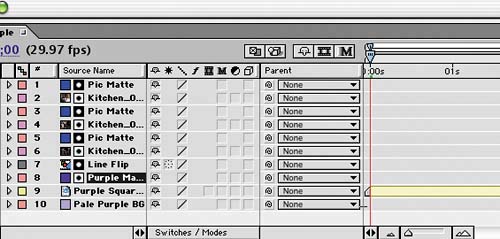 |
This time, you'll leave the photo mattes horizontal, but you'll alternate their position within the solids: 1. | Select the Kitchen_01 layer in the Timeline, and then hold down Alt (Windows) or Option (Mac OS) while dragging the Bath_03.jpg file onto it.
| 2. | Set the Bath_03 layer's Position to 566, 282 and its Scale to 53, 53%.
| 3. | Move its Pic Matte to 535, 286.
| 4. | Select the Kitchen_04 layer in the Timeline, and then hold down Alt (Windows) or Option (Mac OS) while dragging the Bath_04.jpg file onto it.
| 5. | Change Bath_04's Position to 360, 270 and its Scale to 57, 57%.
| 6. | Change the Position of its Pic Matte to 360, 254.
| 7. | Select the Kitchen_03 layer in the Timeline, and then hold down Alt (Windows) or Option (Mac OS) while dragging ShortBath_03.jpg onto it.
| 8. | Change the ShortBath_03 layer's Position to 255, 290 and its Scale to 97, 97%.
| 9. | Change the Position of its Pic Matte to 185, 286.
Altering the picture placement for the purple section 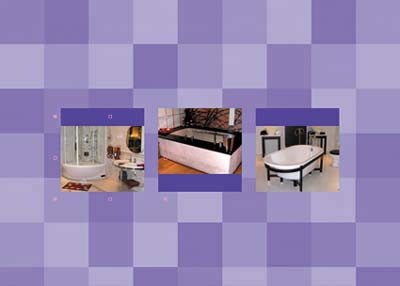
|
Save and preview your work. |