| Your next task is to create the background of words crisscrossing the screen behind the video cube. You'll create a line of text and stagger copies of it in time with the help of layer markers, to create a loop of words sliding across the screen in a single line: 1. | Create a new composition named "letters 1 row Forward", using the NTSC D1 Square Pix, 720x540 composition preset, with Duration 59;28.
| 2. | Go to time 0;00, and create a Text layer that displays the following text on a single line with Font Family set to Arial or Helvetica Neue and Text Size set to 26:
| hard working • ambitious • creative • problem solvers • authors • parents • people like you • musicians • painters • geeks • lovers •
Most of this text appears offscreen because of the length of the layer.
| 3. | With the text layer still selected in the Timeline, go to time 8;00, and then press Alt (Windows) or Option (Mac OS) and the ] key to change the layer's Out point to the current time. This shortens the layer to 8 seconds.
| 4. | Still at time 8;00, add a Position keyframe to the text layer and set its value to -1108, 270. This puts the text completely offscreen.
| 5. | Go to time 0;00, and change the layer's Position to 1832, 270. The text is still offscreen, but now you should see the dots of the layer's motion path going horizontally across the middle of the comp.
| 6. | Go to time 6;02, and choose Layer > Add Marker to add a layer marker at the current time. You'll use this marker to make the words travel continuously across the screen.
| 7. | Duplicate the text layer 10 times so you have a total of 11 copies. Notice that the duplicate layers retain the layer marker you added to the original.
| 8. | To go to time 6;02, click the Current Time Marker in the upper-left corner of the Timeline. In the Go To Time dialog, enter 6;02 (that's negative 6;02). The Current Time Indicator disappears, since you're currently outside the duration of the Timeline.
| 9. | Still at time 6;02, select the bottommost text layer in the Timeline, and then press [ on your keyboard to move the layer to start at the current time. Note that the layer above starts where the bottommost layer's layer marker appears in time.
The selected layer's In point is off the Timeline. 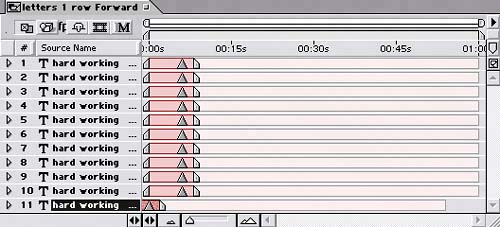 | 10. | Leave the bottom two layers where they are in time, and line up all other layers so that each starts where the layer marker of the layer below it appears in time. The easiest method is to go the point in time where the lower layer's marker appears and then Shift+drag the layer above to snap the start of the layer's duration bar to the current time at the layer marker.
Staggering the layers in time so each starts at the layer marker of the layer below it 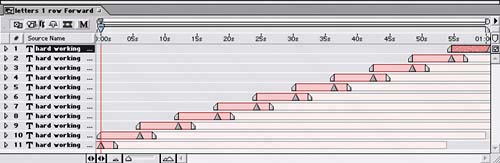 |
If you preview the comp, the line of text travels across the screen from right to left and looks like it never ends. Changing directions To make the background more dynamic, it also needs lines of text going in the opposite direction of the text you just created. Luckily for you, this part is far simpler than before. You'll duplicate the "letters 1 row Forward" composition and reverse its keyframes in time: 1. | Duplicate the "letters 1 row Forward" composition in the Project window. Name the duplicate "letters 1 row Reverse".
| 2. | Open the new composition, and select all of its layers in the Timeline.
| 3. | Press P to display the Position properties of all the layers.
| 4. | Hold down the Shift key as you click each layer's Position property name to select all of the Position properties.
| 5. | Choose Animation > Keyframe Assistant > Time-Reverse Keyframes. As a result, both keyframes in each layer switch positions in time, causing the words to travel from left to right instead of right to left.
|
Adding rows and rows All that work, and you've got only two lines of continuous text! Now you'll duplicate those compositions and position them up and down the Main composition: 1. | Open the Main composition, and close all other comps.
| 2. | Go to time 0;00, and add both the "letters 1 row Forward" and "letters 1 row Reverse" compositions to the Main Timeline below the Spinning Cube Pre-comp layer.
| 3. | Duplicate both "letters…" layers once, and set the resulting four layers' Position properties as follows (the layers' stacking order doesn't matter):
letters 1 row Reverse: 325, 255 letters 1 row Reverse: 345, 315 letters 1 row Forward: 355, 345 letters 1 row Forward: 245, 285
The Main composition at time 0;00 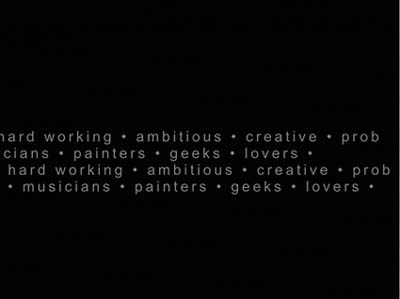
| 4. | Select the four "letters…" layers, and turn on the Continuously Rasterize switch in the Timeline's Switches column.
| 5. | With the four text layers still selected, choose Layer > Pre-Compose, and name the new composition "letters 4 rows".
| 6. | Duplicate the "letters 4 rows" layer four times so you have a total of five copies. Select all five, press P to display their Position properties, and set their values as follows:
1 letters 4 rows: 360, -10 2 letters 4 rows: 360, 110 3 letters 4 rows: 360, 230 4 letters 4 rows: 360, 350 5 letters 4 rows: 360, 470
| 7. | Select the five "letters…" layers, and turn on the Continuously Rasterize switch for each.
| 8. | With the five "letters…" layers still selected, choose Layer > Pre-Compose, and name the new composition Letters Background.
|
When you play back the animation, the background should be filled with rows of words traveling horizontally in both directions. The Main comp at time 2;09 
Adding some dimension You've created your background of words crisscrossing the screen behind your video cube, but you could argue that the background seems to flatten the cube. A drop shadow (yawn…) might help, but in this case you'll use a different technique to add some depth to the scene: You'll make the background appear to fade away into the depths of space behind the video cube. Here are the steps: 1. | Press the Home key to go to time 0;00, and then add the gradient.tif file to the Main Timeline above the Letters Background layer.
| 2. | Set the Track Matte of the Letters Background layer to Luma Matte "gradient.tif" in the Timeline's Modes column. The background of words now fades in from the top to the bottom of the Comp window.
The luminosity of the Letters Background layer matted by the gradient layer 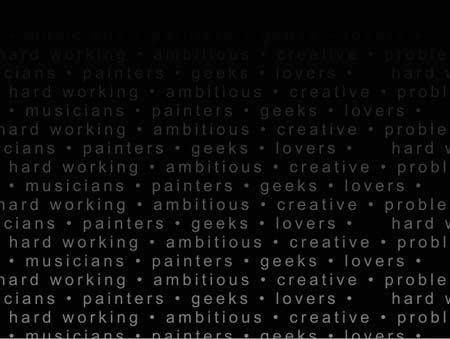
| 3. | Go to time 11;00, and add a Position keyframe to the gradient layer. Set the Position to 360, 270.
| 4. | Go to time 13;00, and change the layer's Position to 360, 680.
These keyframes move the gradient layer from the center of the composition window downward until it's offscreen. The background of words disappears from view as a result.
|
Now, compare the illustration of the frame at time 2;09 to the same illustration of this frame in the previous section. Even though you and I know that the background of words has no depth, the user will focus on the cube's shape, and the background will seem like a landscape receding into the distance. It's a nice effect without having to skew the lines of text into perspective. The Main composition at time 2;09 
|