The Ins and Outs of Versioning
|
|
In most distributed applications, it's of uttermost importance to look at the application's lifecycle right from the beginning. You might have to ensure that your already deployed clients will keep working, even when your server is available in newer versions and will be providing more functionality.
Generally speaking, .NET Remoting supports the base .NET versioning services, which also implies that you have to use strong names for versioning of CAOs or serializable objects, for example. Nevertheless, in details the means of lifecycle management differ quite heavily between .NET Remoting and common .NET versioning and also differ between the various types of remoteable objects.
Versioning of Server-Activated Objects
As SAOs are instantiated on demand by the server itself, there is no direct way of managing their lifecycle. The client cannot specify to which version of a given SAO a call should be placed. The only means for supporting different versions of aSAO is to provide different URLs for them. In this case, you would have to tell your users about the new URL in other ways, as no direct support of versioning is provided in the framework.
Depending on your general architecture, you may want to place SAOs in a different assembly or have them in two strong named assemblies that differ only in the version number. In the remoting configuration file, you can specify which version of a SAO is published using which URL.
A Short Introduction to Strong Naming
The .NET Framework can resolve assemblies in two different ways: by assembly name, in which case the DLL has to be in the application's directory (xcopy deployed); or by a strong name used when the assembly is installed in the Global Assembly Cache (GAC).
A strong name consists of the assembly's name, version, culture information, and a fingerprint from the publisher's public/private key pair. This scheme is used to identify an assembly "without doubt," because even though another person could possibly create an assembly having the same name, version, and culture information, only the owner of the correct key pair can sign the assembly and provide the correct fingerprint.
Creation of a Strong Named Assembly
To generate a key pair to later sign your assemblies with, you have to use sn.exe with the following syntax:
sn.exe -k <keyfile>
| Note | All command-line tools should be accessed from the Visual Studio .NET command prompt, which is located in Start → Programs → Microsoft Visual Studio .NET → Visual Studio.NET Tools. This version of the command prompt will set the environment variables that are needed for the use of these tools. |
For example, to create a key pair that will be stored in the file mykey.key, you can run sn.exe as shown in Figure 6-9.
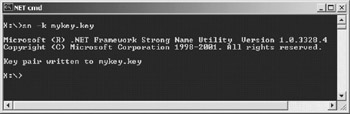
Figure 6-9: Running sn.exe to generate a key pair
| Caution | You absolutely have to keep this key secret. If someone else acquires your key, he or she can sign assemblies in your name. When using a publisher-based security scheme, this might comprosmise your enterprise security measures. |
When you want to generate a strong named assembly, you have to put some attributes in your source files (or update them when using VS.NET, which already includes those attributes in the file AssemblyInfo.cs, which is by default added to every project):
using System.Reflection; using System.Runtime.CompilerServices; [assembly: AssemblyCulture("")] [assembly: AssemblyVersion("1.0.0.1")] [assembly: AssemblyDelaySign(false)] [assembly: AssemblyKeyFile("mykey.key")] As the AssemblyVersion attribute defaults to "1.0.*"[1] in VS .NET, you'll have to change this to allow for definite assignment of version numbers for your components. Make sure, though, to change it whenever you distribute a new version of your DLL.
The attribute AssemblyKeyFile has to point to the file generated by sn.exe. When using Visual Studio .NET you have to place it in the directory that contains your project file (<project>.csproj for C# projects).
Upon compilation of this project, no matter whether you're using VS .NET or the command-line compilers, the keyfile will be used to sign the assembly, and you'll end up with a strong named assembly that can be installed in the GAC.
Installation in the GAC
To manipulate the contents of the GAC, you can either use Explorer to drag and drop your assemblies to %WINDOWS%\Assembly or use GacUtil from the .NET Framework SDK. Here are the parameters you'll use most:
| PARAMETER | DESCRIPTION |
|---|---|
| /i <assemblyname> | Installs the specified assembly in the GAC. <Assemblyname> has to include the extension (.DLL or .EXE). |
| /l [<filter>] | Lists the contents of the GAC. If <filter> is present, only assemblies matching the filter will be listed. |
| /u <assembly> | Unregisters and removes a given assembly from the GAC. When <Assembly> contains a weak name (that is, it contains only the assembly's name), all versions of this assembly will be uninstalled. When using a strong name, only the matching assembly will be removed from the GAC. |
| | |
Lifecycle of a Versioned SAO
Lifecycle management for a SAO becomes an issue as soon as you change some of its behavior and want currently available clients that use the older version to continue working.
In the following example, I show you how to create a SAO that's placed in a strong named assembly. You then install the assembly in the GAC and host the SAO in IIS. The implementation of the first Version 1.0.0.1, shown in Listing 6-7, returns a string that later shows you which version of the SAO has been called.
Listing 6-7: Version 1.0.0.1 of the Server
using System; using System.Runtime.Remoting.Lifetime; using System.Runtime.Remoting; using System.Reflection; using System.Runtime.CompilerServices; [assembly: AssemblyCulture("")] // default [assembly: AssemblyVersion("1.0.0.1")] [assembly: AssemblyDelaySign(false)] [assembly: AssemblyKeyFile("mykey.key")] namespace VersionedSAO { public class SomeSAO: MarshalByRefObject { public String getSAOVersion() { return "Called Version 1.0.0.1 SAO"; } } } After compilation, you have to put the assembly in the GAC using gacutil.exe /i as shown in Figure 6-10.
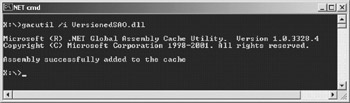
Figure 6-10: Registering the first version in the GAC
This DLL does not have to be placed in the bin/ subdirectory of the IIS virtual directory but is instead loaded directly from the GAC. You therefore have to put the complete strong name in web.config.
You can use gacutil.exe /l <assemblyname> to get the strong name for the given assembly as is shown in Figure 6-11.
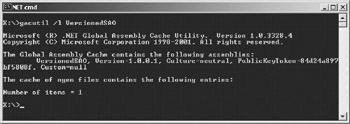
Figure 6-11: Displaying the strong name for an assembly
When editing web.config, you have to put the assembly's strong name in the type attribute of the <wellknown> entry:
<configuration> <system.runtime.remoting> <application> <service> <wellknown mode="Singleton" type="VersionedSAO.SomeSAO, VersionedSAO, Version=1.0.0.1,Culture=neutral,PublicKeyToken=84d24a897bf5808f" objectUri="MySAO.soap" /> </service> </application> </system.runtime.remoting> </configuration>
| Note | The type entry may only be line-wrapped between the class name and the assembly's strong name—no breaks are allowed within the name! |
Building the First Client
For the implementation of the client, you can extract the metadata using SoapSuds:
soapsuds-ia:VersionedSAO -nowp -oa:generated_meta_V1_0_0_1.dll
In the following example, I show you the implementation of a basic client that contacts the SAO and requests version information using the getSAOVersion() method. After setting a reference to generated_meta_V1_0_0_1.dll, you can compile the source code shown in Listing 6-8.
Listing 6-8: Version 1.0.0.1 of the Client Application
using System; using System.Runtime.Remoting; using System.Runtime.Remoting.Lifetime; using System.Threading; using VersionedSAO; // from generated_meta_xxx.dll namespace Client { class Client { static void Main(string[] args) { String filename = "client.exe.config"; RemotingConfiguration.Configure(filename); SomeSAO obj = new SomeSAO(); String result = obj.getSAOVersion(); Console.WriteLine("Result: {0}",result); Console.WriteLine("Finished ... press <return> to exit"); Console.ReadLine(); } } } As the metadata assembly (generated_meta_V1_0_0_1.dll) does not have to be accessed using its strong name, the configuration file for the client looks quite similar to the previous examples:
<configuration> <system.runtime.remoting> <application> <client> <wellknown type="VersionedSAO.SomeSAO, generated_meta_V1_0_0_1" url="http://localhost/VersionedSAO/MySAO.soap" /> </client> </application> </system.runtime.remoting> </configuration>
When this client is started, you will see the output shown in Figure 6-12.
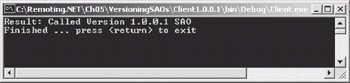
Figure 6-12: Output of the client using the v1.0.0.1 SAO
Enhancing the Server
Assume you now want to improve the server with the implementation of additional application requirements that might break your existing clients. To allow them to continue working correctly, you will have to let the clients choose which version of the SAO they want to access.
In the new server's implementation, shown in Listing 6-9, you first have to change the AssemblyVersion attribute to reflect the new version number, and you will also want to change the server's only method to return a different result than that of the v1.0.0.1 server.
Listing 6-9: The New Version 2.0.0.1 of the Server
using System; using System.Runtime.Remoting.Lifetime; using System.Runtime.Remoting; using System.Reflection; using System.Runtime.CompilerServices; [assembly: AssemblyCulture("")] // default [assembly: AssemblyVersion("2.0.0.1")] [assembly: AssemblyDelaySign(false)] [assembly: AssemblyKeyFile("mykey.key")] namespace VersionedSAO { public class SomeSAO: MarshalByRefObject { public String getSAOVersion() { return "Called Version 2.0.0.1 SAO"; } } } | Note | When compiling the project, you will use the exactly same keyfile (mykey.key) for generating the assembly's strong name! |
After compiling and installing the assembly in the GAC using GacUtil, you can list the contents of the assembly cache as shown in Figure 6-13.
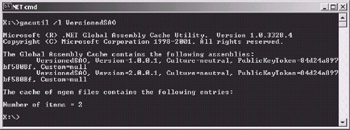
Figure 6-13: GAC contents after installing the second assembly
To allow a client to connect to either the old or the new assembly, you have to include a new <wellknown> entry in web.config that also points to the newly created SAO and uses a different URL:
<configuration> <system.runtime.remoting> <application> <service> <wellknown mode="Singleton" type="VersionedSAO.SomeSAO, VersionedSAO, Version=1.0.0.1,Culture=neutral,PublicKeyToken=84d24a897bf5808f" objectUri="MySAO.soap" /> <wellknown mode="Singleton" type="VersionedSAO.SomeSAO, VersionedSAO, Version=2.0.0.1,Culture=neutral,PublicKeyToken=84d24a897bf5808f" objectUri="MySAO_V2.soap" /> </service> </application> </system.runtime.remoting> </configuration>
Developing the New Client
To allow a client application to access the second version of the SAO, you again have to generate the necessary metadata using SoapSuds:
soapsuds -ia:VersionedSAO -nowp -oa:generated_meta_V2_0_0_1.dll
After adding the reference to the newly generated metadata assembly, you also have to change to the client-side configuration file to point to the new URL:
<configuration> <system.runtime.remoting> <application> <client> <wellknown type="VersionedSAO.SomeSAO, generated_meta_V2_0_0_1" url="http://localhost/VersionedSAO/MySAO_V2.soap" /> </client> </application> </system.runtime.remoting> </configuration>
You can now start both the new and the old client to get the outputs shown in Figure 6-14 for the first version and in Figure 6-15 for the second.
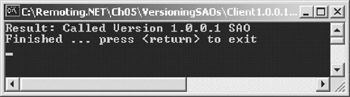
Figure 6-14: Version 1 client running
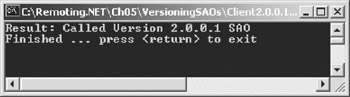
Figure 6-15: Version 2 client running
Both clients are running side by side at the same time, accessing the same physical server. You can also see that there was no change needed to the first client, which is the primary requisite for consistent lifecycle management.
Versioning of Client-Activated Objects
Now that you know about the lifecycle management issues with SAOs, I have to tell you that versioning of CAOs is completely different. But first, let's start with a more general look at the creation of Client Activated Objects.
When CAOs are instantiated by the client (using the new operator or Activator.CreateInstance), a ConstructionCallMessage is sent to the server. In this message, the client passes the name of the object it wants to be created to the server-side process. It also includes the strong name (if available) of the assembly in which the server-side object is located. This version information is stored in the [SoapType()] attribute of the SoapSuds-generated assembly. SoapSuds does this automatically whenever the assembly, passed to it with the -ia parameter, is strong named.
Let's have a look at the C# source shown in Listing 6-10, which is generated by soapsuds -ia -nowp -gc from a simplistic CAO. I've inserted several line breaks to enhance its readability:
Listing 6-10: The SoapSuds-Generated Nonwrapped Proxy's Source
using System; using System.Runtime.Remoting.Messaging; using System.Runtime.Remoting.Metadata; using System.Runtime.Remoting.Metadata.W3cXsd2001; namespace Server { [Serializable, SoapType(SoapOptions=SoapOption.Option1| SoapOption.AlwaysIncludeTypes|SoapOption.XsdString| SoapOption.EmbedAll, XmlNamespace="http://schemas.microsoft.com/clr/nsassem/Server/Server%2C%20  Version%3D2.0.0.1%2C%20Culture%3Dneutral%2C%20PublicKeyToken%3D84d24a897bf
  5808f", XmlTypeNamespace="http://schemas.microsoft.com/clr/nsassem/Server/Server%2
  C%20Version%3D2.0.0.1%2C%20Culture%3Dneutral%2C%20PublicKeyToken%3D84d24a8
  97bf5808f")] public class SomeCAO : System.MarshalByRefObject { [SoapMethod(SoapAction= "http://schemas.microsoft.com/clr/nsassem/Server.SomeCAO/Server#doSomething")] public void doSomething() { return; } } }
 The strings in the XmlNamespace and XmlTypeNamespace attributes are URLEncoded variants of the standard version information. In plain text, they read as follows (omitting the base namespace):
Server, Version=2.0.0.1, Culture=neutral, PublicKeyToken= 84d24a897bf5808f
Doesn't look that scary anymore? In fact, this is the common .NET representation of a strong name as seen before.
What you can see now is that this proxy assembly will reference a server-side object called Server.SomeCAO, which is located in the assembly Server with the strong name shown previously. Whenever a client creates a remote instance of this CAO, the server will try to instantiate the exact version of this Type.
What the server does when the requested version is not available is to take the highest version of the specified assembly. When versions 1.0.1.0 and 2.0.0.1 are available in the GAC, and Version 1.0.0.1 is requested, the server will choose 2.0.0.1 to instantiate the requested object—even though they differ in the major version number.
| Note | This behavior differs from the standard .NET versioning approach, in which the highest version with the same major and minor version is chosen. |
To emulate the standard behavior for resolving assembly versions, or to redirect to a completely different version, you can use the assemblyBinding entry in the application's configuration file:
<configuration> <system.runtime.remoting> <application name="SomeServer"> <channels> <channel ref="http" port="5555" /> </channels> <service> <activated type="Server.SomeCAO, Server" /> </service> </application> </system.runtime.remoting> <runtime> <assemblyBinding xmlns="urn:schemas-microsoft-com:asm.v1"> <dependentAssembly> <assemblyIdentity name="server" publicKeyToken="84d24a897bf5808f" culture="neutral" /> <bindingRedirect oldVersion="1.0.0.1" newVersion="1.0.1.1" /> </dependentAssembly> </assemblyBinding> </runtime> </configuration>
In this case, the server will take any requests for Version 1.0.0.1 and use Version 1.0.1.1 instead. Remember that this only works when the assembly is registered in the GAC and that you have to use soapsuds -ia:<assembly> -nowp -oa:<meta.dll> for each server-side version, as the [SoapType()] attribute defines this behavior.
Versioning of [Serializable] Objects
Because a [Serializable] object is marshaled by value and its data is passed as a copy, versioning behavior is once more different from SAOs or CAOs. First let's again have a look at the transfer format of the Customer object (and not the complete message) from a server similar to the one in the first example in Chapter 1:
<a1:Customer xmlns:a1="http://schemas.microsoft.com/clr/nsassem/VersionedSerializableObjects/VersionedSerializableObjects%2C%20Version%3D1.
0.0.1%2C%20Culture%3Dneutral%2C%20PublicKeyToken%3D84d24a897bf5808f"> <FirstName >John</FirstName> <LastName >Doe</LastName> <DateOfBirth>1950-12-12T00:00:00.0000000+01:00</DateOfBirth> </a1:Customer>
As you can see here, the complete namespace information, including the assembly's strong name, is sent over the wire. When the client that fetched this Customer object using a statement like Customer cust = CustomerManager.getCustomer(42) does not have access to this exact version, a SerializationException ("Parse Error, no assembly associated with Xml key") will be thrown.
To enable a "one-way relaxed" versioning schema, you can include the attribute includeVersions = "false" in the formatter's configuration entry as shown here:
<configuration> <system.runtime.remoting> <application name="SomeServer"> <channels> <channel ref="http" port="5555"> <serverProviders> <formatter ref="soap" includeVersions="false"/> </serverProviders> </channel> </channels> </application> </system.runtime.remoting> </configuration>
After this change, the server will return a different serialized form of the object, which does not contain the assembly's strong name.
The newly returned Customer object's data will look like this:
<a1:Customer xmlns:a1="http://schemas.microsoft.com/clr/nsassem/VersionedSerializable  Objects/VersionedSerializableObjects"> <FirstName >John</FirstName> <LastName >Doe</LastName> <DateOfBirth>1950-12-12T00:00:00.0000000+01:00</DateOfBirth> </a1:Customer>
 This last step, however, has not yet solved all issues with versioned [Serializable] objects. Let's get back to the original need for versioning in the first place: functionality is added to an application, and you want the currently available clients to keep working. This leads to the question of what will happen, when you add another property to either the client or the server side's shared assembly (in the example, I'll use public String Title for the property). The Customer class now looks like this:
[Serializable] public class Customer { public String FirstName; public String LastName; public DateTime DateOfBirth; public String Title; // new! } When the new Customer object (let's call it Version 2.0.0.1 or just Version 2 for short) is available at the client, and the old object (Version 1, without the Title property) at the server, the client is able to complete the call to Customer cust = CustomerManager.getCustomer(42). The client simply ignores the fact that the server did not send a value for the Customer object's Title property.
It won't work the other way though. When the server has Version 2 of the Customer object and the client only has Version 1, a SerializationException ("Member name ‘VersionedSerializableObjects.Customer Title’ not found") will be thrown when the client tries to interpret the server's response. This is exactly what you wanted to avoid. To work around these limitations, you have to have a look at the ISerializable interface, which allows you to specify custom serialization methods:
public interface ISerializable { void GetObjectData(SerializationInfo info, StreamingContext context); } When implementing ISerializable, you simply have to call the SerializationInfo object's AddValue() method for each field you want to include in the serialized form of the current object.
To serialize the Customer object's properties from Version 1 of the preceding example (without the Title property), you can do the following:
public void GetObjectData(SerializationInfo info, StreamingContext context) { info.AddValue("FirstName",FirstName); info.AddValue("LastName",LastName); info.AddValue("DateOfBirth",DateOfBirth); } In addition to this implementation of GetObjectData(), you have to provide a special constructor for your object that takes a SerializationInfo and a StreamingContext object as parameters:
public Customer (SerializationInfo info, StreamingContext context) { FirstName = info.GetString("FirstName"); LastName = info.GetString("LastName"); DateOfBirth = info.GetDateTime("DateOfBirth"); } This constructor is called whenever a stream that contains a Customer object is about to be deserialized.
| Note | It's also possible to include nested objects when using ISerializable. In this case, you have to call info.GetValue(String name, Type type) and cast the result to the correct type. All of those additional objects have to be [Serializable], implement ISerializable, or be MarshalByRefObjects as well. |
You can see Version 1 of the Customer object, which is now implemented using the ISerializable interface in Listing 6-11.
Listing 6-11: The First Version of the Serializable Object
using System; using System.Runtime.Serialization; namespace VersionedSerializableObjects { [Serializable] public class Customer: ISerializable { public String FirstName; public String LastName; public DateTime DateOfBirth; public Customer (SerializationInfo info, StreamingContext context) { FirstName = info.GetString("FirstName"); LastName = info.GetString("LastName"); DateOfBirth = info.GetDateTime("DateOfBirth"); } public void GetObjectData(SerializationInfo info, StreamingContext context) { info.AddValue("FirstName",FirstName); info.AddValue("LastName",LastName); info.AddValue("DateOfBirth",DateOfBirth); } } } When the fields of this object have to be extended to include a Title property, as in the preceding example, you have to adopt GetObjectData() and the special constructor.
In the constructor, you have to enclose the access to the newly added property in a try/catch block. This enables you to react to a missing value, which might occur when the remote application is still working with Version 1 of the object.
In Listing 6-12 the value of the Customer object's Title property is set to "n/a" when the SerializationInfo object does not contain this property in serialized form.
Listing 6-12: Manual Serialization Allows More Sophisticated Versioning
using System; using System.Runtime.Serialization; namespace VersionedSerializableObjects { [Serializable] public class Customer: ISerializable { public String FirstName; public String LastName; public DateTime DateOfBirth; public String Title; public Customer (SerializationInfo info, StreamingContext context) { FirstName = info.GetString("FirstName"); LastName = info.GetString("LastName"); DateOfBirth = info.GetDateTime("DateOfBirth"); try { Title = info.GetString("Title"); } catch (Exception e) { Title = "n/a"; } } public void GetObjectData(SerializationInfo info, StreamingContext context) { } info.AddValue("FirstName",FirstName); info.AddValue("LastName",LastName); info.AddValue("DateOfBirth",DateOfBirth); info.AddValue("Title",Title); } } } Using this serialization technique will ensure that you can match server and client versions without breaking any existing applications.
[1]The * in this case means that this part of the version number is assigned automatically.
|
|
EAN: 2147483647
Pages: 91