Integration Services Tools Overview
| The extract, transform, load (ETL) component of SQL Server is re-designed from the ground up in SQL Server 2005. The new ETL component, Integration Services, replaces the Data Transformation Services (DTS) included in SQL Server 2000. Integration Services introduces a rich set of tools to support the development, deployment, and administration of ETL solutions. The tools support the simplest solutions, in which you just want to perform tasks such as copying data from one location to another, to enterprise-level solutions, in which you develop a large number of complex packages in a team environment. This section describes the Integration Services tools and service in the context of the life cycle of the ETL solution: development and testing, deployment to the test or production environment, and finally, administration in the production environment. This chapter discusses the Integration Services tools for developing and configuring packages, the tools that are available in Business Intelligence Development Studio; as well as the Integration Services management tools that are available in Server Management Studio to import or export packages, assign roles that have read and write permissions on packages, and monitor running packages. The discussion also includes information about the Integration Services command prompt utilities that you use to run or manage packages outside the Studio environments. Business Intelligence Development StudioBusiness Intelligence Development Studio is the SQL Server 2005 studio for developing business intelligence solutions, including Integration Services packages, data sources, and data source views. In Business Intelligence Development Studio you perform the following tasks:
In Business Intelligence Developments Studio, you develop your business solutions in the context of a solution and a project. A solution is a container that manages multiple projects as one unit. Typically, the projects in a solution are related, and together they support a business solution. A solution can include different types of projects such as Integration Services, Analysis Services, or Reporting Services projects. A project contains the items of a specific project type and provides the templates to build those items. The items are saved to disk, locally or remotely, as XML files. Business Intelligence Developments Studio provides the following project types:
In addition to starting a new project from scratch and manually constructing project items or adding existing items, you can launch the following tools with Business Intelligence Development Studio:
The options for project types and tools are presented to you in the New Project window, as shown in Figure 16-1. Figure 16-1. The New Project dialog box, in which you specify the project type, name the project, and optionally add the project to the source control.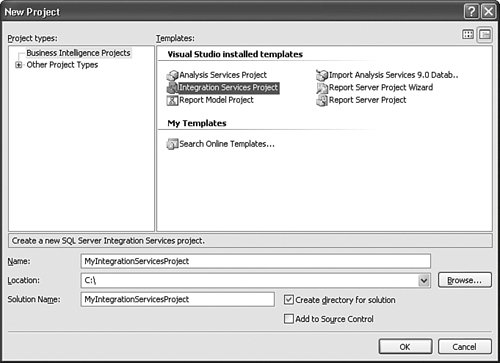 You use the Integration Services project type to create packages and the data sources and data source views that packages use. If you choose the Integration Services project type, Business Intelligence Development Studio creates a project with a Data Sources, Data Source Views, SSIS Packages, and Miscellaneous folder (see Figure 16-2). An empty package is also provided. Figure 16-2. The Integration Services project in Solution Explorer. Many of the windows that you use when building packages are part of Business Intelligence Development studio: the Toolbox that provides the items for building control flow and data flow in packages, the Properties window that lists the properties of a package or package object, and the Solution Explorer that manages projects and project items, including the packages, data sources, and data source views in an Integration Services project. Figure 16-3 shows the default layout of Business Intelligence Development Studio windows. The behavior and placement of windows are configurable. If you have used Microsoft Visual Studio, this environment is familiar to you and you probably already know how to customize the development environment. If you are new to Studios, see Chapter 13, "Inside the Analysis Services OLAP Tools," for more information about the features of Business Intelligence Development Studio. Figure 16-3. The windows that Business Intelligence Development Studio provides in their default locations, with SSIS Designer in the center window.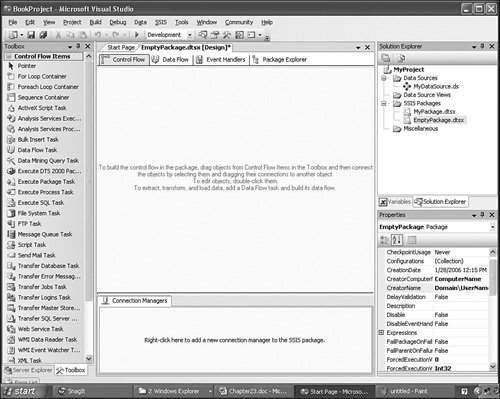 SQL Server Import and Export WizardThe SQL Server Import and Export Wizard is the simplest way to create an Integration Services package. The packages that you create with this wizard can extract data from a variety of data sources such as Excel spreadsheets, flat files, and relational databases, and load the data into a similar variety of data stores. For example, the package can select data from an Excel spreadsheet with a query and write the data into a SQL Server table. You can launch the SQL Server Import and Export Wizard from SQL Server Management Studio or an Integration Services project in Business Intelligence Development Studio. In SQL Server Management Studio, the primary use of the wizard is to create and run packages as is. Administrators typically use these packages to perform ad hoc imports and exports of data, or they save the packages to rerun as part of routine data maintenance. This chapter focuses on using the wizard in Business Intelligence Development Studio. The packages that you create with the SQL Server Import and Export Wizard can perform only very limited data transformation, such as changing column metadata. However, these packages provide a great way to get a jump start on creating more complex packages. If you run the wizard from Business Intelligence Development Studio, you cannot run the package as a step in completing the wizard. Instead, the wizard creates a package and adds it to the Integration Services project from which you launched the wizard. This package includes a basic workflow to extract and load data (see Figure 16-4) . Also, depending on the options that you selected on wizard pages, the package may include tasks that prepare destination data stores, such as dropping and re-creating tables or truncating table data. Figure 16-4. The control flow and data flow generated by the SQL Server Import and Export Wizard for a package that copies data from one database to another and creates the table in the destination database. Depending on the options selected in the wizard, the control flow may vary. Once you have been through the wizard and the package is added to the Integration Services project, you can work with the package in SSIS Designer and enhance the package by adding other tasks, implementing advanced features such as logging and configurations and inserting transformations between the source and destination. SSIS DesignerSSIS Designer is the graphical tool for developing packages. When you first open the designer, it consists of the four tabs: Control Flow, Data Flow, Event Handlers, and Package Explorer (see Figure 16-5). When you run the package a fifth tab, named Progress, is added to the designer. After you stop the package, the Progress tab is renamed to Execution Results. Figure 16-5. SSIS Designer shows the tabs for each designer and the tab for the package content.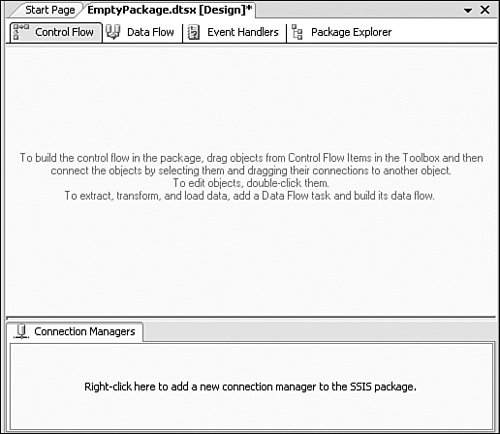 SSIS MenuWhen you open an Integration Services project in Business Intelligence Development Studio, the SSIS menu is added to the menu bar. At this time, the menu has only one option: Work Offline (see Figure 16-6). This option applies to an entire project. When you select the Work Offline option, you are working in an offline mode. This means that Integration Services skips the aspects of package validation that make a connection to data sources and other external components. Figure 16-6. The SSIS menu option (there are multiple options) when you first open an Integration Services project.When you open the first package in SSIS Designer, additional options become available in the SSIS menu (see Figure 16-7). Figure 16-7. The SSIS menu options after you have opened at least one package in SSIS Designer.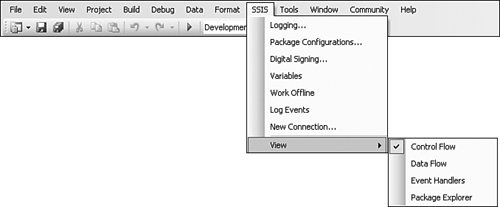 From the options on the SSIS menu, you can access the tools for implementing more advanced features in your packages, specify whether to work in offline mode, or switch to a different tab within SSIS Designer. The Work Offline option applies to the current Integration Services project. This option can also be set before you open SSIS Designer. The following list describes the SSIS menu options:
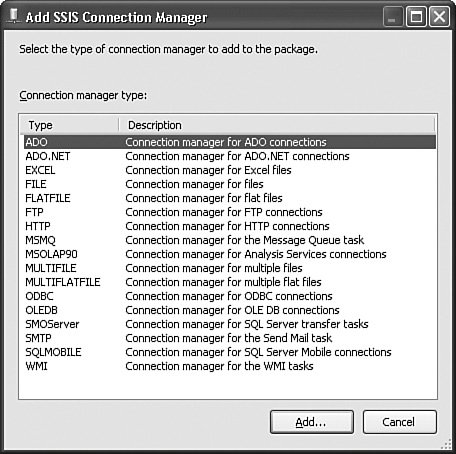
Format MenuThe Format menu becomes available when you open a package in SSIS Designer. This menu includes many options for sizing the control flow and data flow items that a package contains and refining the layout of the control and data flows (see Figure 16-8). By applying these options to packages, you can make packages more legible and the control and data flows easier to understand. Figure 16-8. The Format menu lists the options to modify package layout.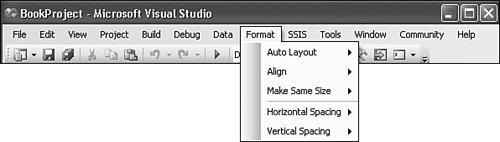 Depending on the layout of the package and the items selected, different options are available. For all options, except for Auto Layout, you must select at least two items before the sub-options become available. Control Flow DesignerThe Control Flow tab provides the control flow designer, in which you construct the package control flow. The control flow consists of autonomous tasks and repeating sub control flows that are linked into an ordered workflow by precedence constraints. When the Control Flow tab is active, the Toolbox lists the tasks and containers that you can use to construct control flows. Figure 16-9 shows the control flow designer and the Toolbox when the Control Flow tab is active. The Toolbox window is in the default location. The "Common Environment Configuration Scenarios" section, later in this chapter, provides information about customizing the Toolbox and the behavior of control flow items. Figure 16-9. The Control Flow tab shows a control flow that consists of a Sequence container with an Execute SQL task, a Data Flow task, and a Script task. Data Flow Design SurfaceThe Data Flow tab (see Figure 16-10) provides the data flow designer, in which you construct the data flows in the package. A package can include no, one, or multiple data flows. A data flow consists of one or more sources that extract data, transformations that modify the data, and one or more destinations that write data. The Toolbox lists the sources, transformations, and data control flow designer, and the default Toolbox when the Data Flow tab is active. The Common Environment Configuration Scenarios section, later in this chapter, provides information about customizing the Toolbox and the behavior of data flow items. Figure 16-10. The Data Flow tab shows a data flow that consists of an OLE DB source and a Row Count transformation.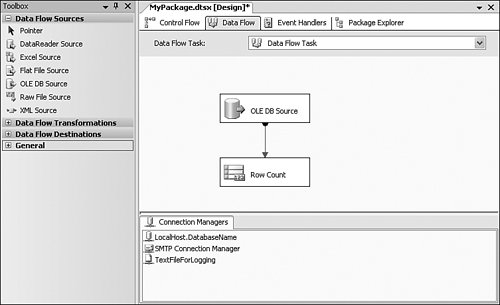 Event Handlers DesignerThe Event Handlers tab provides the event handler designer, in which you construct an event handler for an Integration Services event. An event handler is a workflow that runs in response to an event that the runtime raises. The event handler also consists of a control flow of autonomous tasks and repeating sub control flows that are linked into an ordered workflow. If the event handler includes a data flow, then you use the data flow designer to construct the data flow. The event handler designer is similar to the control flow designer. When the Event Handlers tab is active, the Toolbox lists the tasks and containers that you can use to construct control flows in event handlers. Figure 16-11 shows the control flow designer and the default Toolbox when the Event Handlers tab is active. The Common Environment Configuration Scenarios section, later in this chapter, provides information about customizing the Toolbox and the behavior of control flow items. Figure 16-11. The Event Handlers tab shows a control flow that consists of an Execute SQL task and a Send Mail task. The event handler is on the OnPreExecute event. Package ExplorerThe Package Explorer tab provides an Explorer (why the cap?)-type view of package content. The view is built as you construct the package and provides a great way to understand the structure of the package. Figure 16-12 shows the expanded view of a fairly basic package; it has only one executable (Run SQL Statement) one connection manager (LocalHost.DatabaseName), and no user-defined variables. You can imagine how important this view is to understanding and communicating to others the structure of complex packages! Figure 16-12. The Package Explorer view of a simple package.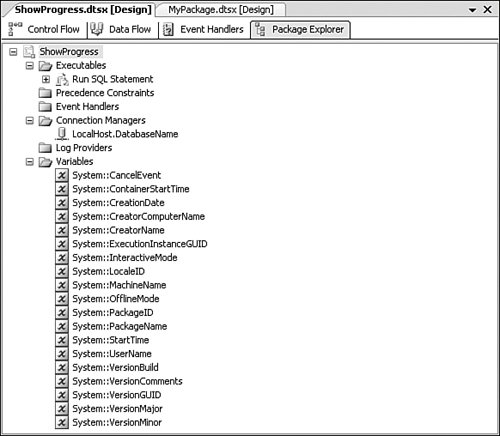 Progress ExplorerThe Explorer on the Progress tab records the progress of package execution and provides a view of package execution while the package is running. The view is built as the package makes progress in the execution of the control flow (see Figure 16-13) in the package and event handlers and in the data flow. The explorer records the beginning and completion of validation, progress percentages, and the start and end times of each executable, tasks, containers, and event handlers in the package, as well as the package itself. Depending on the tasks that the package contains, the Progress tab shows different types of information. For example, the Data Flow task might report the number of rows inserted into the destination data store. If errors or warnings occur, they are also listed in the Progress window. Figure 16-13. A package with a single Execute SQL task runs and generates the progress information shown in Figure 16-14. The green on your screen indicates that the task executed successfully. Figure 16-14. The Progress window shows the start and finish of the validation phases and the start and finish time of the package and the Execute SQL task. Progress is reported on a query that the Execute SQL task runs. In this case, the query is a simple SELECT statement. In addition, the explorer on the Progress tab provides useful information about ways that you can improve the package. For example, if a data flow extracts columns from a data source and makes no subsequent use of the columns, a warning entry that identifies the unused column is written in Explorer window on the Progress tab. After you stop running the package, the name of the Progress tab changes to Execution Results. The results from the previous execution of a package remain available on the tab explorer until you rerun the package, run a different package, or exit SSIS Designer. Connection Managers AreaThe Connection Manager area (see Figure 16-15) contains the connection managers that a package uses. Connection managers connect to data stores. They are used by sources and destinations to extract and load data, as well as many tasks, containers, and transformations that require access to a data store to do their work. You can add and configure connection managers as a separate step in the construction of a package, or you can add and configure the connection managers as you construct the control and data flows or implement logging in the package. If you choose to add and configure the connection managers as you go, Integration Services automatically makes available only the connection manager types that a particular control flow item, data flow item, or log provider can use. Figure 16-15. The Connection Managers area lists three connection managers.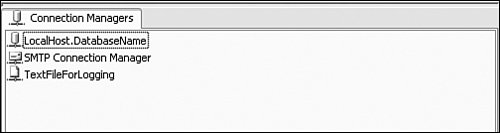 Integration Services includes a wide variety of connection managers and provides a user interface to configure each type. You configure a connection manager as a step in adding the connection manager to the package. Later, you can modify the configuration by double-clicking the connection manager in the Connection Managers area. Figure 16-16 shows the right-click menu where you select the connection manager type and open the dialog box to configure that type. Figure 16-16. The Add SSIS Connection Manager dialog box lists the built-in connection types that Integration Services support. Variable Management ToolsVariables are used in a million different ways in Integration Services packages. Integration Services supports system and user-defined variables. System variables are the read-only variables that Integration Services provides. User-defined variables are the variables that you define to support package functionality. You will soon find that you need to add variables to packages to support package functionality. The following are a few of the ways that packages can use variables:
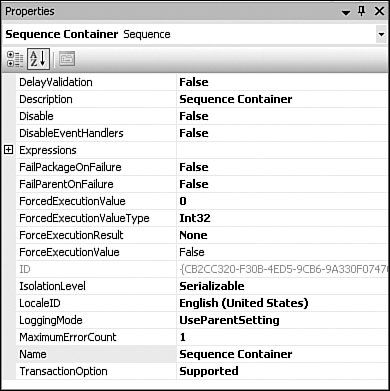
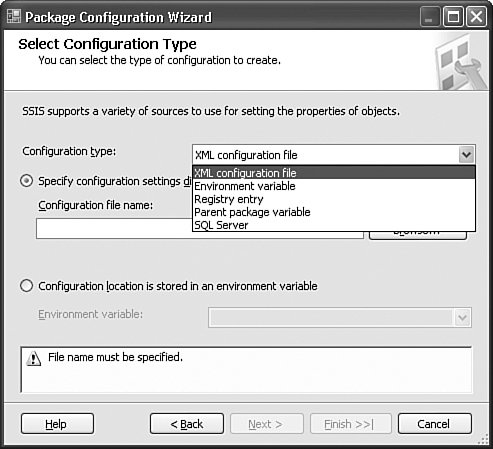
The Variables window for working with variables is not part of SSIS Designer, but variables exist within the context of a package and you must open the package in SSIS Designer before you can add, delete, and configure variables. To open the Variables window, click Variables on the SSIS menu. By default, the window is docked in the upper-left corner of the Business Intelligence Development Studio. Like other Business Intelligence Development Studio windows, you can move this window and configure it to be a dockable or floating window or a tabbed document and use auto-hide. The Variables window can add, delete, and list variables. By default the window contains columns for the name, scope, data type, and value of variables. Figure 16.17 shows the default Variables window. You can set additional variable properties in the Choose Variable Columns dialog box. Figure 16-17. The Variables window when you click the Choose Variable Columns icon.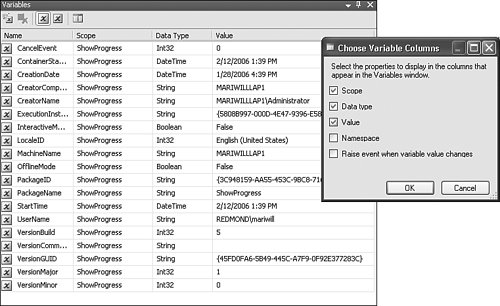 In the Choose Variable Columns dialog box, you can add the less frequently configured variable properties, the namespace, and whether an event is raised when the variable changes value to the Variables window. Tip Variables have properties that are not accessible from the Variables window. These properties can be set in the Properties window instead. For example, if you want to use the evaluation result from an expression as the value of a variable, then you need to configure the variable, or at least this property, in the Properties window. Logging Configuration ToolsIntegration Services include a variety of log provider types that you can use to implement logging in your packages. The log provider types include types to log to text and XML files, SQL Server Profiler, SQL Server, and Windows Events Log. You use the Configure SSIS Logs dialog box to configure logging. In this dialog box, you can specify type of log provider to implement, the logs to use, and the log entries to write to the log. The Configure SSIS Logs dialog box (see Figure 16-18) is not part of SSIS Designer, but log providers exist within the context of a package and you must open the package in SSIS Designer before you can configure logging. To open the Configure SSIS Logs dialog box, click Logging on the SSIS menu. Figure 16-18. The Configure SSIS Logs dialog box shows the log provider types.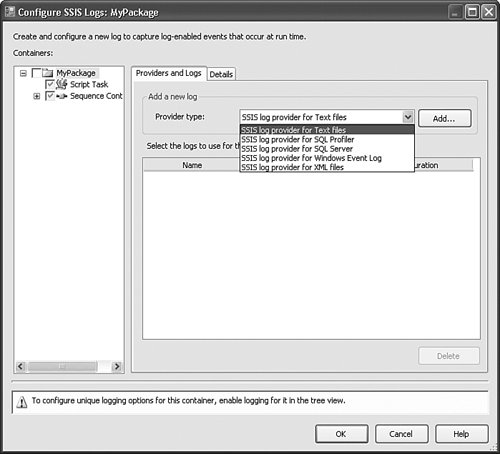 The logs are defined at the package level (see Figure 16-19). After you have defined the logs, the tasks and containers in the package can use them. A package is a hierarchical collection of objects with the package object at the top of the hierarchy. In this hierarchy, every executable (task or container), except the package itself, has a parent. If you do not want to configure logging for each executable, you can specify that an executable uses the logging specifications of its parent container. Figure 16-19. The Configure SSIS Logs dialog box shows the events and information that you can select to log for a package object.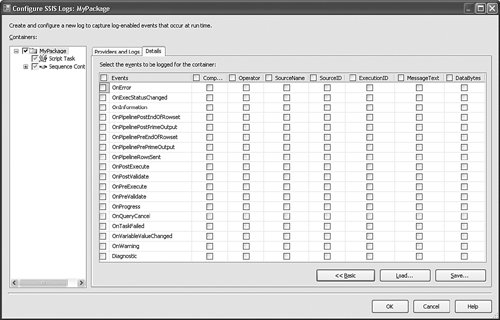 Tip Integration Services supports the use of logging templates. If you need to impose a consistent logging strategy across multiple packages you should consider using logging templates. Properties Management ToolsIntegration Services provides a variety of tools for setting the properties of packages and the objects that packages contain. The tools include custom tools for configuring the properties of tasks, containers, sources, transformations, and destinations, as well as the generic Advanced Editor dialog box that you can use to configure most data flow components. The Properties window (see Figure 16-20), built into Business Intelligence Development Studio, provides an alternative way to configure package items. For packages and the Sequence container, the Properties window is the only tool available to set properties. In addition, the Properties window lists properties that are not available to configure in the custom tools such as properties that are read-only or properties for which the default values are often used. To view properties of an item in the Properties window, click the item in the package and then click Properties Window on the View menu. To show the properties of a package in the Properties window, click the background of the control flow designer. Figure 16-20. The Properties window lists the properties of the Sequence container. You can update the value of properties with the evaluation results of expressions by implementing property expressions on properties. A property expression is an expression that you write using the Integration Services expression language and assign to a property. You can access the tools for building property expressions from the Properties window (see Figure 16-21). Figure 16-21. The Expressions node, from which you open the tools you use to write property expressions.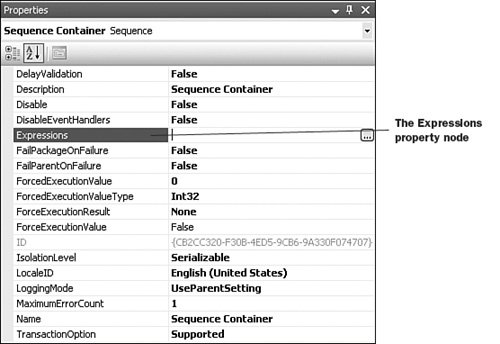 To learn more about using property expressions, see the "Common Package Development Scenarios" section, later in this chapter. Package Configuration ToolsPackage configurations update the values of packages and package objects at runtime. Each configuration is a name/value pair in which the name specifies the path of the property to update and the value specifies the property value. By implementing configurations in a package, you can tailor each deployment of the package to a specific environment. For example, you can update the connection string of a connection manager to point to a different server. Integration Services supports a variety of configuration types. You can store configurations in XML files, environment and parent package variables, Registry entries, or SQL Server tables. The XML file and SQL Server table can store multiple configurations; the other types only a single configuration. If you choose to use a SQL Server table, you can store the configurations for multiple packages in the table and specify a filter to identify configurations for different packages. Integration Services provides two tools for package configurations: the Package Configuration Organizer dialog box and the Package Configuration Wizard. Package Configuration OrganizerIn the Package Configurations Organizer dialog box (see Figure 16-22), you enable the package to use configurations and specify the order in which the configurations are loaded at runtime. The configurations are loaded in top-to-bottom order. If multiple configurations update the same property, the configuration that is loaded last wins. To launch the Package Configuration Wizard click Add. Figure 16-22. The Package Configurations dialog box, after you have enabled configurations on the package.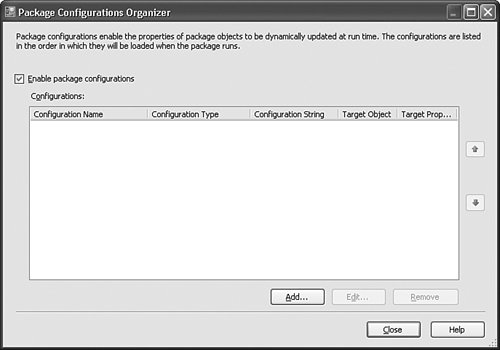 Package Configuration WizardThe Package Configuration Wizard guides you though the steps to create configurations. On the Select Configuration Type page, you select the type in the Configuration type list (see Figure 16-23). You can specify the configuration location directly or choose an existing environment variable to specify the location. Table 16-1 lists and describes the various Integration Services configuration types. Figure 16-23. The Package Configuration Wizard dialog box shows the configuration types.
Depending on whether the configuration type supports multiple configurations, you can select one or multiple package and package object properties and then complete the wizard. The configuration is added to the bottom of the list of package configurations in the Package Configuration Organizer dialog box. You can use the up and down arrows to position the new configuration in its correct loading position. If you want to edit the package configuration, click Edit and then rerun the Package Configuration Wizard. Tip The last page in the wizard contains lists of the paths of properties to configure. If you need to use paths when programming the Integration Services object model, you can copy them from the wizard page. Debugging ToolsBusiness Intelligence Development Studio provides the same debug windows as Visual Studio. If you have debugged applications in Visual Studio, you already know how to set breakpoints and how to use the windows. If you are new to the debug environment, the Microsoft Visual Studio documentation provides information about how you access and use the debug windows. The Integration Services breakpoints are similar to the breakpoints you may have used when writing code in Visual Studio. As in code, Integration Services breakpoints suspend execution to enable you to examine the values of variables, the call stack, and so forth to help you identify and correct errors. You can set breakpoints on packages, tasks, and other container types. To set a breakpoint you enable a break condition on the container. In addition to enabling a break condition, you further identify break conditions by specifying how many times the break condition occurs before execution is suspended. You use the Set Breakpoints <container name> dialog box to set breakpoints (see Figure 16-24). Figure 16-24. The Set Breakpoints dialog box shows that breakpoints are enabled on the OnPreExecute and OnPostExecute events of the Execute SQL task.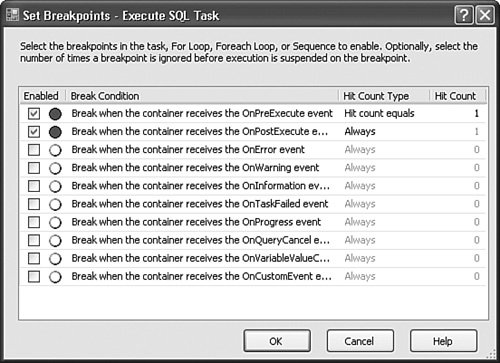 If a container in a package has a breakpoint, the breakpoint icon (a red dot) appears on the container shape in the control flow designer. The Control Flow tab represents the package, and if you enable breakpoints on the package, the breakpoint icon appears on the label of the Control Flow tab. Tip To set breakpoints on the package, place the cursor anywhere in the background of the Control Flow tab, right-click, and click Edit Breakpoints. Package Deployment ToolsAfter package development is completed, you use the Build feature for Integration Services that Business Intelligence Development Studio provides to create a deployment bundle. The deployment bundle is the set of files you will copy to the target computer and then use to install the packages and their dependencies. The Build process creates a deployment manifest and includes it, the packages in the Integration Services project, package dependencies, and any files that you added to the Miscellaneous folder in the deployment bundle. After you have copied the deployment bundle to the computer on which you want to install the packages, you run the Package Installation Wizard on the target computer. The wizard guides you through the steps to install packages. On the wizard pages, you must make the following decisions:
SQL Server Management StudioSQL Server Management Studio is the SQL Server 2005 studio for managing Integration Services packages. In SQL Server Management Studio you perform the following tasks:
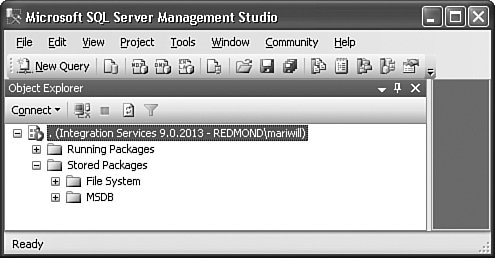
After you connect to Integration Service, the Object Explorer in SQL Server Management Studio provides access to the folders for storing and running packages (see Figure 16-25). The Stored Packages folder and its subfolders list the packages saved to the package store; the packages can be saved to the sysdtspackages90 table in the msdb database or to the file system folders that the Integration Services service monitors. The package store is a logical store that can consist of msdb and specified folders in the file system. To learn more about which folders are by default part of the package store and how to add other folders to the package store, read the Common Package Management Scenarios section later in this chapter. Figure 16-25. Integration Services in the Object Explorer window of SQL Server Management Studio. From the right-click menus of folders you access the tools to perform various management tasks (see Figure 16-26). For example, expand the Stored Packages folder and its subfolders, right-click a package, and then click the menu option to import or export the package, run the package, assign roles to the packager, or delete the package. Figure 16-26. The right-click menu on a package in an Integration Services folder listed in the Object Explorer window of SQL Server Management Studio. Command Prompt UtilitiesIntegration Services provides two command prompt utilities for running and managing packages. You use the dtexec utility to run packages, and the dtutil utility to manage packages. In addition, Integration Services provides the Execute Package Utility, a graphical interface on dtexec. The SQL Server 2005 documentation provides detailed information about the options and option arguments for both utilities. This chapter does not include this information; instead, it includes samples of command lines that you might find useful to help you write command lines that fit your business needs. For usage scenarios, see the "Common Package Management Scenarios" section later in this chapter. |


EAN: 2147483647
Pages: 149