Using Integration Services Tools in Business Scenarios
| The life-cycle of an Integration Services solution typically has three phases: development and testing, deployment to the test or production environment, and administration in the production environment. The cycle is iterative; packages require modification and are exported to the development environment or retrieved from a storage location, updated in Business Intelligence Studio, and then again deployed to the test or production environment. This section provides answers to questions from commonly occurring scenarios in each phase of the life cycle.
Common Environment Configuration ScenariosThis section includes information about common tasks that you do to configure Business Intelligence Development Studio.
How to Customize the ToolboxBy default the Toolbox lists all the control flow and data flow items that Integration Services includes. To populate the Toolbox with Integration Services items, you must open a package in SSIS Designer. When the Control Flow tab is active, the Toolbox lists control flow items, the tasks and containers Integration Services provides, and any custom tasks you have added. Similarly, when the Data Flow tab is active, the Toolbox lists sources, transformations, and destinations. The package must include a Data Flow task before you can access the Toolbox populated with data flow items. To customize Toolbox content:
To reset the Toolbox, right-click the Toolbox and click Reset Toolbar. To sort items, right-click the Toolbox and click Sort Alphabetically. How to Configure Integration Services DesignersThe Options option on the Tools menu opens the Options dialog box, which provides pages to configure the behavior of SSIS Designer. To access the pages for Integration Services, expand the Business Intelligence Designers node, and then expand Integration Services Designers. On the General page (see Figure 16-27), set options for digital signatures and accessibility. By default, the three values of precedence constraints are shown by colors: blue for completion, red for failure, and green for success. To include labels on the design surface that describe the values, select the Show precedence constraint labels check box. Figure 16-27. The options on the General page for digital signatures and accessibility.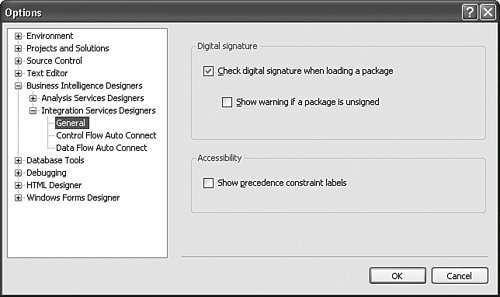 Click Control Flow Auto Connect to open the page to configure the behavior of control flow items, tasks, and containers when you add them to the control flow designer. You can specify whether the new item is automatically connected to a selected shape, the value of the precedence constraint, and the placement of the item on the control flow design surface. Likewise, click Data Flow Auto Connect to configure the behavior of data flow items. You do not use precedence constraints in data flows, and the Data Flow Auto Connect page has only options to specify whether data flow items are automatically connected and their placement on the data flow design surface. How to Work OfflineYou can configure an Integration Services project to be offline. If you are working in an environment disconnected from the data sources and other resources that packages use, you can make your life easier by setting the project mode to offline. This way, you can avoid package validation, which inevitably generates errors. For example, connections cannot be verified because the data sources to which they connect to are not available. To work offline, click the Work Offline option on the SSIS menu (see Figure 16-28). Figure 16-28. The SSIS menu shows the Work Offline option. If a package is open in SSIS Designer, this option is listed with other SSIS menu options such as Logging and Variable.The option to work offline applies to the entire Integration Services project; you cannot mix online and offline modes within a project. Tip The Properties window shows the offline/online mode of the project to which a package belongs in the OnlineMode property of the package. How to Incorporate Source Control in the Development EnvironmentIntegration Services projects can be enrolled in source control. If you have source control software installed on your computer, you have the option to add the project to source control when you first create the project. To enroll the project in source control, select the Add to Source Control check box (see Figure 16-29). Figure 16-29. The New Project dialog box shows the option to add source control to the project.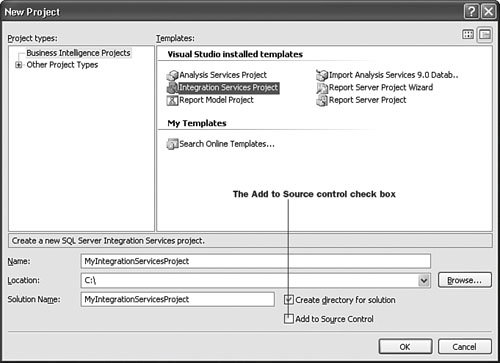 You can also enroll existing projects in source control. From the Source Control option on the File menu, you can add a project to or from source control, exclude selected items from source control, and specify the source control software to use (see Figure 16-30). Figure 16-30. The Source Control submenu shows the options available to work with source control.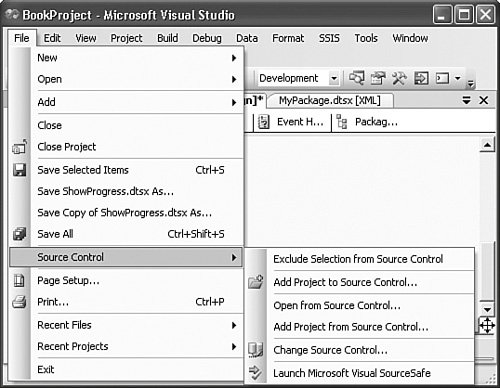 Common Package Development ScenariosThis section covers a number of common package development scenarios. The scenarios include the following:
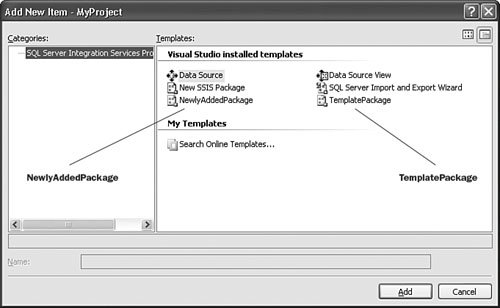
How to Use Packages as TemplatesFrequently groups of packages have a common set of features, or your organization may define how certain properties should be set in packages to impose consistency across packages. These scenarios call for package templates! By default, the package template for new packages is an empty package, but you can use any package saved to the file system as a template. To use packages as templates, you copy them to the DataTransformationItems folder. The default location of this folder is C:\Program Files\Microsoft Visual Studio 8\Common7\IDE\PrivateAssemblies\ProjectItems\DataTransformationProject. However, you cannot replace the built-in functionality of Integration Services. If you right-click the SSIS Packages node in Solution Explorer and click New SSIS Packages, Integration Services always adds a new empty package. To use the packages that you added to the DataTransformationItems folder when you add a "new" package, you need to add an existing item to the Integration Services project. To add a new package, follow these steps:
Tip You can also add data sources and data source views to the DataTransformationItems folder and then use them as templates. This can be especially useful when developing a set of data source views that share core functionality. When you add new items to an Integration Services project, the items are placed in the project folders based on their file extensions. Integration Services packages use the file extension dtsx to identify packages, and when you add a new item with this extension, it is automatically added to the SSIS Packages folder in Solution Explorer. Likewise, if you add a file that has the ds extension, the item is added to the Data Sources folder, and a file with the dsv extension is added to the Data Source Views folder. How to Reuse Package ObjectsYou will probably find that you can reuse configured package objects such as tasks and connection managers in multiple packages. You might want to reuse only a single configured task or you might want to reuse an entire data flow. This is very easy to do! SSIS Designer supports copying and pasting package objects within a package and between packages. If a solution has multiple Integration Services projects, you can copy between packages in different projects. If you copy multiple objects connected by precedence constraints or paths, then the precedence constraints and paths are copied as well. If you copy a Data Flow task, you also copy the data flows that are associated with the Data Flow task. The copy and paste functionality is built into SSIS Designer, and the packages must be opened in SSIS Designer to enable copying and pasting within a package or between packages. To copy objects, follow these steps:
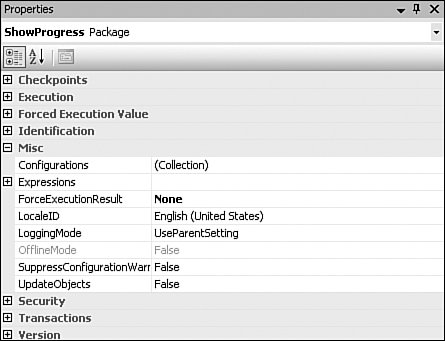
Tip You cannot use the standard copy and paste key combinations to copy and paste package objects. To ensure that copied objects continue to work, you must also copy pertinent dependencies. The dependencies can be variables or connection managers that the object uses. And of course, you cannot copy data flow components to a package that has no Data Flow task. How to Save Copies of Packages to Different LocationsFrom SSIS Designer you can save packages to different location types and locations. This capability is very similar to the import feature that is available to Integration Services in SQL Server Management Studio. To make the menu option to copy a package available, you must first open the package in SSIS Designer and click anywhere in the background of the control flow designer. The File menu includes two options that read very much alike: the Save <package name> As option and the Save Copy of <package name> As option. To save a package to a different location type (SQL Server, file system, or package store) or location, you should use the latter. During the copy and save operation, you can specify the location type and location to save the package to, and optionally, provide a new for name for the package and update the package protection level. Figure 16-32 shows an example. Figure 16-32. The Save Copy of Package dialog box saves a package, renamed to NewSQLServerPackage, to SQL Server and updates the package protection level from Do not save sensitive data to Rely on server storage and roles for access control.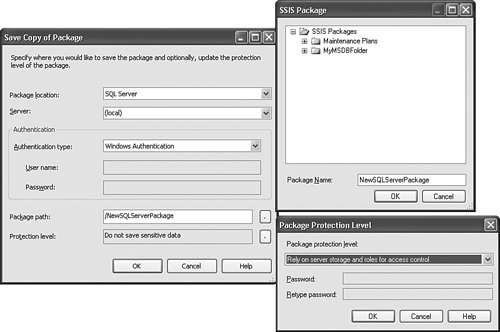 How to Configure PackagesThe package, not to be confused with the package content, is configured in the Properties window in Business Intelligence Development Studio. If you sort the package properties by category, you will find it easier to set related properties (see Figure 16-33). Figure 16-33. The categorized Properties window. Tip To display the package properties in the Properties window, click anywhere in the background of the control flow design surface. How to Implement Checkpoints in PackagesIntegration Services supports checkpoints. You can configure a package to use checkpoints and this way make it is possible to restart it from the point of failure, rather than rerun the whole package. If a package is configured to use checkpoints, information about package execution is written to a checkpoint file. When you rerun the failed package, the checkpoint file is used to identify where the package failed previously and restart the package from the point of failure. If the package reruns successfully, the checkpoint file is deleted. To set the properties related to checkpoints, expand the Checkpoints node in the Properties window. To configure checkpoints, follow these steps:
Tip To test the checkpoints, set the ForceExecutionResult property of tasks and containers to Failure. How to Set User Properties to Secure PackagesIntegration Services provides a variety of package protection levels to encrypt packages or to omit saving sensitive information in the package definition. When you develop a package in Business Intelligence Development Studio, you set the package protection to a level that is suitable for a single developer of a team of developers. Some package protection levels (EncryptAllWithUserKey and EncryptSensitiveWithUserKey) encrypt packages using a key based on the user profile. This means that only the same user using the same profile can load and work with the package. Obviously, these protection levels are difficult to use in a team environment because developers cannot open packages that were created by other team members. Other protection levels (EncryptAllWithPassword and EncryptSensitiveWithPassword) require that the passwords be known to all developers. Frequently the DontSaveSensitive protection level is used during package development. You can set the protection level to ServerStorage to rely only on the built-in security features of SQL Server to protect packages. To set the properties related to package protection level expand the Security node in the Properties window. To configure the protection level,
If you import or export a package in SQL Server Management Studio or save a copy of a package in Business Intelligence Development Studio, you can change the protection level that the package uses. How to Implement Looping in PackagesIn DTS, it was difficult to implement looping in packages. The solution typically included custom code. In SQL Server 2005, Integration Services introduces two new container types, the Foreach Loop and the For Loop, that make it very easy to include looping in the package control flow.
Of the two types of loops, the For Loop is probably the most straightforward to implement. To configure it, you provide the expression the evaluation results of which determine whether the loop repeats, and optionally, expressions to initialize the loop counter and increment or decrement the loop counter. The three properties to configure the For Loop are: EvalExpression (the evaluation expression), InitExpression (the initialization expression), and AssignExpression (the expression to increment or decrement the loop counter). In the following very simple implementation, you use a variable, varCounter, to control loop execution. The variable must have a numeric data type. The loop repeats the loop repeats 5 times. Set InitExpression to @varCounter = 1 Set EvalExpression to @varCounter < 6 Set AssignExpression to @varCounter = @varCounter +1 Tip You must include the @ prefix to identify variables, the expression must be a valid Integration Services expression, and you must use the single equal (=) character instead of the double equal (==) characters. To use the Foreach Loop to implement looping you first choose the type of enumerator to use. You select the enumerator type on the Collection page of the Foreach Loop Editor dialog box (see Figure 16-34). Figure 16-34. The Collection page.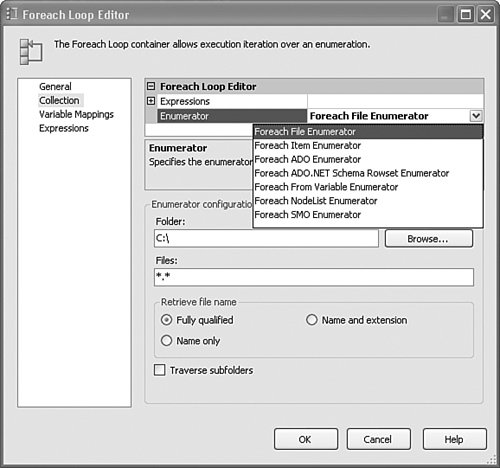 The built-in enumerator types that Integration Services provides (see Table 16-3) support repeating control flows to enumerate a wide variety of objects and items. For example, you can use the Foreach File enumerator to repeat a control flow for all the files in a specified folder, regardless of the number of files present in the folder. You will learn that the Foreach File enumerator supports wildcards, which makes it possible to filter the filesand choose just those that you wish to enumerate.
After you select the enumerator type to use and configure it, you need to map variables to the collection value. This is how the Foreach Loop provides information to the repeating control flow. Let's walk through a couple of scenarios. To provide the names of files to use in a data flow, follow these steps:
To provide the logins on a server,
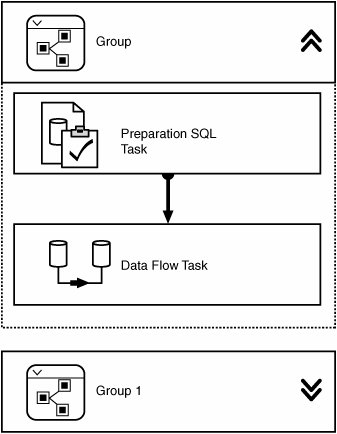
How to Manage Control Flow Layouts with Many ItemsIf the control flow in a package contains a large number of tasks and containers, the design surface can become crowded and you may not be able to view all the control flow items at one time to understand fully the functionality of the package, or you may not be able to easily locate the task or container that you want to work with. The grouping feature, available in the control flow designer, is useful in this situation. To group tasks and containers,
You can then expand and collapse a group to suit your needs (see Figure 16-35). Expanding a group provides access to the properties of the task and containers in the group. Figure 16-35. Expanded and collapsed groups. To ungroup tasks and containers,
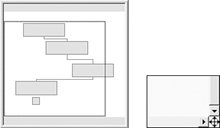
The navigator is another useful feature for working with packages that have large control flows or data flows. You use the navigator to access parts of the control flow or data flow in packages when the flows are too large to view in the designer at one time. Tip The Sequence container also groups tasks and containers, but in contrast to the grouping feature, it is not a design-time only feature. For example, you can set properties on the Sequence container to disable it and this way disable all the tasks and containers in the Sequence container. The navigation feature in SSIS Designer can also make it easier to work with packages in which the control flow and data flows have a large number of items. The navigation feature, also know as the navigator, is located in the lower right corner of the control flow and data flow design surfaces (see Figure 16-36). The navigator is not available as long as all items are visible on the design surface at one time. Figure 16-36. The navigator pop-up and the navigator location. To use the navigator,
How to Format Package LayoutAs you develop a package and modify control and data flows by adding and deleting items, you might find that the package layout becomes more difficult to understand. In short, the graphical layout does not communicate package functionality in the most optimal way. You could work your way through the layout, item by item, resizing and re-placing each item on the design surface, but Business Intelligence Studio offers a much easier way to do this. On the Format menu (see Figure 16-37), you will find useful options to size and align items and to set the horizontal and vertical spacing between items. Figure 16-37. The Format menu.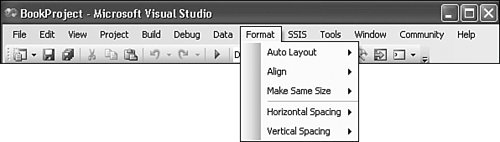 To apply an option, you must select at least two items on the Control Flow, Data Flow, or Event Handlers tab. The item selected first is the item to which other items are sized or aligned. You can think of this item as the precedence item. You can identify the item selected first by its white handles. The items that are selected second or later have black handles. If you select items by dragging the cursor across items, the item the cursor touches first is the precedence item. The Format menu provides the following options:
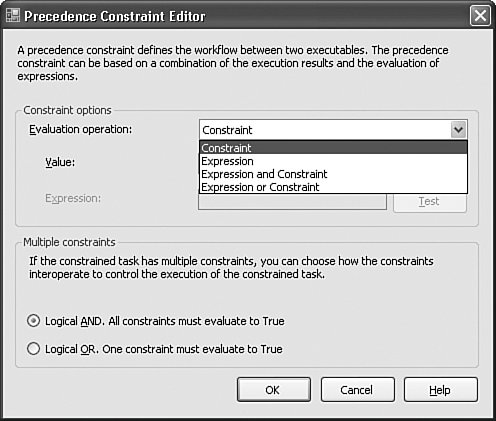
How to Use Constraints and Expressions to Determine Whether Executables RunPrecedence constraints link executables (containers and tasks) in packages into a control flow and specify conditions that determine whether executables run. A precedence constraint connects two executables: the precedence executable and the constrained executable. You can use expressions in place of or in combination with the outcome (success, failure, or completion) of the precedence executable to determine whether the constrained executable runs. The Precedence Constraint Editor is shown in Figure 16-38. Figure 16-38. The Precedence Constraint Editor shows the available evaluation operations. Select either Expression and Constraint or Expression or Constraint to use an expression in the evaluation operation of the precedence constraint. The expression that you use must evaluate to a Boolean. For example, a package could use an expression that evaluates whether the constrained executable runs based on the amount of disk space available, the number of rows a data flow inserted into a table, or the day of the month. Tip Make sure that you include the @ character as the first character in the variable name and also, because variable names are case sensitive, that the variable name you provide matches the name of the variable case-wise. Let's look at some sample expressions. In the following expression, the variable varRowCount, set by a Row Count transformation in a data flow, is compared to the value 1000. You could use this expression to determine whether the package should run a task that backs up a database depending on the number of rows inserted into the destination database. The prefix @ is required when variables are used in expressions to differentiate the variables from column names. In most user interface, the @ is added for you automatically. @varRowCount > 1000 Likewise, in the following expression, the variable @varDisk, set by a Script task, is compared to the value 20. You could use this expression to determine whether to continue package execution. @varDisk >= 20 In the following expression, the GETDATE function determines the day. If the day is the first day in the month, the constrained executable runs. DATEPART("day",GETDATE()) == 1 Tip The equal operator in the Integration Services expression language is ==, that is, two equal (=) characters with no spaces between them. How to Use Expressions to Set Variable ValuesYou can configure most variable properties in the Variables window, but you must use the Properties window to configure variables to evaluate as expressions. To configure variables:
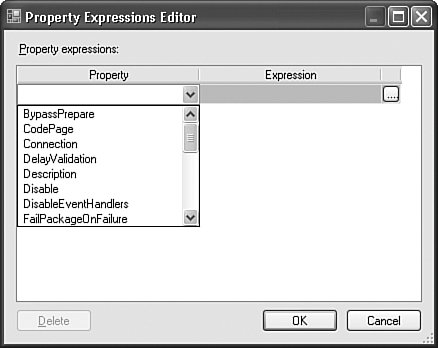
You will notice that when the Expression field loses focus, the Value property is automatically updated with the evaluation result of the expression and the ValueType is set. Let's look at some sample expressions. In the Expression field, type GetDate(). Notice, that the Value property now contains the current date and the ValueType property is set to DateTime. In the Expression field, type "A" + "B". It is an expression and strings must be delimited by quotes?Notice that the Value property now contains AB and the ValueType property is set to String. How to Use Expressions to Values of PropertiesThe value of properties can be updated with the evaluation results of expressions by implementing property expressions on properties. Property expressions are expressions that you write in the Integration Services expression language. The expressions can use variables and the operators and functions that the Integration Services expression language provides. The variables can be either system- or user-defined. The custom tools for tasks and containers include the Expressions page (see Figure 16-39), but you can also add property expressions in the Properties window. Figure 16-39. The Expressions page in the Execute SQL Task Editor on which you access the expression tools for writing property expressions for properties of the Execute SQL task.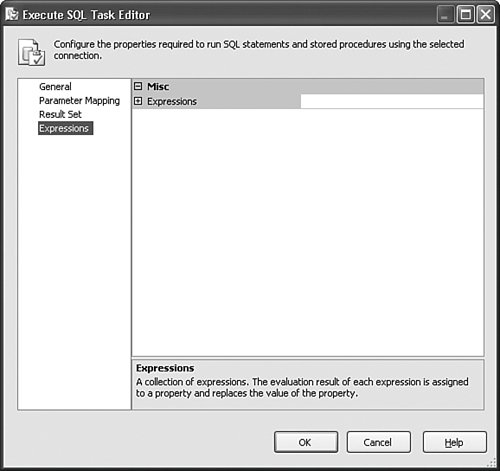 From the Expressions page or the Expressions node in the Properties window, you click (. . .) to open the Property Expressions Editor dialog box (see Figure 16-40). Here you select the properties for which to create property expressions in the Property list, and then either type the expression directly in the Expression box or click (. . .) to use the Expression Builder to write expressions. Figure 16-40. The Property Expressions Editor lists the properties of the Execute SQL task in the Property list. The Expression Builder (Figure 16-41) makes it easy to write expressions. It lists the available variables and the functions, type casts, and operators that you can use in expressions. You can type the expression in the Expression box or build the expression by dragging variables, functions, type casts, or operators to the Expression box. The advantages of using the Expression Builder instead of the Property Expression Editor are that you can verify that the syntax of the expression is valid and view the evaluation result of the expression. The value of the property with which the property expression is associated is not updated when you evaluate the expression. The values of properties are updated when you save, load, or run the package. Figure 16-41. The Expression Builder shows the Variables folder, and the folders for functions, type casts, and operator. The expression sets the CodePage property of the task to 1045.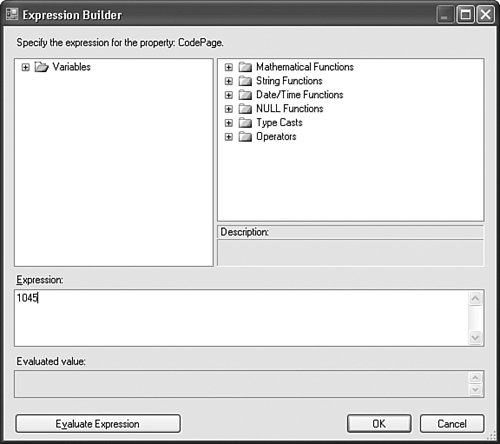 The Expression Builder lists the variables, functions, type casts, and operators for use in property expressions. Note that the name of the property, in this case CodePage, appears in the text at the top of the dialog box. The Expression Builder automatically adds the @ prefix and also includes the variable namespace. If it is not necessary to include the namespace to uniquely identify a variable, you may omit the namespace. Note The Expression Builder is also available for building the expressions that data flow components use. The only difference is that the Expression Builder then includes a Columns folder, which lists the columns in the data flow that are available to use in expressions. Let's consider some sample expressions. The following expression uses the variable, varConnectionString, It could be used to set the ConnectionString property of a file connection manager. The variable would have the String data type and would contain a value like "C:\MyProject\ TestLog.txt". @[User:: varConnectionString] The following expression uses the system variables PackageName, MachineName, and StartTime. Because the StartTime variable has a date/time datatype it must be cast to a string before the variable value can be concatenated with the other strings in the expression. This expression could be used to set the Subject property of a Send Mail task. The evaluation results would be a value like "MyPackage is running on MYLAP1started at: 2/18/2006 3:07:20 PM."
Other expressions are more simple. The following expression can set the DisableEventHandlers property to True and this way prevent the execution of the event handler control flow. True How to View Data During Package ExecutionFrequently it is useful to see the data as it moves through the data flow in a package. You might want to view the data after a transformation updates values or modifies the dataset, verify that the dataset contains the columns that you need, or examine the data for unexpected values. Data viewers provide an easy way to do all these things. Tip In the early stages of package development, use a Row Count transformation instead of a destination as the terminating component in a data flow. This way, you can focus on getting the package to work correctly before you write any data to a data store. Data viewers are attached to the paths that connect components in a data flow. Integration Services provides four different types of data viewers: grid, histogram, scatter plot, and column chart. The column chart and grid types are exemplified in Figure 16-42). You can only use the histogram and scatter plot types with numeric data. Figure 16-42. The Column Chart data viewer and the Grid data viewer.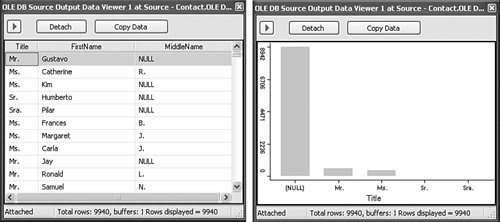 You can copy the data in data viewers to use for further analysis. If you copy data from a Grid data viewer, the column names are copied as well. Tip Data viewers show data one buffer at a time. Keep that in mind when you view aggregated data, the aggregation is not necessarily applicable to the entire dataset. How to Implement Logging in PackagesThe earlier section about logging in this chapter describes the types of logging that you can implement in packages. To view the logged information, you need to exit Business Intelligence Development studio and open another tool like the Windows Event Viewer or SQL Profiler or a text or XML file, or run an SQL statement to query log entries in SQL Server tables. This is not very convenient during package development. To view log entries in real time in Business Intelligence Development Studio, you use the Log Events window. There are no additional steps in the configuration of the package logging; all you do is open the Log Events window and the log entries are automatically written to the window. If the package is configured to log to multiple logs, the information appears only once in the Log Events window. To open the Log Events window (see Figure 16-43), click Log Events on the SSIS menu. Figure 16-43. The Log Events window lists log entries for the Foreach Loop container. From the Log Events window you can copy the log entries and also view the log entry in a separate dialog box. To copy the log entries, select the entries, right-click, and then click Copy. To view a log entry in the Log Entry dialog box, double-click the log entry in the Log Events window. Common Package Deployment ScenariosAfter you complete the development or modification of packages, you need to deploy them to a test environment for further testing or to a production environment. This section includes information about common tasks that you do to prepare Integration Services projects for deployment, create the deployment bundle, and install packages on the target computer.
How to Add Packages and Other Files to an Integration Services ProjectThe deployment bundle includes all packages in an Integration Services project. If you want to deploy only a subset of the packages, you must create a new Integration Services project and add those packages to the project. If you want to include packages from other projects, you must add the packages to the project from which you build the deployment utility. Integration Services automatically identifies and includes package dependencies in the deployment bundle, so you do not need to explicitly add those items to the project. Package dependencies include any configuration files that the package uses. On the other hand, the log files that the package uses are not automatically included. To decide whether you need to include the log files, you need to know whether the File connection manager creates a new file or uses an existing file. The easiest way to do this is to locate the pertinent File connection managers in the Connection Managers area of SSIS Designer, double-click it, and take a look at the Usage type option. If it is set to Create file, you do not need to include the log files, but if it is set to Existing file, and the file does not already exist on the target server, you do. Tasks such as the Execute SQL, XML, and WMI Data Reader tasks that execute language statements can be configured to use a direct input, a File connection, or a variable to provide the statement. If the task uses statements stored in a file, then you must add that file to the project. Again, if the file already exists on the target server, you need not do this. If you add packages to the project, they are automatically added to the SSIS Packages folder; other items are added to the Miscellaneous folder. Tip Data sources and data source views are not deployed with packages. If you added connection managers that are based on data source views, the connection managers are automatically included in the package definition. The data source views are included as SELECT statements in the pertinent properties of sources, transformations, and destinations in the package definition. How to Configure the Deployment Utility and Build a ProjectBefore the build process that Business Intelligence Development Studio provides for Integration Services projects will generate the deployment utility and create the deployment bundle that you use to install packages, you must update project properties. In Solution Explorer right-click the project and click Properties, or select the project and then click Properties on the Project menu. Figure 16-44 shows an example of the resulting dialog box. Figure 16-44. The Property Pages dialog box for the Integrations Services project, MyProject.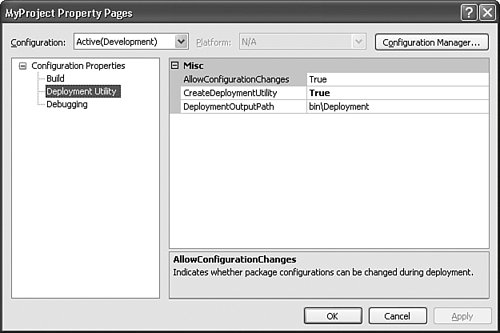 You need to configure only three properties for the deployment utility: AllowConfigurationChanges, CreateDeploymentUtility, and DeploymentOutputPath. To show these properties, click Deployment Utility in the <project name> Property Pages dialog box. By default, the AllowConfigurationChanges property is set to True. This means that you can update the values of configurations when you install the packages on the target computer. Typically, you want to allow the update of configurations the first time you deploy a set of packages. Depending on the updates to packages, you may want to disallow the update of configurations on package redeployment to ensure that package properties are not inadvertently changed and the redeployed package works the same way as the package it replaces. To build the deployment utility when you run the build process, set the CreateDeploymentUtility property to True. The default value, bin\Deployment, of DeploymentOutputPath, specifies the folder relative to the Integration Services project for which you build the deployment utility to store the files in the deployment bundle. Next, you right-click the Integration Services project and click Build. After the build process completes, the Deployment folder contains a deployment manifest, <project name>.SSISDeploymentManifest, the packages, and any package dependencies. How to Prepare to Install Packages on the Target ComputerDepending on the configuration of the packages you want to deploy, you may have work to do on the target computer before packages can be run successfully in the new environment. The following are some common tasks:
How to Install Packages, Package Dependencies, and Other FilesAfter you complete the build process to create the Deployment folder, you are ready to install the packages on the target computer. To install packages on a different computer, follow these steps:
Common Package Management ScenariosSQL Server Management Studio is the SQL Server 2005 studio for managing Integration Services packages. The following sections teaches you
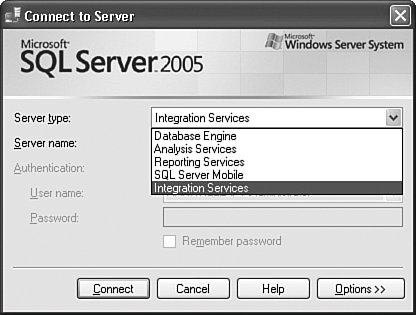
Each of these tasks is covered in the following sections. How to Connect to Integration ServicesIn contrast to Business Intelligence Studio, the first step to use SQL Server Management Studio is to log on to a server. In the Connect to Server dialog box (see Figure 16-45), you select Integration Services and specify a server. Integration Services supports only Windows Authentication and by default uses the NT AUTHORITY\NetworkService account. Figure 16-45. The Connect to Server dialog box shows the server types with Integration Services selected. After you have connected to Integration Services, you can work with packages from SQL Server Management Studio in the Object Explorer window. Tip If you cannot connect to Integration Services, verify that the Integration Services service is started. The SQL Server 2005 Surface Area Configuration tool and Services snap-in list the service and its state. Tip By default, MsDtsSrvr.ini.xml specifies a default instance of SQL Server and you must modify the file to connect to a named instance. How to Modify the Service Configuration File to Connect to a Named Instance of SQL ServerTo connect to a named instance of SQL Server, you must modify the service configuration file, MsDtsSrvr.ini.xml. By default, the file is located in C:\Program Files\Microsoft SQL Server\90\DTS\Binn. The following XML code is the content of the default configuration file.
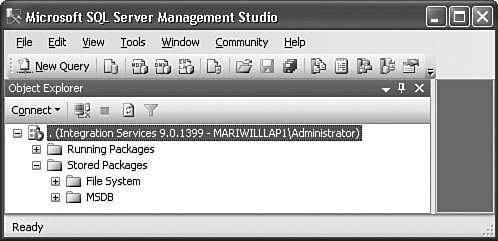
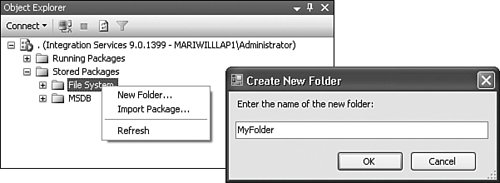
Open the file in any text editor, change the <ServerName> element from <ServerName>ServerName</ServerName> to <ServerName>ServerName\InstanceName</ServerName>, and save the file. You must restart the Integration Services service to use the updated service configuration file. How to Add and Change Top-Level Folders in the Stored Packages FolderIntegration Services contains the two root-level folders: Running Packages and Stored Packages. Running Packages lists packages that are currently executing. Stored Packages contains the sub-folders that list the packages saved to the package store (the msdb SQL Server database or the file system). Integration Services can save packages to the file system or the sysdtspackages90 table in the msdb. You can save packages to any folder in the file system, but Integration Services service monitors only packages that you save to the folders that are specified in the service configuration file, MsDtsSrvr.ini.xml. By default, the configuration file, located in C:\Program Files\Microsoft SQL Server\90\DTS\Binn, specifies the subfolders: File System and MSDB (see Figure 16-46). Figure 16-46. Integration Services in the Object Explorer window of SQL Server Management Studio. You cannot modify the root-level folders, nor can you delete them; however, you can modify the sub-folders within Stored Packages and extend their structure to meet your needs. For example, you might want to organize your packages by the department that uses them or by the types of tasks they perform. To add or delete top-level folders or change the names of top level folders, you must modify the service configuration file, MsDtsSrvr.ini.xml. The following XML code is the content of the default configuration file.
The elements <Name>MSDB</Name> and <Name>File System</Name> specify the top-level folders within the Stored Packages folder. To add, delete, and modify the folders, open MsDtsSrvr.ini.xml in any text editor and then edit the file. Before you begin to add folders, you need to choose the type of folder you want to add. You will notice the file has two types of Folder elements: One specifies "SqlServerFolder" and the other "FileSystemFolder". To add a folder for packages stored in msdb, copy and paste the Folder element that specifies "SqlServerFolder," and for packages saved to the file system use the one that specifies "FileSystemFolder." In the new XML Folder block, update the Name element. If you copied the Folder element that specifies "FileSystemFolder," you can also update the location and folder name of the file system folder that Integration Services service monitors and add more folders to monitor. By default, the configuration file specifies the Packages folder, (..\Packages), a folder that is created when you install Integration Services. The following Folder element specifies a folder named Finance and the folder path, C:\MyPackages. A folder can monitor only one location. <Folder xsi:type="FileSystemFolder"> <Name>Finance</Name> <StorePath>C:\MyPackages</StorePath> </Folder> The Integration Services service must be restarted to use the updated service configuration file. How to Customize the Structure of Subfolders within the Top-Level FoldersUnlike the top-level folders within the Stored Packages folder, you do not modify the Integration Services service configuration file to add subfolders within the top-level folders. Instead, you use the user interface that SQL Server Management Studio provides. To add a new folder,
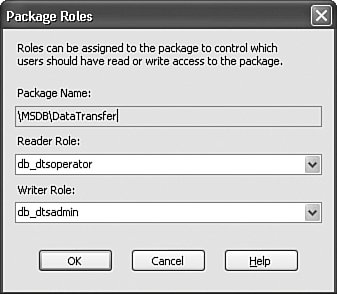
How to Assign Read and Write Permissions to PackagesYou can protect packages that are saved to the msdb SQL Server database by assigning Integration Services database-level roles that specify read and write permissions on packages. Integration Services provides the three fixed database-level roles for controlling access to packages: db_dtsadmin, db_dtsltduser, and db_dtsoperator. Table 16-4 presents the read and write permissions for each of the roles.
To set read and write permissions follow these steps:
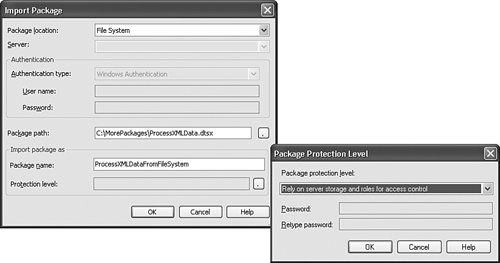
Tip Packages saved to the msdb database are stored in the sysdtspackages90 table. Columns in this table contain information about the roles that are assigned to packages. The readerrole column specified read access, the writerrole column write access, and the ownersid column the security identifier of the package owner. You can import packages saved to SQL Server, the package store, or the file system into SQL Server or the package store. The destination of the imported package is specified by the type of folder from which you invoke the import process. If you import packages from a folder that manages packages stored in SQL Server, the package is imported into the sysdtspackages90 table in the msdb SQL Server database; likewise, if you import packages from a folder that manages packages in the file system, the packages are imported into the folder specified in the Integration Services service file; otherwise, the packages are imported into the nonmanaged file system folder. To import a package follow these steps:
Integration Services provides a variety of protection levels. You first set the protection level when you develop a package. However, you might want to apply a different protection level to your imported packages. For example, if you import your packages to SQL Server, you may choose to rely on the built-in security features of SQL Server to keep packages safe and update the package to use the protection level, Rely on server storage and roles for access control. To learn more about package protection levels, see the section, "How to Set User Properties to Secure Packages," earlier in this chapter. Importing packages is a quick and easy way to install packages and to change the storage format of packages. However, you should be aware that the import feature does not include package dependencies. If your packages have dependencies, or they rely on ancillary files that you have added to the Integration Services project to deploy with the packages, then you should consider building a deployment utility and importing the packages by using the Package Installation Wizard. The export process is the reverse of the import process described previously. Import brings in packages; export sends out packages. The steps to export a package are very similar to the steps to import a package. You can export packages to SQL Server, the package store, or the file system. If you export to SQL Server, you can export to the top-level folder for the msdb database or one of its subfolders. If you export to the package store, you can specify any of the folders that Integration Services manages. The service manages two types of storage: the msdb SQL Server database and the folder that the configuration file for Integration Services specifies. If you export a package to the top-level folder for msdb or its subfolders, the package is exported to msdb. Likewise, if you export a package to the top-level folder that the service specifies or its subfolders, the package is exported to the file system. If you export to the file system, you can specify any local or remote folder. The Integration Services service does not manage or monitor these packages. To export a package follow these steps:
How to Run Packages Using the Package Execution UtilityIn SQL Server Management Studio, you can run packages immediately by using the Execute Package Utility or schedule the package to run in a step in a SQL Server Agent job. This chapter focuses on the Execute Package utility. To learn more about running packages in a job, see Chapter 8, "Inside Scheduling Tools." The Execute Package Utility (see Figure 16-50) is a graphical interface on the dtexec command prompt utility; it includes the richness of the dtexec command line options, but it is more intuitive to use. The dtexec command prompt utility configures and runs packages that are saved to SQL Server, the package store, or the file system in a command prompt window. The utility provides access to package configuration and execution features. For example, you can set the values of properties, add logging capability, and specify a different package configuration file. If you are not comfortable running packages from the command prompt or you want to run packages without leaving SQL Server Management Studio, the Execute Package Utility is the tool of choice. Figure 16-50. The General page of the Execute Package Utility.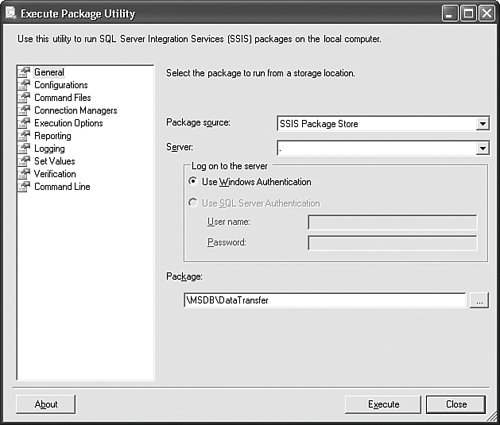 In the Execute Package Utility you can run the packages as they are, or you can use the pages in the user interface to modify the command line options that dtexec uses to run the package. The changes that you make apply only to the current execution instance; they are not saved. To run a package using Execute Package Utility, right-click the package that you want to run and click Run Package. Execute Package Utility has separate pages for different categories of options that you might want to configure. For example, the options for modifying all logging features are on the Logging page. You can run the package from any page. Table 16-5 presents a run-down of the pages and options you can set.
Tip The Package Configuration Wizard provides an easy and quick way to generate paths for properties. To generate multiple paths, use the XML or the SQL Server configuration type when you run the wizard. Tip The connection managers in the Configuration String drop-down list are not filtered by the selected log provider type. Make sure that the connection manager you select is compatible with the log provider type. Tip The Execute Package Utility provides an easy and foolproof way to generate command lines to use with the dtexec command prompt utility or save for reuse in command files. When you click Execute, the Package Execution Progress dialog box opens (see Figure 16-51). The dialog box displays validation and progress information. While the package is running, you can click Stop to stop package execution. After the package completes, click Close to exit the dialog box. Figure 16-51. The Package Execution Progress dialog box shows validation, progress, start time, and finish times for the ShowProgress package.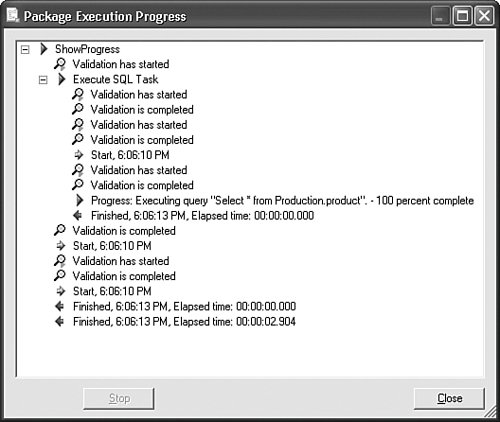 How to Run Packages Using the dtexec Command Prompt UtilityYou use the dtexec command prompt utility to execute Integration Services packages from the command prompt window. The dtexec command prompt utility supports access to package configuration and execution features. For example, in the command line for dtexec you can configure the package to use checkpoints, use a different configuration than the one specified when the package was designed, and specify the number of executable files that the package can run concurrently. The dtexec utility can run on packages saved to the sysdtspackages90 table in the msdb SQL Server database, the package store, or the file system. Before taking a closer look at command lines for dtexec, let us briefly cover some basic rules for the command lines:
Tip When a package runs, dtexec can return an exit code. The utility can set the following values when exiting:
In the command line for dtexec, you provide the typical options and arguments; you specify the package to run, the package location type, and the package location. If the location type requires authentication, the command line also includes any applicable password and username (not usually one word). The following command lines run a package saved to sysdtspackages90 table in the msdb SQL Server database, the package store, and the file system. To run a package saved to SQL Server using Windows Authentication: dtexec /Sql MyPackage /Server MyServer To run a package saved to the package store in the MSDB folder: dtexec /DTS \MSDB\MyPackage /Server MyServer To run a package saved to the file system: dtexec /File c:\MyPackage.dtsx A few more command line examples should prove useful. To run a package saved to the file system that uses the log file, MyLog.txt, and the XML configuration file, MyPackageConfig.dtsConfig: dtexec /File c:\MyPackage.dtsx /Logger DTS.LogProviderTextFile;c:\MyLog.txt /ConfigFile c:\MyPackageConfig.dtsConfig To run a package saved to SQL Server and set the value of the userdefined variable, MyVariable, defined in the scope of the task, MyTask:
To validate the package without running it: dtexec /Sql MyPackage /Server MyServer /va How to Manage Packages Using the dtutil Command Prompt UtilityYou use the dtutil command prompt utility to manage Integration Services packages. The utility can copy, move, delete, or verify the existence of a package. You can run the utility to perform these actions on packages saved to the sysdtspackages90 table in the msdb SQL Server database, the package store, or the file system. The dtutil command prompt utility does not support command files or redirection. Before taking a closer look at command lines for dutil, let us briefly cover some basic rules for the command lines.
When forming the command line for dtutil, you provide the typical options and arguments: You specify the source and destination, package password if applicable, and depending on package source and destination, the pertinent username and password. However, when you move or copy packages you have the opportunity to reconfigure the package in significant ways; you can change the package protection level, regenerate the package GUID, or sign the package. You use the En[crypt] option to encrypt the package with the specified package protection level. The syntax is: /En[crypt] {SQL | FILE}; Path;ProtectionLevel[;password]. The first argument indicates the package location type, the second the package path, and the third the package protection level. Depending on the protection level, you may need to include a fourth argument: the password with which the package was encrypted. To encrypt a package saved to the file system using the password @fIH1K9, you would use the following command: dtutil /Encrypt File; C:\MyEncryptedPackages\MyEncryptedPackage.dtsx;2; @fIH1K9 The dtutil command prompt utility uses numeric values to indicate the protection level. Table 16-6 describes the package protection levels.
You use the /I[DRegenerate] option create a new GUID for a package and update the package ID property. When you copy a package, the package ID remains the same and it is impossible to differentiate log entries of the original package and the package copy. If you plan on running both the original and the copy, it's a good idea to regenerate the ID in the copied package. The IDRegenerate option takes no arguments. To copy and generate a new package ID for a package saved in the file system, you would run the following command: dtutil /File c:\MyFolder\MyPackage.dtsx /Copy FILE;c:\MyCopyFolder\MyCopiedPackage.dtsx/I The capability to sign packages is another Integration Services security feature. You can use the /Si[gn] option to sign a package using a digital signature. The Sign option takes three arguments, which are separated by semicolon. The syntax is: /Si[gn] {SQL | File | DTS}; path; hash. The first argument indicates the package location type, the second the package path, and the third the certificate identifier, expressed as a hexadecimal string. The command line uses a sample hash. To copy and sign a package saved in the file system you would use this command:
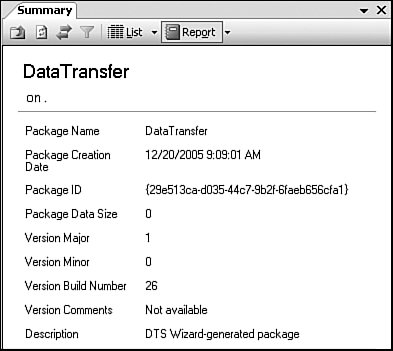
Tip If the package is already signed, dtutil prompts for confirmation to re-sign the package. If the command line includes the Quiet option, the package is silently re-signed. How to View Summaries of Package PropertiesSQL Server Management Studio includes the Summary tab, which can display information about Integration Services folders and packages. If the Summary tab is not visible, press F7 or click Summary on the View menu. You can view information in a list or report format. Figure 16-52 displays the report format. Depending on whether a folder of package is selected, the list and report formats provide different types of information. Lists and reports on folders provide information about the subfolders and packages in the folder, and on packages, lists, and reports they provide information about the selected package. The report on the Running Packages folder lists the running packages. Figure 16-52. The report on the DataTransfer package. If you run packages by using the Execute Package Utility, you can specify the package version and build version you want to permit to run. The report on the Summary tab lists this information. |
EAN: 2147483647
Pages: 149