Common Deployment and Management Scenarios
| This section contains information about using the Notification Services tools to perform common deployment and management tasks. If the task can be performed with SQL Server Management Studio and NSControl, the instructions for performing the task with SQL Server Management Studio appear first, followed by instructions for performing the task with NSControl. The primary tasks enabled by the tools are multi-step processes, such as deploying or updating an instance. These tasks also require steps that are not directly performed by the Notification Services tools. For completeness, those external steps are included when necessary. Note For simplicity and improved security, the following instructions use Windows Authentication. You can modify SQL Server Management Studio instructions to use SQL Server Authentication by providing a SQL Server login and password when registering instances of Notification Services. You can modify NSControl instructions to use SQL Server Authentication by adding the sqlusername and sqlpassword options on NSControl commands. Deploying an Instance of Notification ServicesDeploying an instance of Notification Services involves several steps: creating database objects, enabling the instance, registering the instance, and providing Windows and database access to the Notification Services engine (which is usually one or more Windows services), and then starting the engine. Creating Database Objects and Enabling the InstanceCreating database objects requires you to connect to the instance of the SQL Server database engine where you want to store all instance and application data. For example, if you want to store instance and application data on the default instance on Server01, open SQL Server Management Studio and connect to Server01. In Object Explorer, you should see a Notification Services folder. Right-click this folder and select New Notification Services Instance. In the dialog box that appears, click the Browse button and select the ICF for the instance you are deploying. Figure 15-5 shows what this dialog box looks like for an ICF named MyICF.xml. Figure 15-5. New Notification Services Instance dialog. Notice that this ICF contains three parameters, which are values you define at deployment time. In the ICF, each parameter is surrounded by % characters, such as %_SQLServer_%. In this dialog, you provide the value with which to replace each parameter. Using the values shown, Notification Services replaces each occurrence of %_SQLServer_% (the database server name) with the value Server01, each occurrence of %_InstanceBaseDirectoryPath_% (the base path to instance files) with C:\NS\MyNSInstance, and each occurrence of %_NSServer_% (the server where the Notification Services engine will run) with the value Server01. Also notice that the Enable instance after it is created check box is selected. This is a shortcut. If you select this box, the instance is enabled during creation. However, the instance does not run until it is started. When you click OK, Notification Services replaces parameters, validates the ICF and ADFs, and then creates instance and application database objects. After this process is complete, the instance appears in the Notification Services folder. (If not, right-click the Notification Services folder and select Refresh.) Registering the InstanceNext, you need to register the instance. Registration adds information about the instance and its databases to the local Windows Registry and creates performance counters. Registration can also create a Windows service that runs the Notification Services engine. Unless you are running the Notification Services engine in your own application or process, you must create a Windows service on each computer that runs a hosted event provider, generator, or distributor. This Windows service always has an associated Windows account and password, which it uses for Windows permissions and it can also use for SQL Server access. If you cannot use Windows Authentication to connect to SQL Server, you can specify a SQL Server login and password. As stated earlier, if you are connected to SQL Server from a client computer, the instance is registered on the client, not the server. This may or may not be correct, depending on the hosted event provider, generator, and distributor SystemName values in your ADFs. The bottom line is that you need to register the instance on each computer that runs an event provider, generator, or distributor, and also where you run subscription management interfaces or remote administration applications. To register an instance of Notification Services on the local computer, right-click the instance, point to Tasks, and then select Register. The dialog box shown in Figure 15-6 appears. Figure 15-6. Register Instance dialog. If you create the Windows service, Notification Services grants most of the necessary Windows permissions to the service logon account, including membership in the SQLServer2005NotificationServicesUser$ComputerName group. You may need to grant additional folder permissions so that the Notification Services engine can pick up events, read content formatter files, and drop notifications. The permissions are documented in the "Granting Windows Permissions" section. Notification Services does not grant SQL Server permissions to the Windows account or to the optional SQL Server Authentication login. Registration is a process that can happen on several computers, and can be done before or after creating database objects. Also, SQL Server and database permissions should be restricted as much as possible. Therefore, you need to grant database permissions manually. If you click OK with these options selected, Notification Services adds information to the local Registry, creates a Windows service with the specified credentials, and creates local performance counters. Granting SQL Server PermissionsIf using Windows Authentication, the Windows account that the Notification Services engine runs under needs permission to log in to the instance of SQL Server that stores instance and application data. If using SQL Server Authentication, the SQL Server login associated with the engine needs permission to log in to the instance of SQL Server. The account used by the engine to log in to SQL Server also needs a user account in each of its instance and application databases. This might be one database or multiple databases, depending on instance and application database settings. These user accounts obtain database permissions through Notification Services database roles:
If an account used by a Notification Services engine performs all these tasks, grant database permissions with the NSRunService database role. If the account is used for a subset of these tasks, use selective membership in the NSEventProvider, NSGenerator, and NSDistributor roles to grant permissions. For this deployment scenario, the instance is deployed on a single server, and uses Windows Authentication. The instance also uses the default database settings, meaning a new database is created for the instance and each application. Therefore, you need to grant database permissions in one instance database and each application database. In SQL Server Management Studio, you can create logins and grant database permissions all in one dialog. First, use the Security folder in Object Explorer to make sure the account used by the Notification Services engine has a login account. To create a new login, right-click the Security folder, point to New, and then select Login. To modify an existing login, expand Security, expand Logins, right-click the login, and then select Properties. Both resulting dialog boxes look similar to Figure 15-7. Figure 15-7. The Login dialog's General tab.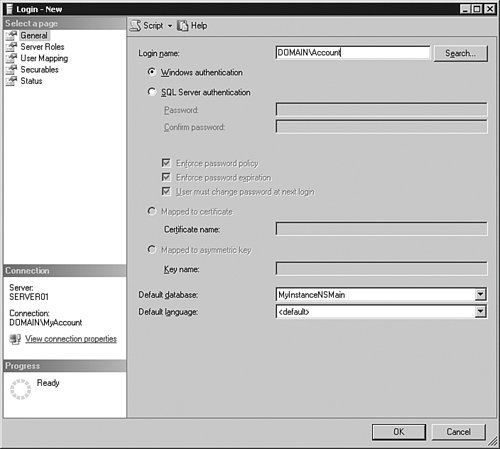 If creating a new login, enter the name of the login in the Login name box. The picture shows how to create a new Windows Authentication login named DOMAIN\Account. To grant database access to DOMAIN\Account, click User Mapping in the left pane. For each database associated with the instance, select the check box next to the database in the Users mapped to this login box, and then select NSRunService in the Database role membership box, as shown in Figure 15-8. Figure 15-8. The Login dialog's User Mapping tab.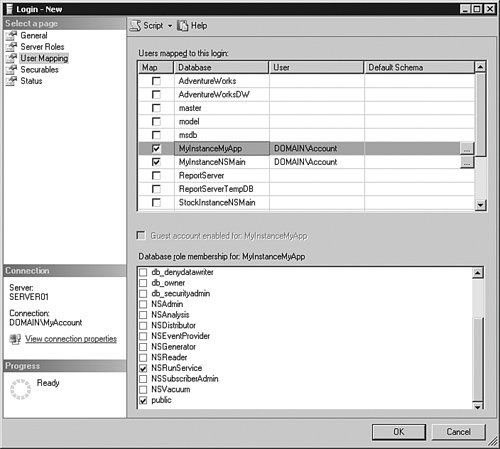 When you click OK, SQL Server creates any new login and user accounts and then grants the specified permissions. Granting Windows PermissionsWhen you use Windows services to run instances of Notification Services, most Windows permissions are granted when you register the instance. Other permissions you need to grant depend on your applications. The following list shows the permissions typically required by the Notification Services engine:
Starting the InstanceIn this deployment scenario, and in all situations in which the engine is run by one or more Windows services, you start the instance in SQL Server Management Studio by right-clicking the instance and selecting Start. This starts all Windows services associated with the instance. If the instance fails to start, it is typically a problem with the account used to run the service. The account name and password might be mistyped. Or the account might not have the necessary SQL Server and Windows permissions. If the Windows services run on remote computers, make sure SQL Server is configured to accept remote connections. Also make sure the instance was registered with the correct instance of SQL Server and that the SQL Server instance and databases are online and available. After starting the instance, check the status of all components by right-clicking the instance and selecting Properties. All components should be enabled, as shown in Figure 15-9. Figure 15-9. Instance Properties dialog. If individual components have a current status of Enable Pending, it most likely means that there is a mismatch between the SystemName value specified in the ADF and the name of the system where the Notification Services engine is running. However, if you start the instance through SQL Server Management Studio, Notification Services attempts to start the Windows service on each computer specified as a SystemName value, and fails if the Windows service does not exist. Therefore, you are likely to know that something is wrong when a Windows service does not start. If this happens, look closely at the name of each server where Notification Services is attempting to start the instance and make sure it matches the server where you registered the instance. You can verify that Windows services are running by clicking Windows Services in the left pane of the Properties window (see Figure 15-10). Figure 15-10. Windows Services and associated components.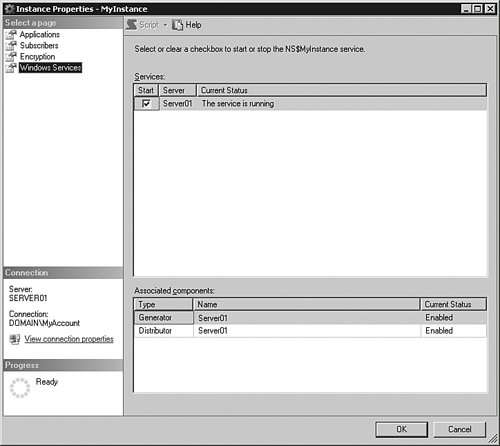 Basic NSControl Deployment ScriptDeploying through SQL Server Management Studio is easy, but sometimes you want to script a deployment for more consistent deployment and recovery experiences. The following script shows how to use the NSControl utility to do the same tasks as shown in the SQL Server Management Studio scenario. Note that you must have the Notification Services engine components installed to create a Windows service when registering an instance. You should run this script once on the computer where the Notification Services engine will run. Separately register the instance on any additional computers.
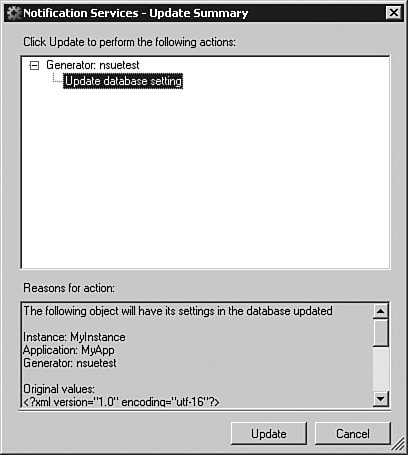
You may also need to grant Windows permissions for event providers, content formatters, and distributors. Because these permissions are very application-specific, granting them is not shown in the preceding example. Argument EncryptionYou may have noticed the Encryption pages in the Notification Services dialog boxes and the argumentkey options in NSControl. When you define event providers and delivery channels, you may need to specify sensitive information such as server names, logins, and passwords. To keep this information out of your files, you can use parameters, as shown in the deployment scenario. However, unless you use argument encryption, the sensitive information is stored in clear text in the database. If you want to encrypt this information before storing the values, you can set the EncryptArguments property to TRue in the ICF and then provide an encryption key when creating and registering the instance. You must also provide this key when updating the instance. The key is a string of up to 2500 characters that will be encrypted and stored in the Windows Registry and in the instance database. Scale-Out ConsiderationsIf you are running hosted event providers, generators, or distributors on one or more remote servers, you must install the Notification Services client components and then register the instance on those servers to create the Windows service, Registry entries, and performance counters. If you are running a subscription management interface, non-hosted event providers, or remote administration tools, or are hosting the Notification Services engine on other servers, you must install the Notification Services client components and then register the instance (without creating the Windows service) on those computers. High-Availability OptionsNotification Services supports failover clustering, log shipping, and database mirroring for high availability. Step-by-step instructions for deploying an instance of Notification Services on a failover cluster are provided in SQL Server Books Online. You can use log shipping and database mirroring to maintain a warm standby database server in case the primary database server experiences a failure. When deploying the Notification Services engine failover cluster, you register the instance on all nodes of the cluster and then create a Generic Service to handle failovers of the Windows service. When defining an application that runs on a failover cluster, the SystemName values must be the network name (which is the virtual server name), not the machine name. If the SystemName values are not correct, the instance gets stuck in the Enable Pending state. Using log shipping or database mirroring maintains a warm standby database server. To bring a standby server online, you must re-register the instance to update the name of the database server, and you must update the instance and its applications to update the database server name and the name of the computer where the hosted event providers, generators, and distributors run. You may want to keep standby copies of the ICF and ADFs available with the updated system names so that you can update the instance and its applications quickly. However, be sure that the ICF and ADFs are up to date. Upgrading an Instance from SQL Server 2000 to SQL Server 2005Each version of Notification Services is tied to its specific release of SQL Server. Notification Services 2.0 requires SQL Server 2000 databases. SQL Server 2005 Notification Services requires SQL Server 2005 databases. If you deployed an instance of Notification Services on SQL Server 2000, and you want to upgrade to SQL Server 2005, you must upgrade the instances of Notification Services. Upgrading instances of Notification Services upgrades database objects, adds new views and stored procedures, and removes dependence on extended stored procedures. Upgrading requires you to prepare the instance, install SQL Server 2005, upgrade the instance, update the instance, recompile any custom components, and then enable and start the instance. Preparing an Instance for UpgradingBefore you can upgrade an instance of Notification Services, you must disable, stop, and unregister the instance. In Notification Services 2.0, these tasks are done through the Notification Services Command Prompt. First, open the Notification Services 2.0 command prompt by clicking Start, pointing to All Programs, pointing to Microsoft SQL Server Notification Services 2.0, and then selecting Notification Services Command Prompt. At the command prompt, run the following three commands: nscontrol disable -name MyInstance net stop ns$MyInstance nscontrol unregister -name MyInstance If the instance is scaled out across multiple servers, you must run the net stop and nscontrol unregister commands on the additional servers. After running these commands, you can close the command prompt window. After unregistering the instance, you should back up all databases used for instance and application data. Having backups enables you to revert back to SQL Server 2000 if necessary. Installing SQL Server 2005The next step in the upgrade process is to upgrade the SQL Server 2000 database engine to SQL Server 2005 and install SQL Server 2005 Notification Services. The database engine can be upgraded in place. Notification Services is installed side by side with previous versions, which allows some flexibility in how you upgrade, especially on client computers. Before upgrading the database engine, you should run SQL Server 2005 Upgrade Advisor, which reports any issues that might prevent you from upgrading or that might cause differences in how applications operate. Fix any issues reported, and then upgrade the database engine and install Notification Services by running SQL Server 2005 Setup. (Notification Services will report that you need to perform the steps in the following sections.) Also make sure you install SQL Server 2005 Notification Services on any computer that runs components of the Notification Services instance, including event providers, generators, distributors, subscription management interfaces, and remote administration consoles. After running Setup, make sure you start the database engine so that it is ready for the next upgrade steps. Upgrading the InstanceAfter installing SQL Server 2005, you need to run a repair command to add some metadata about the instance to the msdb database. This metadata is added when you use SQL Server 2005 to deploy an instance, but does not exist for instances deployed with SQL Server 2000. One way Notification Services uses this data is to display Notification Services instances within Object Explorer. Repairing instance metadata is an infrequent task that is typically done only when you upgrade from SQL Server 2000. For this reason, the repair command is available only in the NSControl command-line utility. To run the repair command, open the SQL Server 2005 Notification Services command prompt by clicking Start, pointing to All Programs, pointing to Microsoft SQL Server 2005, point to Configuration Tools, and then selecting Notification Services Command Prompt. At the command prompt, run the following command: nscontrol repair -name MyInstance -database MyInstanceNSMain -schema dbo -server Server01 During the upgrade step, Notification Services updates the instances version and edition information with the version and edition of the toolset you are using. (So, to upgrade to SQL Server 2005 Enterprise Edition, you need to use the SQL Server 2005 Enterprise Edition tools.) We're going to switch back to SQL Server Management Studio, where we can perform most of the remaining upgrade tasks. (You can also perform these tasks from a command prompt window.) First, open SQL Server 2005 Management Studio and connect to the instance of Notification Services that contains the instance and application data. When connected, you should see a Notification Services folder in Object Explorer. When you expand this folder, you should see your instance of Notification Services. However, the instance will appear with a warning symbol. The warning symbol indicates that the instance's version information is incorrect, which will be fixed when you perform the upgrade step. To upgrade, right-click the instance of Notification Services and select Upgrade. Notification Services compares the version and edition information in the instance database with the version and edition of the current toolset. If the instance is of a lower version or edition than the toolset, Notification Services upgrades the instance. Note Upgrading changes instance version and edition information, but does not apply any user-defined ICF or ADF changes to an instance. If you want to change any instance or application settings, such as SystemName values, you must do this when you update the instance. Modifying Subscription RulesIn Notification Services 2.0, subscription rules used a Notify function to generate notifications. For example, a rule might use a Notify function as follows: SELECT dbo.FlightNotificationsNotify(S.SubscriberId, S.DeviceName, S.SubscriberLocale, E.Carrier, E.LeavingFrom, E.GoingTo, E.Price, E.Conditions) FROM FlightEvents E, FlightSubscriptions S WHERE E.LeavingFrom = S.LeavingFrom AND E.GoingTo = S.GoingTo AND ( (E.Carrier = S.Carrier) OR (S.Carrier = '*') ) AND E.Price < S.Price SQL Server 2005 Notification Services does not use Notify functions. When you upgrade to SQL Server 2005, you will need to modify your subscription rules to insert notifications directly into a view named after the notification class and then update the instance to apply the changes. The following code shows how this rule would be modified as follows to insert notifications into the FlightNotifications notifications class: INSERT INTO FlightNotifications(SubscriberId, DeviceName, SubscriberLocale, Carrier, LeavingFrom, GoingTo, Price, Conditions) SELECT S.SubscriberId, S.DeviceName, S.SubscriberLocale, E.Carrier, E.LeavingFrom, E.GoingTo, E.Price, E.Conditions FROM FlightEvents E, FlightSubscriptions S WHERE E.LeavingFrom = S.LeavingFrom AND E.GoingTo = S.GoingTo AND ( (E.Carrier = S.Carrier) OR (S.Carrier = '*') ) AND E.Price < S.Price At this time, you can also make any other desired changes to your instance and application definitions. Updating the InstanceAfter you have modified your subscription rules to replace the Notify function with INSERT statements, you need to apply those changes. In Object Explorer, right-click the instance of Notification Services, point to Tasks, and select Update to display the Update Instance dialog. Just as with the New Instance dialog, you must click the Browse button, select your ICF, provide values for any parameters, and then select the Enable instance after it is updated box (see Figure 15-11). Figure 15-11. Update Instance dialog. When you click OK, Notification Services examines the ICF and its referenced ADFs, compares them to the metadata in the database objects for the instance and its applications, and then presents a screen that summarizes the changes to the instance and its applications (see Figure 15-12). Figure 15-12. Update Summary dialog. Note Updating can take a several minutes because of the way underlying APIs compare the data in the XML to data in the database objects. When you click the Update button, Notification Services applies the changes. Recompiling Custom ComponentsIf your instance uses custom event providers, content formatters, or delivery protocols, recompile those components with the SQL Server 2005 assemblies. Registering and Starting the InstanceWhen you re-register the instance, use the same settings and values as you use with SQL Server 2000. Re-registering updates the Registry for SQL Server 2005 binary files. To register the instance locally, right-click the instance, point to Tasks, and select Register. To register the instance on other servers, you either need to run SQL Server Management Studio on those servers, or run the nscontrol register command, using the SQL Server 2005 version of the Notification Services Command Prompt. After you register the instance, right-click the instance and select Start. Upgrading Using NSControlMany of the tasks required to upgrade an instance of Notification Services from version 2.0 to SQL Server 2005 must be done in NSControl. The tasks shown as being done in SQL Server Management Studio can be replaced with the corresponding NSControl command. Just be sure to perform the initial disable, stop, and unregister commands with the Notification Services 2.0 version of the Notification Services Command Prompt, and to perform the repair, upgrade, update, register, and enable tasks in the SQL Server 2005 version of the Notification Services Command Prompt. Upgrading to a Different Edition of SQL Server 2005If you upgrade an instance of SQL Server 2005 to a different edition, such as upgrading an instance from Developer Edition to Enterprise Edition, you must also upgrade instances of Notification Services. The version and edition of the database engine must match the version and edition of Notification Services. Notification Services supports the following SQL Server 2005 edition upgrades:
Upgrading Editions Using Management StudioTo upgrade an instance of Notification Services to a different edition of SQL Server 2005, you must first disable and stop the instance. In SQL Server Management Studio, right-click the instance and select Disable, and then right-click the instance and select Stop. Next, install the new edition of SQL Server 2005, making sure to upgrade both the database engine and Notification Services. If you have scaled out instances of Notification Services, make sure to install the new edition on each server. After the installation is complete, open the upgraded edition of SQL Server Management Studio and connect to the instance of SQL Server that contains instance and application data. In Object Explorer, right-click the instance, point to Tasks, and then select Upgrade. It is important that you use the new edition to do this, as the upgrade command uses the tool's version and edition information to determine the new version and edition of the instance. After performing the upgrade, right-click the instance, point to Tasks, and select Update. In the Update Instance dialog, select the ICF, provide any parameter values, and select Enable instance after it is updated. When you click OK, Notification Services examines the instance and then displays the Update Summary dialog. Click Update to complete the update. When the update is complete (which can take several minutes), right-click the instance and select Start. Using NSControl to Upgrade EditionsThe tasks required to upgrade an instance of Notification Services to a different edition can be done from the command line. Replace the disable, upgrade, update, and enable steps with their NSControl commands. Replace the stop and start steps with net stop and net start. Viewing the Notification Services Summary ReportFor a quick view of the state of the instances on an instance of SQL Server, you can use a simple report that gathers data about your Notification Services instances. Using Management Studio to View Summary InformationTo view the Notification Services summary report, first make sure the Summary window is available. If not, select Summary from the View menu. In Object Explorer, select Notification Services. Then, in the Summary window, click Report. SQL Server Management Studio generates a report similar to that shown in Figure 15-13, which shows the instance names along with some key instance details. Figure 15-13. Notification Services summary report.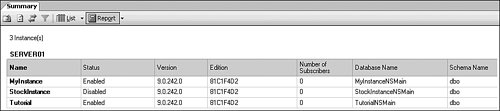 Using NSControl to View Summary InformationNSControl does not produce a cross-instance summary report. However, you can view the status of individual instances by using the nscontrol status command. For example, to view the status of MyInstance, run the following command: nscontrol status -name MyInstance Enabling, Disabling, Starting, and StoppingAfter you deploy an instance of Notification Services, you must enable and start the instance. Enabling allows a component to run. Starting the instance runs enabled components. An instance must be both enabled and started for the instance and its applications to process data. After you deploy an instance, you may need to temporarily halt processing for maintenance or other reasons. Your two options are disabling the instance, application, or components, or stopping the instance:
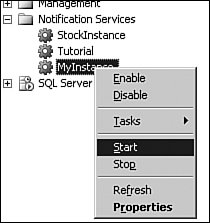
Notification Services recovers from an instance being disabled or stopped by using its internal clock to start where it stopped. You can control how Notification Services processes older data when restarted by setting "quantum limits," which enables the instance to skip old events and scheduled subscriptions. For more information, see SQL Server Books Online. If you need to disable an entire application or stop an instance, you can use a process like the following to allow the instance or application to finish processing any current data before it or its components are paused or stopped:
You can use the NSAdministrationHistory stored procedure to obtain information about event batches pending generation, notification batches pending distribution, and distribution work items in process. If an instance, application, or component is stopped without following this process, the instance, application, or component recovers and starts processing either where it left off or at the current processing quantum minus the specified quantum limit. The preceding process is simply a recommendation if you want current notifications to move through the "queue" before you perform maintenance activities. Also, to minimize the impact on subscribers, you should attempt to perform maintenance during periods of low activity. Enabling and Disabling an Instance Using Management StudioTo enable an instance of Notification Services in SQL Server Management Studio, right-click the instance and select Enable. To disable an instance, right-click the instance and then select Disable. Enabling and Disabling an Application or Component Using Management StudioTo change the state of an individual application or component in SQL Server Management Studio, use the Instance Properties dialog. To display the Instance Properties dialog, right-click the instance and select Properties (see Figure 15-14). Figure 15-14. Enable and disable, using the Properties dialog.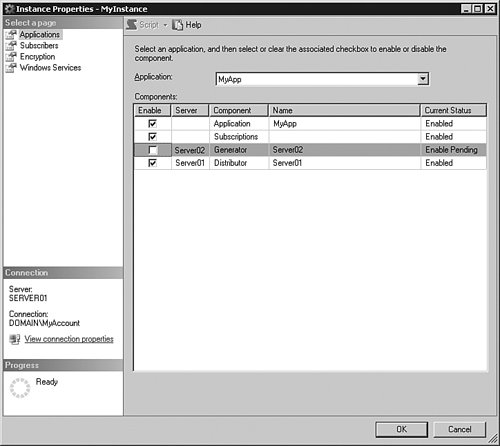 Select the application to configure in the Application box. You can enable the entire application, or you can individually enable its subscriptions, event providers, generator, or distributor by selecting the corresponding Enable boxes. You can disable the application or individual components by clearing the Enable boxes. Apply changes by clicking the OK button. To enable or disable subscriber management for the instance, select the Subscribers page and then select or clear the Enable box. In Figure 15.14, the application, its subscriptions, and its distributor will be enabled and the generator will be disabled when you click OK. Note the Enable Pending state in the picture. If a component is in a "pending" state, the Notification Services engine has not acknowledged the change in state. As stated earlier, it can take up to 30 seconds to pick up the change in state. If the component is stuck in a pending state, there may be a mismatch between where the component is configured to run and the actual name of the computer (or virtual server) where the engine is running. Using NSControl to Disable and Enable Instance, Application, or Component StateThe NSControl command line utility provides enable and disable commands. The syntax for these commands is as follows: nscontrol [en|dis]able [-nologo] [-help] [< component > [...n]] -name instanceName [-server databaseServer] [-application applicationName] [-sqlusername sqlUserName -sqlpassword sqlPassword] where < component > is one or more of the following: -events [systemName] | -generator | -distributor [systemName] | -subscriptions | -subscribers To disable the generator for the application MyApp in instance MyInstance, you would run the following command: nscontrol disable -name MyInstance -application MyApp -generator When you are ready to enable the generator, you would run the following command: nscontrol enable -name MyInstance -application MyApp -generator Starting and Stopping Windows Services in Management StudioIf you are using Windows services to run your instances of Notification Services, you can stop and start Windows services associated with an instance of Notification Services by using SQL Server Management Studio. To start all services associated with an instance, right-click the instance and select Start (see Figure 15-15). To stop all services, right-click the instance and select Stop. Figure 15-15. Starting all Windows services for an instance. You can also start and stop individual Windows services by using the Instance Properties dialog. To display the Windows Services settings in this dialog, right-click the instance and select Properties, and then in the left pane select Windows Services. Figure 15-16 shows the Windows Services for an instance that is scaled out over two servers, Server02 and Server01: Figure 15-16. Starting individual Windows services, using the Properties dialog.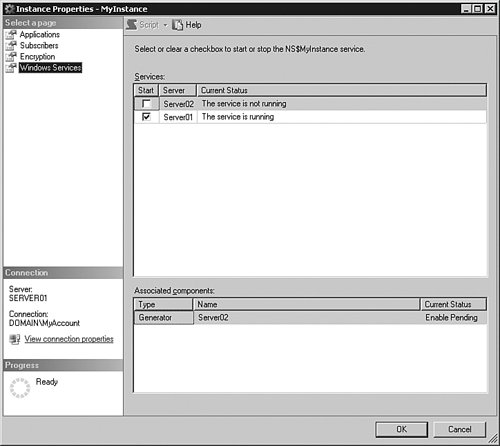 To start the service on Server02, select the Start check box and then click the OK button. Or, to stop the service on Server01, clear the Start check box and then click the OK button. Starting and Stopping from the Command PromptNSControl does not start and stop Windows services. However, you can start and stop individual Windows services by using the net start and net stop Windows commands. The Notification Services engine is named NS$instance_name. The following examples show how to start and stop a Windows service for the MyInstance Notification Services instance. net start ns$MyInstance net stop ns$MyInstance Updating an Instance of Notification ServicesWhenever you want to modify an instance of Notification Services, such as adding a new application, you must perform a set of steps to update the instance. During the update, Notification Services examines the ICF and ADF files, compares the settings to metadata stored in the instance and application database objects, and then applies the differences to the database objects. Before you perform the update steps, make your changes to the ICF and ADFs. For example, you might add a delivery channel and application in the ICF, and you might change the application execution settings in the ADF. Also make sure to back up instance and application databases. Many changes made to event classes, notification classes, or subscription classes cause Notification Services to delete and re-create the underlying database tables. Backing up databases before updating enables you to undo any changes by restoring pre-update data. Updating Using Management StudioFirst, open SQL Server Management Studio and connect to the instance of SQL Server that contains the instance and application data. In Object Explorer, expand Notification Services to display all the Notification Services instances on the server. Next, you need to disable the instance before you can update it. Updating fails on an enabled instance. To disable the instance, right-click the instance and select Disable. After the instance is disabled, you can apply the changes you made to the ICF and ADFs. Right-click the instance of Notification Services, point to Tasks, and select Update. In the Update Instance dialog, click the Browse button, select your ICF, provide values for any parameters, and then select the Enable instance after it is updated box (see Figure 15-17). Figure 15-17. Update Instance dialog.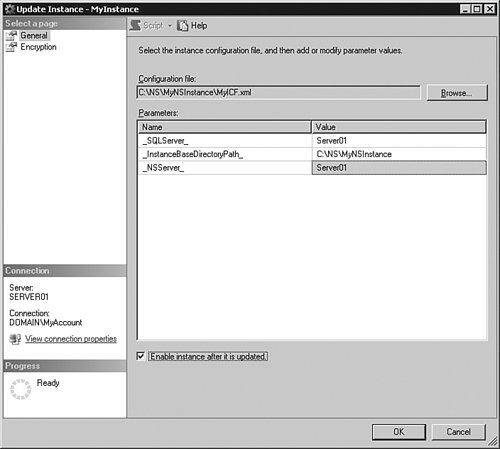 When you click OK, Notification Services examines the ICF and its referenced ADFs, compares them to the metadata in the database objects for the instance and its applications, and then presents a screen that summarizes the changes to the instance and its applications (see Figure 15-18). Figure 15-18. Update Summary Dialog. Note Updating can take a several minutes. At the Update Summary screen, review the changes. To make the listed changes, click the Update button. Because you enabled the instance via the Update Instance dialog, there are no additional steps to perform. The instance has been updated and enabled. Updating Using NSControlThe steps for using NSControl to update an instance can be derived from the steps in the previous section. First, run nscontrol disable to disable the instance. Then run nscontrol update to apply ICF and ADF changes to the databases. Finally, run nscontrol enable to enable the instance. Updating Registry InformationWhen you register an instance of Notification Services, you specify the name of the database server where the instance (and application) data is stored. The Notification Services engine, subscription management interfaces, and other components use this information to access the instance and application data. If you specify creation of a Windows service during registration, you also supply a Windows account and password for the service, and optionally a SQL Server Authentication login and password. If any of this information changes, you must update the Registry information. The Windows service uses these accounts to connect to the database server. In SQL Server 2005, updating Registry information requires you to unregister the instance and then register it again. It is important to note that SQL Server Management Studio registers the instance locally and uses the name of the SQL Server instance to which you are connected as the database server. If these values are not correct, you should use the NSControl command line utility to unregister and register the instance. Using Management Studio to Update the RegistryFirst, stop the instance of Notification Services. To stop all Windows services associated with the instance, right-click the instance and select Stop. To stop an individual Windows service in a scaled-out instance, right-click the instance, select Properties, clear the service's check box on the Windows Services page, and then click OK. After stopping the service, right-click the instance, point to Tasks, and select Unregister (see Figure 15-19). Figure 15-19. Unregistration confirmation.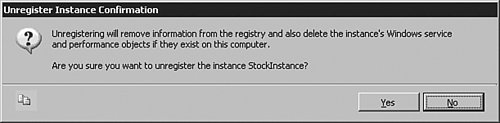 When you click the Yes button, Notification Services removes the instance's information from the Windows Registry. To re-register the instance, point to Tasks and select Register (see Figure 15-20). Figure 15-20. Register Instance dialog.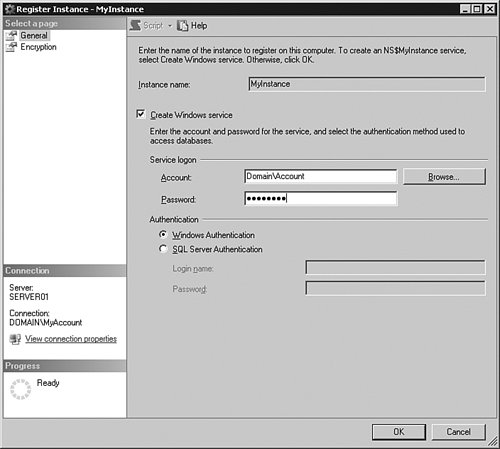 If you use the Windows service to run the Notification Services engine, and the local computer runs a hosted event provider, generator, or distributor, check the Create Windows service box and supply a service logon account and password. If you use SQL Server Authentication for connections to SQL Server, select SQL Server Authentication and supply a login and password. Remember that the account used to connect to SQL Server must have the permissions outlined in the "Deploying an Instance of Notification Services" section of this chapter. SQL Server Management Studio registers the instance locally (on the server where you are running SQL Server Management Studio), using the current SQL Server instance as the database server name. After the instance is registered on all computers where it needs to be registered, you can start all Windows services associated with the instance by right-clicking the instance and selecting Start. Using the NSControl to Update the RegistryWhen using NSControl, use nscontrol unregister to delete existing registry information and then use nscontrol register to re-register the instance. Exporting Instance and Application MetadataIn SQL Server 2005, you can export the instance and application metadata from the instance and application databases, creating new copies of the ICF and all ADFs. The nscontrol export command does not recreate the original ICF and ADFs. It creates files that contain the current instance and application definition, including values that may have been provided through replaceable parameters. If you want to maintain the parameters in your files, you should keep the original ICF and ADFs. You can export metadata while the instance is running. You do not need to disable or stop the instance. Using Management Studio to Export MetadataSQL Server Management Studio uses the current Microsoft Windows locale setting to export the metadata to its XML editor. You can then modify these files and save them. To export instance and application metadata, right-click the instance of Notification Services, point to Tasks, and select Export to Editor. Notification Services opens one XML Editor window for the ICF and one window per ADF, as shown in Figure 15-21. Figure 15-21. SQL Server Management Studio, the XML Editor, and Dynamic Help.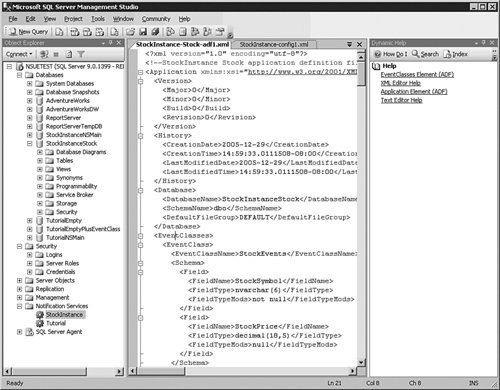 In the SQL Server Management Services XML editor, you can use Dynamic Help to access reference documentation. Put the cursor in an XML element (such as EventClasses, as shown above), and relevant help topics are displayed in the Dynamic Help pane. To display the Dynamic Help pane, click the Help menu and then select Dynamic Help. Using the Command Prompt to Export MetadataYou also can export metadata with NSControl. The nscontrol export command writes the files using UTF-8 encoding. To export the configuration and application definition files using other encodings, use SQL Server Management Studio. Use the following command to export instance and application data with NSControl, overwriting any existing files that have the same names: nscontrol export -name MyInstance -out "C:\NS\MyNSInstance" -force The resulting ICF is named instance_name-config.xml. Each resulting ADF is named instance_name-application_name-adf.xml. Configuring Logging LevelsNotification Services uses configurable logging levels to determine what is written to the Windows Application log. You can control the logging level of an instance of Notification Services by editing the NSservice.exe.config configuration file. The file, which has a default location of C:\Program Files\Microsoft SQL Server\90\NotificationServices\9.0.242\bin, is XML and uses the following format: <?xml version="1.0" encoding="UTF-8"?> <!-- The default logging levels for all components is Warning Off = 0 < Error = 1 < Warning = 2 < Info = 3 < Verbose = 4 Change the values of the value attribute to change the logging level. Setting the logging level enables all log events that are less than or equal to the log level setting --> <configuration> <system.diagnostics> <switches> <add name="LogAdministrative" value="2"/> <add name="LogService" value="2"/> <add name="LogEventProvider" value="2"/> <add name="LogEventCollector" value="2"/> <add name="LogGenerator" value="2"/> <add name="LogDistributor" value="2"/> <add name="LogVacuumer" value="2"/> <add name="LogOther" value="2"/> <add name="LogPerformanceMonitor" value="2"/> </switches> </system.diagnostics> </configuration> As the file says, you can set the logging level between 0 and 4. The default level is 2 for all switches. Zero turns off all logging, and 4 logs errors, warnings, information, and all status messages. SQL Server Books Online says that you can set the logging level per instance. This is true, but a bit impractical. When you start an instance of Notification Services, the instance reads the local configuration file and uses those settings until the service is restarted. To control logging at a per-instance level, you would need to separately document the settings and then make sure to update the configuration file prior to each time you start the instance. It may be better to simply set a reasonable logging level for all instances that run on a particular computer. If you scale out an instance of Notification Services, you can customize the logging level on each computer. However, you also must monitor events on each computer. Removing Obsolete DataWhen a Notification Services application runs, it accumulates event, notification, and operational data in its application database objects. This data can cause tables to grow very large, and can affect application performance. The best way to remove obsolete application data is to define a vacuuming schedule in each application definition. This schedule determines the retention age for data and how often Notification Services should remove obsolete data, as shown in the following example: <Vacuum> <RetentionAge>P3DT00H00M00S</RetentionAge> <VacuumSchedule> <Schedule> <StartTime>23:00:00</StartTime> <Duration>P0DT02H00M00S</Duration> </Schedule> <Schedule> <StartTime>03:00:00</StartTime> <Duration>P0DT02H00M00S</Duration> </Schedule> </VacuumSchedule> </Vacuum> In this example, events are obsolete when they reach the retention age of three days. Notifications are obsolete after the retention age is reached and if the notifications have been delivered or have no future retry attempts. The vacuuming process runs at 23:00 and 3:00 in Coordinated Universal Time (UTC), for two hours each. You might inherit applications that do not have a vacuuming interval configured. (You can verify this by exporting instance and application metadata and looking for a Vacuum element with RetentionAge and VacuumSchedule child elements.) If there is no vacuuming schedule, or if you need to remove data between vacuuming intervals, you can manually run the NSVacuum stored procedure in each application database. For example, to run the vacuuming process for a duration of five minutes (300 seconds), you can run the following stored procedure: Use MyAppDatabase; EXEC MyAppSchema.NSVacuum 300; If you need to save all event and/or notification data, make sure to run your archiving process, such as an Integration Services package, before vacuuming. Deleting an Instance of Notification ServicesDeleting an instance of Notification Services drops all database objects associated with the instance and its applications. If Notification Services created new databases for the instance, those databases are dropped. If Notification Services created database objects within existing databases, only the database objects created by Notification Services are dropped. Deleting an Instance in Management StudioIn Object Explorer, right-click the instance and select Disable, and then right-click the instance and select Stop. (If you are hosting the engine in your own application or process, stop the instance through your application or process.) After the instance is stopped, unregister the instance. If the instance is registered on the computer where you are running SQL Server Management Studio, unregister the instance by right-clicking the instance, pointing to Tasks, and then selecting Unregister. Otherwise, unregister the instance by using nscontrol unregister. To drop instance and application database objects, right-click the instance, point to Tasks, and then select Delete. If Notification Services created the databases, the databases are dropped. Otherwise, only the instance and application objects are dropped. Using NSControl to Delete an InstanceIf you want to use a command-line script to delete an instance, first run nscontrol disable. Then, run net stop and nscontrol unregister on each computer where the instance is registered. Finally, delete the instance by using nscontrol delete. You can run the nscontrol disable and nscontrol delete commands from any computer that has the Notification Services client components. For More InformationSQL Server Books Online contains conceptual and reference information about Notification Services, as well as a tutorial that builds a basic notification application. Much of the conceptual content was rewritten for this release, and there are now examples in most (if not all) of the XML references. Books Online is very large, and content tends to be spread across several sections. One good way to find all the Notification Services information is to use filters. To filter the content for Notification Services, first make sure the Contents tab is displayed by selecting Contents from the Help menu. At the top of the Contents pane is a box named Filtered By. In this box, select SQL Server Notification Services. When you select this filter, the information in the Contents tab (and also the Index tab) is restricted to information about Notification Services plus information that is applicable across all or most SQL Server components. Figure 15-22 shows Books Online with the filter selected. Figure 15-22. Filtered contents in SQL Server Books Online.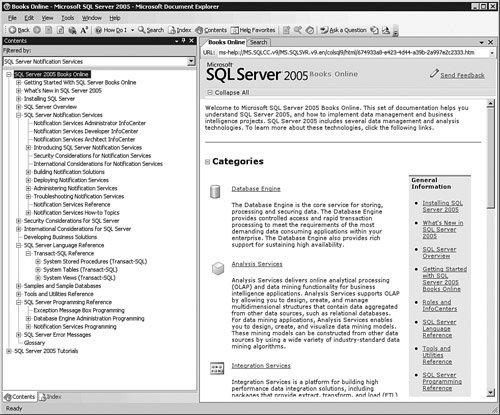 I recommend you start with the Notification Services tutorial (but you might want to skip the step of updating the instance on lessons three through seven to save some time) and then use the "SQL Server Notification Services" section to fill in the holes and expand your knowledge. I also recommend using the "Deploying Notification Services" subsection if you need to scale out an instance or use failover clustering. Also, there are several sample applications in the "Samples and Sample Databases" section of Books Online. In addition to Books Online, the book Microsoft SQL Server 2005 Notification Services, by Shyam Pather (Sams Publishing: Indianapolis, 2006), is very good. It focuses on developing Notification Services applications, but it also provides information about deploying and managing instances of Notification Services. It's good information from an insider on the development team. |

EAN: 2147483647
Pages: 149