Creating a New Package in DTS Designer
In the next set of procedures, you will build the first package that you will use in the data movement application. This package loads and updates the SBS_OLAP data warehouse. First, you will execute a script that adds tables to the SBS_OLAP database. Then you will create a package containing an Execute SQL task that populates the TimeDim table in the SBS_OLAP database with time data for a specified date range.
Add tables to the SBS_OLAP database
In this procedure, you will add dimension, fact, and staging tables to the SBS_OLAP database using a Transact-SQL script. The prototype of the data movement application you are building throughout the course of this book will populate these staging tables from a number of different data sources, transform this data into the dimension and fact tables, and then process the data in these dimension and staging tables into the Analysis Services cube that you will build in Chapter 9.
-
In Microsoft Windows, click the Start button, point to All Programs, point to Microsoft SQL Server, and then click Query Analyzer.
-
Ensure that your SQL Server default instance is selected, ensure that Windows Authentication is selected, and then click OK to connect to your default instance.
-
On the toolbar, click Load SQL Script.
-
In the Look In list, navigate to C:\Microsoft Press\SQL DTS SBS\Ch2\ChapterFiles and then double-click AddTablesToSBS_OLAP.sql.
This script adds three dimension tables, one fact table, and three staging tables to the SBS_OLAP database. The staging tables will be used to stage data before the data is transformed and added to the dimension and fact tables. No staging table is created for the Time dimension because you will populate the table storing Time dimension members directly using the SQL Server DATEPART function. The IDENTITY property is used to populate the key value in each of the dimension tables. A PRIMARY KEY constraint enforces uniqueness in each of the dimension tables and FOREIGN KEY constraints enforce the relationship between the fact table and each dimension table.
-
On the toolbar, click Execute to add these tables to the SBS_OLAP database.
Now that you have added these tables to the SBS_OLAP database, you are ready to begin creating the packages that will populate these tables with both historical data and incremental data.
Create a connection object to the SBS_OLAP database
In this procedure, you will create a connection object to the SBS_OLAP database that will be used by an Execute SQL task, which you will create in the next procedure.
-
Switch to SQL Server Enterprise Manager.
-
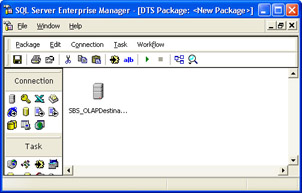
In the console tree, right-click Data Transformation Services in your local SQL Server instance and then click New Package to open a blank design sheet in DTS Designer.
-
On the Connection menu, click Microsoft OLE DB Provider For SQL Server to begin creating a new connection object to a SQL Server database.
The text in the New Connection text box is selected so that you can easily change the name of this connection to a descriptive name . In this procedure, you will configure a connection to the SBS_OLAP database called SBS_OLAPDestination.
Tip In addition to selecting new connection objects and tasks for your package from the menu, you can use the undockable Connection and Task toolbars provided by DTS Designer.
-
Type SBS_OLAPDestination in the New Connection text box, ensure that (local) appears in the Server list, ensure that Windows Authentication is selected, select SBS_OLAP in the Database list, and then click OK.
The SBS_OLAPDestination connection object appears on the design sheet.
Important Using (local) for the server name ensures that this package can be easily migrated from a development computer to a production computer without editing the package, because this connection object will always attempt to connect to the default SQL Server instance on the computer on which the package is executed.
-
On the toolbar, click Save to display the Save DTS Package dialog box.
You will save all packages that you will use in the prototype of the data movement application in the Data Movement Application folder.
-
Type PopulateTimeDimension in the Package Name box, type mypassword in the Owner password box, select Structured Storage File in the location list, type C:\Microsoft Press\SQL DTS SBS\DataMovementApplication\PopulateTimeDimension.dts in the File Name box, and then click OK to save this package.
-
In the Password box, type mypassword again to confirm the owner password and then click OK.
-
Click OK to acknowledge that the package cannot be executed without the owner password.
Now that you have created a connection object to the SBS_OLAP database, you are ready to create a task that uses this connection object. But first, you will create a stored procedure that will be used by the task.
Create a stored procedure that populates the TimeDim table
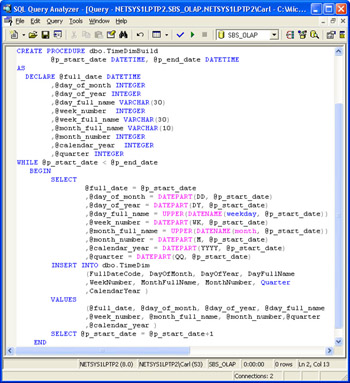
In this procedure, you will execute a SQL script that creates the TimeDimBuild stored procedure that will be used by the Execute SQL task that you will create in the next procedure. The TimeDimBuild stored procedure requires two input parameters, a start date and an end date, that determine the range of the Time members added to the TimeDim table in the SBS_OLAP database.
-
Switch to SQL Query Analyzer and then click Load SQL Script on the toolbar.
-
In the Look In list, navigate to C:\Microsoft Press\SQL DTS SBS\Ch2\ChapterFiles and then double-click CreateTimeDimBuild.sql.
This script creates the TimeDimBuild stored procedure that adds time records to the TimeDim table for the time period specified by two input parameters.
-
On the toolbar, click Execute to create this stored procedure.
Now that you have created this stored procedure, you are ready to create the Execute SQL task that uses it.
Create an Execute SQL task that populates the TimeDim table
In this procedure, you will create an Execute SQL task that calls the TimeDimBuild stored procedure to add time records to the TimeDim table in the SBS_OLAP database based on the values passed to the stored procedure by the Execute SQL task. The TimeDimBuild stored procedure requires two input parameters, a start date and an end date. You will create two global variables and define default values for these global variables . The default value for a global variable can be changed at run time or during package execution. The Execute SQL task will retrieve these variable values and pass them as parameters to the TimeDimBuild stored procedure. Using the input parameters that are passed by the Execute SQL task, the stored procedure will generate time members for the Time dimension and add these records to the TimeDim table in the SBS_OLAP database. Passing these input parameters through global variables enables you to pass different global variable values at run time to add additional Time dimension members without opening and modifying the package each time. You will learn methods for modifying global variables at run time in Chapter 3, Chapter 6, and Chapter 7.
-
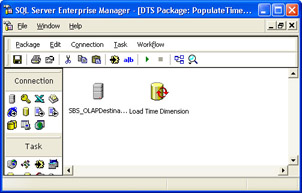
Switch to the PopulateTimeDimension package in DTS Designer.
-
On the Task menu, click Execute SQL Task.
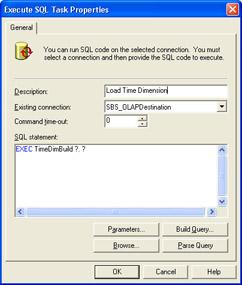
Notice that the SBS_OLAPDestination connection object is already selected as the connection that will be used by this task. In this procedure, you will provide a descriptive name for this task and then provide the SQL code that this task will execute.
-
Type Load Time Dimension in the Description box and then type EXEC TimeDimBuild ?, ? in the SQL Statement window.
The two question marks are placeholders for the parameters required by this stored procedure. In this procedure, you will define these global variables from within the Execute SQL task.
-
Click Parameters to define the parameters for the stored procedure executed by this Execute SQL task.
Tip If you receive an error when you click Parameters, verify that you have selected the SBS_OLAP database in the SBS_OLAPDestination connection object.
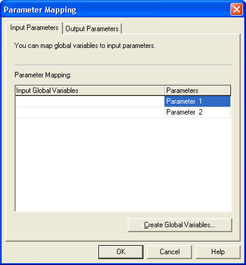
Since you have not yet created any global variables for this package, you must first create the global variables required for this stored procedure. If the appropriate global variables had already been created, you could have mapped them to the parameters.
-
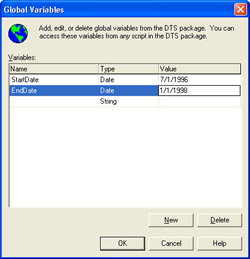
Click Create Global Variables, which opens the Global Variables dialog box. Here you can add, edit, or delete global variables that can be accessed from any task or script in this package.
In this procedure, you will define the StartDate and EndDate global variables. Since the input parameters in the stored procedure are defined using the SQL Server datetime data type, you will select a type Date in DTS. You will also specify July 1, 1996, as the initial start date, and December 31, 1997, as the initial end date.
-
Type StartDate in the Name field, select Date in the Type list, and then type 7/1/1996 in the Value field.
DTS anticipates that you will add another global variable on the second line.
-
On the second line, type EndDate in the Name field, select Date in the Type list, and then type 1/1/1998 in the Value field.
Tip To include December 31, 1997, as the last value populated , you need to specify January 1, 1998, as the end point.
You have now defined two global variables that can be used by any task or script in this package.
-
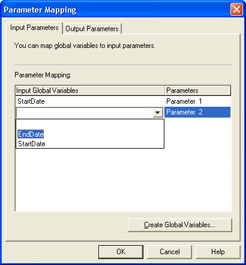
Click OK, which returns you to the Parameter Mapping dialog box. You can now map the global variables that you just created as input global variables for the parameters that you defined earlier in the SQL statement.
Important You must assign the global variables that will provide the input values for the stored procedure in the order required by the stored procedure. In this case, the TimeDimBuild stored procedure uses the first parameter passed as the start date and the second parameter passed as the end date.
-
Select StartDate in the Input Global Variables list for Parameter 1, select EndDate in the Input Global Variables list for Parameter 2, and then click OK.
-
Click Parse Query to verify that the SQL statement can be successfully parsed, and then click OK. (The statement parses successfully.)
When the syntax is incorrect or the parameters are not assigned to global variables, the statement will not parse successfully.
-
Click OK to complete the configuration of the Execute SQL task.
-
On the toolbar, click Save.
You have now successfully created your first package using DTS Designer.
Execute the PopulateTimeDimension package and verify results
In this procedure, you will execute the PopulateTimeDimension package from within DTS Designer and then ensure the results are correct using SQL Query Analyzer.
-
Switch to SQL Query Analyzer, and then click Clear Window on the toolbar to clear the query pane.
-
In the query pane, type SELECT * FROM SBS_OLAP.dbo.TimeDim , and then click Execute on the toolbar.
No rows are displayed in the results pane because you have not yet populated the TimeDim table. Do not close this query in SQL Query Analyzer.
-
Switch to SQL Server Enterprise Manager to return to the PopulateTimeDimension package in DTS Designer.
-
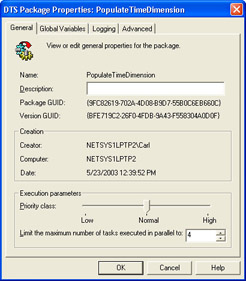
Right-click an open area of the design sheet and then click Package Properties so that you can review the general properties of the package. You will learn about these properties in Chapter 3.
-
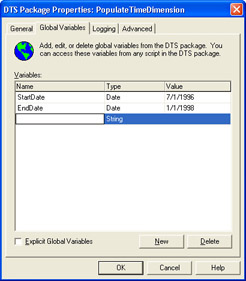
Click the Global Variables tab to review the global variables that you created while configuring the Load Time Dimension step.
When the Load Time Dimension step in this package executes, it will use the default values for these global variables unless you override them at run time. You can also create new global variables for the package on the Global Variables tab of the DTS Package Properties dialog box.
-
Click Cancel and then click Execute on the toolbar.
-
When the package finishes, click OK in the Package Execution Results message box and then click Done to close the Executing DTS Package: PopulateTimeDimension dialog box.
The TimeDim table in the SBS_OLAP database was successfully populated with time values from July 1, 1996, through December 31, 1997.
-
Switch to SQL Query Analyzer and click Execute on the toolbar to re-execute the query in the query pane.
Notice that the TimeDim table was populated with 549 rows, one row for every day in the time range specified by the StartDate and EndDate global variables used by the Execute SQL task in the package. Ensure that the first date is July 1, 1996, and the last date is December 31, 1997.
-
Close SQL Query Analyzer and then switch to the PopulateTimeDimension package in DTS Designer.
-
On the toolbar, click Save and then close the PopulateTimeDimension package in DTS Designer.
Now that you have successfully populated the time dimension table for the SBS_OLAP data warehouse, you are ready to build a more complex package with multiple connections, tasks, and precedence constraints.
EAN: 2147483647
Pages: 87